The reflector is one of the classic designs for a telescope. The reflector telescope was first conceived by Sir Isaac Newton (hence “newt” in Newtonian), who first conceived of the idea that mirrors can be used to create a magnified image in the same way that a lens could. Newtonians are some of the most commonly sought after telescopes for their simple design and incredible light gathering capability. This article will cover the benefits of a Newtonian telescope and the things you should consider before purchasing your new telescope.
How Does a Reflector Telescope Work?
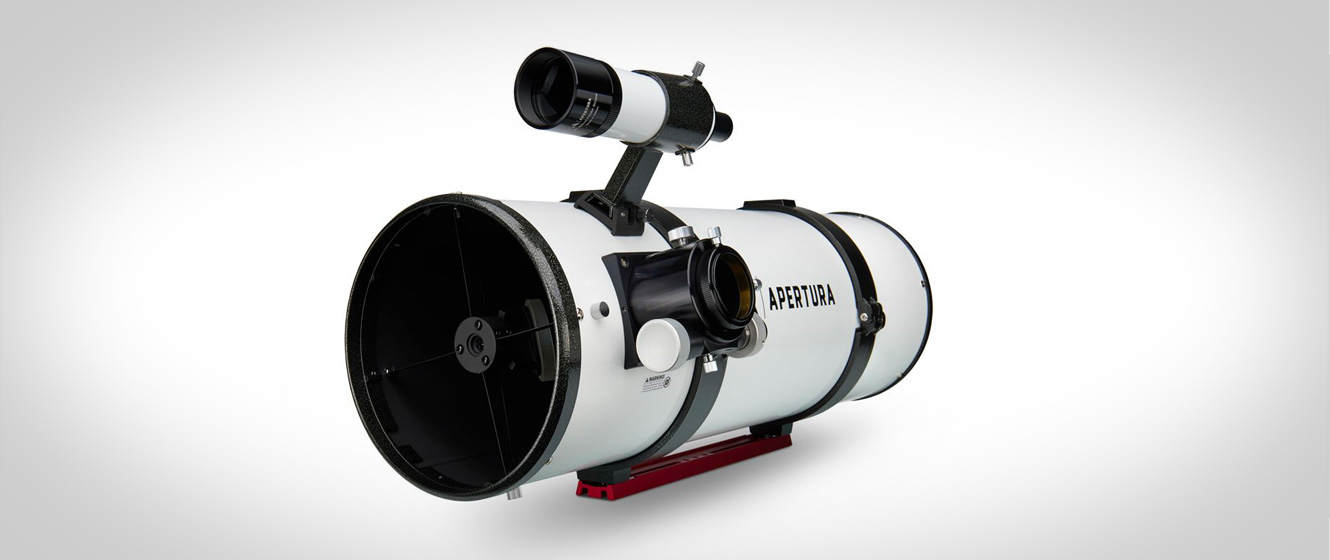
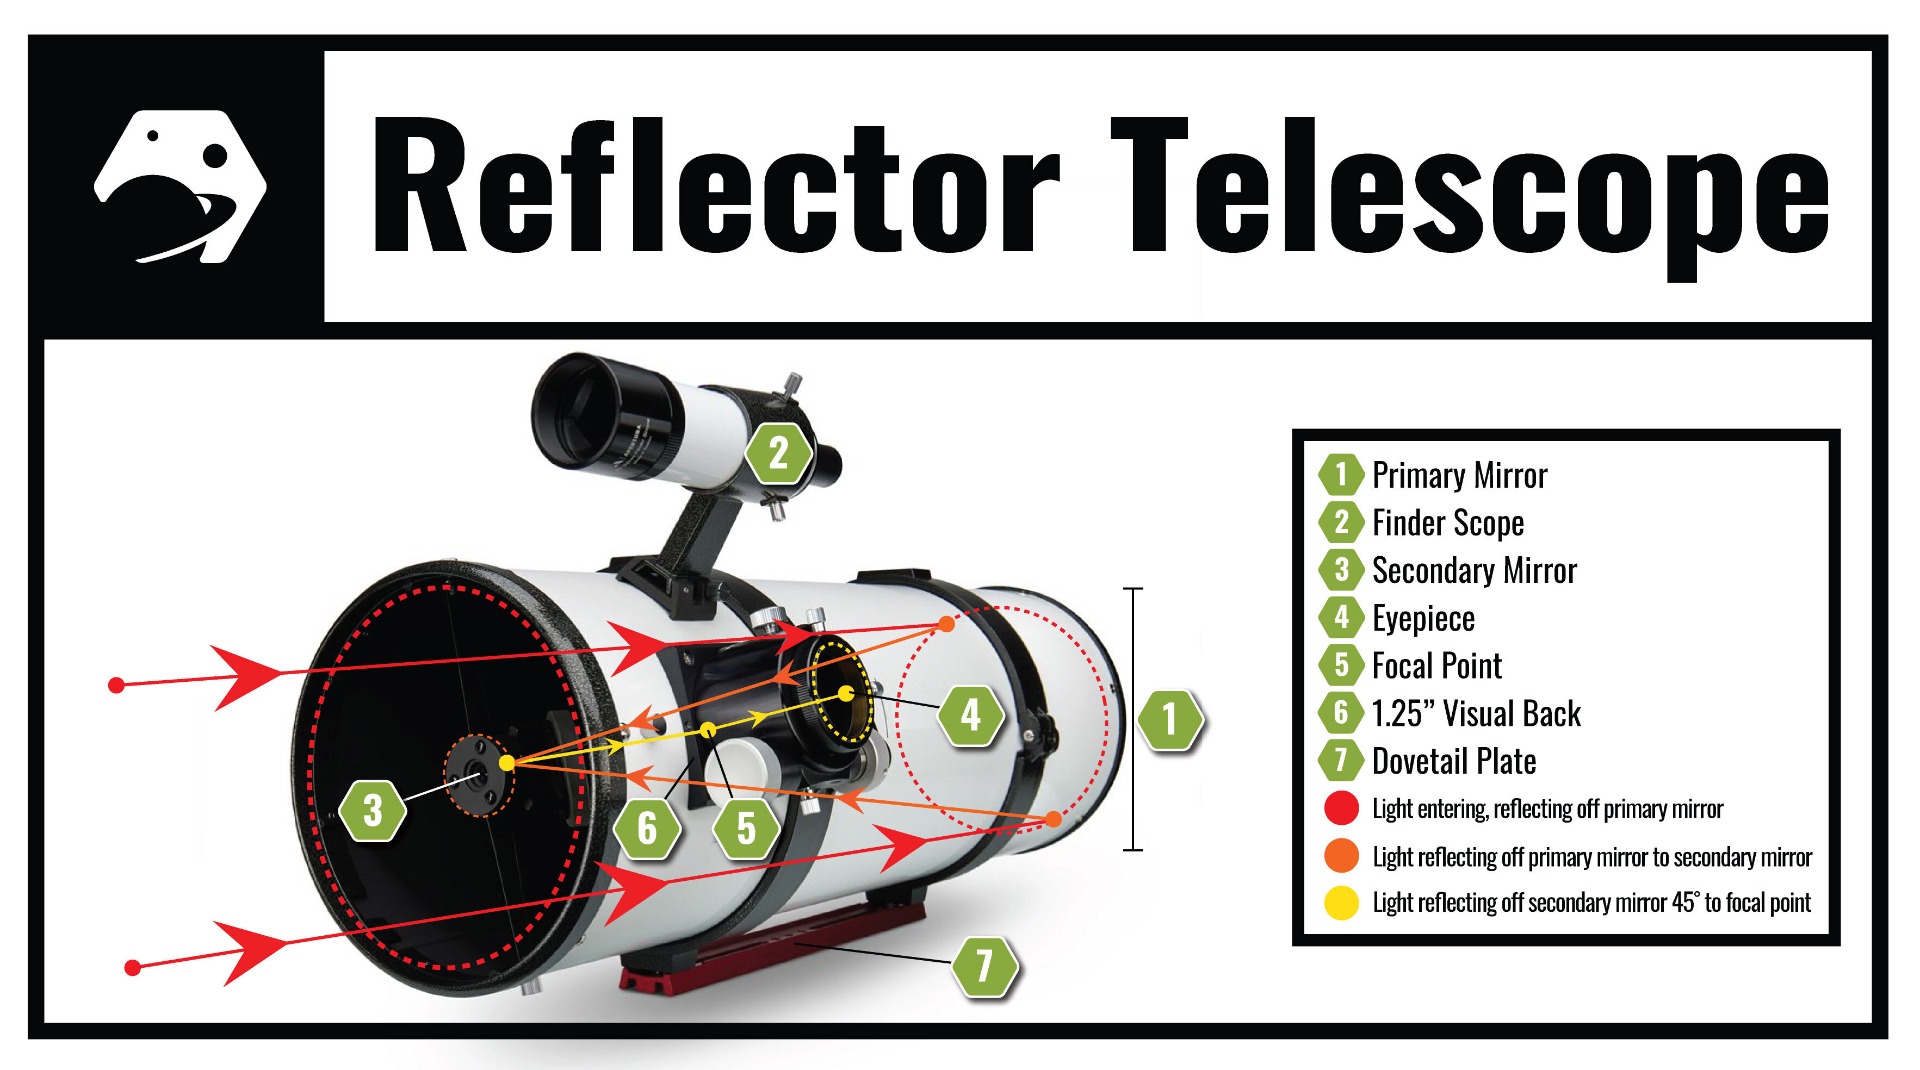
A reflector works by using a mirror to reflect light back to a diagonal, which then reflects the light to a point (also known as the focal point), where the eyepiece would go. Light from space passes into the optical tube and bounces off a curved “parabolic” mirror. This mirror is usually made up of a special type of glass, with an aluminum reflective coating.
From the parabolic mirror, the light reaches the secondary mirror. Unlike the primary mirror, the secondary mirror is flat and is angled 45 degrees relative to the primary. This secondary mirror is made from the same material as the primary mirror and has the same reflective properties. The light then bounces through a hole in the side of the telescope. This is where the focuser goes, and in the focuser is where the eyepiece is placed. The diagram below best illustrates the path that the light takes.
Benefits of a Reflector Over Other Telescope Designs
Compared to other premium telescope designs, reflectors are easier to make. A reflector is much less expensive per inch of aperture. You can get nearly 3x the aperture in a reflector as you could in a high-quality refractor telescope (ex: You could purchase a 16” Dobsonian for roughly the same price as a 6” premium refractor telescope).
As a result, significantly larger reflector telescopes can be available on the commercial market when compared to refractor telescopes. A larger telescope collects more light, which in turn increases the resolution and contrast of your image, sometimes by an exponential amount. With a reflector telescope, you can look further back into the universe and see faint galaxies millions of light-years away, even from your light-polluted backyard. For those with severe light pollution, a reflector telescope might be your only way to visually see those faint fuzzies in your eyepiece and are some of the best telescopes for urban stargazing.
Understanding Common Aberrations in Refractors
Collimation
To obtain the best possible views, the primary mirror and secondary mirror need to be precisely aligned. Any misalignment could result in blurry, out-of-focus views that will prevent you from maximizing your views of the universe. The process to align these two mirrors is referred to as “collimation”. Reflectors require consistent collimation, as the misalignment of these two mirrors can occur quite easily. Misalignment can occur as a result of accidentally bumping your telescope or from temperature change causing your optical tube to flex.
Fortunately, collimation is quite an easy problem to address, especially compared to other telescopes. You can easily collimate your telescope by using collimation tools such as an autocollimator, a laser collimator, or a Cheshire collimator.
Coma
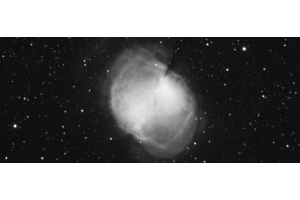
Another drawback to using a reflector is the presence of coma. This is a type of spherical aberration that is a result of using a parabolic mirror to produce an image. Coma is present and quite visible in every Newtonian reflector that has a focal ratio of f/6 or below. Stars will appear as misshapen “flares” along the edge of the field of view.
For visual astronomy, coma is not a huge problem as it does not greatly impact the view of celestial objects (and only at low magnification). However, for astrophotography, it can be a headache to deal with without the right equipment.

Example of coma in a picture of Messier 27. Note along the edge of the field of view stars appear misshapen and smudged.
Reduced Contrast
You might notice that the images produced by reflectors have a lower contrast when compared to refractor telescopes. This is due to the secondary mirror blocking some of the light from reaching the primary mirror. The size of the secondary mirror is correlated with the focal ratio of the telescope. An f/4 reflector will have a larger secondary mirror vs an f/8 reflector and will have a lower contrast (although the views of the nebula will be brighter). That being said, we recommend a faster reflector with a focal ratio of f/4-f/6 for astrophotography and f/6-f/8 for visual astronomy.
Cooldown Time
Telescope mirrors take a while to cool down to ambient temperatures when compared to refractors. This will result in rising air currents of warm air in your optical tube. As a result, the image quality will be reduced while the telescope reaches ambient temperature. Your telescope might take up to 30 minutes to fully cool down once outside, depending on the difference in temperature from storage to outside.
Diffraction Spikes
This isn’t necessarily a drawback unless you prefer pinpoint stars. The vanes supporting the secondary mirror will appear in your images as 4 spikes around the star. These are diffraction spikes, caused by light diffraction around the vanes.
Transportation
Reflectors are heavy. While the setup is pretty straightforward (unless you’re putting the tube on an equatorial mount), they are cumbersome to deal with. We do not recommend purchasing a big reflector if you have any health conditions that will prevent you from being able to lift a large telescope and carry it around your backyard.
Common Accessories
Fans
Buying a small fan to place on the back of your telescope is a fantastic way to accelerate the cooldown time. This will enable you to be ready to go for your visual or astrophotography session. Some telescopes come with cooling fans, however, you can easily purchase and install your own.
Coma Correctors
A coma corrector is absolutely necessary for astrophotography. Without a coma corrector, the stars along the edge of the field of view will have that “comet” shape to them as discussed earlier. A coma corrector will correct most of the field of view, leaving you with pinpoint stars across the entire field of view.
Crayford Focuser
Should you only have a 1.25” focuser for your reflector, we’d strongly recommend upgrading to a 2” Crayford focuser. This will enable you to use both 1.25” and 2” eyepieces, and some come with both a coarse and fine focus. If you’re doing astrophotography, you might find that your telescope doesn’t come to focus. This is a result of the focal point being too close to the tube for your DSLR to reach focus. You’ll need to buy a low-profile Crayford focuser to avoid this problem.

Questions? Contact Us!
Still not sure if a reflector is the right telescope for you? Send a message to our non-commissioned product advisors! Our team of telescope experts are happy to point you in the right direction.