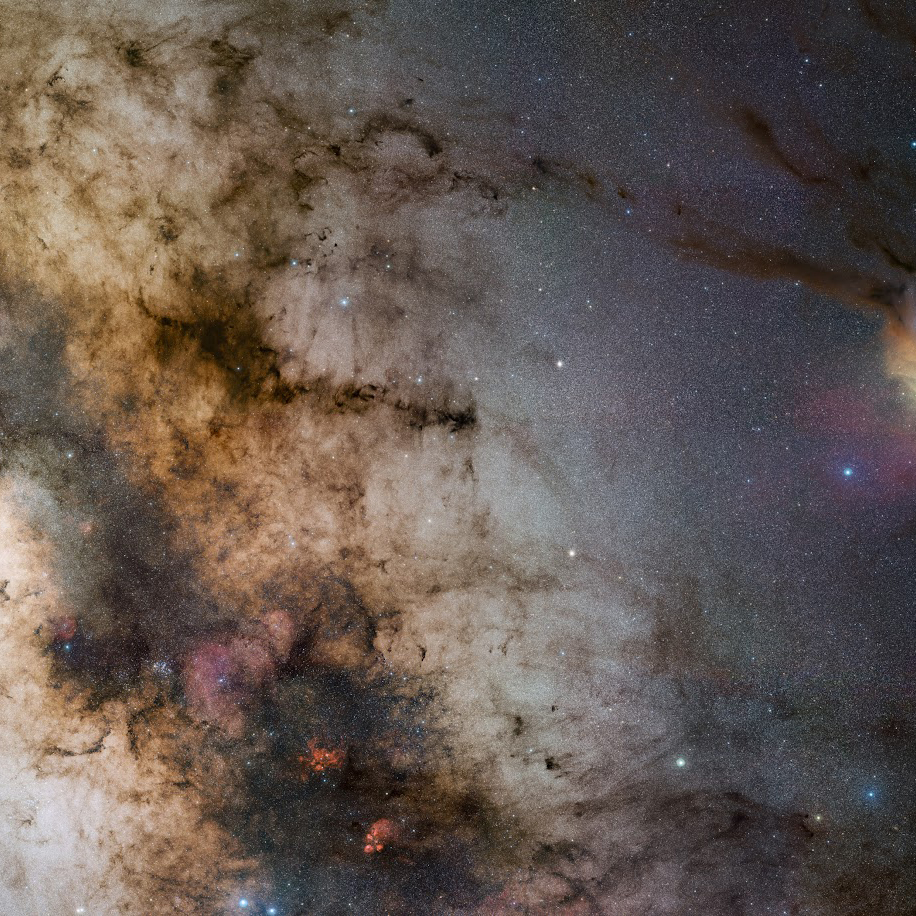
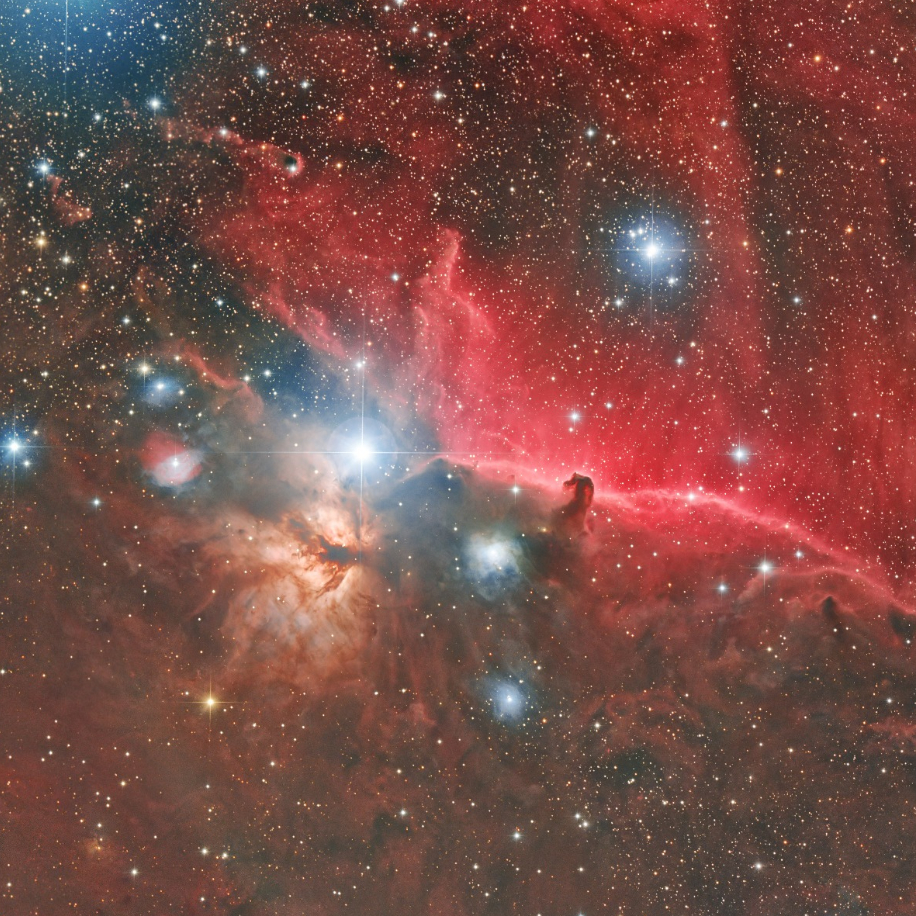
Please use another browser such as Chrome, Edge, Firefox, or Safari for the best experience

Skip to content Beginner's Guide To Using A Telescope

Astrophotography Equipment and Cameras

 
×

New and Trending Astrophotography Gear

The world of astrophotography continues to expand, thus comes new and innovative gear to explore To help keep you up to date on what’s trending, we have compiled a list of the latest and greatest releases from the most popular astrophotography brands. From telescopes and cameras to mounts and accessories, check out these items our gear experts believe are sure to be game changers within your astrophotography journey!

  • In the realm of up and coming telescopes, the Apertura 75Q refractor features a whopping five lens elements, is equipped with an inherent flat field, and excludes the need for backspacing calculations. Coming standard with premium Hoya glass and 405mm of focal length, this small yet mighty scope is sure to deliver impressive images.
  • Looking to simplify your setup? The engineers at ZWO have designed an ingenious two-in-one imaging and autoguiding solution: the ASI2600MC-DUO. This innovative camera is fitted with two sensors, one for imaging and one for guiding, completely eliminating the need for an additional guide camera or guide scope!
  • As harmonic drive equatorial mounts are gaining in popularity, Sky-Watcher has delivered their latest equatorial mounts: the Wave 100i and Wave 150i. These powerful mounts feature strainwave gearing, hauling exceptionally large payloads within a small, portable package.
  • Designed by astrophotographers for astrophotographers, Apertura has introduced their All Night Imaging Power Supply. With features such as 518Wh, unrivaled voltage stability, and astronomy-minded ports and cables, this ground breaking device is the ultimate power solution for any astrophotography setup!


Cameras

With the different types of astrophotography available comes a wide variety of cameras! From DSLR and mirrorless, to astronomy-dedicated planetary, deep space, and guide cameras, there are plenty from which to choose. Each have their own strengths and weaknesses, and selecting one will heavily depend on what celestial objects you plan to image.

DSLR and mirrorless cameras are great options for beginners who are just getting started in astrophotography, as their familiar and intuitive interface makes it easy to transition into this hobby. While useful for most types of astrophotography, these cameras are at a disadvantage as they are not designed for imaging in low light scenarios. Dedicated astro-imaging cameras, on the other hand, are tailor-made for collecting signal in the dark, making them ideal for imaging dim, distant objects. This ZWO ASI533MC Pro for instance, has an impressive rated quantum efficiency of 80%, along with a remarkably low readout noise of 1.0e!

A pair of Celestron EclipSmart Solar Eclipse Glasses

Due to their lack of a display screen, dedicated astrophotography cameras must be operated through a PC or WiFi camera control system. When it comes to categorizing these cameras, they can be classified in three different ways:

Monochrome cameras are the most sensitive cameras available on the market today. This is due to their lack of internal color filter array, which allows every pixel to be utilized for signal conversion. While not as sensitive as their monochrome counterparts, color cameras still produce outstanding images, and in less time. making them very popular within the astrophotography community. Though guide cameras can be used for imaging the planets, their main purpose is to assist your mount with its tracking capabilities.

Color vs Monochrome signal collection

Want to learn more about cameras? Well you're in luck! We're here to help you choose the best camera for your set up. Simply click the image below and begin the journey. Or, wanna get straight to the point? Then check out our Choosing the Best Deep Sky Camera and Choosing the Best Planetary Camera guides!

HPS Mount Badges

Mounts

The purpose of a mount is to keep your telescope fixed on a certain target within space, and it achieves this by moving opposite Earth’s rotation—tracking the night sky. When it comes to astrophotography, this tracking must be done with very little error in order to produce high-quality images. If there is any sort of unsteadiness during tracking, details will be blurred and stars will be misshapen. Accuracy is even more important when using high focal length telescopes that are heavily zoomed into the night sky.

With such precision necessary, equatorial mounts are the way to go! These mounts are designed to align with Earth's celestial poles (called polar alignment), allowing for perfect counteraction of Earth's rotation. Equatorial mounts come in many shapes and sizes, and as such, help achieve different types of astrophotography. An equatorial mount’s payload determines what gear you can mount to it, and the weight of the mount plays a huge role in where you can set up your gear. For instance, if you have a small, portable refractor, your selected mount will only need a minimal payload capacity to support such a small telescope. In contrast, if you plan to set up a remote observatory, having a heavy, high payload mount is the ideal choice. Want to simply image your favorite celestial objects from the comfort of your own home? The popular Sky-Watcher EQ6-R Pro, pictured below, has the perfect size, weight, and payload capacity for at-home observing!

EQ6R Pro

To help you in selecting the best equatorial mount for your needs, our team of gear experts have created an in-depth Astrophotography Mount Buying Guide and categorized the available mounts into four classifications:

  • Portable Grab & Go
  • Backyard Observing
  • Remote Observatory Grade
  • New Wave Harmonic
HPS Mount Badges

These classifications are based on the equatorial mount payload capacity and mount head weight and give great insight into what each are capable of delivering! Ready to find the perfect mount for your set up? Browse our extensive collection of equatorial mounts from Celestron, Sky-Watcher, ZWO, and plenty more by clicking below!

Variety of mounts


WiFi Camera Control

When it comes to simplifying your setup, the addition of a WiFi Camera Control system is the way to go! These powerful devices are designed to streamline operation of your imaging rig by allowing control through your smartphone or tablet and a brand-specific dedicated app. This allows you to leave your laptop at home and enjoy imaging the night sky through software that fits in the palm of your hand. The ZWO ASIAIR is a popular choice amongst astrophotographers, providing 256Gb of eMMC storage, extensive ports, and an easy-to-use interface, all within a slim, lightweight body.

The asiair

These all-in-one gadgets act as the control center of your imaging rig and come equipped with a wide range of abilities, including but not limited to:

  • Image capture
  • Polar alignment
  • Plate solving
  • Target selection
  • Target framing
  • Autoguiding

Also, their small size and ease of use make them perfect for portable rigs! Compatibility with cameras and other accessories are dependent on the model itself, but overall, they allow connection with a wide range of filter wheels, electronic autofocusers, guide cameras, and other accessories you may utilize.

Browse our collection of WiFi Camera Control systems here at High Point Scientific by clicking below!

The asiair

Accessories

With the vast expanse of different types of astrophotography, various cameras available, and a diverse range of telescopes to choose from, comes a wide variety of accessories to pair with your imaging rig. These accessories are designed to enhance your astrophotography sessions and range anywhere within the following:

The addition of accessories to your imaging rig helps you progress on your astrophotography journey by either opening the doors to new imaging possibilities, improving the quality of your astro-photos, or providing elevated convenience. For instance, adding a filter such as the Optolong l-eNhance reduces the effects of light pollution and allows imaging from the city; utilizing a focusing aid like the Apertura Bright Focus Masks helps you dial in the details, and a power supply such as the renowned Apertura All Night Imaging Power Supply keeps your imaging rig running all night long!


The Apertura All Night Imaging Power Supply

No matter which accessories you choose to incorporate into your setup, we have you covered. Check out our huge selection of accessories available here at High Point Scientific. You're sure to find the perfect additions to your imaging rig!

Finding the Perfect Conditions for Astrophotography

We all know clear skies are required in order to conduct astrophotography, but are there other external factors that you should account for prior to your next imaging session? The answer is yes: the Bortle class you plan to image under, the phase of the Moon, and local seeing conditions play a huge role in the quality of the images captured.


Consider Your Bortle Class:

While a non-issue during lunar or planetary imaging, light pollution wreaks havoc on the ability to conduct other types of astrophotography. Glow from businesses, homes, and street lamps shroud light from celestial objects, making it difficult to discern detail within the captured images. The Bortle Scale gives insight into the night sky's brightness of a certain location due to light pollution. This measurement features nine (9) levels of brightness, with 9 being the brightest and 1 being the dimmest. It is important to determine the Bortle class you plan to image under, so you can get a sense of the level of brightness you're going to be dealing with. If travel is possible, it’s always best to image under skies with the lowest possible Bortle class, as the less light pollution you have to image through, the better your astrophotos will become. If travel is not an option, specialized filters can be added to your imaging train to help cut through light pollution by isolating certain wavelengths produced by emission nebulae.

Mind the Moon:

While artificial light pollution is an ongoing issue, natural light pollution is also something to bear in mind. The more illuminated the Moon becomes throughout the month, the brighter our atmosphere becomes as well. This is why it’s recommended to image during the new moon phase and to avoid targets that are near the Moon if it is present within our night sky. Scheduling astrophotography sessions around the phases of the Moon is a common practice amongst astrophotographers, as it helps uphold optimal image quality!

Assess Local Seeing Conditions:

There is a reason professional astrophysicists and astronomers send telescopes out into space—that reason being Earth’s atmosphere. Referred to as seeing conditions, the overall clarity of the night sky based on humidity, high clouds, the wind, and plenty more, play a crucial role in the quality of our astro-images. In poor seeing conditions, the object within the field of view can appear blurred and out of focus, making for lack luster photos. While blurring due to the atmosphere may not be as apparent during wide field imaging, if you’re imaging small objects such as the planets, the craters on the Moon, or distant galaxies, it is important to consider the current seeing conditions for the sharpest possible images.


What are the Different Types of Astrophotography?

Due to the extensive range of celestial objects within the night sky, there are various types of astrophotography. Capturing different objects requires specific gear, unique imaging acquisition techniques, and special external conditions. Our team has laid out four different classifications of astrophotography, giving you great insight into what’s required to capture the best images of the Milky Way, deep space, the planets, our Sun, or our Moon! Take a look below to learn more.

Milky Way Imaging
While far away from city lights, have you ever seen a hazy band of brightness bending across the night sky? That magnificent glowing arch is none other than our very own Milky Way Galaxy! While absolutely stunning in person, attaching your camera to your tripod lets you capture this beauty yourself. This type of astrophotography is great for beginners, because there is less equipment involved as some of the other types of astrophotography. You only need a camera, tripod, and a fast, wide angle lens for captivating photos of our galactic home. It’s best practice to image under a clear, moonless night from a dark sky location and to capture as many long exposure frames as you can to maximize detail.

Galaxies & Nebula
Deep sky astrophotography involves imaging anything outside of our solar system. This includes capturing some of the most captivating and fascinating objects within our night sky: galaxies and nebulae! This type of astrophotography provides an exciting sense of exploration of our universe, revealing intricate detail otherwise invisible to the naked eye. In building a rig for deep space astrophotography, the larger the aperture, the better. Collecting as much light as possible will help dial in the details. It’s also important to find a camera with excellent low light performance and a reliable equatorial mount to handle the long exposures necessary for this type of imaging. Deep space astrophotography is best conducted under dark, moonless skies, though if light pollution is inescapable, specialized filters have been designed to help combat its detrimental effects. There are catalogs after catalogs of deep space objects to image, and with the wide variety of telescopes, cameras, mounts, and accessories available, the imaging opportunities are near limitless.

Planetary Imaging
From Jupiter’s cloud bands to Saturn’s rings, the planets of our solar system are some of the most intriguing objects within our night sky, and photographing them is easily within your reach! To build an imaging rig for planetary astrophotography, a high frame rate camera is necessary, and the larger the telescope, the better. Being heavily zoomed into the planets with a high focal length and wide aperture will help yield the greatest detail. As opposed to deep space astrophotography and Milky Way imaging, planetary astrophotography involves capturing short videos of the planets that are then stacked by software which preserves the highest quality frames and discards the worst. The result is a sharp image that can further be enhanced within your favorite image editing software. One of the biggest perks of this type of astrophotography is light pollution has little to no effect on the level of detail that can be captured, making it perfect for those who live in busy, urban areas!

Lunar & Solar
The Sun and Moon are the two brightest and most notable celestial objects within our sky. As such, they have had a huge impact on countless cultures throughout the world, being the muse of art pieces, literary works, and plenty more. Because of their incredible brightness, imaging them is much more straightforward than the other types of astrophotography listed above, making this category the most accessible type of astrophotography. To capture the Sun or Moon, you will need a camera, high focal length telescope or lens, a telescope mount, and if conducting solar astrophotography, a solar filter or dedicated solar scope. In many cases, a single exposure is sufficient for impressive resolution of detail, though for the highest quality, it’s best practice to capture a short video then stack the frames within a stacking software to tease out the most structures. Whether imaging the intricate craters, valleys, or mountains on the Moon, or the ever-changing solar surface, solar and lunar astrophotography is simple, fun, and easily within reach for just about everyone on the planet!


Astrophotography FAQ: What You Need to Know

Entering the world of imaging can feel intimidating, even for an experienced visual observer. Much like the nebulosity revealed in a faint deep sky object with astrophotography, there is a lot of detail and nuance beneath the surface of this topic that can seem daunting at first—however, we're here to bring this mystifying world of astro-imaging into focus, and de-spell the notion that astrophotography has to be complicated! Read on to find out how we take images of these incredible targets in the first place, how you can image with a DSLR and telescope, what equipment we use to track targets, and much more!

What is astrophotography?

Broadly speaking, any image of a celestial object in the night sky could be considered an astrophotograph—from the Milky Way, the Moon, other planets in our solar system, to galaxies, star clusters, nebulae and more! While the process and equipment used for capturing all these objects can differ, all these fall within the same exciting and ever expanding amateur astrophotography hobby.

What goes into making an astrophotograph? How do we capture these images?

This process varies depending on what we’re trying to image, but on a basic level, an object is tracked across the sky while data is collected by the camera, and then this data is all combined into a single image through a process known as stacking. This process allows us to capture fine, faint details that only reveal themselves with enough time spent imaging/recording a target!

Do I need specialized cameras and/or equipment for astrophotography, or can I use my smartphone, point-and-shoot camera, mirrorless camera, or a DSLR?

You can absolutely do astrophotography with a regular photography camera or a smartphone! Milky Way photography is a great way to start astrophotography with just a camera and a tripod, and simple lunar photography can be done with just a telescope and smartphone adapter or one of the many widely available DSLR/mirrorless camera telescope adapters. While less common now, there are also “microstage” or sliding camera adapters for point-and-shoot camera users!

What is the best DSLR or mirrorless camera for astrophotography?

This is a tricky question. There are cameras that are designed either for astrophotography or are popular hosts for "astrophotography modification," and when pairing a camera with a telescope, you can go down the rabbit-hole of how well the physical pixels match your camera (which we do in this article)—so you very well could narrow things down to a few “best” models for your telescope of choice. We would contend, however, that using the camera you already have or purchasing a fairly recent model from Canon, Nikon, or Sony, would be the “best” camera for most people’s astrophotography journey. With how good modern DSLRs and mirrorless cameras have become, most of these will produce great results and allow you to gain experience while saving money, and with the popularity of the Canon, Nikon, and Sony platforms, astrophotography adapters are easy to find!

Do I need a telescope for astrophotography, or can I use a photography camera lens like a 200 MM telephoto lens?

While a lot of astrophotography targets are best captured through a telescope, there are a number of large, bright celestial objects you can begin to capture with a telephoto lens! Objects like the Orion nebula and the Moon can be captured with just a 200 mm lens and a star tracker, and Milky Way photography in particular shines with short focal length camera lenses like 24 mm.

What is the best telescope for astrophotography?

With so many great options now available at so many different price points, there is no one definitive best astrophotography telescope. What scope or scopes are best for you will depend on what types of targets you want to image, what qualities work best for your preferences and other supporting equipment (think mount payload, whether you’re comfortable collimating, how important portability/compactness is, camera and accessory support, etc), and your budget. There are telescopes designated ‘astrographs’ that are designed specifically to excel at astrophotography. However, there are plenty of other scopes that aren’t given this name that are still excellent for astrophotography. That said, there are some scopes that are not well suited for use with mounts and astrophotography, such as Dobsonians.

How can I do astrophotography with my smartphone?

With the incredible technology packed into today’s smartphone cameras, taking a neat image through your telescope is easier than ever! By using an adapter like the Apertura Smartphone Astrophotography Adapter, you simply need a telescope and an eyepiece to take pictures of large bright objects like the Moon.

Is a full Moon bad for astrophotography?

Just as lots of artificial light can wash out images, so too can light from the Moon! As with light pollution, filters can help “cut through” the glow of the Moon, as can choosing astronomical targets in a different part of the sky. That said, sometimes waiting until the Moon moves into the next phase of its predictable cycle is best.

What is light pollution? How does it affect astrophotography?

The artificial light we use to light our properties, roads, parking lots, buildings, and cities doesn’t just illuminate the world around us, but the sky as well. This brightening of the sky makes the bright objects within it stand out less, and therefore makes them harder to see when observing or imaging. This is why we call it light ‘pollution’. A scale that we use to express the amount of light pollution in a given area is the Bortle Scale, and there are a number of resources you can use to check the pollution in your area. While this can wash out images, with the use of filters this can be minimized. For more information be sure to check out our article The Effects of Light Pollution on Visual Astronomy and Astrophotography.

How do I take star trail astrophotography?

Star trail astrophotos are some of the easiest images to start taking. All you need is a camera and a tripod! As the stars in the night sky are constantly moving, at the most basic level all you need to do is point your camera towards the sky and take a picture for long enough that the motion becomes obvious. Oftentimes star trail photos are not just one image, but multiple pictures combined in post processing to form an image to capture even longer/more trails. As most cameras do not expose for much longer than a minute, you may want to purchase an intervalometer that will allow you to take longer/multiple exposures easily.

What is an astronomy/astrophotography mount?

A mount is a piece of equipment that is attached to a tripod and holds a telescope. It is used to move the telescope and point it at different objects in the night sky, and in the space of astrophotography essentially only models that do this via motors are used. This motorization allows the mount to track a target across the sky (necessary for long exposure times) and additionally can be combined with onboard computers to find objects in the first place (called GoTo technology). There are two different mount designs that accomplish this in different ways: Altitude-Azimuth (Alt-Az) mounts and Equatorial (EQ) mounts.

Why do astrophotographers prefer equatorial mounts?

Imagine a wheel with an arrow painted on it, that is currently pointing upwards. Your camera just has enough room in the frame to see this arrow and a bit of the wheel around it. Now imagine the wheel begins to spin. If you only can move your camera up and down, left and right, or a combo of these directions, while you can keep the arrow centered in the image, it will no longer be pointing up and the edges of the frame will continue to shift and change. If however your camera can spin along with the wheel, then you can keep the arrow facing the same direction as well as the other objects in your frame. In this scenario the wheel is the night sky (which is constantly rotating, from our perspective), the arrow is an object like a nebula, the camera that can rotate along with these is an EQ mount, and the other camera is an Alt-Az mount. While an Alt-Az can absolutely track the object, exposure times need to be short to prevent motion blur from the rotation — and as the edges are constantly rotating out of frame a crop will need to be applied as well. EQ mounts on the other hand allow for long exposure times, as well as capture the edges of the frame!

What is the best location for astrophotography?

While the best place for astrophotography technically would likely be on top of a mountain that is far, far, away from civilization, this something most of us can’t realistically manage. However, using a light pollution map or searching for “astronomy dark sites” near you is a good way to find the best location to image near you. If your options for travel are limited, try to set up as far away from artificial light sources as possible.

What is the best time for astrophotography?

Though ‘after sunset’ seems like the obvious answer, it does take some time after that for things to get as dark as they possibly can be. That time varies based on your location and the time of year, so there isn’t a set amount of time we can recommend waiting — however searching for the “astronomical dawn” for your location will give you a good idea of when the best time to start imaging is for you!

What is the best camera to do astrophotography with?

Just as there is no best DSLR for astrophotography, so too is there no best camera in general for astrophotography. However, there are cameras build specifically for astrophotography and these certainly are the best “class” of cameras for astrophotography. The extra level of control that they provide over the sensor, cooling features that help with long imaging sessions, physical designs that integrate more seamlessly with astrophotography equipment, and enhanced sensitivity to wavelengths outside of what is desired for regular photography, are some of the key factors that set them apart from DSLRs and mirrorless cameras.

How do you focus a telescope on astronomical targets for astrophotography?

It’s all about the stars! By adjusting focus until the stars appear their smallest, you will also be finding the correct focus point for deep sky objects as well. This usually done with the help of either a tool like a Bahtinov mask, with software tools that give feedback on star size as you focus, or combination of the two with something known as an electronic focuser and a V-curve algorithm!

How difficult is astrophotography?

There’s no easy answer to this question — astrophotography can be as simple as using a smartphone adapter with a telescope to snap a single image of the Moon, but it can also get very complex. It all depends on what type of images you’re trying to capture! Whatever level of imaging you’re looking to tackle, be sure to check out our Astronomy Hub for guides that will make your astrophotography journey as easy as possible.

How can I find astrophotography targets to image with my telescope?

There are a number of ways to find targets to image — our What’s in the Sky This Month? monthly post and newsletter are a good place to start, as are the ‘Tonight’s Best’ style features built into many hand controllers, apps, and programs. However there are also a number of digital planetariums such as Stellarium or the Sky Atlas built into ZWO’s ASIAIR allowing you to virtually explore the night sky at your location and pick out interesting targets.

Do I need to spend a lot of money to take astrophotos?

What classifies as “a lot of money” is subjective, and what equipment you need depends on the type of image you’re interested in taking. However to build what we would consider a common imaging rig for astrophotography you would want the following: a telescope with a corrective element like a field flattener/coma corrector (or one of the scopes listed out in our No Fuss Astrophotography Telescopes article!), a GoTo mount capable of carrying twice the weight of that telescope, a guidescope, a guide camera, and either a photography camera with an intervalometer or a dedicated astrophotography camera.

What causes the “spikes” on stars in astrophotos?

You may have seen some images with perfectly spaced sets of spikes emanating from the stars. This phenomena occurs in images taken with reflector telescopes, where light diffracts around the vanes that hold the secondary mirror, forming a pattern around bright stars in the same shape of these obstructing vanes. Imaging with a telescope design that does not have these vanes, like a refractor, will result in perfectly round stars — however for those refractor imagers keen on this star aesthetic, crossing string in front of the telescope can induce this effect!

How does a 200 MM telescope compare to a 200 MM telephoto lens?

With camera lenses, like telephotos, the number given is the lens’ focal length. Telescopes however list the size of the aperture, or how large the front lens is/ how large the mirror is. A telescope’s focal length is found by multiplying the aperture by the focal ratio, or f-stop, of the scope — and so we can see that a 200 mm f/5 telescope would be more comparable to a 1000 mm telephoto lens!

What is a star tracker?

These are devices similar to astronomy mounts, but geared specifically towards DSLR/mirrorless astrophotography. They have an axis that, when lined up properly in a process called “polar aligning”, counteracts the rotation of objects in the night sky enough for camera lens focal lengths and slightly longer exposure times. These are a good budget entry point to astrophotography, and for certain types of astrophotography goals may be all you need!

Why aren’t astrophotos noisy? All the pictures I try to take at night are a grainy mess!

There are a number of techniques astrophotographers employ to reduce noise. Hardware approaches, such as choosing sensors less prone to noise, choosing camera settings to minimize this, and using sensor cooling systems help reduce noise from being captured in the first place. To reduce the noise that is captured, software approaches such as stacking, calibration, and dedicated noise reduction plugins/programs.

How do I connect a camera to a telescope for astrophotography?

This depends on the camera you’re looking to connect, whether you’ll be using a field flattener or coma corrector, what other accessories you want to use, and the design of all those components. The most basic way this is achieved is by using what is known as a nosepiece (or Barlow if you have a Newtonian) with a dedicated astronomy camera or with a DSLR/mirrorless camera and T-ring. There is a lot to consider even in these simple setups however, so for more information and diagrams we recommend giving our article How to Connect a Camera to a Telescope a read!

What shutter speed or exposure time should I use for astrophotography?

As you may know, astrophotos are combinations of multiple images stacked on top of eachother — a “3 hour image” is not one super long exposure but rather a combination of many shorter images. There is no hard-and-fast rule for how long these individual images exposure times should be. Longer exposure times are better for faint objects like nebulae and galaxies, but just how long depends on the equipment, the tracking capabilities of a system, how much information the camera’s pixels can “hold”, and how much risk one is willing take that a cloud or plane won’t photobomb and ruin a very long exposure. A DSLR on a star tracker may work best with 15-30 second exposures for example, while more involved setups utilizing advanced tracking software and dedicated astronomy cameras image anywhere from a few minutes up to 10-15 minutes per image!

Are the colors in astrophotos “real”?

Yes and no. Some targets like the Moon, galaxies, and planets are best imaged in “broadband”, where we seek to capture essentially the whole visible light spectrum. Accordingly, the colors in these images are the colors captured by the camera! Nebulae are a bit of a different story. These objects emit light on specific wavelengths, what one can imagine as very very thin “slices” of the light spectrum, but some of these are close together (SII and Ha) or edge into infrared (Ha). Nebulae can be imaged in broadband, but oftentimes a “narrowband” imaging approach is taken instead. There are three wavelengths that we focus on in this approach called Ha, SII, and OIII. When constructing an image with these thin slices of the spectrum, these can be assigned to colors that may not necessarily be accurate to what they “really” look like, but instead colors that better help visualize these objects and the different components within them. A popular example of this is the “Hubble Pallet”, so named for its use in the famous Hubble Telescope images.

Why do I keep seeing “field flatteners” or “coma correctors” recommended for my telescope and astrophotography?

Different telescope designs have different distortions inherent to them, and nothing will make this more evident than swapping your view of an object in the center of an 1.25” eyepiece, for a full-frame image that you can brighten up and stretch to the edges of your monitor! To optimize these designs for astrophotography, corrective elements like field flatteners (for refractors) and coma correctors (for Newtonians) are added, though some scopes have begun to build this correction in!

How is astrophotography a window into the past?

Light moves fast. 670 million miles per hour fast. It only takes about 8 minutes for the light from the Sun to make its 93 million mile journey to Earth. However deep sky objects like galaxies and nebulae are incredibly far away. The light entering our telescopes and being captured by our cameras has been traveling for thousands or sometimes millions of years from these incredible objects, giving us a look into what the universe looked like long ago!

Astrophotography Terms To Know

Astrophotography

This refers to photography of astronomical bodies and phenomena. Astrophotography is not new, for example the popular T threading still used today harkens from Tamron’s T-mount developed for their 35 mm cameras - however it has seen a notable increase in popularity with improvements in cameras, mounts, filters, and software making astrophotography much more accessible. This is not limited to celestial bodies such as nebulae, planets, or galaxies either, as solar imaging is now more within the reach of the average consumer than ever before.

Autoguiding

Autoguiding is a process which utilizes a smaller telescope, referred to as a guide scope, and an additional camera sensor, known as a guide camera, to assist your mount in its tracking precision. Alternatively, this can be achieved using an Off-Axis Guider (OAG), which is fitted within your primary imaging train. An OAG uses the light captured by your telescope and sends it to your guide camera via an internal prism. So, how does autoguiding actually work? Your guide camera will take a constant series of short exposures (typically 1-3 seconds each) that will then be analyzed by software. After the software selects the best guide star(s) to guide upon, the goal is to keep these stars as steady as possible from frame to frame. If there is a discrepancy in the positioning of the stars, the guiding software will communicate with the mount to make small adjustments to fix these tracking errors. While it may not be necessary for short exposure astrophotography such as planetary, lunar, or solar, autoguiding is highly beneficial for long exposure astrophotography.

Bortle Scale

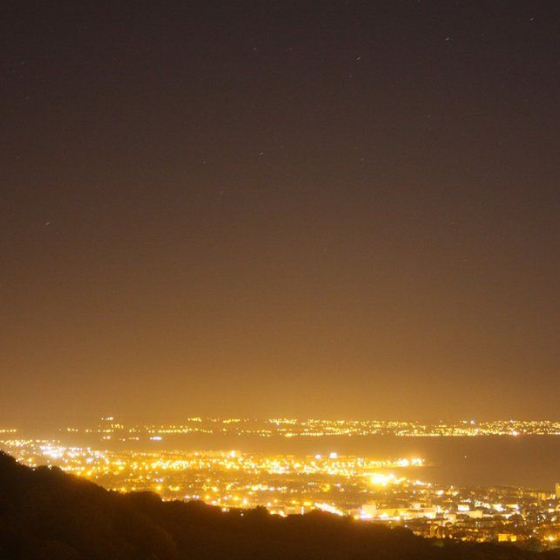
The Bortle scale measures how light polluted a particular area is, and classifies the level of brightness from 1 to 9, with 9 being the brightest. This scale is incredibly helpful for astronomers, as the darker the sky, the more celestial objects are able to be discerned.

Celestial Pole

The north and south celestial poles are positions within the night sky that extend from Earth’s axis of rotation. As the Earth rotates, these poles remain fixed within the night sky as the stars appear to rotate around them. These points on the celestial sphere are incredibly important to astrophotographers, as their equatorial mounts must be aligned with these celestial poles to achieve perfect counteraction of Earth’s rotation. If in the northern hemisphere, the bright star Polaris is incredibly close to the northern celestial pole, and as such, is denoted as the “North Star.”
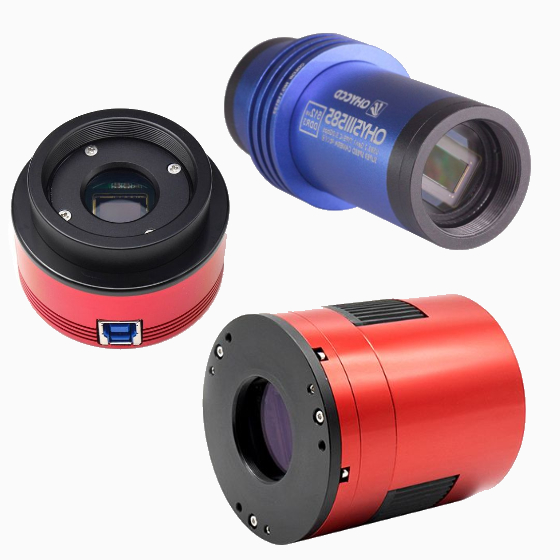
Color Camera

Often referred to as One-Shot-Color (OSC) cameras, these cameras are able to produce an image in full color without the use of additional filters. This greatly simplifies the imaging process, and allows astrophotographers to complete a project in far less amount of time. They are especially useful for those who have limited clear nights, where they can go weeks to months without having an imaging opportunity due to their climate. These cameras are excellent choices to image the planets, the Sun, the Moon, and deep space.

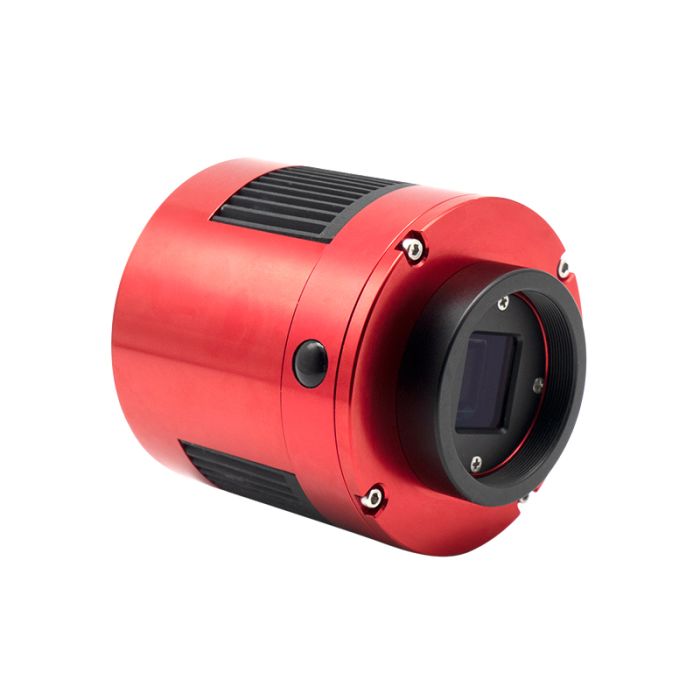
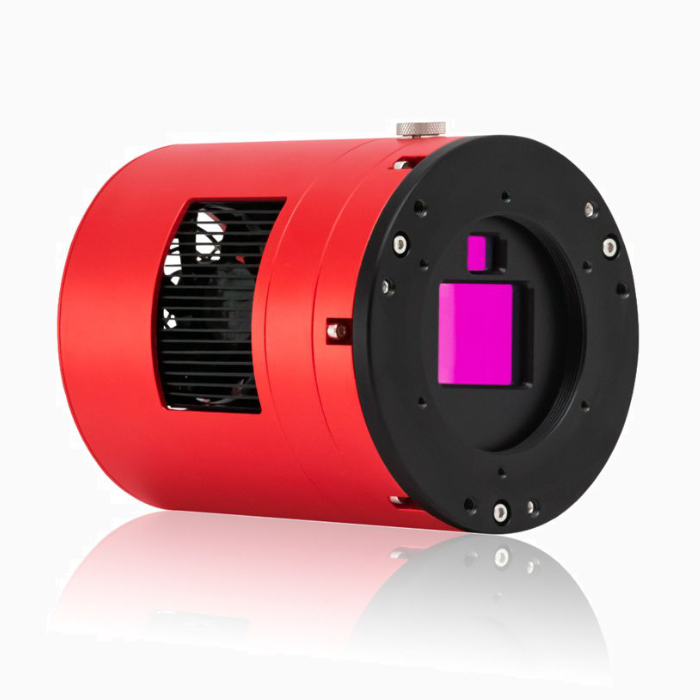
Dedicated Astronomy Camera

Dedicated astronomy cameras are cameras which were specifically designed for astrophotographic applications. They are much more sensitive than DSLR or mirrorless cameras, and are perfect for imaging dim, distant objects. Their ability to capture infrared light is incredibly useful when imaging emission nebula, as these types of celestial objects give off wavelengths within this spectrum. Also, depending on the type of astrophotography they were designed, they are either fitted with high frame rates for capturing the planets, the Moon, or the Sun, or come with an internal cooling system ideal for deep space imaging.
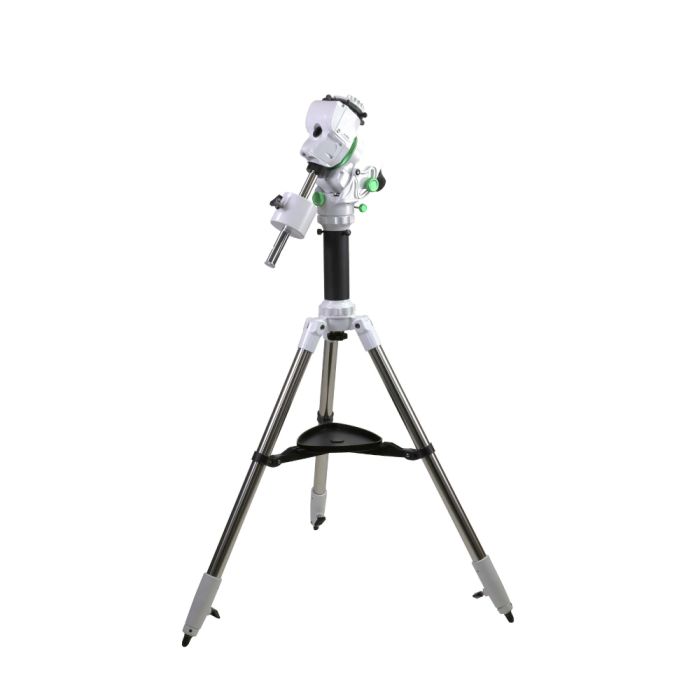
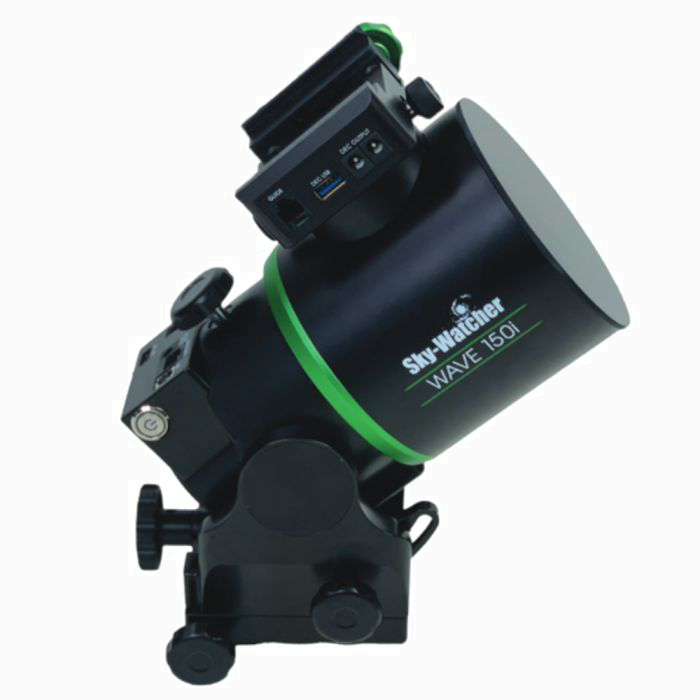
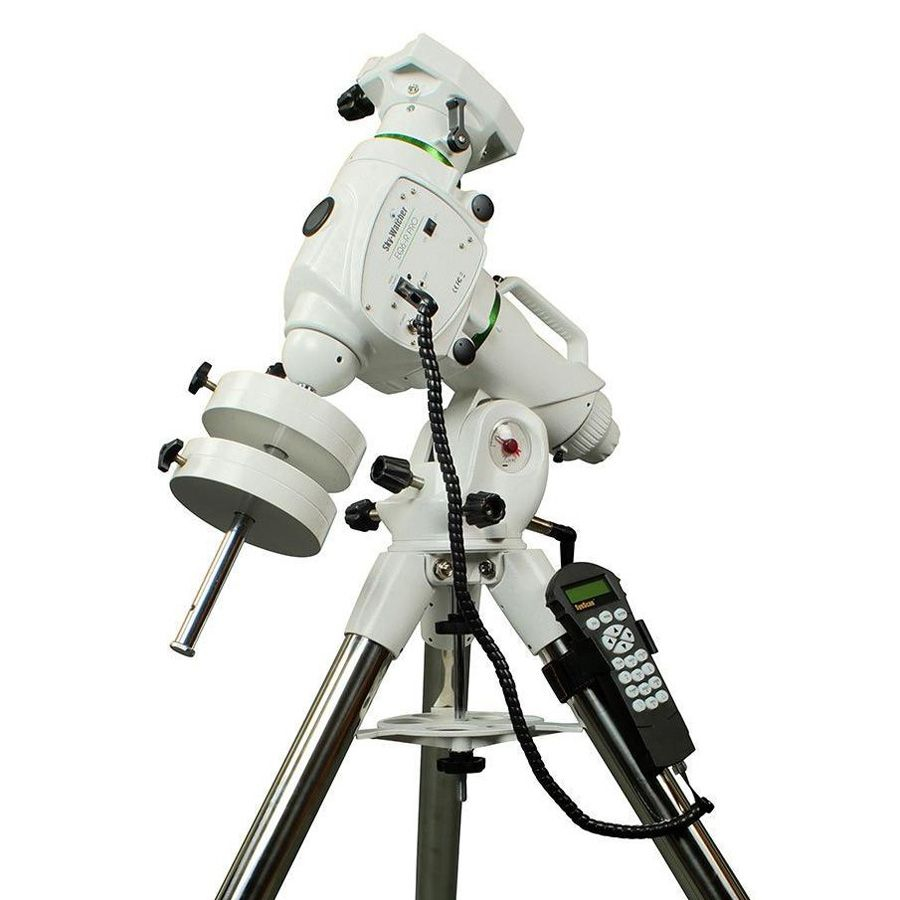
Equatorial Mount

An equatorial mount is an astronomy instrument that features two axes of rotation: right ascension (RA) and declination (DEC). Equatorial mounts also feature an additional axis, called the polar axis, that these RA and DEC axes rotate about. This polar axis is to be lined up with Earth’s celestial pole to accurately counteract Earth’s rotation. These mounts are ideal for astrophotography applications, as the addition of a polar axis eliminates the issue of field rotation within captured images.

Exposure Time

Exposure time is the amount of time the camera sensor is allowed to collect light. In general, the longer the exposure time, the more light collected, and the brighter the image will become. This should be selected with caution though, as an exposure time that's too long can oversaturate the pixels and blow out the image, resulting in a loss of signal. Determining the correct exposure time is highly dependent on the aperture of the optics as well as the gain settings used. A larger aperture will produce a brighter image than that of a smaller aperture with the same exposure time. In a similar fashion, an image with a higher gain setting will be brighter than a lower gain setting image with equal exposure time. Finding the perfect balance between the aperture, gain, and exposure time will maximize image quality.

Focal Length

The focal length is the distance, usually measured in millimeters, between the primary mirror or lens and the point at which the image comes to focus. Generally, classic refractors have a longer focal length, Newtonian reflectors tend to have a focal length that is shorter, and Schmidt-Cassegrain fall somewhere in the middle.

Focal Ratio

The focal ratio is calculated by dividing the aperture (mm) of the primary mirror or lens into the focal length. Example: 2500 mm divided by 254 mm (10") equals an f/ratio of 9.84, which is usually rounded off, in this case to f/10. The focal ratio signifies how quickly a telescope gathers light and tells us something about the telescope's field of view, how long exposures will take during astrophotography sessions, and how much magnification the eyepiece will produce for that telescope.

Bahtinov Mask

A Bahtinov mask is a tool that aids the user in finding optimal focus and was created by Russian astrophotographer Pavel Bahtinov in 2005. This type of focusing aid creates 3 diffraction spikes over a bright star within the field of view. While adjusting the focus knob, the point in which the three lines intersect perfectly over the star result in perfect focus. This tool is widely used by astrophotographers worldwide and creates an effortless focusing routine.

Frame Rate

In the realm of astrophotography, frame rate refers to the amount of frames captured within a given second — i.e. FPS. Selecting the FPS is an important aspect when imaging the planets, the Moon, the Sun, or when autoguiding. In general, the higher the frame rate, the better, as the more images there are to stack, the sharper the final image will become. It’s important to keep a balance between frame rate and the exposure of the subject, however, as too high of frame rate will require increased gain, which in turn increases noise.

German Equatorial Mount

A German equatorial mount is a specific type of equatorial mount created by Joseph von Fraunhofer in 1824. These mounts feature a design that places the telescope on one side of the declination axis, which is offset by counterweight(s) on the opposite end. The declination and right ascension axes meet each other within a T-joint. This T-joint is aimed at the north or south celestial pole, parallel to Earth’s axis of rotation, and rotates about this polar axis. With these three axes, these mounts are popular within the astrophotography community due to their ability to counteract Earth’s rotation without presenting field rotation within the captured images.
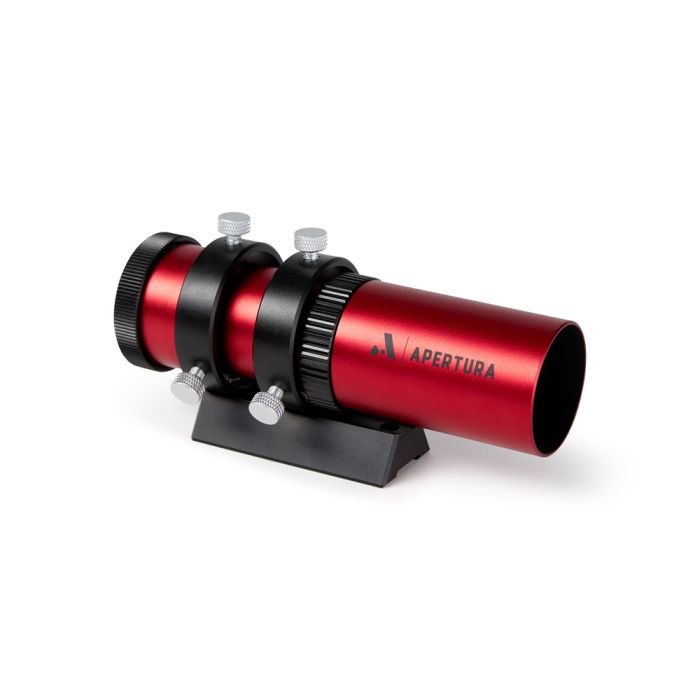
Guide Camera

A guide camera has the important job of assisting your mount with its tracking capabilities. It does this by capturing constant frames of the night sky, usually 1-3 seconds each, that are then sent to autoguiding software. The software analyzes the field of view, selects guide stars and determines their center of mass, then compares each incoming frame to this calculated center of mass. If any discrepancies are found between the captured frames, the software will then communicate with the mount to fix these errors.

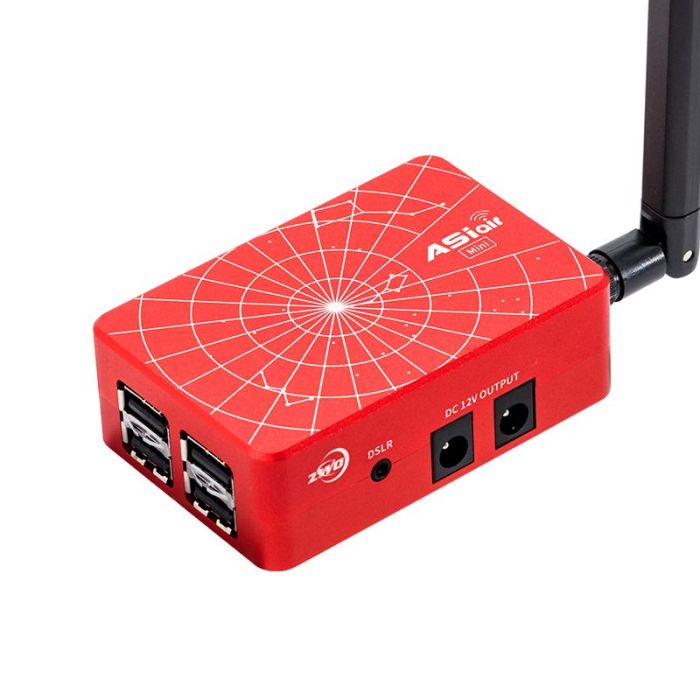
Image Capture Software

Astrophotography image capture software are specialized pieces of software designed to operate your astrophotography equipment. There are plenty of options available, though some of the most popular ones are N.I.N.A, Astro Photography Tool, Sequence Generator Pro, and SharpCap, just to name a few. These applications have been designed to provide seamless imaging sessions, allowing extensive opportunities such as target selection, target framing, plate solving, autoguiding, image acquisition, camera cooling, automation, and plenty more.

Imaging Train

Your imaging train is your telescope, camera, and any other accessories that are fixed between them, such as filters, filter wheels, off-axis guiders, focal reducers, etc.

Incoming Light

The term incoming light refers to the photons emitted by the celestial object being imaged. These photons are collected by your telescope and camera, then converted into signal.

Light Pollution

Light pollution is the brightening of the atmosphere due to lights from streetlamps, other forms of artificial light, and even the Moon. As light enters the atmosphere, it washes out the night sky, making it very difficult to observe the stars, nebulae, and planets. In order to combat light pollution in astrophotography, special filters have been developed to cut through excess light and enhance images. These filters are known as City Light Suppression filters, commonly referred to as CLS filters.
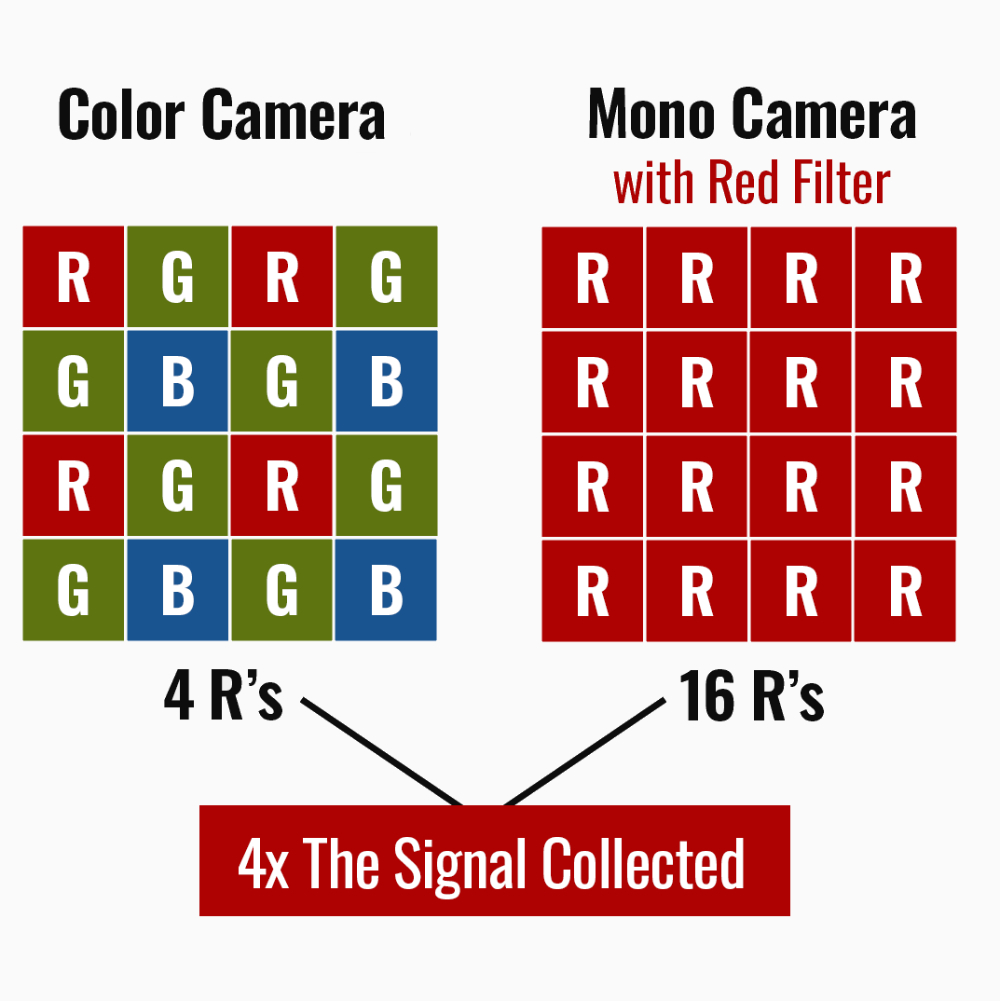
Monochrome Camera

Monochrome cameras deliver the most detail and sensitivity out of all other camera options. Color cameras have an arrangement of pixel filters in a 2x2 grid, typically consisting of two green, one red, and one blue, which is then repeated across the entire sensor in what is known as a Bayer pattern. Monochrome cameras however, have photosites that do not contain an alternating pattern of those red, green, and blue light pre-filters. Instead, their photosites collect all incoming light regardless of color – allowing for up to 3x the collection of signal (red, green, and blue light). Because the camera itself is not pre-filtering each color, in order to produce a full color image, they must be paired with filters to create a full color image. These filters can range from simple RGB filters to narrowband filters, and the collected data is then combined in a photo editing software. Though light is still passed through an external filter, every pixel well is utilized, resulting in 4x more red or blue signal and 2x more green signal compared to a color camera.
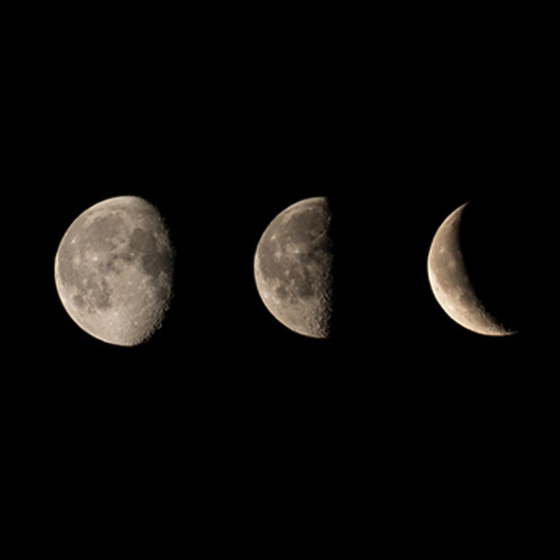
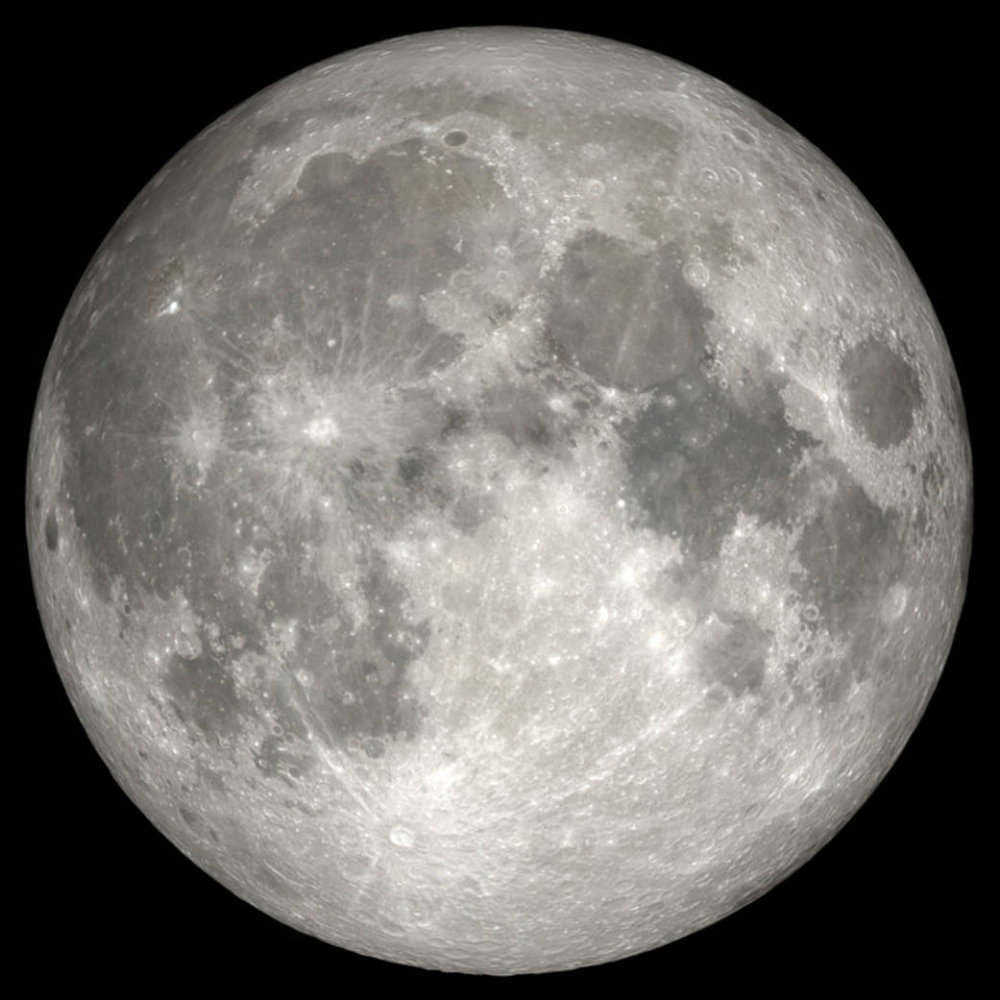
New Moon

New moon marks the beginning of a new cycle of moon phases. This is where the Moon seemingly disappears from the sky, as its non-illuminated side is facing us. Because of the lack of moonlight shrouding dim celestial objects, this phase of the Moon is important to astronomers and astrophotographers. The moon will soon appear as a crescent as it continues to orbit the Earth.

Imaging Newtonian

An Imaging Newtonian is a fast reflector telescope that is normally optimized for astrophotography or astro-imaging. Most Imaging Newtonian telescopes have an f/5 focal ratio or less, and some are not meant for visual use at all but rather, were designed to be dedicated imaging telescopes. It is common to find fast imaging Newtonian reflectors for sale as optical tube assemblies only, allowing the astro-imager to use his choice of equatorial mount.

Off-Axis Guider

As opposed to using a guide scope, off-axis guiders are fitted into the main imaging train itself, and utilizes the incoming light from the primary telescope for guiding. It achieves this via an internal prism that sends light into the guide camera. When using traditional guide scopes, these scopes can alter in position slightly through the night of imaging, causing the issue of differential flexure. But utilizing the main imaging rig’s incoming light, off-axis guiders eliminate this issue.

Payload Capacity

The payload capacity of a telescope mount is the maximum weight it can carry. It’s important to respect the rated payload capacity, as exceeding this limit can result in serious damage to the mount, or to the gear riding atop.

Plate Solving

The process of plate solving involves software analyzing a captured frame and comparing the star patterns to a database to determine the exact pointing position of the telescope. This procedure is incredibly helpful in Go-To processes, allowing the user to slew directly to the desired object with the click of a button.

Polar Alignment

Polar alignment is the process of aligning a telescope mount’s polar axis with the Earth’s axis of rotation. By having these two axes parallel to one another, precise counteraction of the Earth’s rotation can then be achieved. While a typical process of equatorial mounts that have three inherent axes of rotation, a similar effect can also be achieved by utilizing an equatorial wedge with two-axis alt-azimuth mounts.

Post-Processing

In order to complete an astroimage, it’s necessary to bring the captured frames into software to perform post process editing. This action varies for different types of astrophotography, though in general, it involves image stacking to reduce noise and remove artifacts, and image editing to enhance the captured detail and color.

Peak QE

Camera sensors have differing sensitivities to different wavelengths, which are often described as a percentage of how much light of a certain wavelength is converted to actual signal. These are plotted on a graph, which often overlays the sensitivity of the green pixels, red pixels, and blue pixels for each wavelength. The peak quantum efficiency, or peak QE value, is the highest percentage measured across all of the pixels on the camera sensor.
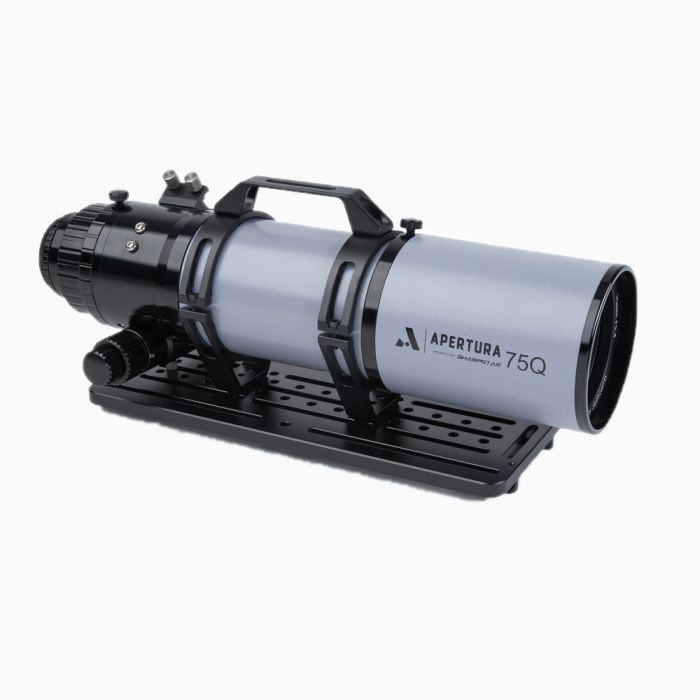
Refractor

A refractor is a type of telescope that utilizes lenses to focus the light into an eyepiece or a camera sensor. In general, how well the refractor performs at correcting incoming light depends on the number of lens elements fitted within the optical tube, as well as the type of glass and coatings utilized. For instance, a triplet refractor with three lenses performs better than a double refractor with only two lenses. As opposed to reflector style telescopes, refractors require less maintenance as they do not have to be collimated periodically, and are generally much more portable due to their compact size.

Schmidt-Cassegrain

The acronym SCT stands for Schmidt-Cassegrain Telescope, one of the most popular telescope designs in amateur astronomy today. A Schmidt-Cassegrain, which belongs more broadly to the Catadioptric telescope type, uses a folded optical design incorporating both mirrors and lenses to gather and bring the light to focus. The folded light path allows for a short tube assembly even with relatively large apertures of 8" or more. A shorter tube length makes the SCT far more portable than a classic Newtonian or refractor of the same aperture.
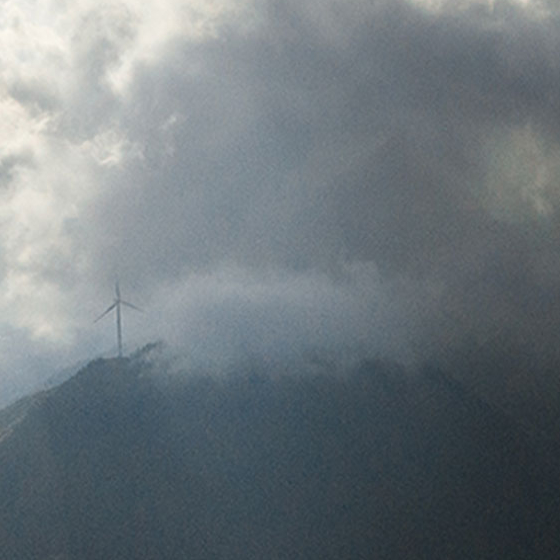
Seeing Conditions

This term refers to the overall clarity of the night sky at any given time and within any given location. This clarity fluctuates constantly, as it is based on numerous different atmospheric conditions, such as humidity, turbulence, high clouds, heat, and plenty more. To give an example, you may have witnessed stars in the night sky “twinkle.” This is due to our atmosphere distorting their incoming light, causing a twinkling effect. When it comes to astronomy, especially when observing the planets and the Moon, seeing conditions are very important to consider, as these distortions can cause the subjects to become blurred and unfocused. It’s best practice to observe celestial objects when the atmosphere is most stable.

Solar Filter

A filter that blocks the majority of incoming light from the Sun, only allowing a small amount through. These block much more light than sunglasses, tinted glass, or neutral density filters. The superior light blocking ability of solar filters allow for direct viewing or imaging of the Sun and solar eclipses through magnified optics. Without these filters it is not safe for people or camera sensors to directly observe the Sun.

Star Tracker

A star tracker is a mini equatorial mount that is designed to hold very small imaging trains. They are designed with portability in mind, and as such, are very lightweight and compact. They’re perfect for tucking away in a backpack, and many even run on batteries for heightened portability. While optimal for Milky Way photography, some models are robust enough for carrying small refractors.
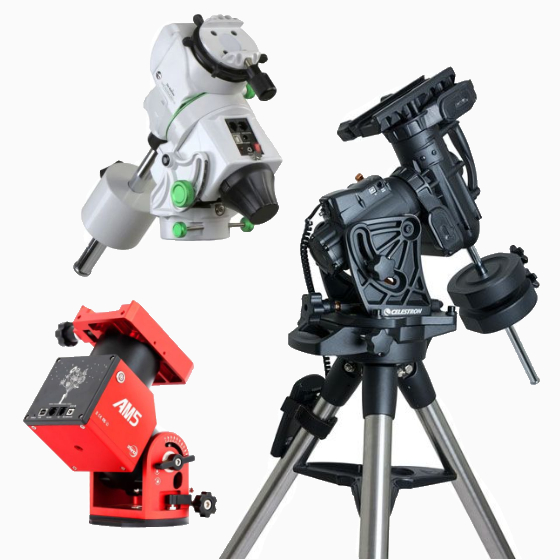
Harmonic Mount

Harmonic equatorial mounts, often times referred to as strainwave mounts, are a type of equatorial mount with unique internal gearing. How these mounts work is as follows: A motor within this mount attaches to an internal wave generator, which is fixed inside of a flexible spline gear. While the motor rotates this wave generator, the flexible spline gear then pushes against the ring gear it’s housed inside of. The coupling of the flexible spline gear and ring gear is what drives the mount. One key advantage of this internal gearing system is that it can work with unbalanced loads, making the use of counterweights optional in most cases. Also, these mounts deliver high torque values, and have impressive weight-to-payload ratios. As such, these mounts are much smaller and more compact than other equatorial mounts, making them ideal for traveling.