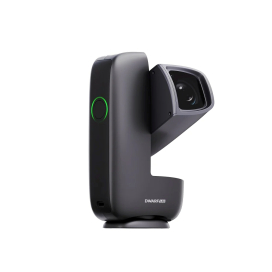
Weighing in at an outstanding 1.85 lbs., the DWARF Mini proudly holds the title of smallest smart telescope in the world! But does this pocket-sized powerhouse have what it takes to help you conquer the cosmos? Check out Teagan's full video review below to find out!
| Aperture | Focal Length | Mount | Features |
|---|---|---|---|
| 30 mm | 150 mm | AltAz | Versatile Dual Lens Design |
Advantages:
- Unbelievably light weight and compact form factor
- Multiple capture modes and a surprisingly powerful widefield sensor
- Streamlined session scheduling, and onboard restacking
To Consider:
- Limited 2.1 MP Resolution
- Limited 30fps video frame rate
- Doesn’t come with a tripod or carry case
The DWARF Mini is DWARFLab’s fourth foray into smart telescope technology, and this time, they departed from the unique book-style body in favor of a more familiar design. Boasting multiple quality of life improvements, such as a built-in dark filter and 360° panning, this ultra-portable, all-in-one imaging system promises to deliver effortless astrophotography for beginners and pros alike. Having spent many nights under the stars with several of the latest smart telescopes, such as the DWARF 3 and Seestar S30 Pro, I'm eager to see if the worlds smallest smart telescope holds up to the hype. So, let’s unbox this smart telescope and put these exciting claims to the test!
The DWARF Mini Promises to:
- Automate the astrophotography process with speed and precision
- Effortlessly capture breathtaking photos, timelapses, videos, and more
- Set a new standard for smart telescope portability
Unboxing
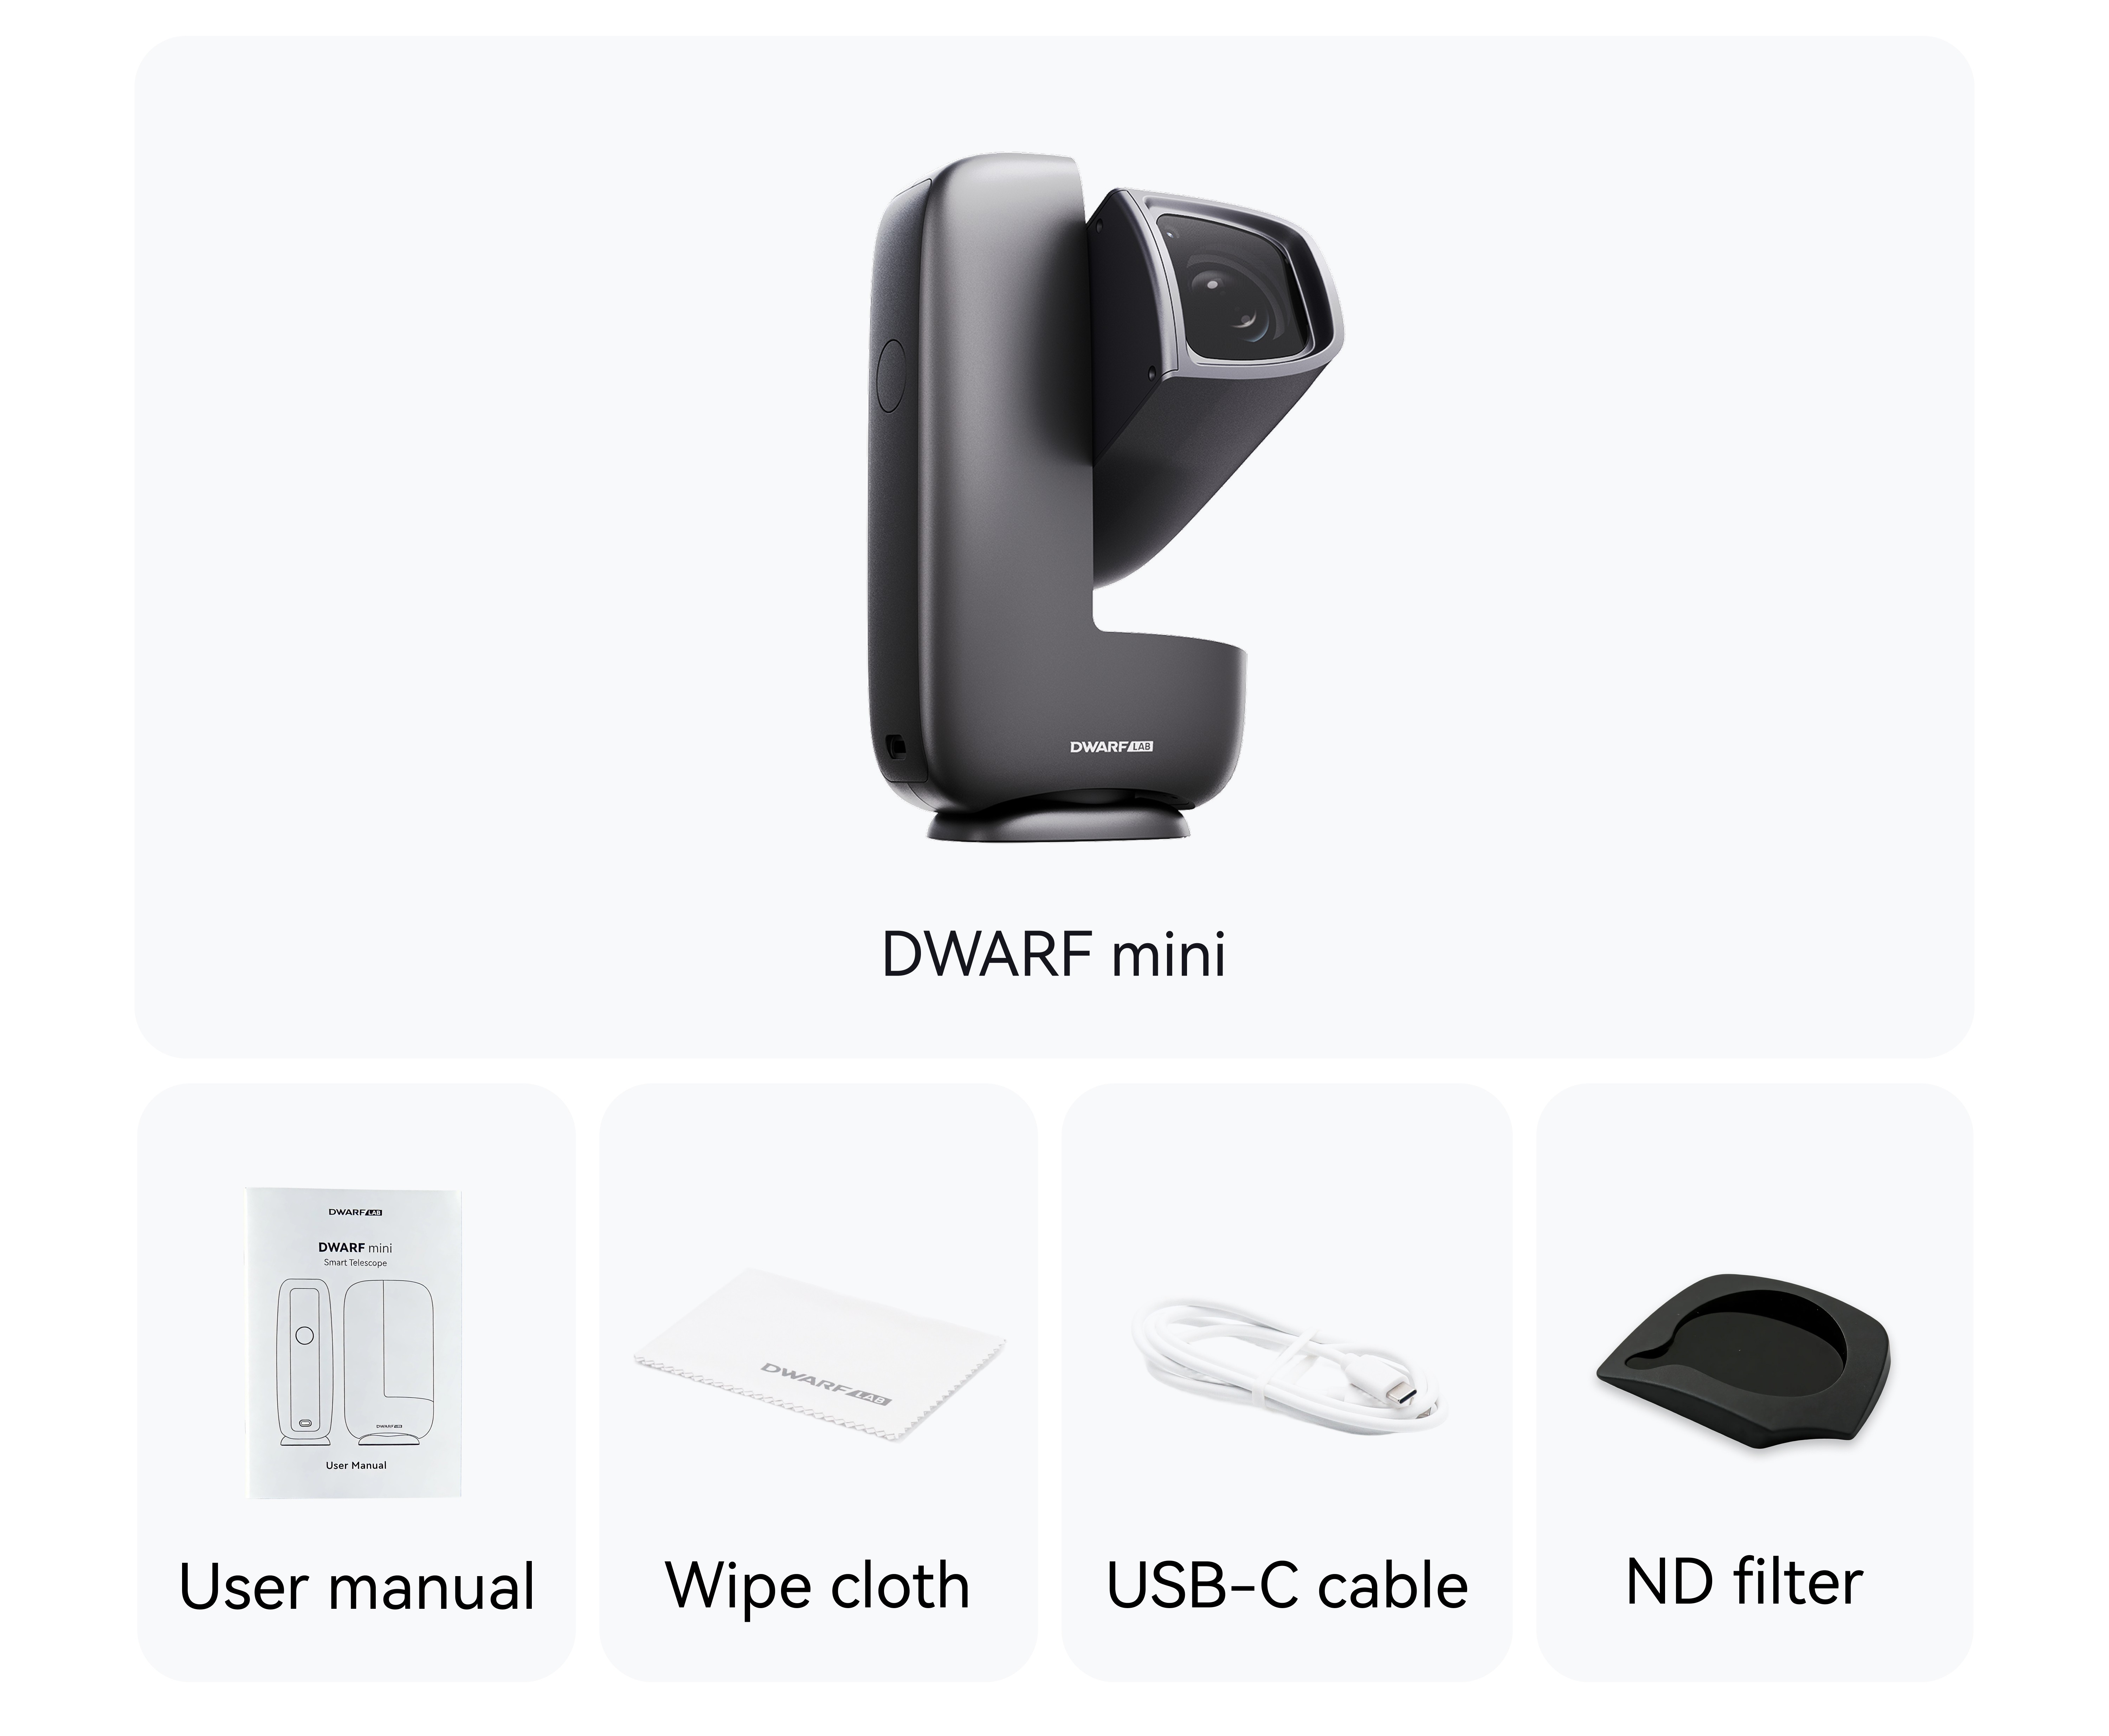
Unboxing the DWARF Mini is a no-nonsense task, which is fitting for a smart telescope that promises to give back time often lost to the complicated setups common to this hobby. Inside the box you’ll find the following accessories alongside the DWARF Mini:
- User Manual
- Cleaning Cloth
- USB-C to C Charging Cable
- (ND) Solar Filter
Tips
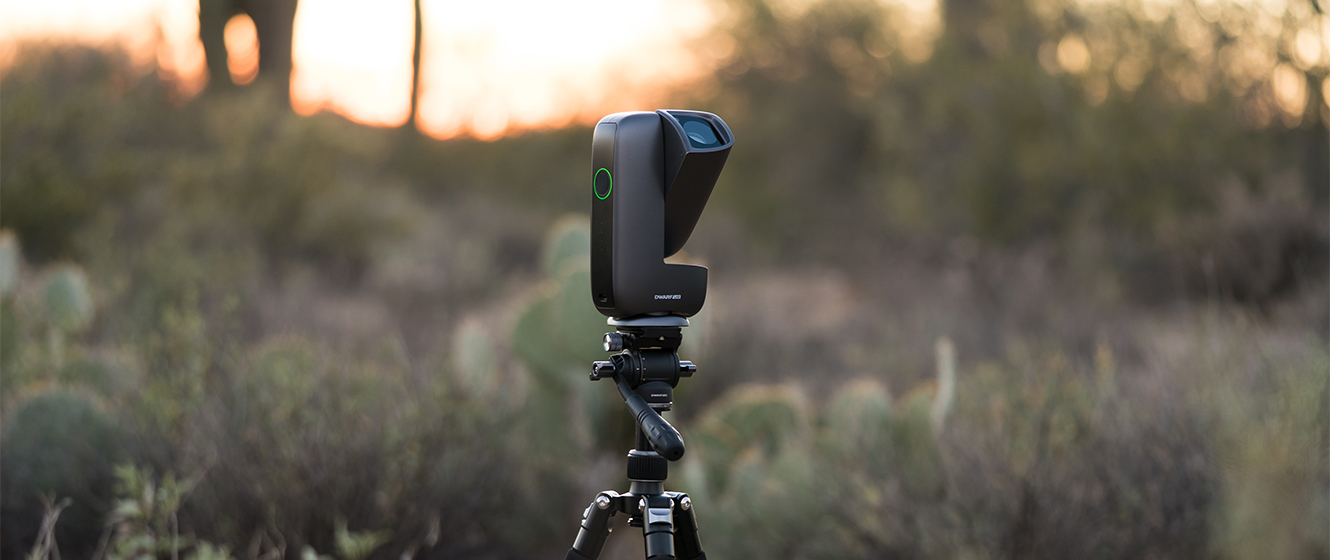
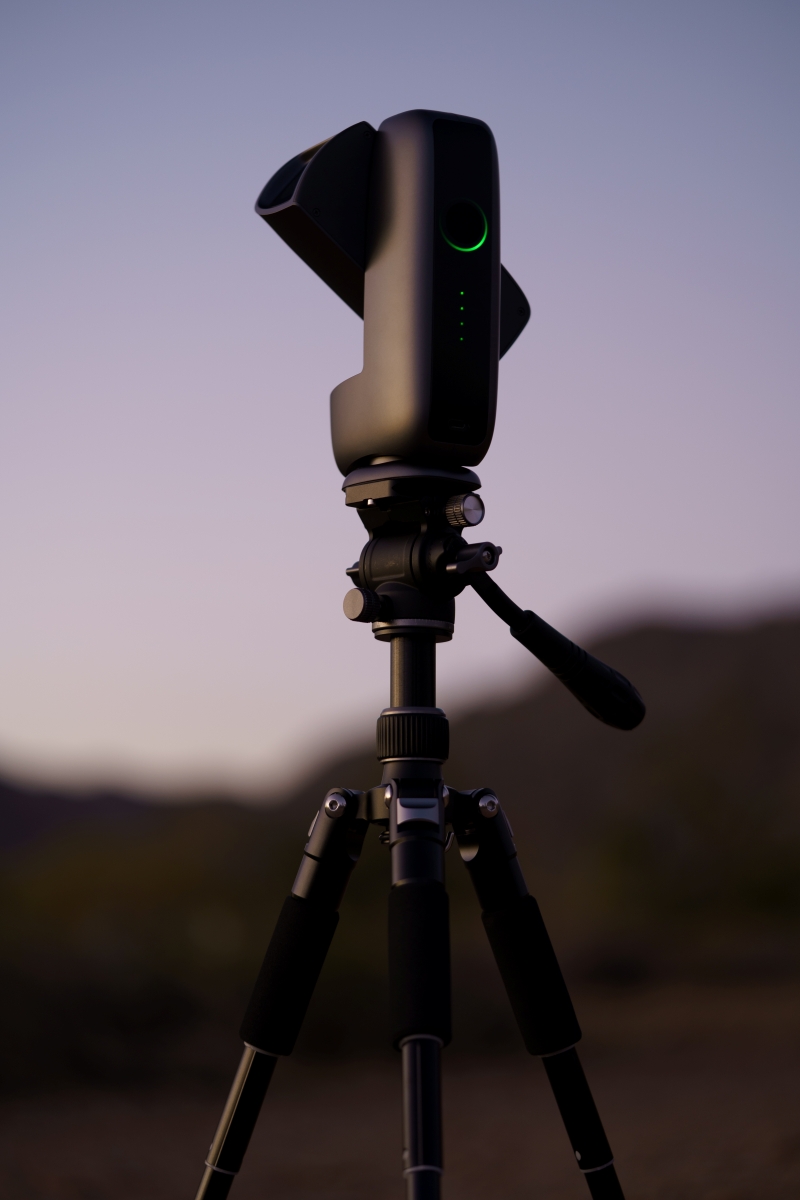
You won’t find a tripod, but the DWARF Mini works with standard photography tripods (with a ¼ 20 threaded mounting screw) or you can simply place it on a level surface. I picked up one of DwarfLab's Mini Tripod with Hydraulic Head. This compact tripod sports fluid-like movements and is designed to help with polar alignment (more on that later).
First Light
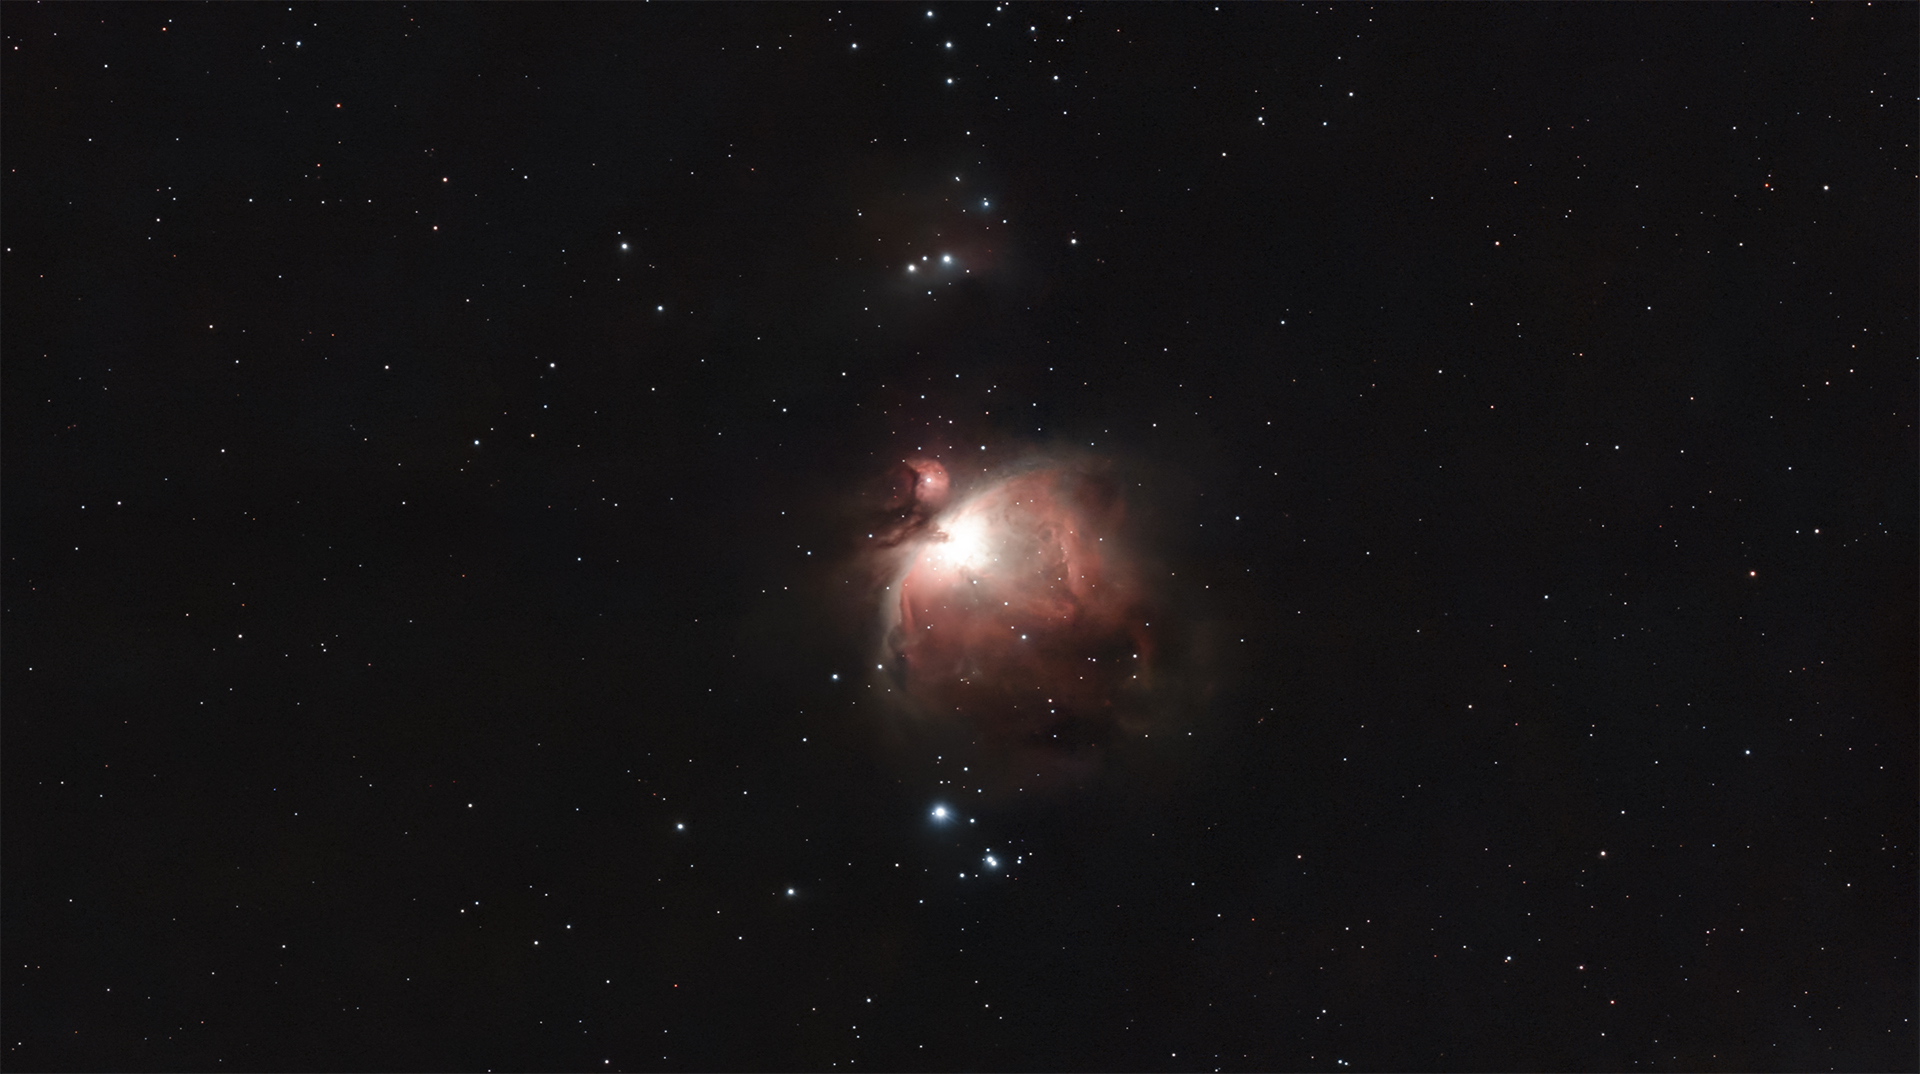
For my first test with the DWARF Mini, I chose The Great Orion Nebula, also known as M42. Since M42 is the brightest nebulae in the night sky, capturing a clear photo shouldn't take more than 20 minutes. It is a great test target to determine how well the DWARF Mini performs. Follow along as I outline each step of this exciting first test!
What are we looking for during this test?
- Fast and precise calibration, tracking, and stacking
- A clear photo of M42 with vivid details
- Streamlined controls from the DWARFLab app
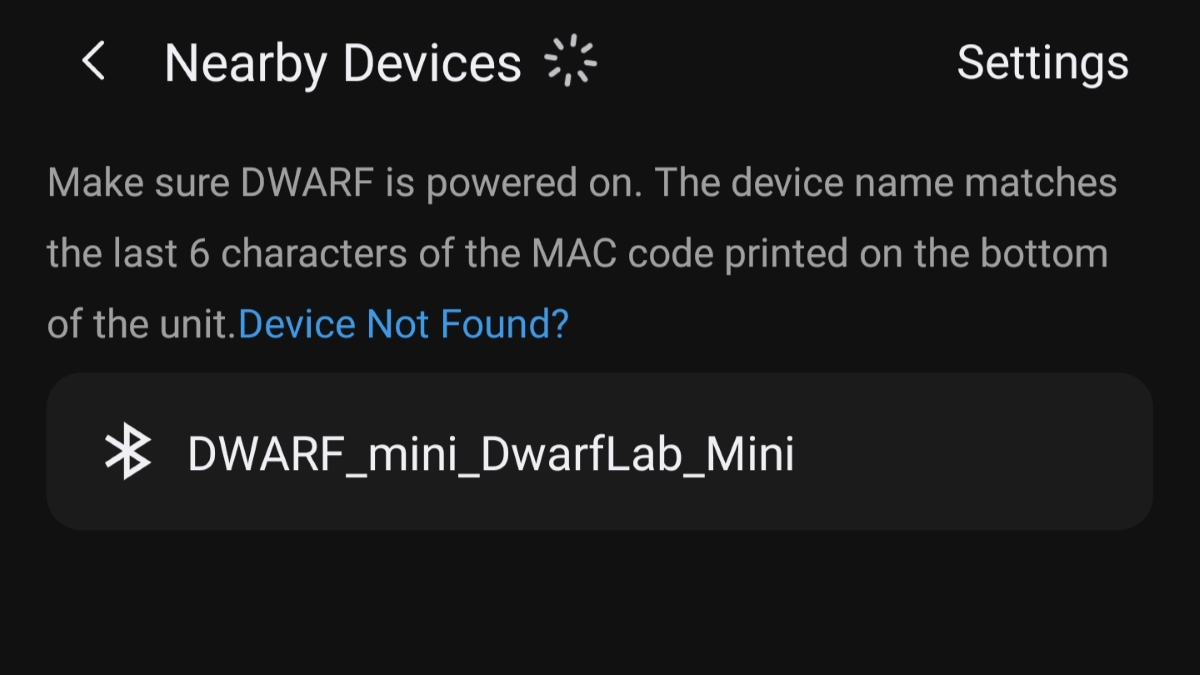
I started by downloading the DWARFLab app from the smartphone's app store and following a few short steps to connect.
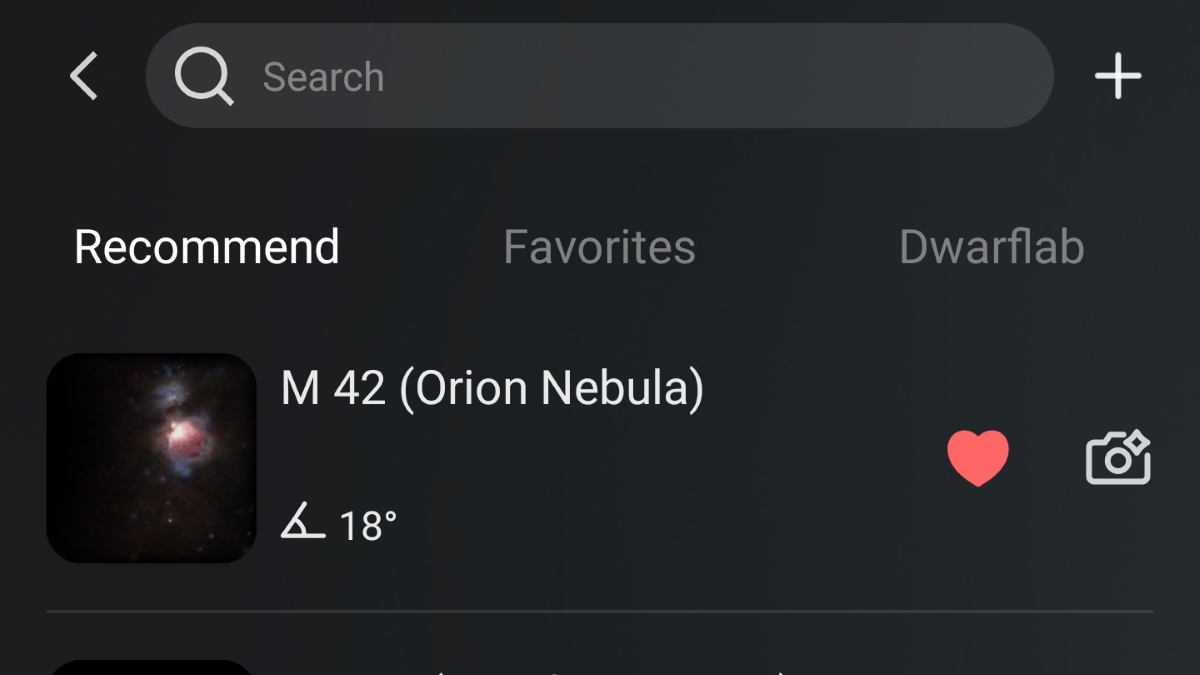
Once I connected to the DWARF Mini, I jumped right into the Sky Atlas and selected M42 from the recommended targets.
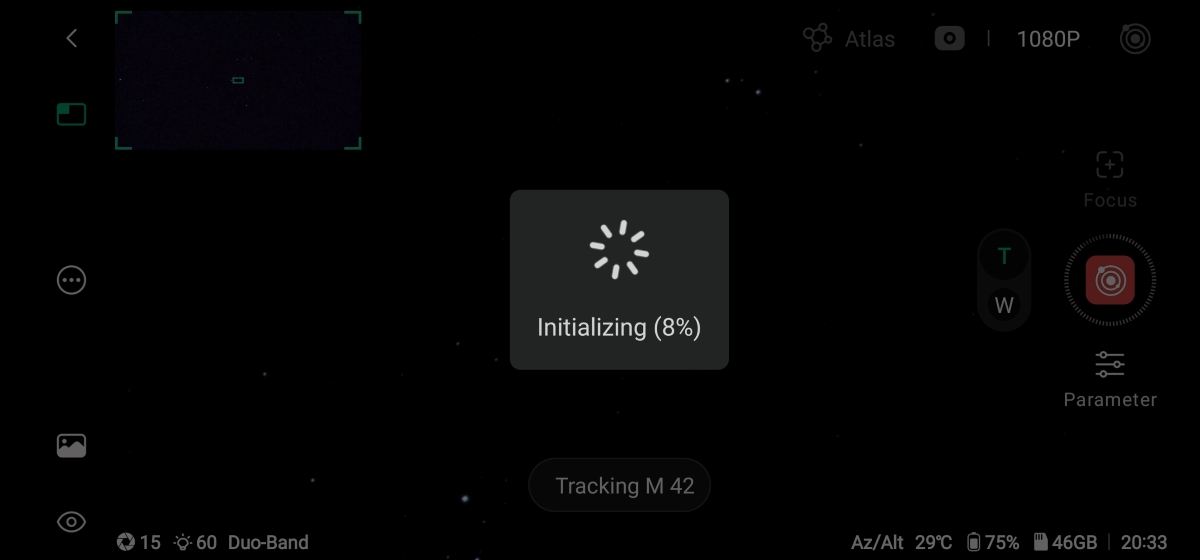
After selecting my target, the DWARF Mini came to life and quickly began scanning the night sky to orient itself to my specific location and find its target. After the calibration routine was completed, I made sure the stars were properly focused by selecting "auto focus" from the parameter menu.
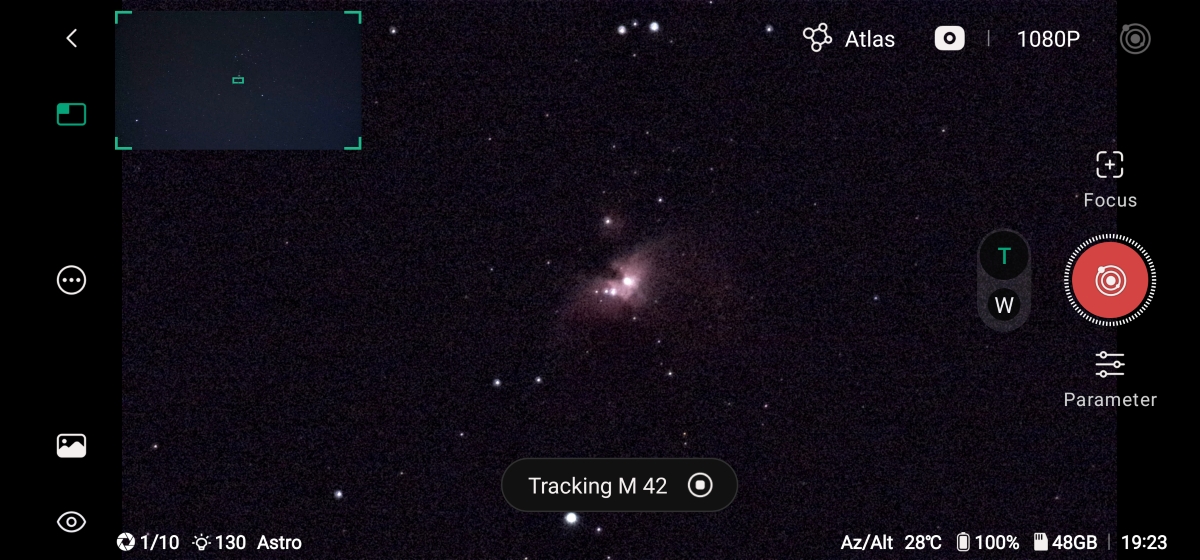
After the brief auto-focusing calibration, I began my imaging session! Mere moments later I was already looking at a dim image come to life on my screen, and in less than five minutes of imaging, I could already see the wide wings wrapping around a cluster of stars and brighter gas clouds known as the trapezium.
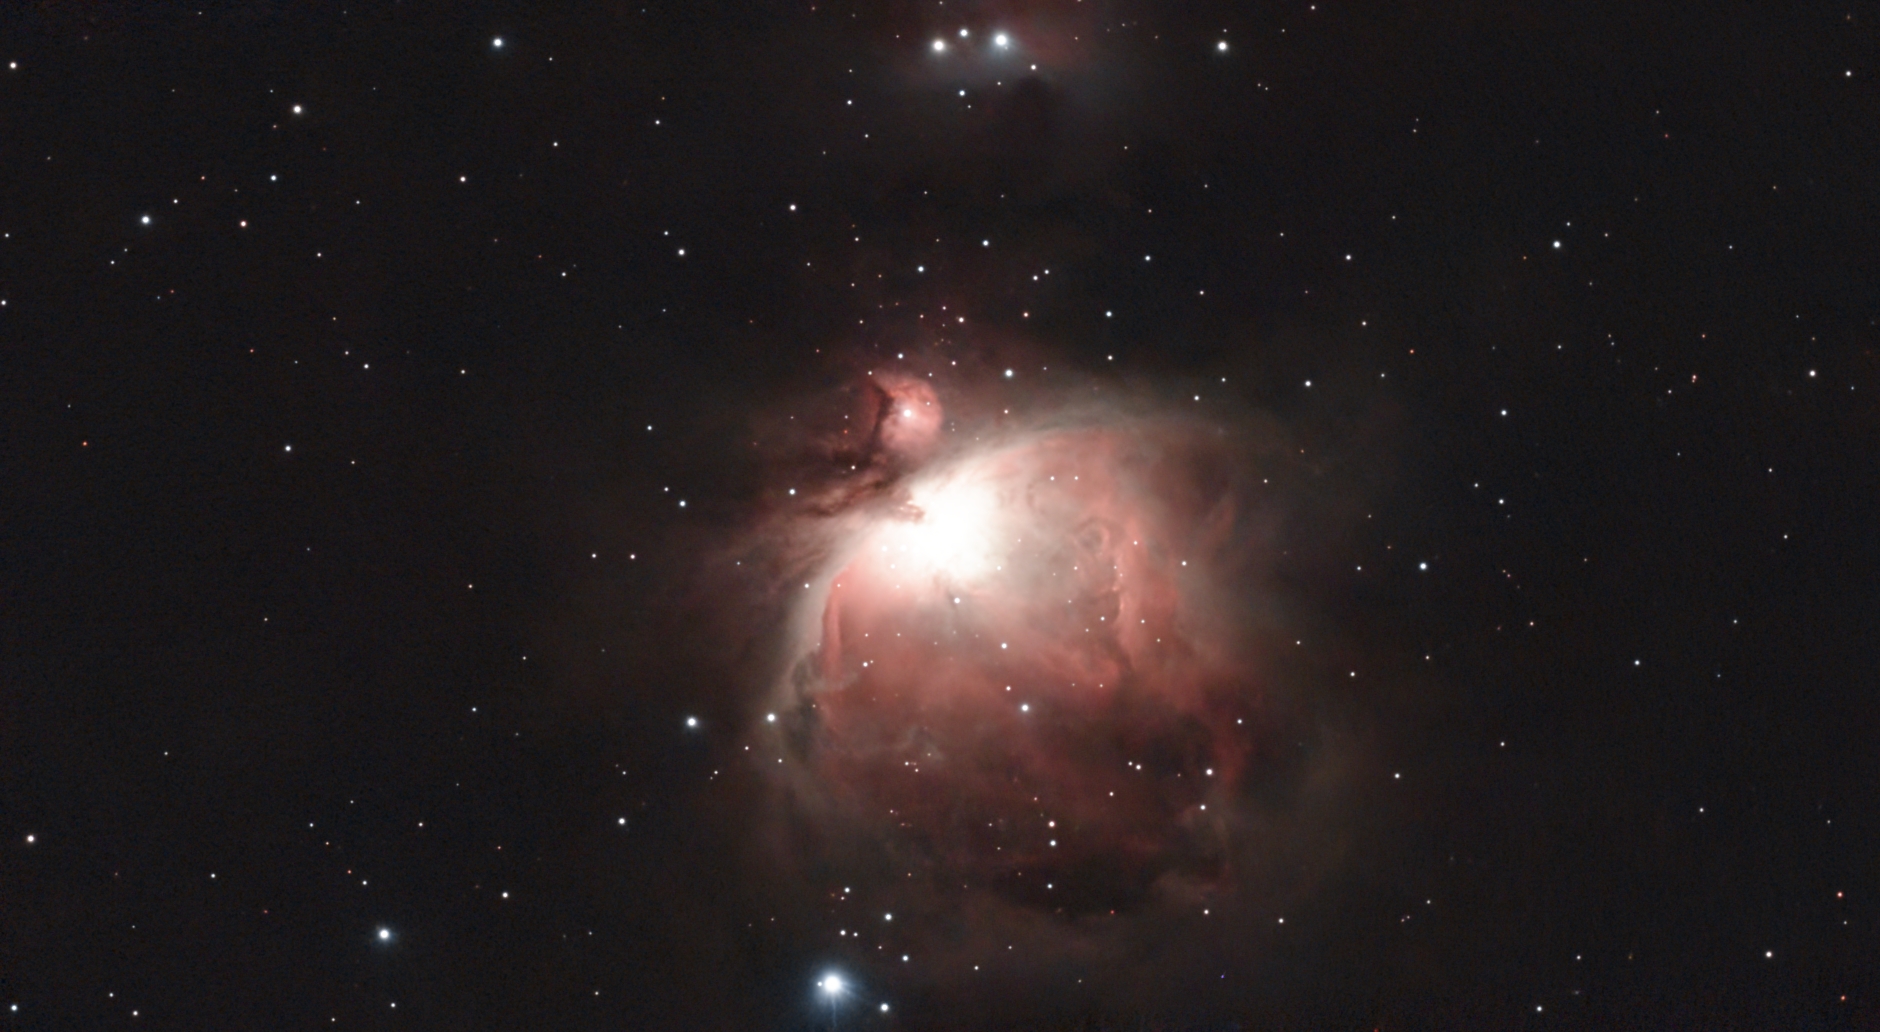
After about 15 minutes, I came back to see the final stacked photo, and it's no “stretch” to say I was quite impressed! It's safe to say the DWARF Mini hit all marks with ease. Check out the results below!
Tips
Before the imaging session began, the app prompted me to capture a new set of dark frames. Fortunately, the DWARF Mini has a built-in dark filter, so this calibration step was easily completed from the app. This is certainly a welcome improvement!
EQ Mode
Capturing a photo of the Orion Nebula in less than 20 minutes and navigating the entire process from the comfort of my smartphone is incredibly satisfying. However, this initial test only scratched the surface of what the DWARF Mini offers. For my next test, I wanted to see how this pocket-size powerhouse handles a more advanced EQ mode, which promises to significantly improve target tracking, eliminate distortions caused by field rotation, and expand exposure times to over 90 seconds.
The set-up process for the EQ mode requires some hands-on calibration, but with the DwarfLab Mini Tripod and straightforward in-app tutorial, I had everything set up in less than five minutes. Below, I'll cover the process to start capturing longer exposure astro-photos with the DWARF Mini step-by-step.
What are we looking for during this test?
- Fast and error-free EQ setup
- Expanded exposure time for a more detailed final stack
- Significantly better tracking
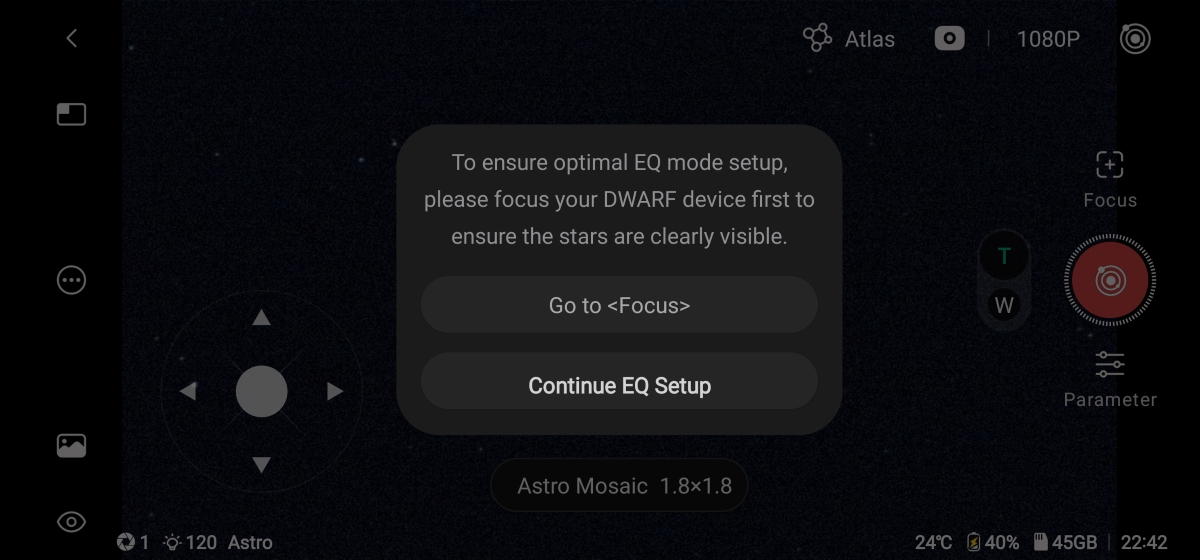
There are a couple different ways to initiate the EQ calibration, but the easiest for me was simply navigating to Deep Sky mode, selecting the settings icon on the left side of the screen, and selecting EQ mode from the options. This opens a pop-up window which prompted me to ensure the stars are in focus. Since I already calibrated the focus in the previous test, I went ahead and selected "Continue EQ Setup".
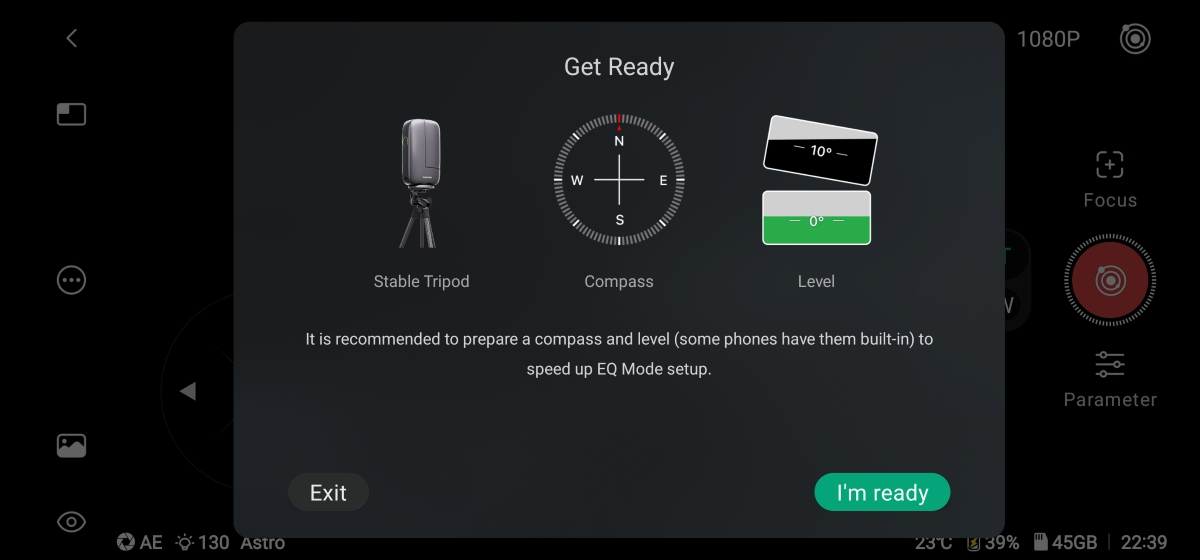
In the following menu, the app lists a few items that help speed up the EQ setup: a stable tripod, a compass, and a level. While these accessories can be helpful, the only thing you really need is a tripod with the ability to pivot up or down.
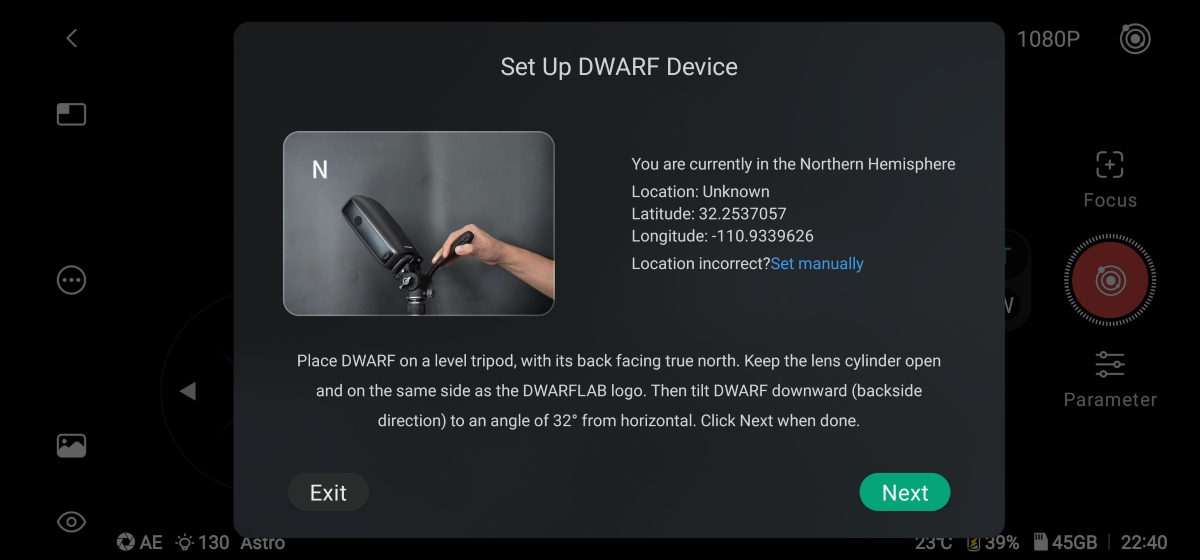
In the following menu, the app informed me to place the DWARF Mini on a stable tripod with the logo side of the device facing south, then slowly angle the device down according to your specific latitude. It helps to set up the tripod so one leg is pointing north, which ensures it won't tip over when adjusting the position.
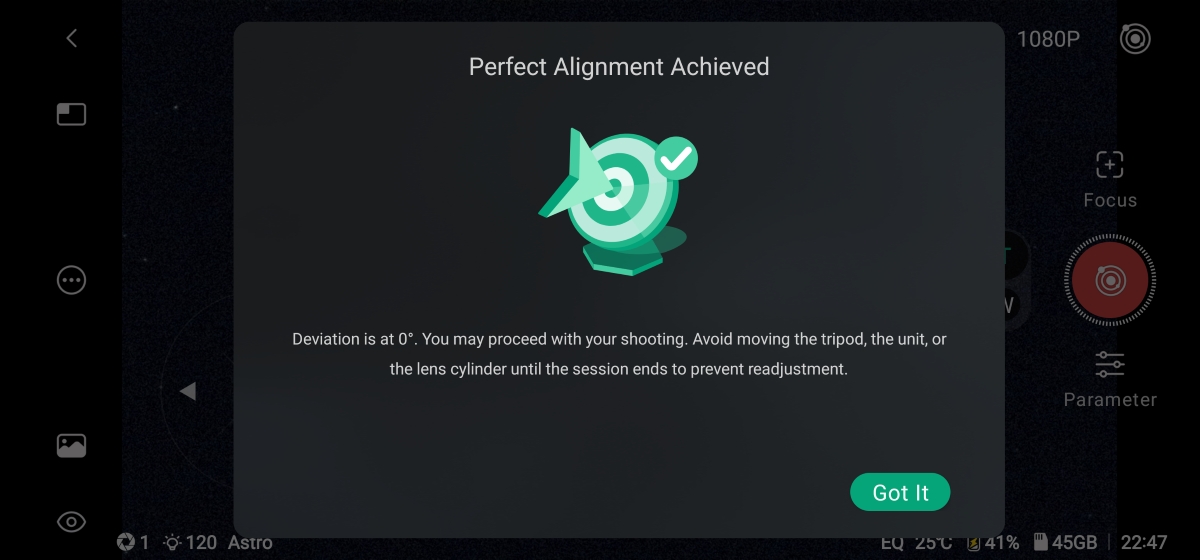
After pressing next, the DWARF Mini checked my alignment then instructed me to make a few small position adjustments to reach an accurate polar alignment. Once I achieved an alignment within 5° of deviation, the app let me know I could begin imaging. I'd recommend aiming for a 3-0° deviation before moving on.
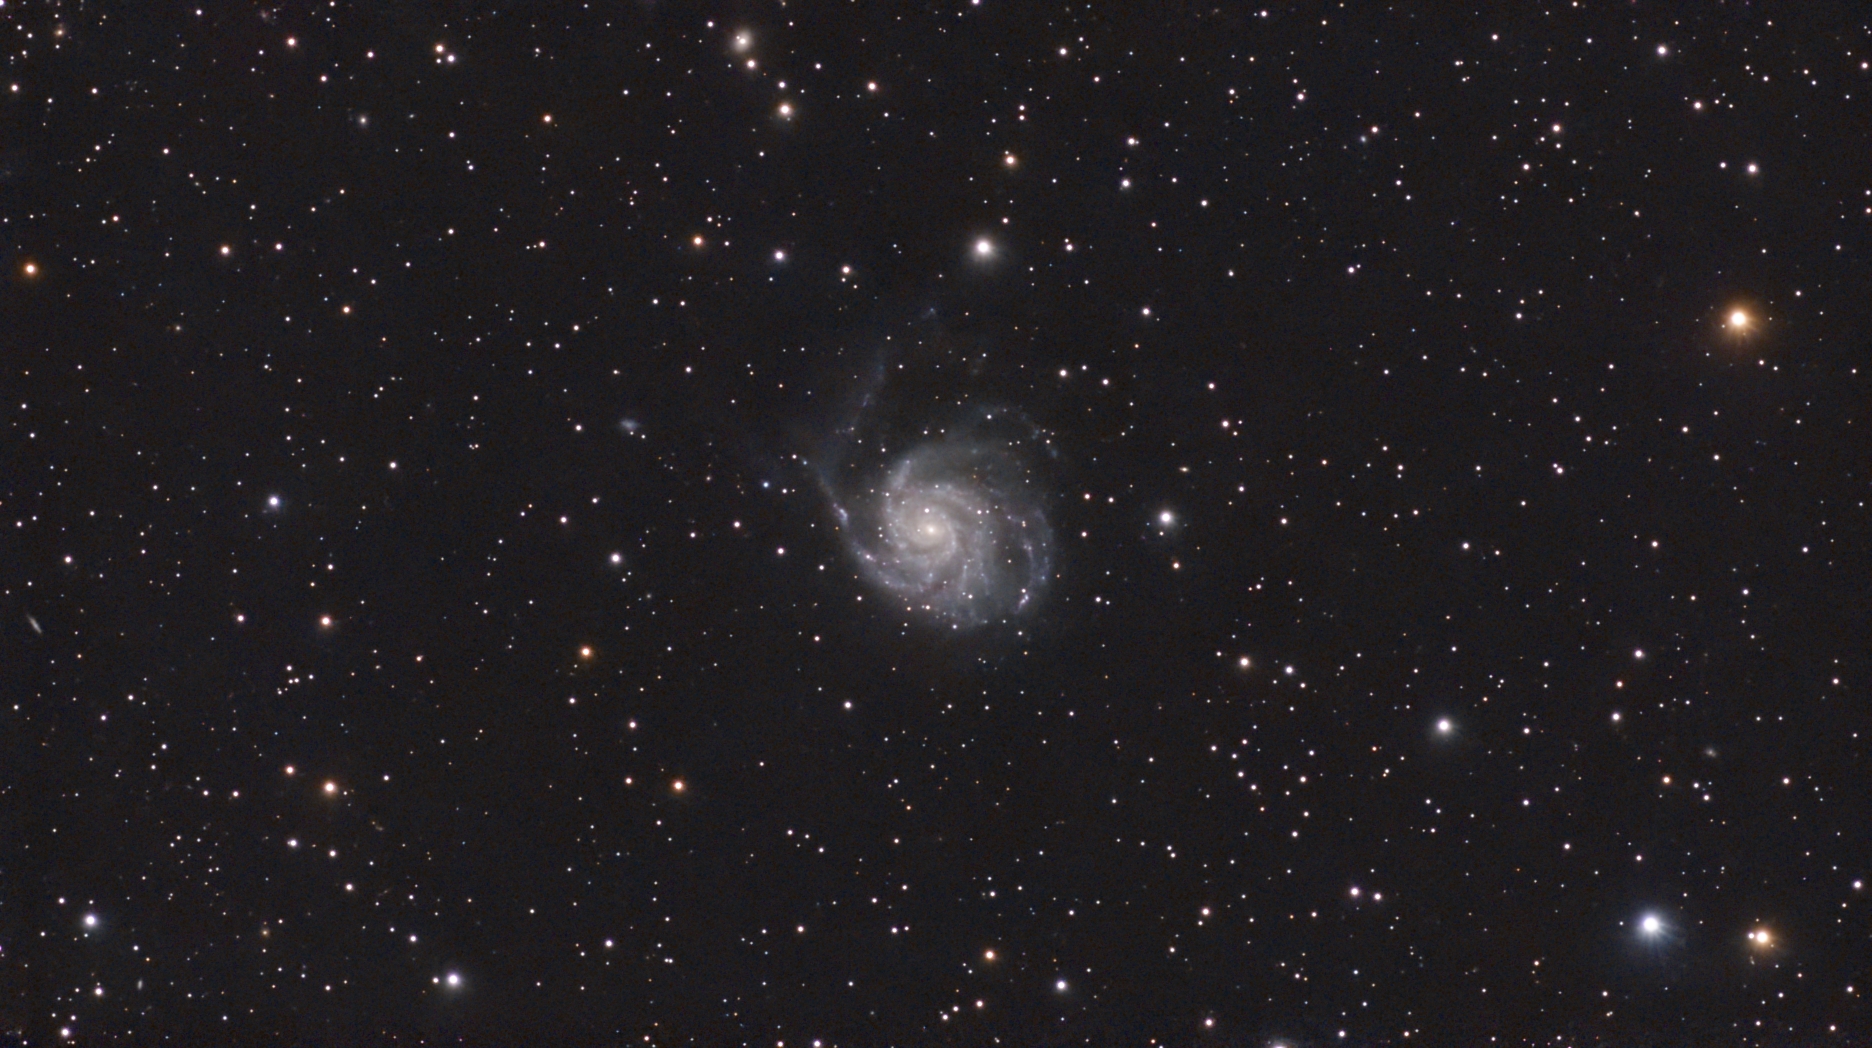
I managed to hit 0° of deviation within two tries, and while the smooth motions of the DWARFLab Mini Tripod certainly helped with all the fine adjustments, I'd say the whole process was as painless as I hoped. As soon as I was done with the EQ setup, I had no trouble selecting an exciting target from the recommend list, and it even automatically recommended the best settings to capture a clear photo. In the EQ mode, the exposure time maxed out at 120 seconds, which is more than I expected and a huge improvement over the 15 second maximum when in the standard alt-az mode; however, the recommended capture settings suggest a 60 second exposure for my target (M101), and this felt like a safe bet for my last test of the night. At four hours, this session took a lot longer than my previous tests, but this final stacked photo is certainly worth the wait! Check out the results:

Tips
The DWARF Mini only has a battery life of about 4 hours. If you want to expand your imaging window, I highly recommend picking up a portable power supply, like the Apertura Portable Telescope Power Supply - 155Wh. This supportive accessory will ensure your smart telescope has all the power it needs to keep imaging all night long!
Scheduled Sessions
With the success of my initial tests, I was excited to keep the momentum going. One of the new features I needed to test is the Mega Stack mode, which promised to take my astro-photos to the next level by combining multiple nights of imaging data for an even better final stacked photo. But staying up till sunrise two nights in a row was a bit more than I was ready to commit to. Luckily, the DWARF Mini has a "Scheduled Session" mode that promises to stay up on your behalf, meaning I could get some much needed rest while the DWARF Mini captures the cosmos.
Scheduling an imaging session shouldn't be a hassle. After all, it's designed to automatically handle the whole imaging session without any additional user input. So, follow along as I walk you through how I set up my first scheduled session with the DWARF Mini.
What are we looking for during this test?
- A successful night of imaging with no additional user input
- Easy in-app navigation and fast schedule syncing

To create a new scheduled session, I navigated to the home menu of the DWARFLab app and selected "schedule" from below the live view button.
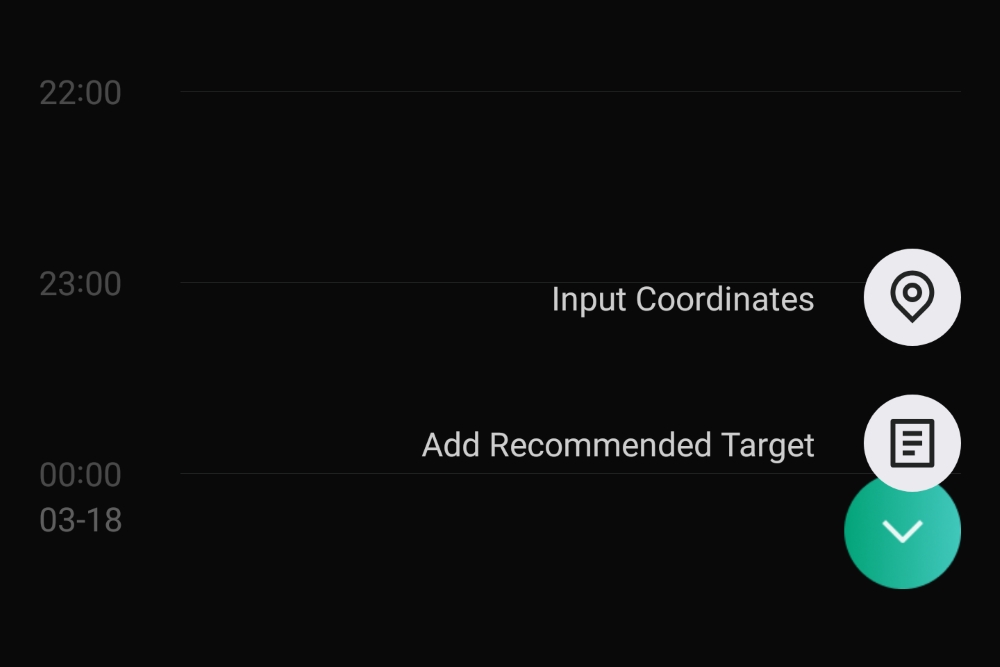
Next, I gave my session a name, turned on the automatic location mode, and set the session date. After saving the blank session, a new menu appeared, and I selected the "+" icon near the bottom, right-hand side of the screen to choose my target.
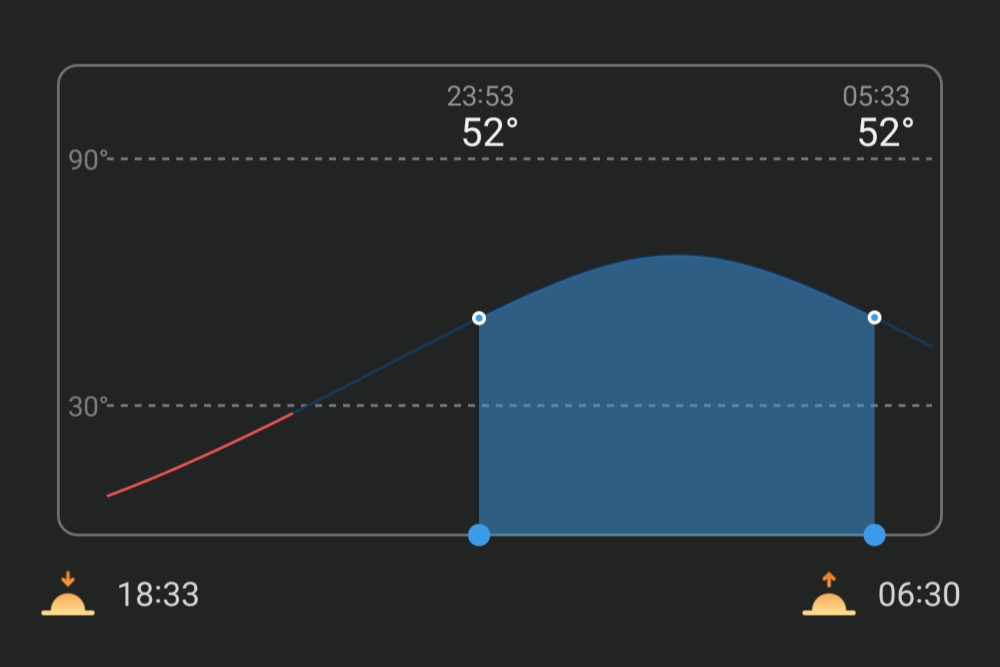
Next, I selected M101 from the list of recommended targets and this opened another menu with a chart at the bottom. This chart showed me the peak capture window for my target, and it allowed me to highlight an area to set the session length. After setting the length, I scrolled down to the sessions parameters and selected "astro" from the filter options, set the exposure time to 60 second exposure, and set the gain to 40. These are the same parameters I used for my previous test, which is necessary since I wanted to create a multi-night stack of M101.

After saving my filled-out scheduled session, I connected to the DWARF Mini to sync the session. Since I was all set up a few hours before the session was scheduled to begin, I made sure to disconnect and let the DWARF Mini go into "standby mode" to conserve battery life.
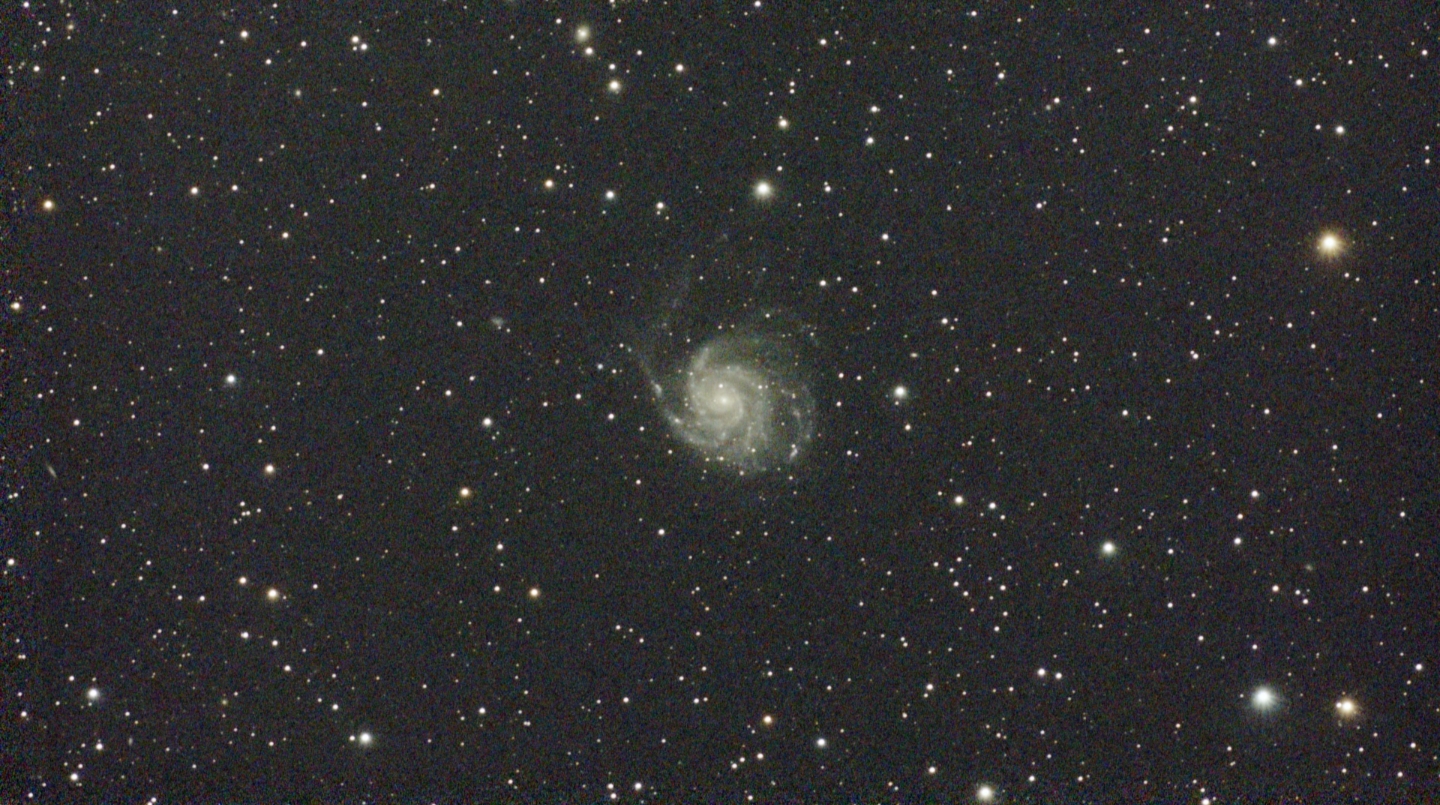
I admit I had my doubts about this test. The thought of leaving the DWARF Mini unattended with a set of imaging instructions while I got a good night’s rest just felt too good to be true. But I was not disappointed when I awoke to another successful test and another batch of data ready to be stacked. In the next section, I'll dive into the new Infinity Lab and Mega Stack mode, which promised to let me stack the frames from both sessions.
Infinity Lab
In the photo gallery of the DWARFLab app, which can be accessed while connected to your DWARF Mini, you'll find the new Infinity Lab. This onboard photo suite gives you access to powerful processing tools, such as Mega Stack and Stellar Studio to give you even more control of your astro-photos. Of course, with the success of my previous test, I was eager to dive into the Mega Stack feature and see what I could create with multiple nights of imaging data. Follow along to find out more!
Mega Stack
Restacking both of my M101 sessions took nearly four hours to complete, so I was relieved to learn I could disconnect my phone while waiting for the results. Before initiating the stacking process, I manually reviewed each batch of data and deleted quite a few bad frames. While this process feels rather tedious, I suppose it's only fair I put in some effort, especially after having the DWARF Mini work all night! All jokes aside, it would be nice to see DWARFLab streamline this process and maybe offer a rating function that automatically sorts the frames based on star quality.

Heads Up!
You can't stack frames from sessions that use different parameters, such as exposure settings, shutter speeds, and filters, so make sure you take the time to match your parameters before starting a new session!
Stellar Studio
Stellar Studio is a powerful new processing mode that allows you to upload your final stacked photos to a cloud-based image processor and help you polish your astro-photos using tools that would otherwise require a powerful PC, such as AI-powered denoising, Color Calibration, Deconvolution, and Star Removal.
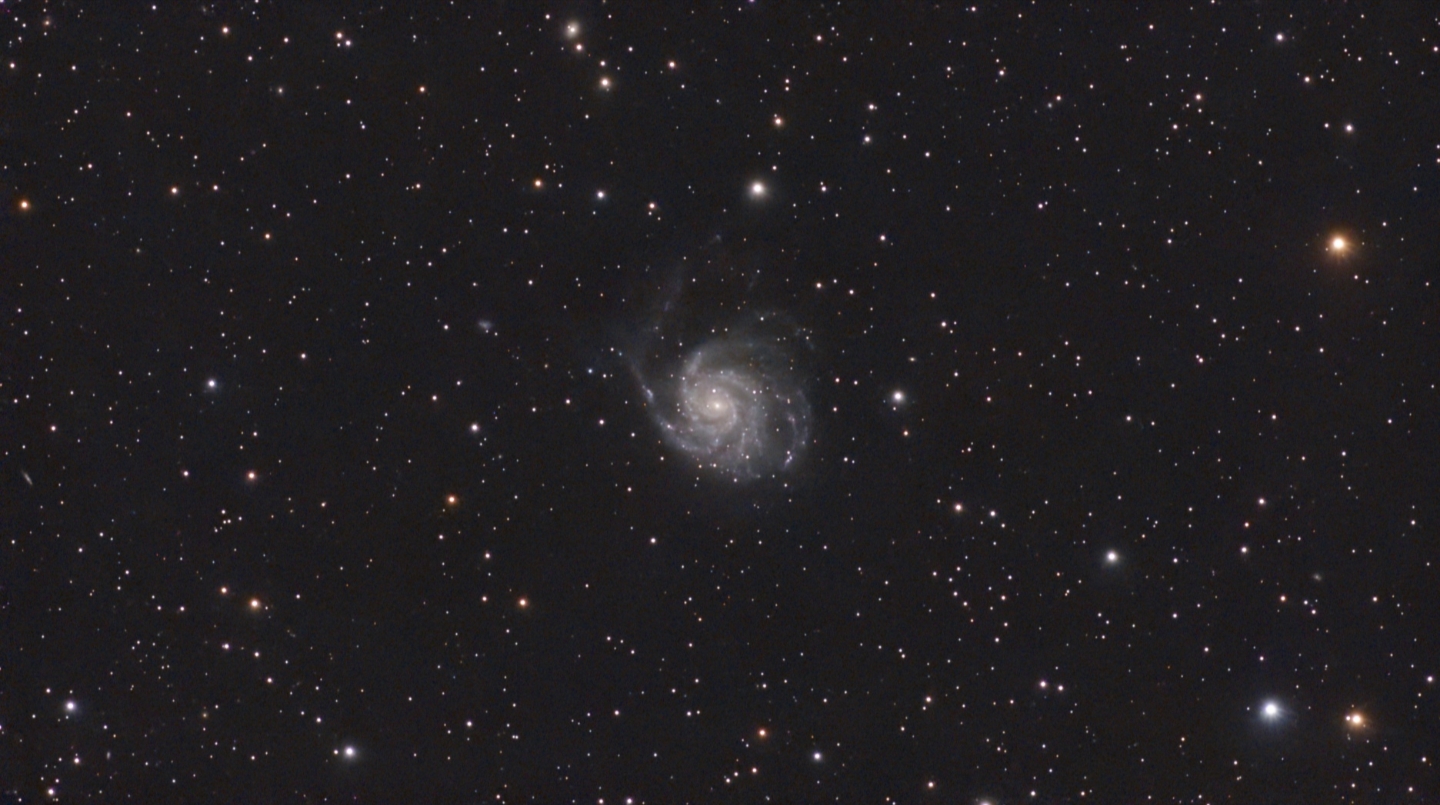
I ran all the final reveal photos features thus far through the deconvolution and denoising process. When you see the side by side below, you'll understand why. The comparison is night and day. While this mode is advertised as an optional feature, I'd say it's a mandatory step if you want to unlock the full potential of your imaging data. Luckily, I found this mode to be surprisingly fast, reliable, and easy to use. I look forward to seeing DWARFLab expand its cloud-based functionality, but as it stands, this new feature is already a hit!
Heads Up!
To use Stellar Studio, you’ll need to upload your stacked image to a cloud-based server, which requires a stable internet connection to properly upload and download the files. Unstable connections can lead to significant delays and processing errors (see STA mode for more information on connecting to your home Wi-Fi and DWARF Mini at the same time).
Milky Way, Mosaics, Star Trails, & More!
Thus far, the DWARF Mini has stood up to the hype and kept every promise made, but there's still so much to explore. Below we'll dive into the DWARF Mini's expanded capture modes, which unlock a range of creative avenues for both beginners and pros alike. Read on to learn whether DWARFLab was able to pack as much power into this pocket-sized smart device as they claim!
Milky Way & Widefield Mode
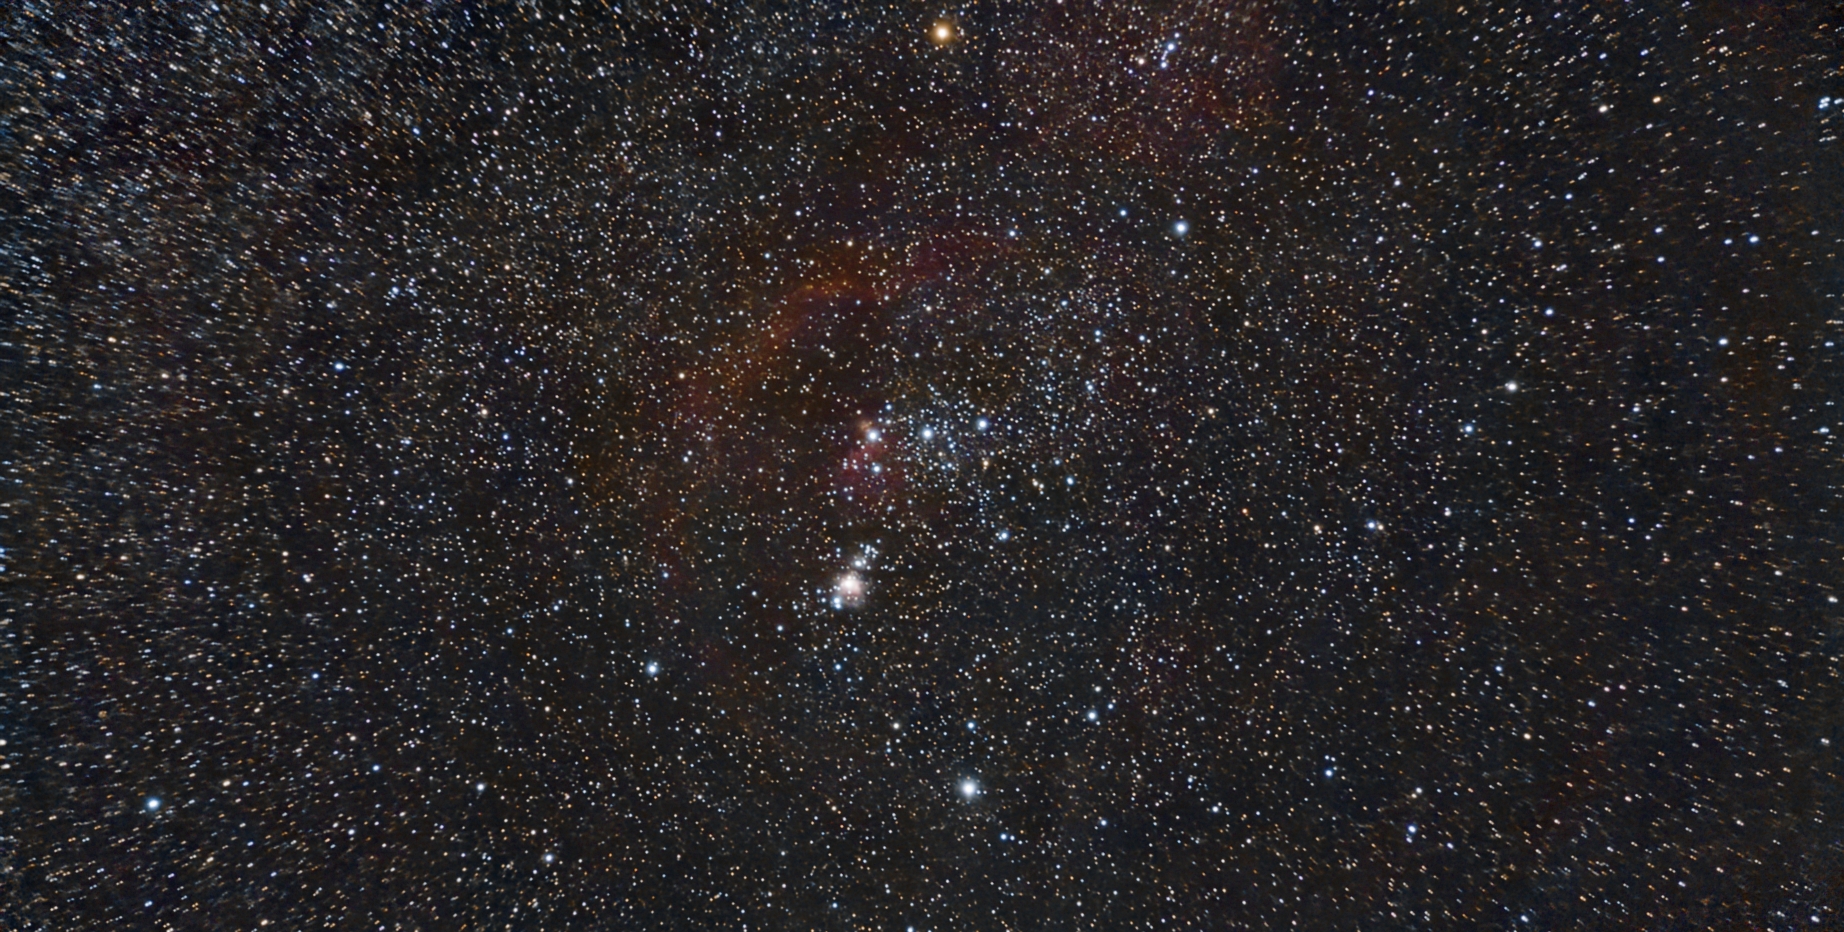
Thanks to the dual lens design, you can also capture stunning widefield images of the Milky Way and more with the DWARF Mini! I truly wasn't expecting much from this test, so I was blown away to discover how well it performed. I'm especially impressed with how much faint nebulosity surrounding the Orion Complex came through in the final stacked photo.
At the time of this test, it's too early in the season to get a shot of the Milky Way, but I'm excited to give it a go in the coming weeks. Be sure to check back in early April for an update on the Milky Way mode!
Mosaic Mode
So far, we've seen that the DWARF Mini is certainly capable of capturing some stunning photos, but you might still feel that the 2.1 MP sensor is a little limiting. This is completely understandable, especially for a device released in 2026. In practice, I didn't find myself missing those extra megapixels, especially after giving the new Mosaic mode a test! This is one of the features I was most excited to try out when I got my hands on the DWARF Mini. This automated imaging mode expands the final stacked photo up to 1.8x larger than the native size of the DWARF Mini's Sony IMX662 sensor, giving you the freedom to capture higher resolution photos with a wide framing. This mode works great for larger targets like M42. Check out my results below!
Lunar & Solar Modes
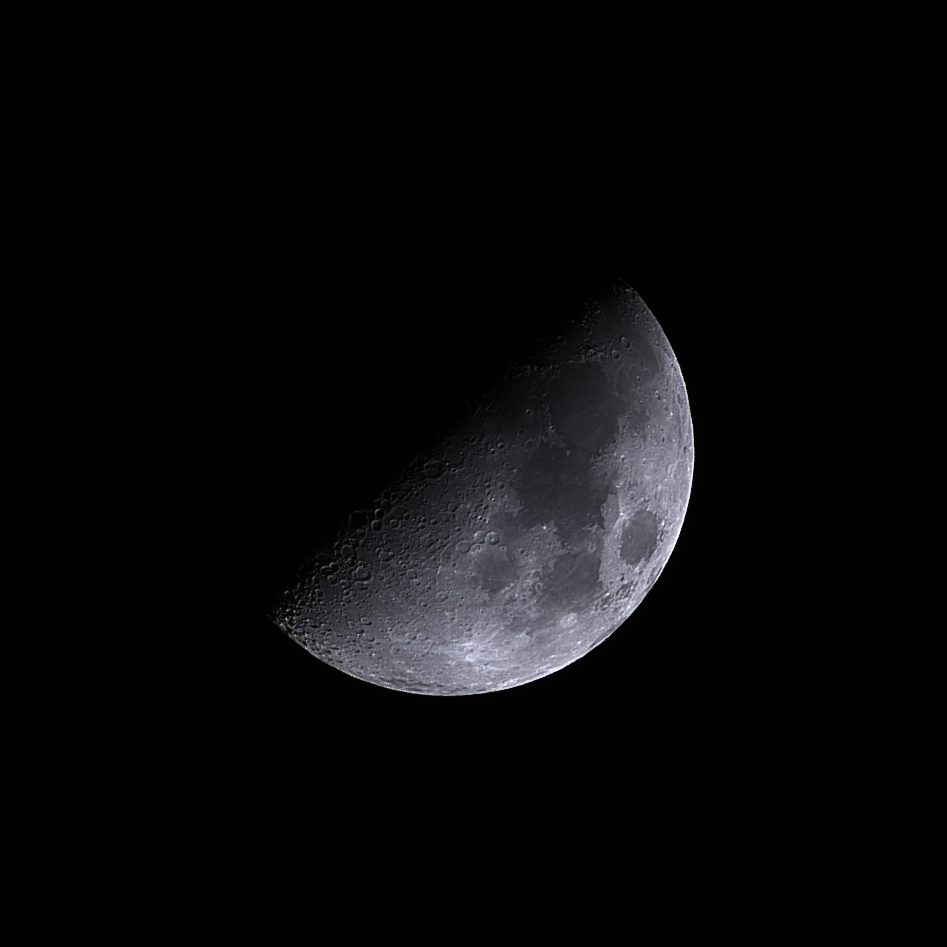
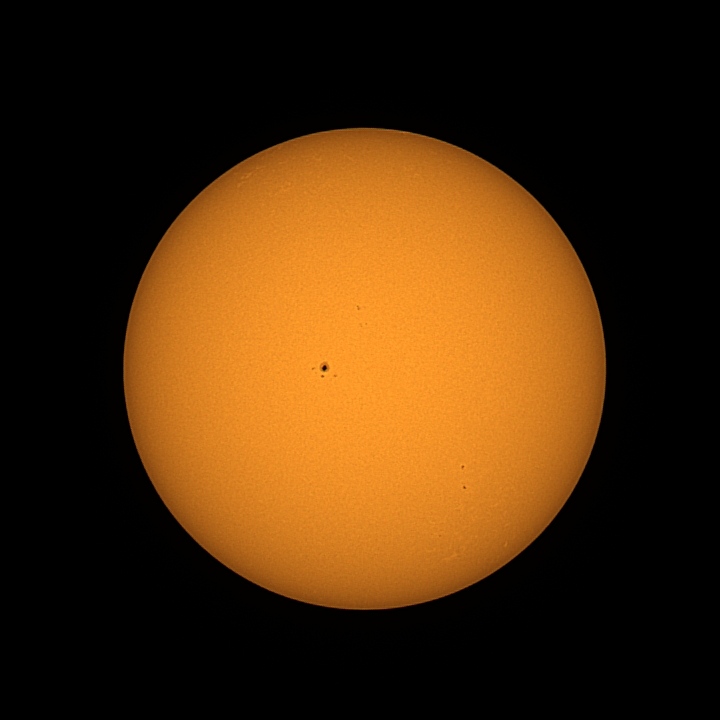
The DWARF Mini comes with a magnetic solar filter, so you can easily capture a photo, video, or timelapse of our Sun. You can also capture a beautiful photo of our Moon!
Timelapse & Star trails
One of my favorite imaging modes of the DWARF Mini is the new star trail mode! Having spent many nights out under the stars with a DSLR and an unintuitive intervalometer, I found this mode to be extremely rewarding for the effort required. The DWARF Mini does all the heavy lifting, and checking back to see the results felt like opening a Christmas present! Check out the comet-style timelapse I captured below!
Since the DWARF Mini has a built-in intervalometer, it allows you to capture a timelapse of daytime scenes, sunsets, and plenty more! However, without a customizable aperture, there are some limitations to kind of scenes you can capture.
Please note: the following demonstration is compressed, sped up, and converted to a GIF format to illustrate the star trail functionality. The in-app results are saved as a MP4 files with significantly higher quality and resolution.
Heads Up!
The DWARFLab app does not prompt you to capture dark frames before initiating a star trail session, and unlike with the tele camera, it doesn't come preloaded with a full set of dark frames. Due to this, some of my initial tests had a reverse vignetting effect that ruined the resulting video and photo. Fortunately, it was easy to resolve this issue by navigating to the device settings menu and capturing a set of wide field dark frames before starting a new session.
Double DWARF!
By teaming up with a fellow DWARF Mini user you’ll be able to collect more data in less time! This new social imaging mode is in the works, but in the meantime, you might be surprised to learn that you can control multiple DWARF devices from the same smartphone! You can easily swap between devices from the home menu of the app, and don't worry, your DWARF Mini or DWARF 3 will keep imaging after you disconnect!
Heads Up!
DWARFLab has not yet released the promised Team Up mode for the DWARF Mini. While we anticipate this feature will open opportunity for a social experience with other DWARF Mini users, we don't know much about how it will work. Check back soon for more updates on this exciting imaging mode!
Final Thoughts
After multiple nights out on the stars with the DWARF Mini, I'm blown away by this smart telescope. It's no stretch to say the DWARF Mini is the most exciting smart telescope I’ve used. This all-in-one system provides plenty of creative avenues to capture and share the night sky, and the streamlined planning mode is a great addition. Being able to schedule out a whole night of imaging gives me the chance to explore more of the night sky than ever before and waking up to a stunning photo of a distant galaxy or vibrant nebula truly adds some magic to my mornings. I especially appreciate the portable and compact form factor, which means I hardly sacrifice any valuable space when packing the DWARF Mini along on hikes or camping trips. I also have to mention how great it is to have access to a truly hands-free system. Handling everything from my smartphone just feels right, and seeing the capture progress live on my screen makes it easy to sit back and enjoy my time under the stars.
Whether you're a beginner looking to learn more about astrophotography before building your first imaging system, or a seasoned astrophotographer looking for a more portable and hassle-free imaging experience, the DWARF Mini will certainly leave you satisfied! Be sure to check back soon for more updates as DWARFLab continues to expand the ways you capture the cosmos with a smart telescope!

What We Love Most About the DWARF Mini:
- Unbelievably light weight and compact form factor
- Built-in dark filter and versatile dual lens design
- Multiple capture modes and a surprisingly powerful widefield sensor
- Streamlined session scheduling, and onboard restacking
"So far, fantastic!!"


"I am totally new to smart telescopes, but so far the results have been fantastic. I have a lot to learn, and the weather lately hasn't been the greatest, but I have gotten good results with the moon, a nebula, and several galaxies during marginal conditions."
FAQs
How does the DWARF Mini compare to the DWARF 3?
The DWARF Mini is an unbelievably lightweight and compact all-in-one astrophotography system. It features a dual lens refractor design, a built-in dark filter, and 2.1 MP sensor. The DWARF 3 has sightly larger build, a unique reflector style telephoto lens, and a 8.29 MP imaging sensor. Both smart telescopes offer streamlined ease of use, multiple capture modes, and a dual sensor design; however, the DWARF Mini is optimized for astrophotography performance.
Does the DWARF Mini have a tracking mode?
Unlike the DWARF 3, the DWARF Mini does not feature an auto object tracking mode that allows the user to select an object for the scope to follow.
How do I update my DWARF Mini?
One of the best parts of owning a smart telescope is the ability to be
updated with new and useful features. The DWARF Mini smart telescope can be
easily updated using the DWARF Labs app and a compatible smart device.
You'll first need to connect your DWARF Mini to your smart device, and then
navigate to the "my devices" tab from the settings menu. If your DWARF Mini
is properly connected, you'll find the option to "update firmware" near
the bottom of the menu. Once you click this option, the app will first
check for available updates, and if one is available, it will ask you to
confirm the update, and begin the installation process. Keep in mind,
you'll need to be connected to the internet via WiFi or with a cellular
data connection.
How do I connect my smart device to my DWARF Mini?
In order to operate the DWARF Mini smart telescope, you'll need to use the
DWARF Labs app and a compatible smart device. This will allow you to
control the smart scope. Begin by downloading the DWARF Labs app from your
app store. Once downloaded, power on your DWARF Mini and enable your
smart devices WiFi and Bluetooth. You'll find the option to "connect" on
the home screen of the app, press this and place your device near the
smart scope. After a few moments, you should see an option to connect to
the DWARF Mini appear on the screen, confirm that you are connecting to the
correct device and press "connect." If everything worked properly, you
should now be connected to the smart scope.
Can I charge my DWARF Mini during an imaging session?
Yes! The DWARF Mini comes with a standard USB-C cable that can be used to charge
the device, even while in use. You can also plug the cable into a laptop, portable
power bank, or cigarette lighter car charger with the correct power output.
Can I control more than one DWARF device from the same smart phone?
Yes! The DWARFLab app allows you to connect and disconnect from multiple devices. You can only connect to one at time. However, swapping between devices is quick and effortless. Since the DWARF Mini and DWARF 3 can operate independently without an active connection, swapping between devices won't disrupt your session. This gives you the freedom to control as many DWARF devices as you'd like and capture multiple targets at the same time!
Glossary
Alignment
In astronomy, alignment can be referring to two different concepts. The first is known as planetary alignment, which describes the apparent proximity of at least two planets, as observed from Earth. The second concept is the precise positioning of optics to allow light through and create the best possible image.
Altitude
In astronomy, altitude is the angular distance of a celestial object from a person's observable horizon. It is measured in degrees.
Altitude-Azimuth (Alt-azimuth, Alt-az) Mount
Commonly referred to as Alt-Az mounts, this type of mount rotates in two perpendicular axes: left/right and up/down. The altitude axis alters the elevation angle while the azimuth axis alters the compass bearing angle. The two of these combined allow for a pointing to any location in the sky. As opposed to equatorial mounts, these Alt-Az mounts don’t require alignment with the celestial pole, making it easy for beginners to utilize.
Aperture
Aperture is the diameter of a telescope's primary mirror or lens listed in millimeters or inches. The bigger the aperture of a telescope, the more light it will gather, allowing the observer to see more detail on celestial objects and ascertain finer details that a telescope of lesser aperture may not see.
Astronomy
Astronomy is the scientific study of space and the celestial objects within it. It also deals with the physical universe as a whole. Astronomy can be broken up into four subcategories: astrophysics, astrometry, astrogeology, and astrobiology. The study of astronomy has helped measure time, seasons, and navigation on Earth.
Astrophotography
This refers to photography of astronomical bodies and phenomena. Astrophotography is not new, for example the popular T threading still used today harkens from Tamron’s T-mount developed for their 35 mm cameras - however it has seen a notable increase in popularity with improvements in cameras, mounts, filters, and software making astrophotography much more accessible. This is not limited to celestial bodies such as nebulae, planets, or galaxies either, as solar imaging is now more within the reach of the average consumer than ever before.
Auto-Focus
Automatic focusing utilizes software to shift the focus of a telescope in and out to determine the precise focal point of the optics. It does this by reading the star size at each focus point, creating a graph of this data, then finds the minimum star size; bringing the optics into sharp focus.
Azimuth
Azimuth is the angle between an object in the night sky and North. This angle is measured clockwise around the horizon of the observer.
Bias Frame
Bias frames are to try and capture just the noise inherent to the camera sensor, so you take them at as fast an exposure time as possible. Whether or not the camera is connected would be irrelevant, as again we're just attempting to profile the camera at this point.
Blocking Filter
Blocking filters are used in dedicated solar telescopes to reject all remaining light outside of the H-alpha wavelength. This is necessary as etalons pass harmonics of the desired wavelength. Luckily however these harmonics are far enough apart that while the filter in a blocking filter has a relatively speaking large bandpass, compared to that of an etalon, it can block them while still providing a clear view of the H-alpha light.
Blood Moon
A Blood Moon is another name for a total lunar eclipse. Due to the phenomenon where the Moon appears to be a shade of red as the shadow of the Earth covers the Moon.
Bluetooth
Bluetooth devices contain certain hardware that allows transmission of data via an antenna. The discoverable device sends out signals that are then detected by the receiving device, and their connection allows a transfer of information. This association between devices is called a piconet, where short radio waves are communicated back and forth.
Bortle Scale
The Bortle scale measures how light polluted a particular area is, and classifies the level of brightness from 1 to 9, with 9 being the brightest. This scale is incredibly helpful for astronomers, as the darker the sky, the more celestial objects are able to be discerned.
Calibration Frames
Calibration frames are types of images that are applied to light frames to remove unwanted artifacts caused by a number of different factors. Dark frames are images taken at the same temperature as the light frames, and are necessary to remove hot pixels or other fixed noise for a cleaner image. Bias frames are similar in this aspect, though their purpose is to reduce the sensor’s readout noise seen within the light frames. Another type of calibration frame are flat frames, which remove dust motes or unwanted gradients for a uniform, even field.
Chromatic Aberration
Different wavelengths of light travel at different speeds based on the medium it occupies. When white light is exposed to glass such in a telescope or lens, blue light, red light, and green light slow at varying rates. This change of speed causes each wavelength to focus at different points along the focal plane, resulting in color fringing seen within the images taken.
Computerized Mount
A telescope mount controlled by motors and software that can be used to automatically locate and track celestial targets. Typically operated with a hand controller (though sometimes remotely or via a personal computer), users can either enter coordinates or simply select the star, planet, or other object of their choice. Computerized mounts can either be alt-azimuth or equatorial and are especially useful in areas where light pollution may hinder your ability to see stars.
Contrast
Contrast, in the context of astronomy, describes the difference in brightness between the celestial object(s) and the background of the sky.
Deep Sky Object
A deep sky object is a faint celestial object that exists beyond our solar system. Deep sky objects are primarily nebulae, star clusters, and galaxies. This categorization does not include individual stars.
DSLR / Mirrorless Camera
What one may consider a “regular” camera; used for everyday photography and feature an interchangeable (removable) lens system. Popular brands from this category that also enjoy wide support in the astrophotography hobby are Sony, Canon, and Nikon.
Eclipse
An eclipse is when one celestial body blocks the light that comes from another celestial body. This causes a shadow to fall on a third celestial body. From Earth, people can observe both solar and lunar eclipses. These phenomena happen when the Sun, Earth, and Moon align in different orientations.
Equatorial Mount
An equatorial mount is an astronomy instrument that features two axes of rotation: right ascension (RA) and declination (DEC). Equatorial mounts also feature an additional axis, called the polar axis, that these RA and DEC axes rotate about. This polar axis is to be lined up with Earth’s celestial pole to accurately counteract Earth’s rotation. These mounts are ideal for astrophotography applications, as the addition of a polar axis eliminates the issue of field rotation within captured images.
Exposure Time
Exposure time is the amount of time the camera sensor is allowed to collect light. In general, the longer the exposure time, the more light collected, and the brighter the image will become. This should be selected with caution though, as an exposure time that's too long can oversaturate the pixels and blow out the image, resulting in a loss of signal. Determining the correct exposure time is highly dependent on the aperture of the optics as well as the gain settings used. A larger aperture will produce a brighter image than that of a smaller aperture with the same exposure time. In a similar fashion, an image with a higher gain setting will be brighter than a lower gain setting image with equal exposure time. Finding the perfect balance between the aperture, gain, and exposure time will maximize image quality.
Field of View (FOV)
In simple terms, your field of view is the amount of sky that is witnessed by your telescope/camera combination, or telescope/eyepiece combination. This measurement is calculated in angular degrees. To calculate how much of the sky you can image with your astrophotography rig, take the width of your camera chip, multiply it by 57.3, then divide that product by the focal length of your optics. If you want to determine how much of the sky you can view through your eyepiece, take the apparent field of view of your eyepiece (provided by the manufacturer), then divide it by the quotient of your telescope’s focal length & the focal length of your eyepiece.
Filter
A filter is an accessory that is inserted within the imaging train. These accessories allow only select wavelengths through to the camera sensor. For instance, a blue filter will only allow the camera sensor to collect blue light, while all other light is blocked out. There are a wide variety of filters, from light pollution filters to narrowband filters. The combination of data from filters is a great way to create images that highlight certain wavelengths from celestial objects.
Focal Length
The focal length is the distance, usually measured in millimeters, between the primary mirror or lens and the point at which the image comes to focus. Generally, classic refractors have a longer focal length, Newtonian reflectors tend to have a focal length that is shorter, and Schmidt-Cassegrains fall somewhere in the middle.
Focal Ratio
The focal ratio is calculated by dividing the aperture (mm) of the primary mirror or lens into the focal length. Example: 2,500 mm divided by 254 mm (10") equals an f/ratio of 9.84, which is usually rounded off, in this case to f/10. The focal ratio signifies how quickly a telescope gathers light and tells us something about the telescope's field of view, how long exposures will take during astrophotography sessions, and how much magnification the eyepiece will produce for that telescope.
Galaxy
Galaxies are massive collections of various celestial objects, and structures, that share a common orbital path around a galactic nucleus. The three types of galaxies are spiral, elliptical, and irregular.
Latitude
Latitude is one of two coordinates used to find a position on a globe. Lower latitudes are closer to the equator, while higher latitudes are closer to the poles.
Milky Way
The Milky Way is the name of the galaxy that hosts our solar system. Named for its bright milky appearance in the night sky, the Milky Way is home to countless stars, nebulae, and a even a few supermassive black holes. It estimated to be over 13 billion years old, and it would take over 100,000 light years to travel from one side to the other.
Moon
A moon is a naturally occurring object that orbits a planet or other celestial bodies (excluding stars). These are also called natural satellites. The Moon, capitalized is the Earth's only natural satellite and is the brightest object in the night sky. The Moon stabilizes the tilt Earth's orbit, causing the seasons, and tides.
Nebula
A nebula is a type of celestial body that is made up of gas and/or dust. There are 3 different types of nebulae within space. Emission nebulae have a “glowing” effect, where they absorb and emit light from surrounding stars. The colors emitted are entirely dependent on the gasses present within the nebulae itself. This type of nebula also includes planetary nebula and supernova remnants, produced by stars themselves. As opposed to emitting light itself, reflection nebulae reflect starlight from neighboring stars. Reflection nebulae are typically blue in color, such as the Pleiades or the Running Man Nebula. The last type of nebulae is dark nebulae, which blocks stars and other objects from our view, creating a dark silhouette.
Optics
In basic terms, this refers to the system that “collects” and focuses incoming light down to a smaller, brighter, magnified image that is then viewed through an eyepiece or captured by a camera. There are different ways to accomplish this, most commonly with glass elements (refractor) or with systems of mirrors (reflector). Each approach comes with its own set of tradeoffs, whether that be chromatic aberration, coma, etc. which can sometimes be mitigated with upgraded optical components (ED glass) or additional corrective components (like coma correctors). Numbers of standard optical designs have emerged as well, such as doublets, triplets, Petvals, Newtonians, SCTs, RCs, and more.
Polar Alignment
Polar alignment is the process of aligning a telescope mount’s polar axis with the Earth’s axis of rotation. By having these two axes parallel to one another, precise counteraction of the Earth’s rotation can then be achieved. While a typical process of equatorial mounts that have three inherent axes of rotation, a similar effect can also be achieved by utilizing an equatorial wedge with two-axis alt-azimuth mounts.
Seeing Conditions
This term refers to the overall clarity of the night sky at any given time and within any given location. This clarity fluctuates constantly, as it is based on numerous different atmospheric conditions, such as humidity, turbulence, high clouds, heat, and plenty more. To give an example, you may have witnessed stars in the night sky “twinkle.” This is due to our atmosphere distorting their incoming light, causing a twinkling effect. When it comes to astronomy, especially when observing the planets and the Moon, seeing conditions are very important to consider, as these distortions can cause the subjects to become blurred and unfocused. It’s best practice to observe celestial objects when the atmosphere is most stable.
Stacking
A method used to bring out what would otherwise be faint or invisible detail and contrast in an astrophotography image. When imaging a target, the longer an exposure is, generally the more faint detail will become visible. However as exposure time becomes longer several complications emerge - motion blur due to compounding small deviations or errors in tracking, increased sensor noise and glow, and overexposure of the bright areas of an image. Stacking mitigates these issues by combining a number of shorter exposure images, commonly called sub exposures, sub frames, or simply “subs”, into one image that effectively has a longer exposure time. The stacking process can further improve the resulting image with the use of calibration frames that help identify and compensate for visual artifacts introduced by the optics or sensor itself.
Star
A star is a luminous sphere of plasma held together by the collective gravitational attraction of hydrogen and helium atoms. Stars also contain various trace elements, such as lithium, carbon, and towards the end of there life cycle, iron. Stars come in many temperatures, colors, and sizes. High mass stars like Betelgeuse appear to shine red from our perspective because our eyes are only sensitive to a small portion of the electromagnetic spectrum. To see the true luminosity of Betelgeuse, you need specialized equipment designed to capture the appropriate wavelength of light.
Sun
Our Sun is the star the planets in our solar system orbit around. Like other stars, our Sun is a luminous sphere of plasma held together by the collective gravitational attraction of hydrogen and helium atoms.
Tracking
As the Earth is continuously spinning and in motion, the location of a celestial object in the sky moves over the course of a night. This becomes apparent during observation as a target moves out of view, and particularly observable in images as stars and objects quickly become a blur as exposure time and focal length increases. To compensate for this, computerized mounts and smart telescopes employ tracking techniques to keep the target centered in the optics. Depending on the motion style of the mount, the resulting image can vary. Alt-Az motion, popular in smart telescopes, keeps the object centered but can not compensate for its “spin” without what is known as a wedge. Accordingly these images lose information on the edges of the frame as they rotate out of view, leading to ever smaller, circular, images as time spent imaging increases.
Tripod
A tripod is a tool that consists of three legs, of varying thickness and materials, and is used to support cameras, telescope mounts, and other equipment through (most often) a threaded connection. It acts as a stand to increase height and stability.
USB
Universal Serial Bus or USB is a protocol for data transmission, and is by far and away the most common way astronomy equipment will communicate with a PC in a wired capacity. There are a number of USB connectors, such as USB-A (the rectangular port you’re likely familiar with), USB-B, USB-C, and micro USB; as well as a number of different revisions (2.0, 3.0, 3.1, etc.) that have brought more speed, power, and reliability to the protocol.
WiFi (Wi-Fi)
Wi-Fi, sometimes shortened to just WiFi or wifi, is a protocol for wireless communication. Primarily it is used to transmit and receive data between a device (such as a smartphone, computer, smart TV, and an ever increasing number of other household devices) and a router or wireless access point that is connected to the internet. Communication with the internet is not the only function the Wi-Fi protocol is useful for, and indeed many of the aforementioned devices can communicate with each other locally using this protocol and the router as an intermediary. Increasingly this protocol has been used for more direct communication between two devices (like a smartphone and a smart telescope), with one creating its own access point or broadcast that both devices then send and receive data on. While this does have the disadvantage of disconnecting a device’s connection to the internet, it has become necessary to transfer large amounts of data quickly that otherwise exceed what Bluetooth can accommodate.

Click the arrow above to see MLA, APA, and Chicago Manual of Style citations.
MLA:
Burchett, Daniel. "DWARF Mini Smart Telescope: Full Review" AstronomyHub, High Point Scientific, 19 Mar. 2026, https://www.highpointscientific.com/astronomy-hub/post/dwarf-mini-smart-telescope-full-review.
APA:
Burchett, D. (2026, March 19). Dwarf mini smart telescope: full review. High Point Scientific. https://www.highpointscientific.com/astronomy-hub/post/dwarf-mini-smart-telescope-full-review
Chicago Manual of Style:
Bibliography:
Burchett, Daniel. "DWARF Mini Smart Telescope: Full Review" AstronomyHub (blog). High Point Scientific, March 19, 2026. https://www.highpointscientific.com/astronomy-hub/post/dwarf-mini-smart-telescope-full-review.
Footnote:
Daniel Burchett, "DWARF Mini Smart Telescope: Full Review," AstronomyHub, High Point Scientific, March 19, 2026, https://www.highpointscientific.com/astronomy-hub/post/dwarf-mini-smart-telescope-full-review.