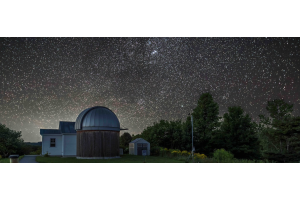
Have you ever looked at your astrophotos and wondered why they don’t look as good as the images you see online? Most of us have made that comparison at some point. When I first started astrophotography in 2015 in my backyard of Ohio, I had no idea what made a great astrophoto, and I didn't pay any attention to the fundamentals, like calibration frames or exposure time. I was just excited to be outside under the night sky, capturing what I could. After 10 years of trial and error, I've come to realize just how important those fundamentals really are. In the video below and the supplemental article I have put together, I take you through my process, step by step, so you can improve your astrophotography, no matter the gear you're using!
TL;DR: To improve your astrophotos, start with the fundamentals: plan your target, capture more high-quality data, use calibration frames, keep your stars sharp, and process with intention. From there, filters, darker skies, stray light control, longer exposures, and a repeatable setup can help bring out more detail, color, and clarity in your final image.
Planning Your Shot
The first section of this framework is planning. Planning a shot can feel overwhelming because there are so many nuances to consider. The goal is to make this process simple so you’re set up for success from the very start. I’ve broken down the planning process into a checklist below, which covers picking out suitable applications/online resources and how you’ll use them to choose your ideal target.
Finding a Suitable Target
What planetarium application should I use?
- Stellarium: This is the software I would personally recommend. It’s widely used and gives users a huge amount of options to play with. There is a desktop and mobile version with augmented reality that really helps with planning out a shot at your exact location.
- Sky Guide:This app is generally considered to be very user friendly with easy to navigate UI. While not as robust as Stellarium, some may find the simplicity appealing.
- SkySafari8: This is a complex and robust option. It includes telescope control and a massive database of objects. It is important to note that it may be overwhelming for some beginners.
What should I consider when finding suitable targets?
- A suitable target should be available high in the sky for an extended period of time. This ensures you are able to get collect ample data for the stacking process.
- A suitable target should be away from obstructions like trees. A target is no good if it passes through a tree or a neighbors roof halfway through the night. Keep in mind some obstructions can move, so plan accordingly!
- A suitable target should be away from the Moon and other sources of light pollution. Light pollution will wash out contrast and finer detail in your images. It can also cause massive gradients that can sometimes be uncorrectable when processing.
- A suitable target should be a good fit for your equipment’s focal length. Using a 3,000 mm telescope to capture the entirety of the Andromeda Galaxy isn’t going to work. We need to be aware of our field of view and what will fit nicely inside that frame.
Considering the Weather
Where can I find if I have clear skies?
- Astrospheric: I recommend using Astrospheric because it gives a comprehensive view of weather related conditions such as clouds, wind, and rain as well as transparency and seeing. The options are easy to navigate and changes are shown in real time.
- Clear Outside: This is another great option for looking at sky conditions, but purely in chart form. It breaks down vital information into different rows/columns and color codes it to quickly show problem areas.
- Clear Sky Chart: This gives a nice “at a glance” view of important information all in a single, condensed chart. This is also color coded, but it gives less information than an option like Clear Outside.
What weather and sky conditions should I look for?
- Low to no cloud cover is essential. If we can’t see our object, then we can’t image it. Sometimes we can get lucky and image between clouds even if it is partly cloudy, but that luck rarely lasts. Finding a nice clear night is preferred.
- Good seeing can be affected by winds high in the atmosphere, heat from ground objects like shingles on a hot roof, and general wind creating “bumpy” air. Good seeing is absolutely critical for planetary and lunar astrophotography.
- Good transparency can be affected by wildfire smoke, dust/dirt from high winds, humidity levels, and more. Good transparency is critical when capturing dim deep sky objects.
Gathering the Data
Now that you’ve found the perfect target and hopefully have a clear night, you are ready to capture your target using the information from the planning section. Take some time to consider each of the below points and ensure you’re hitting on as many of these as possible:
How Important is the Composition of My Subject?
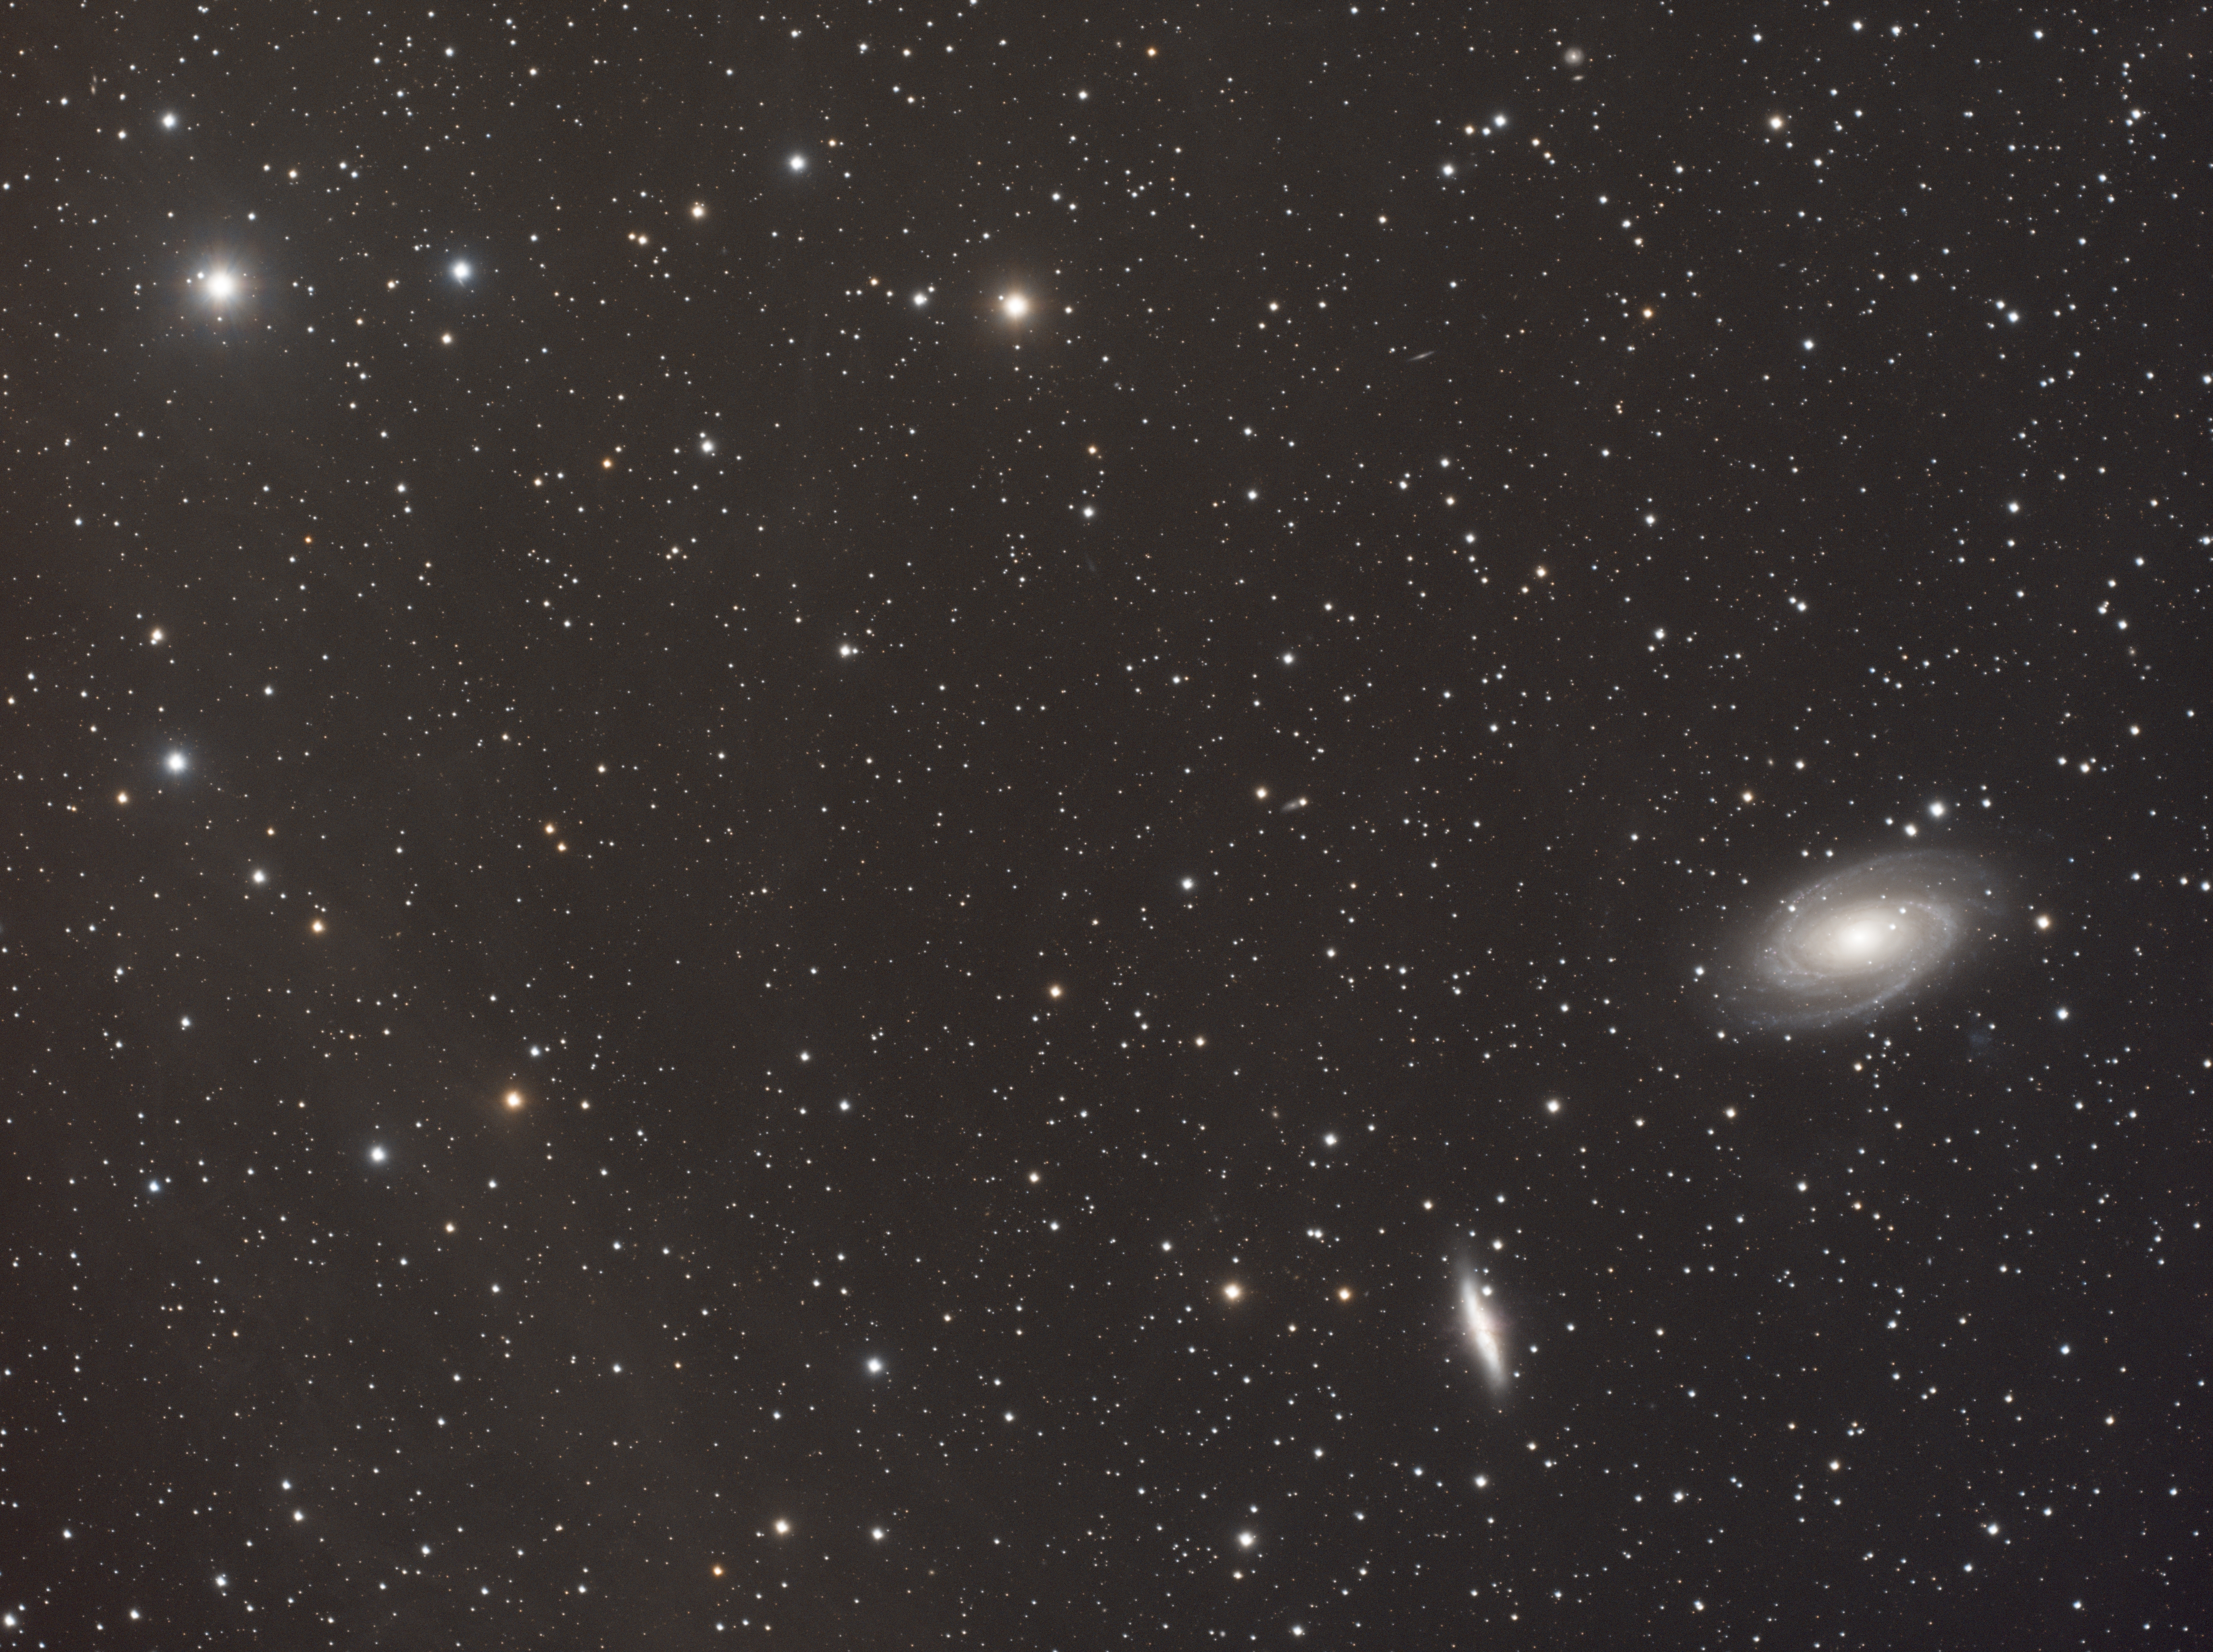
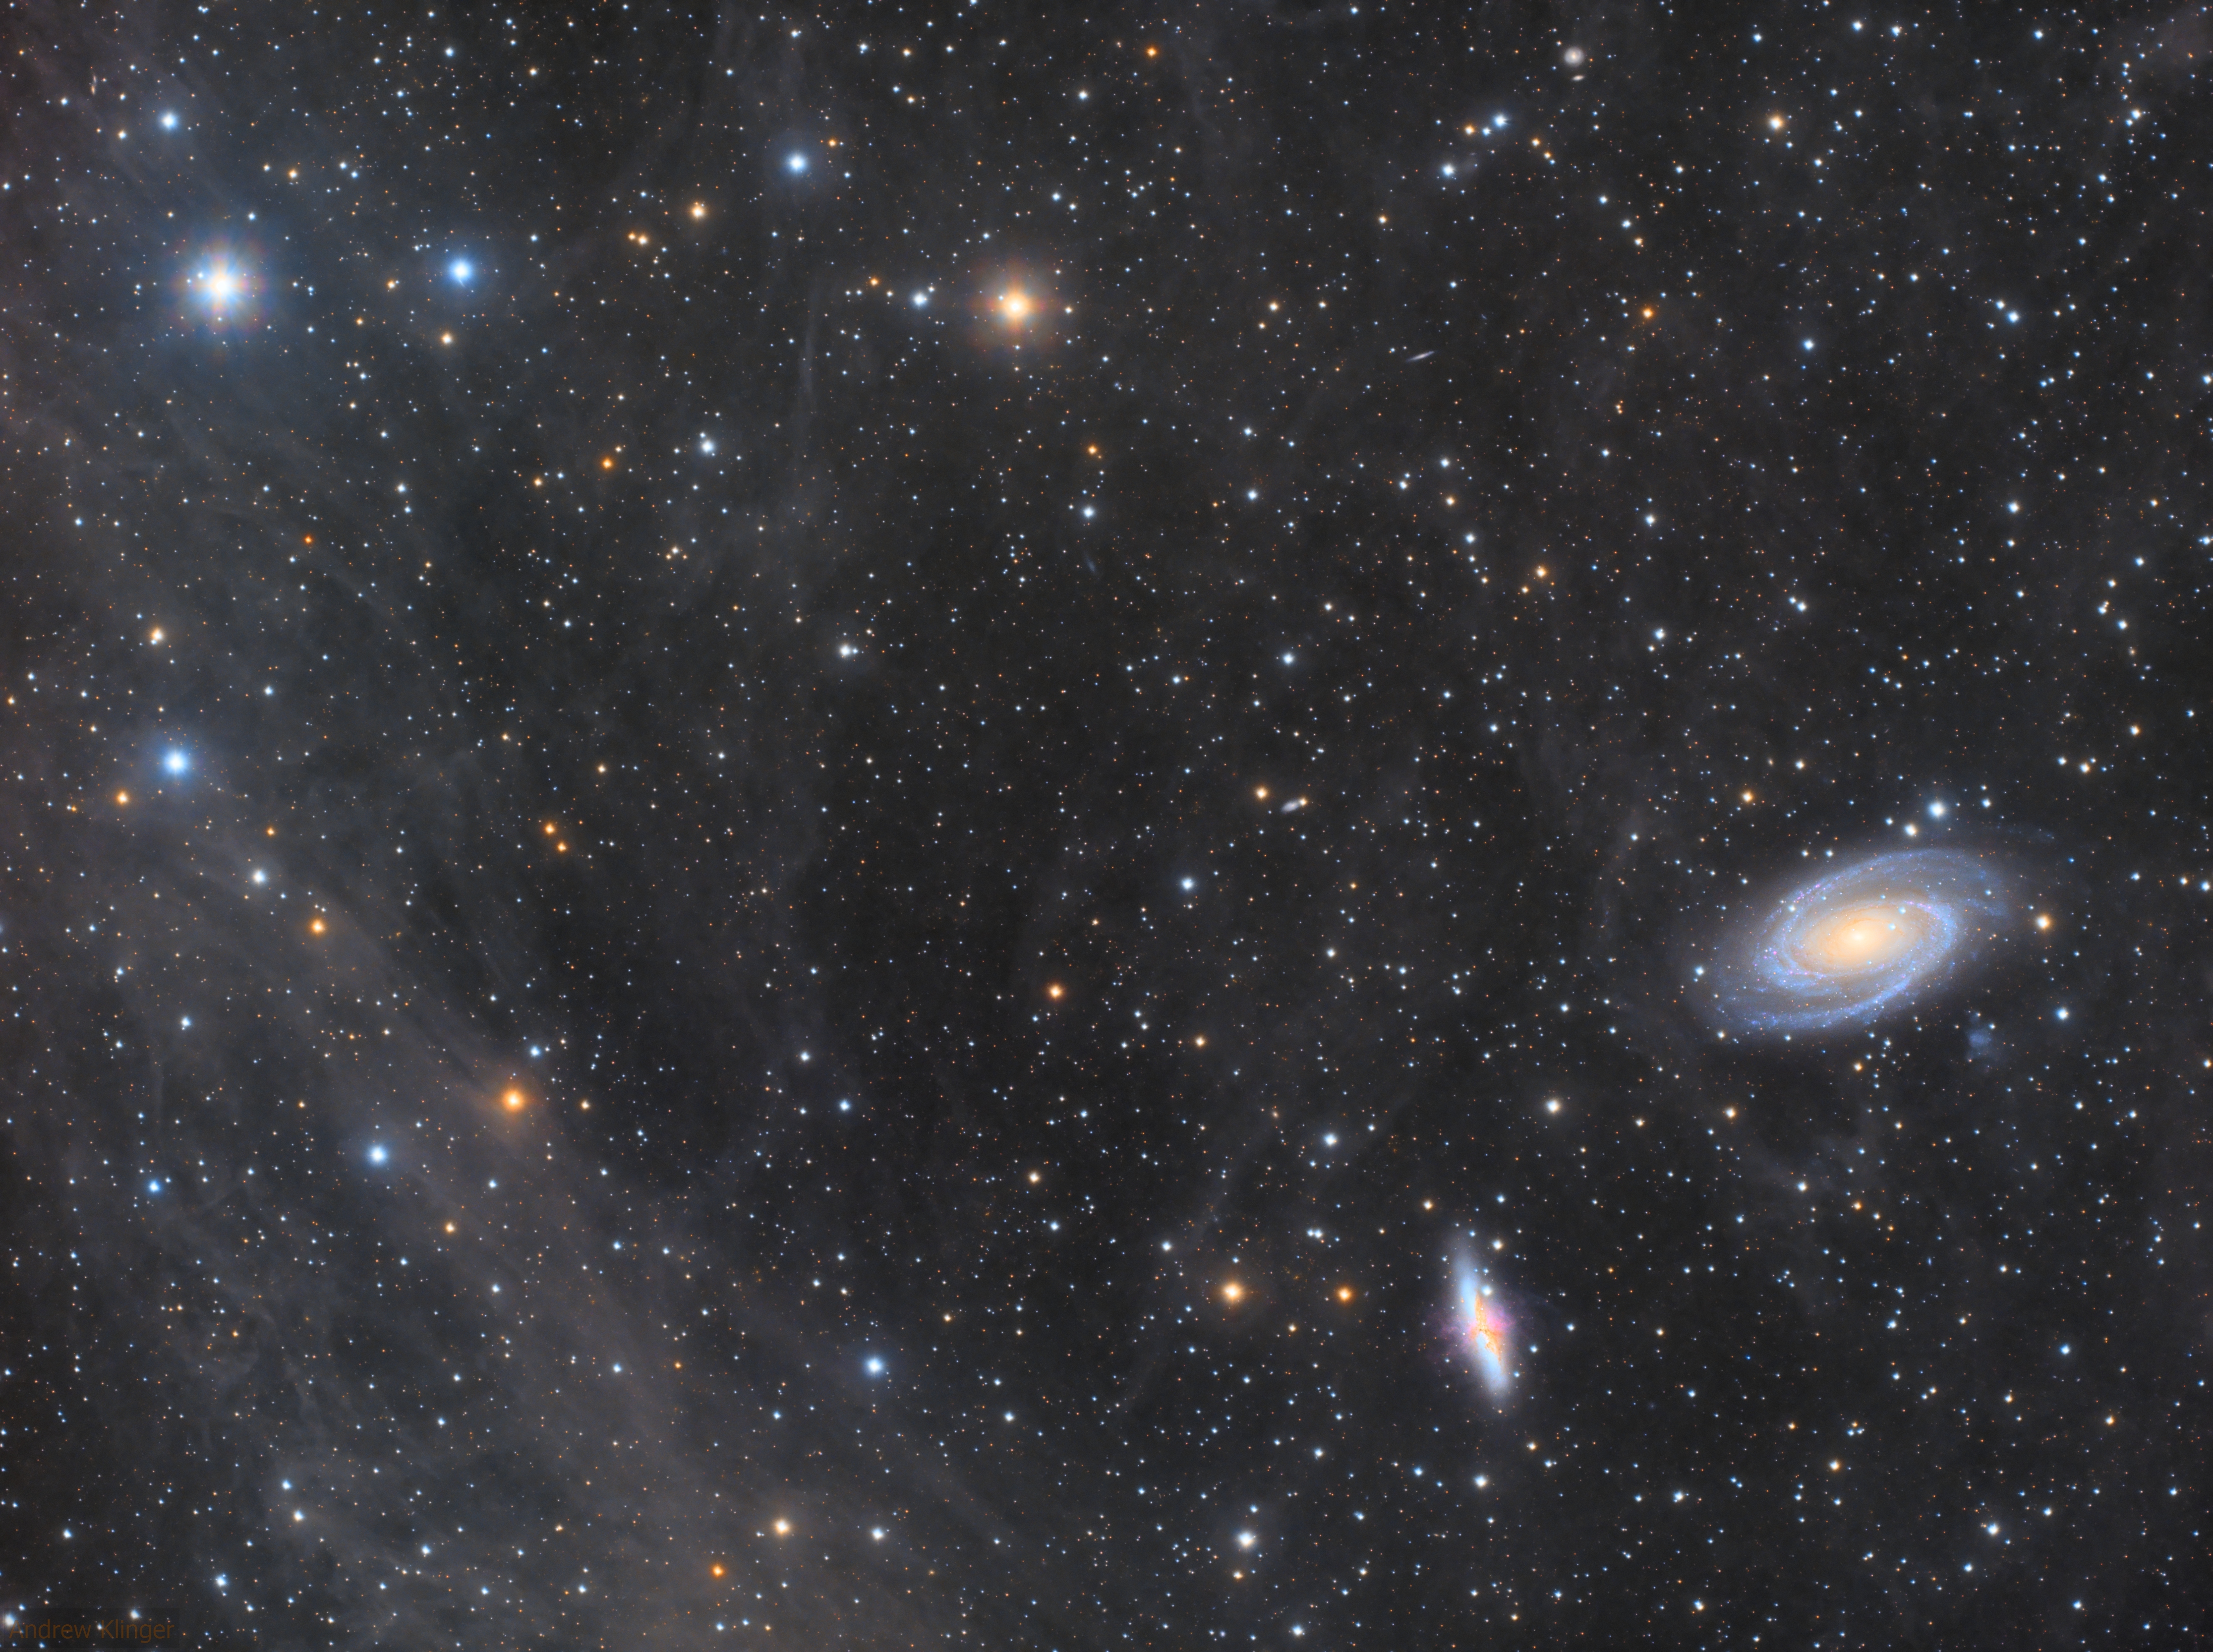
- An attractive composition is technically subjective, but you also don’t want your main subject to be tucked away in a corner or upside down in your frame. Use your best judgement. You don’t want to be someone who frames the Andromeda Galaxy like the first example below.
How Does Exposure Affect Noise and Detail?
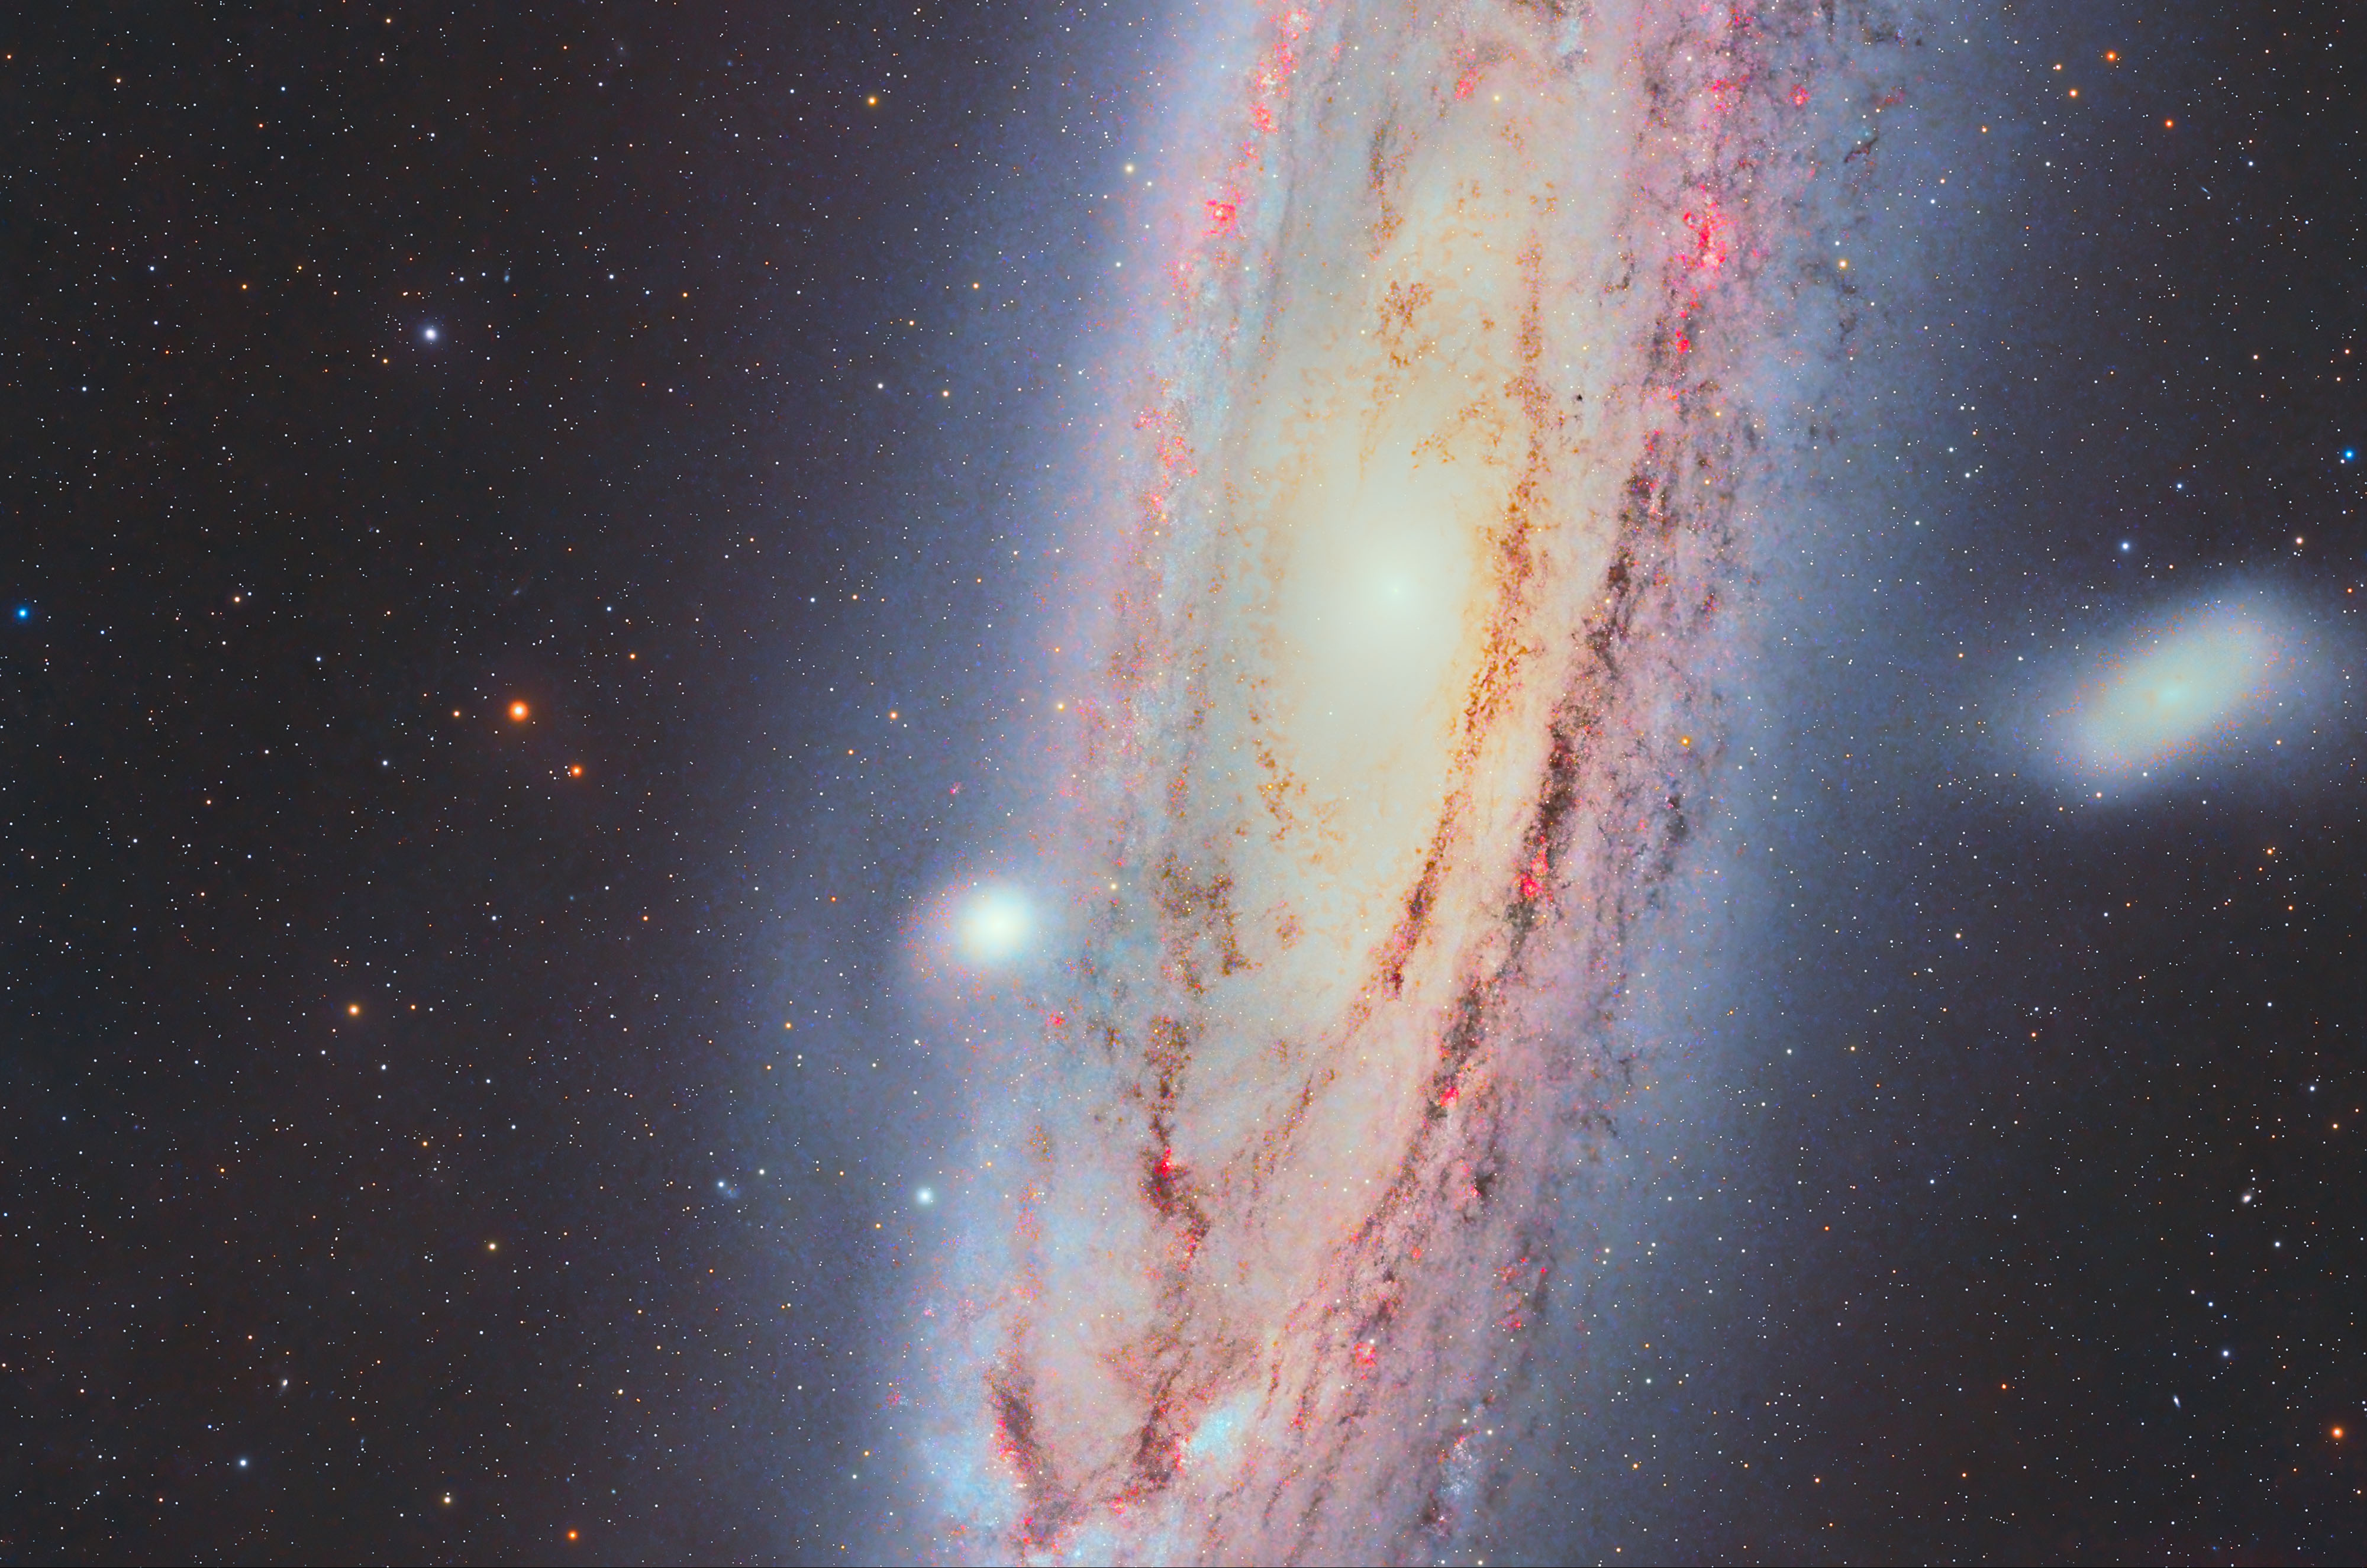
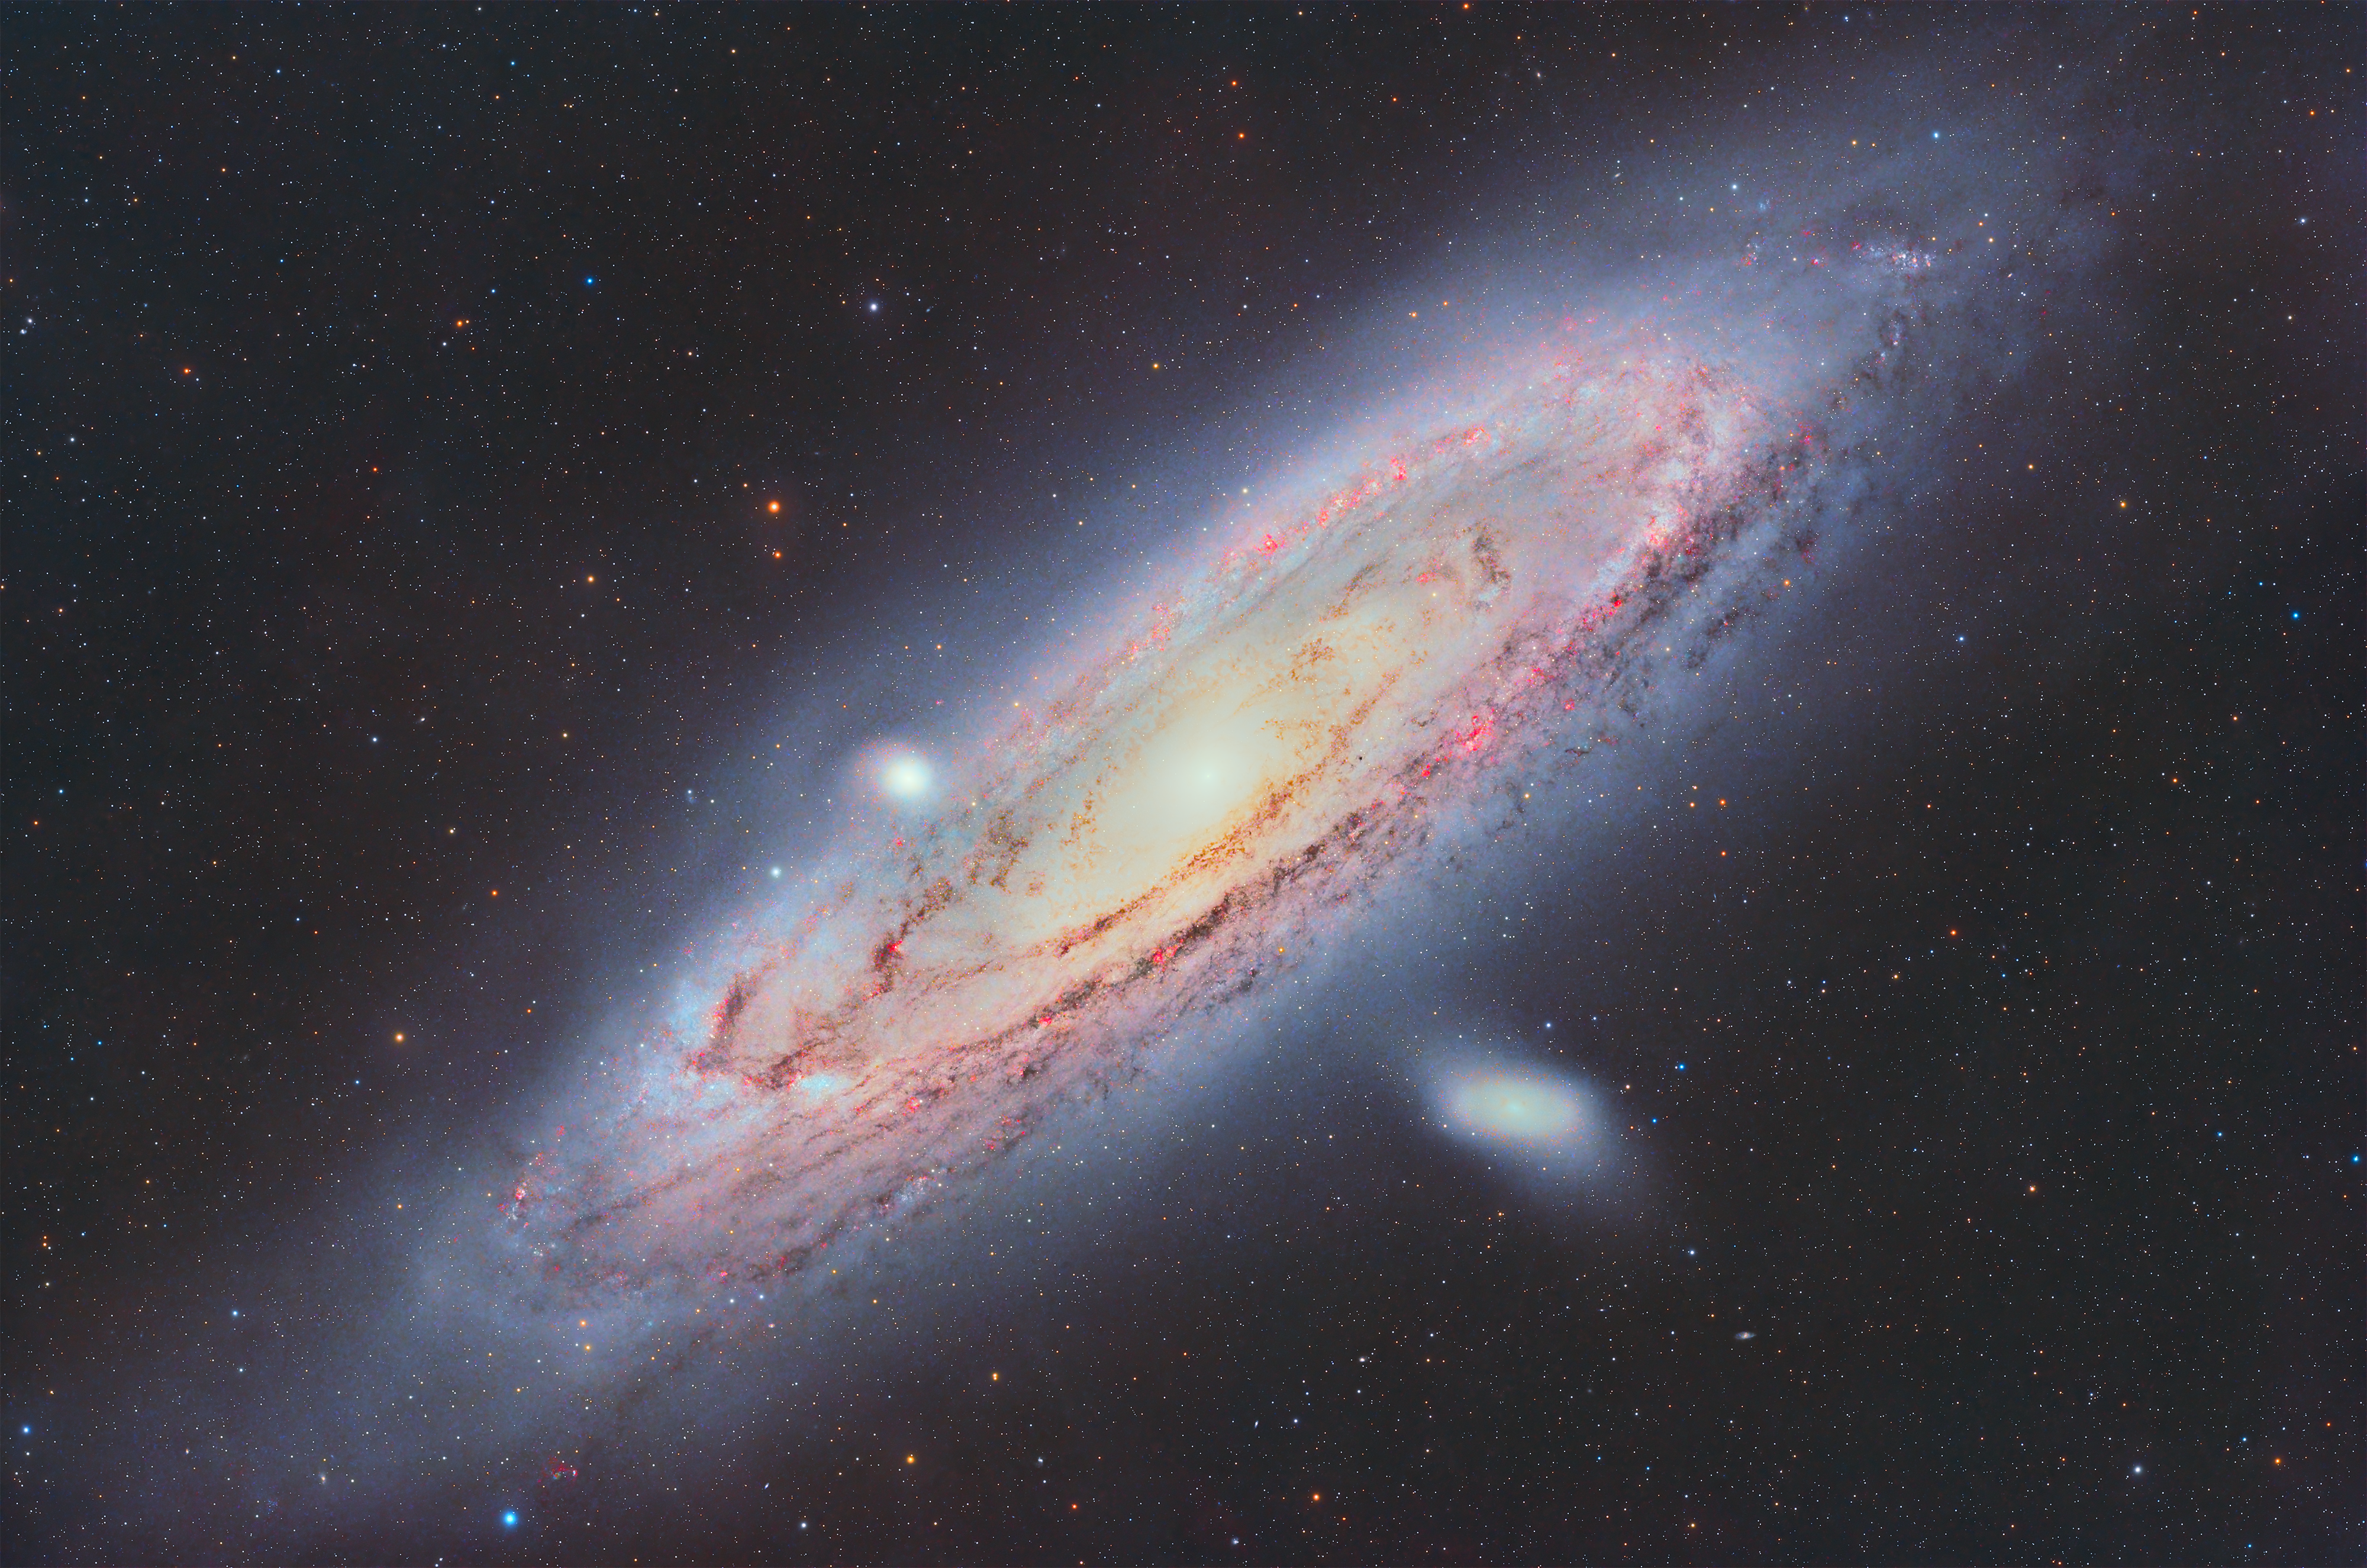
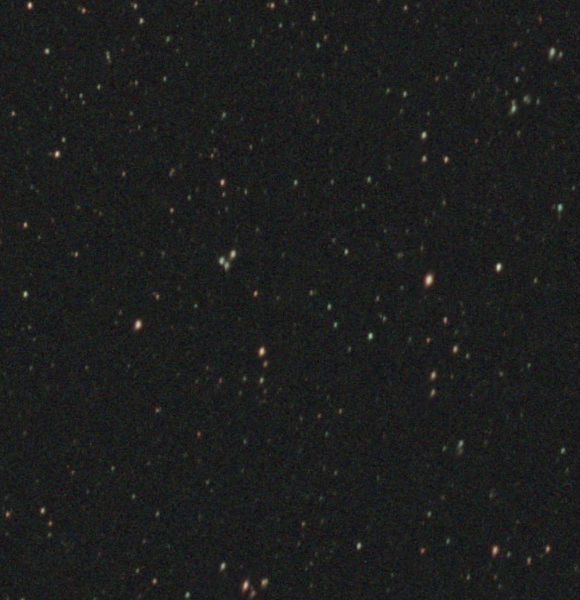
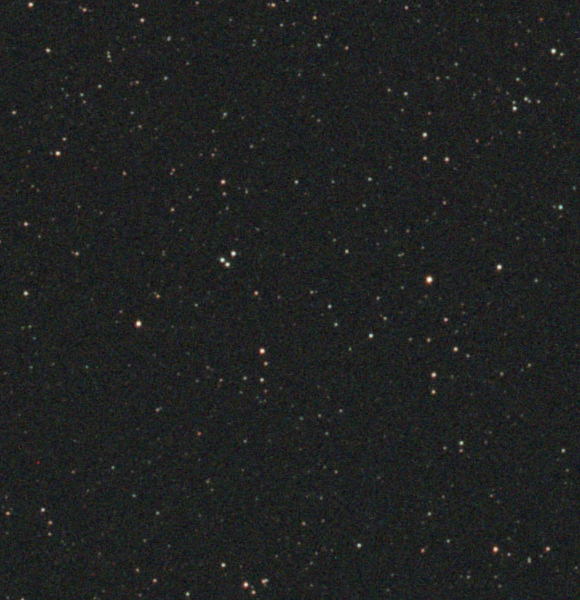
- Low noise and high detail come from the bedrock of a good astrophoto; you need heaps of exposure time. There is no substitute for lots of exposure time. It is probably the most important factor that goes into creating a stellar final image. This will create depth, clean up that annoying noise, and provide plenty of detail. For example, here is what 25 hours of exposure under Bortle 1 skies does for an astrophoto.
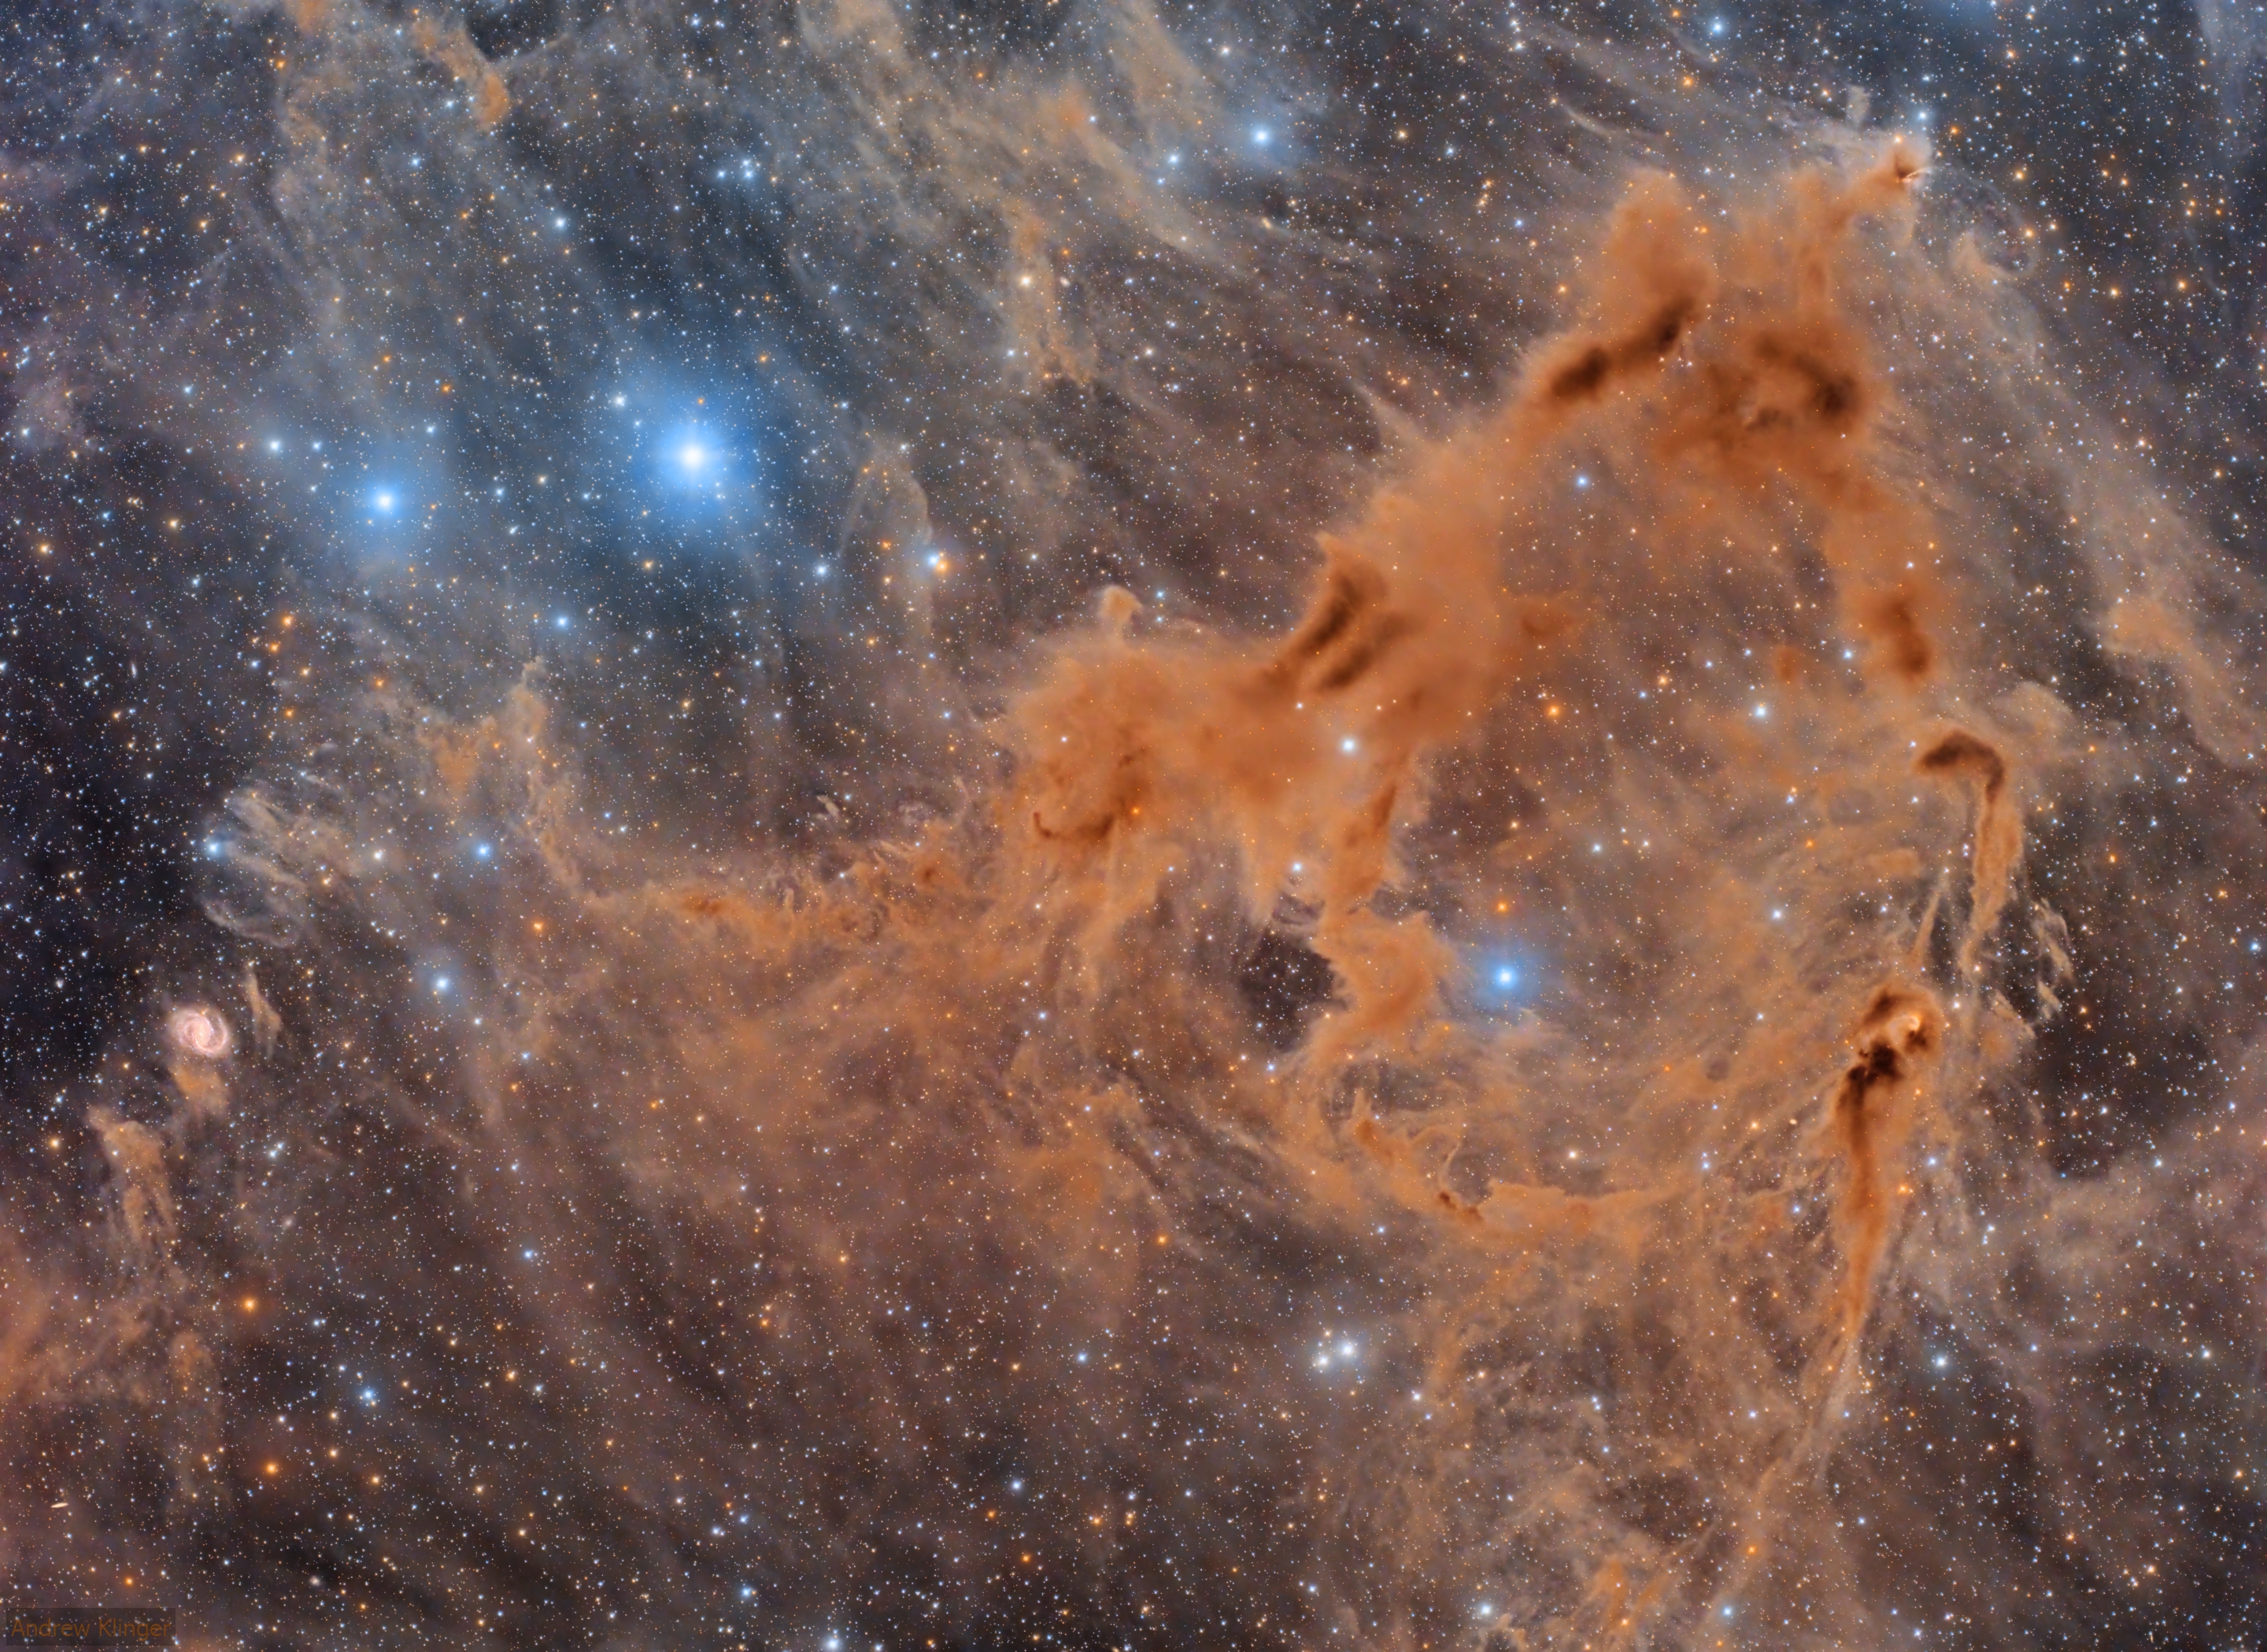
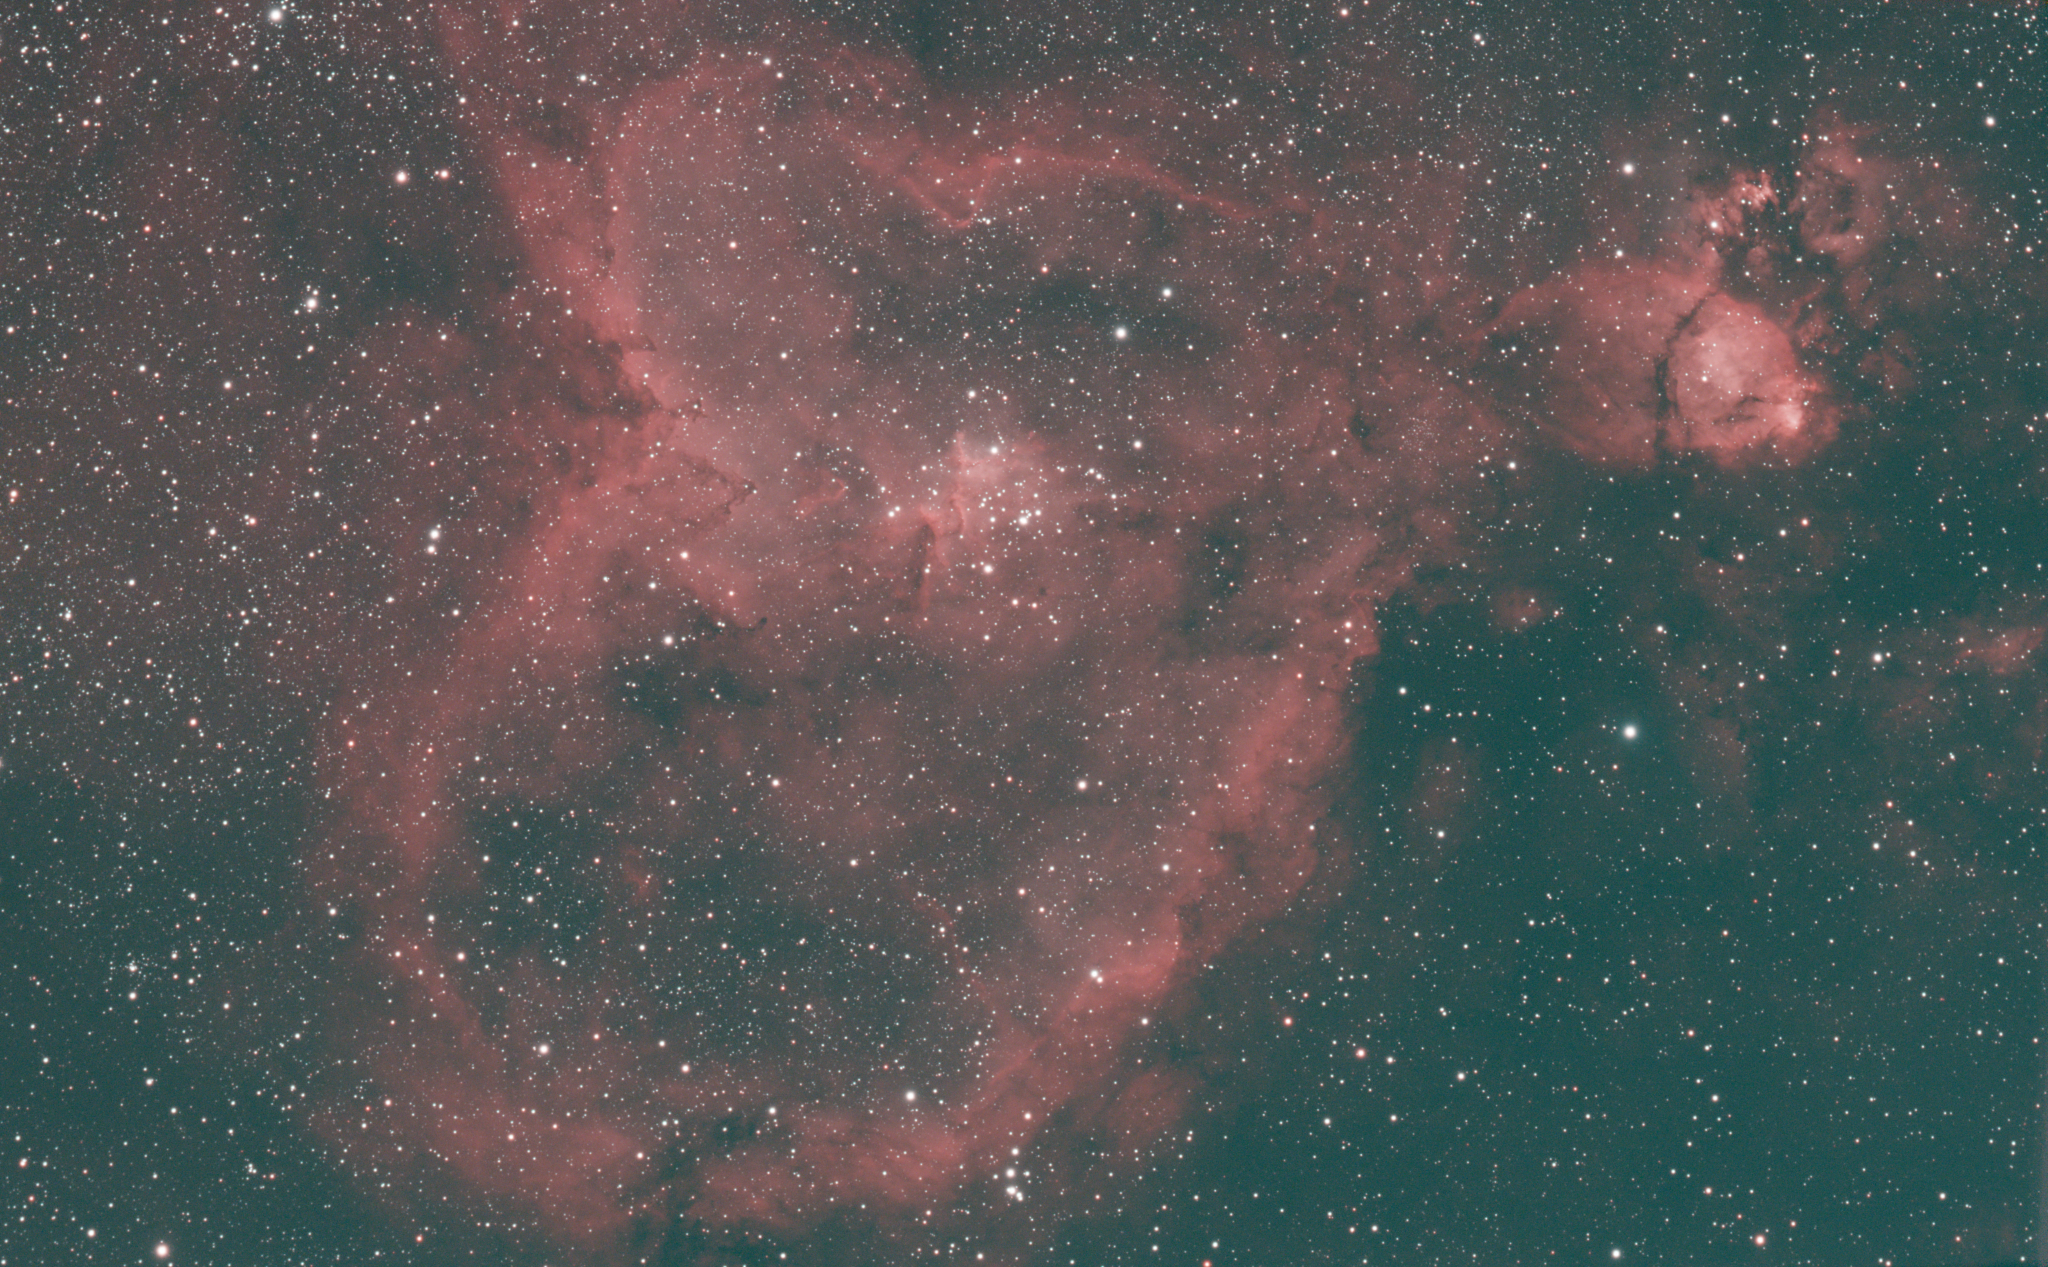
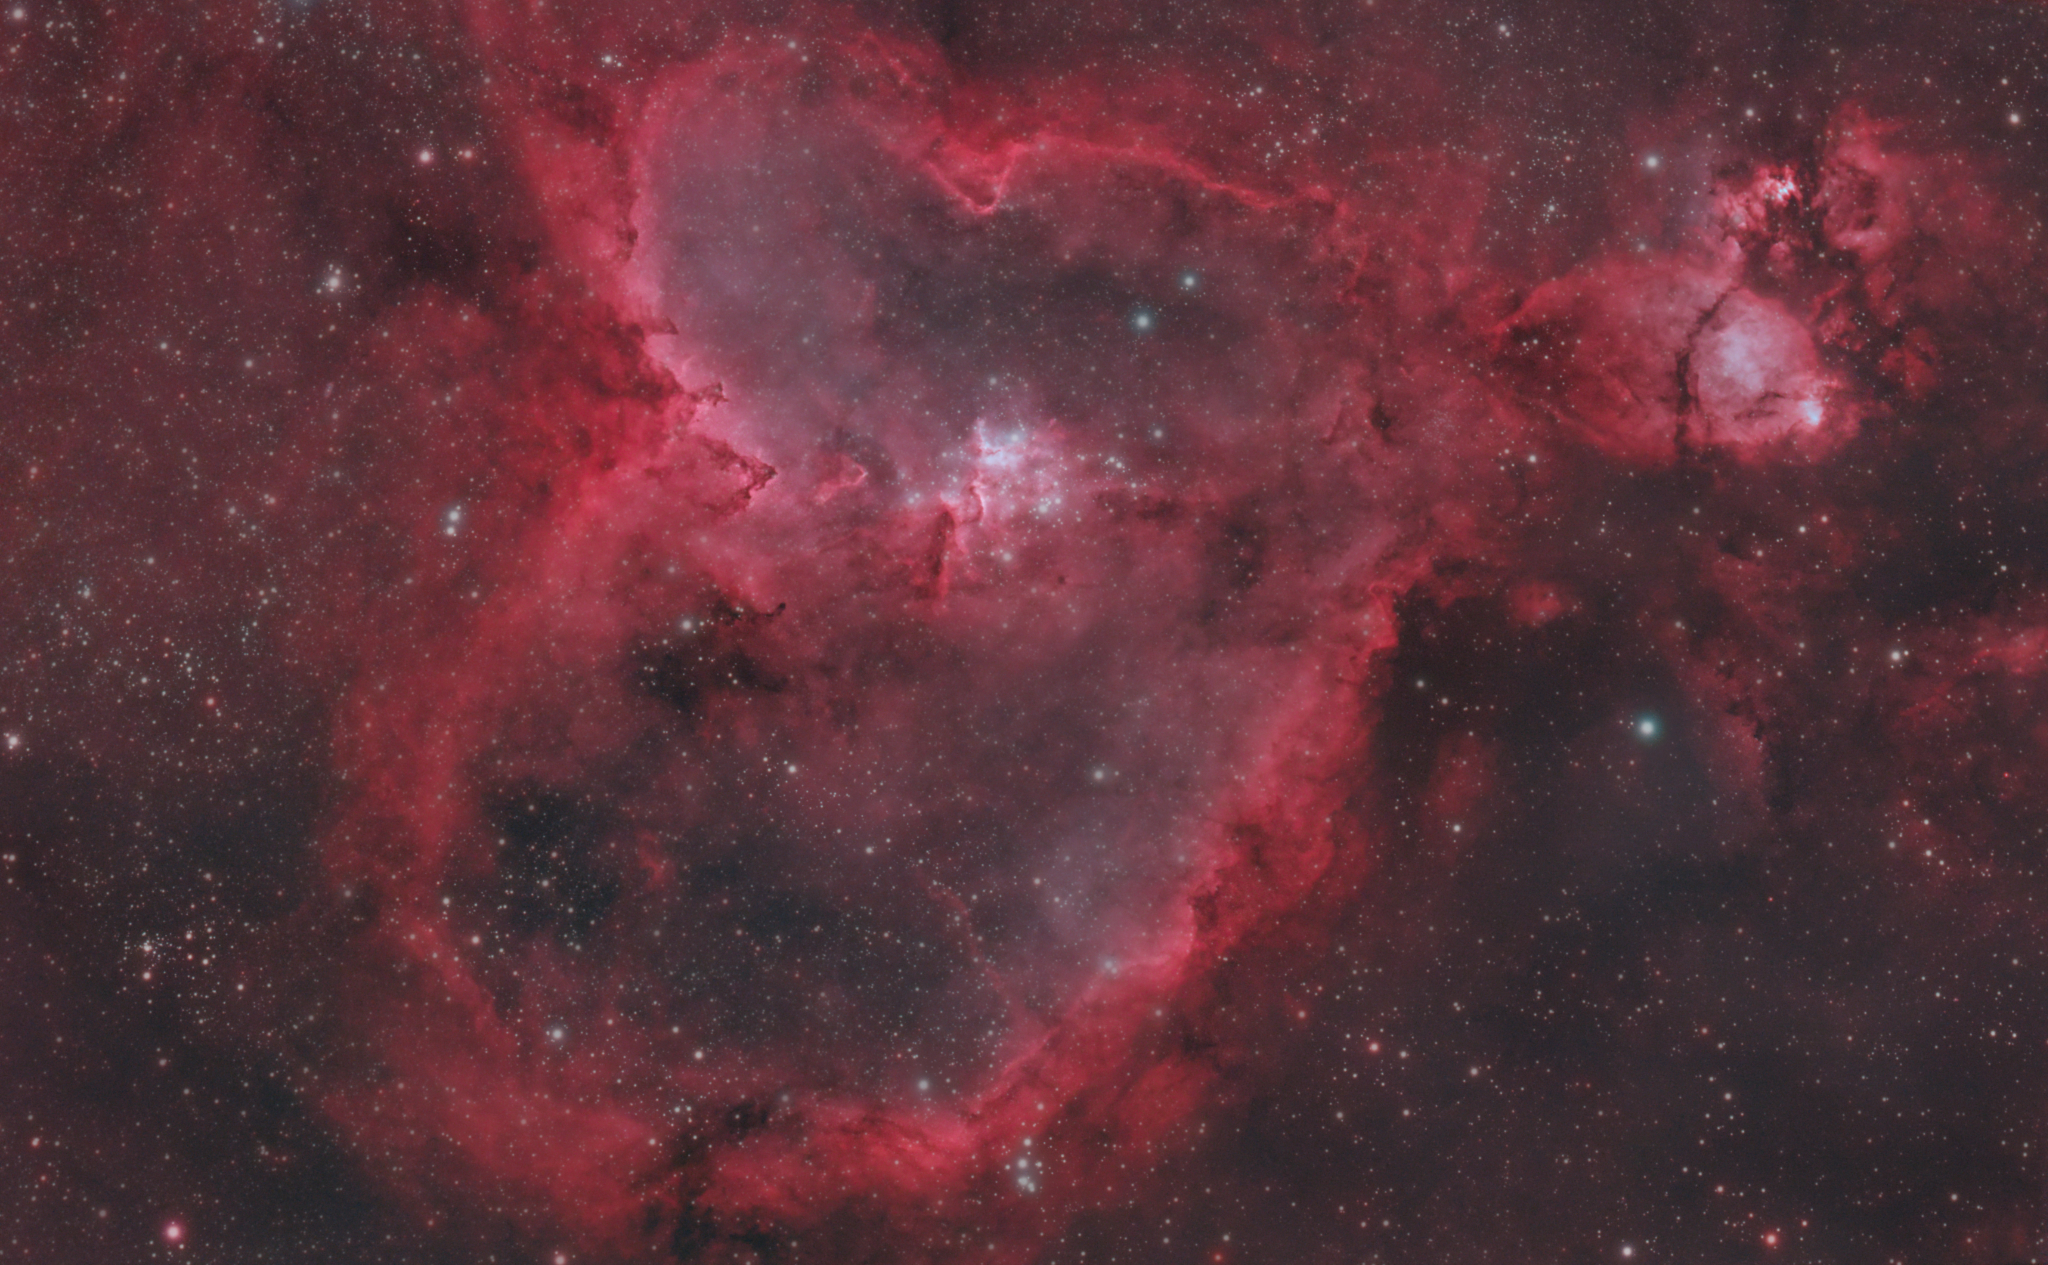
Why Should I Avoid Gradients?
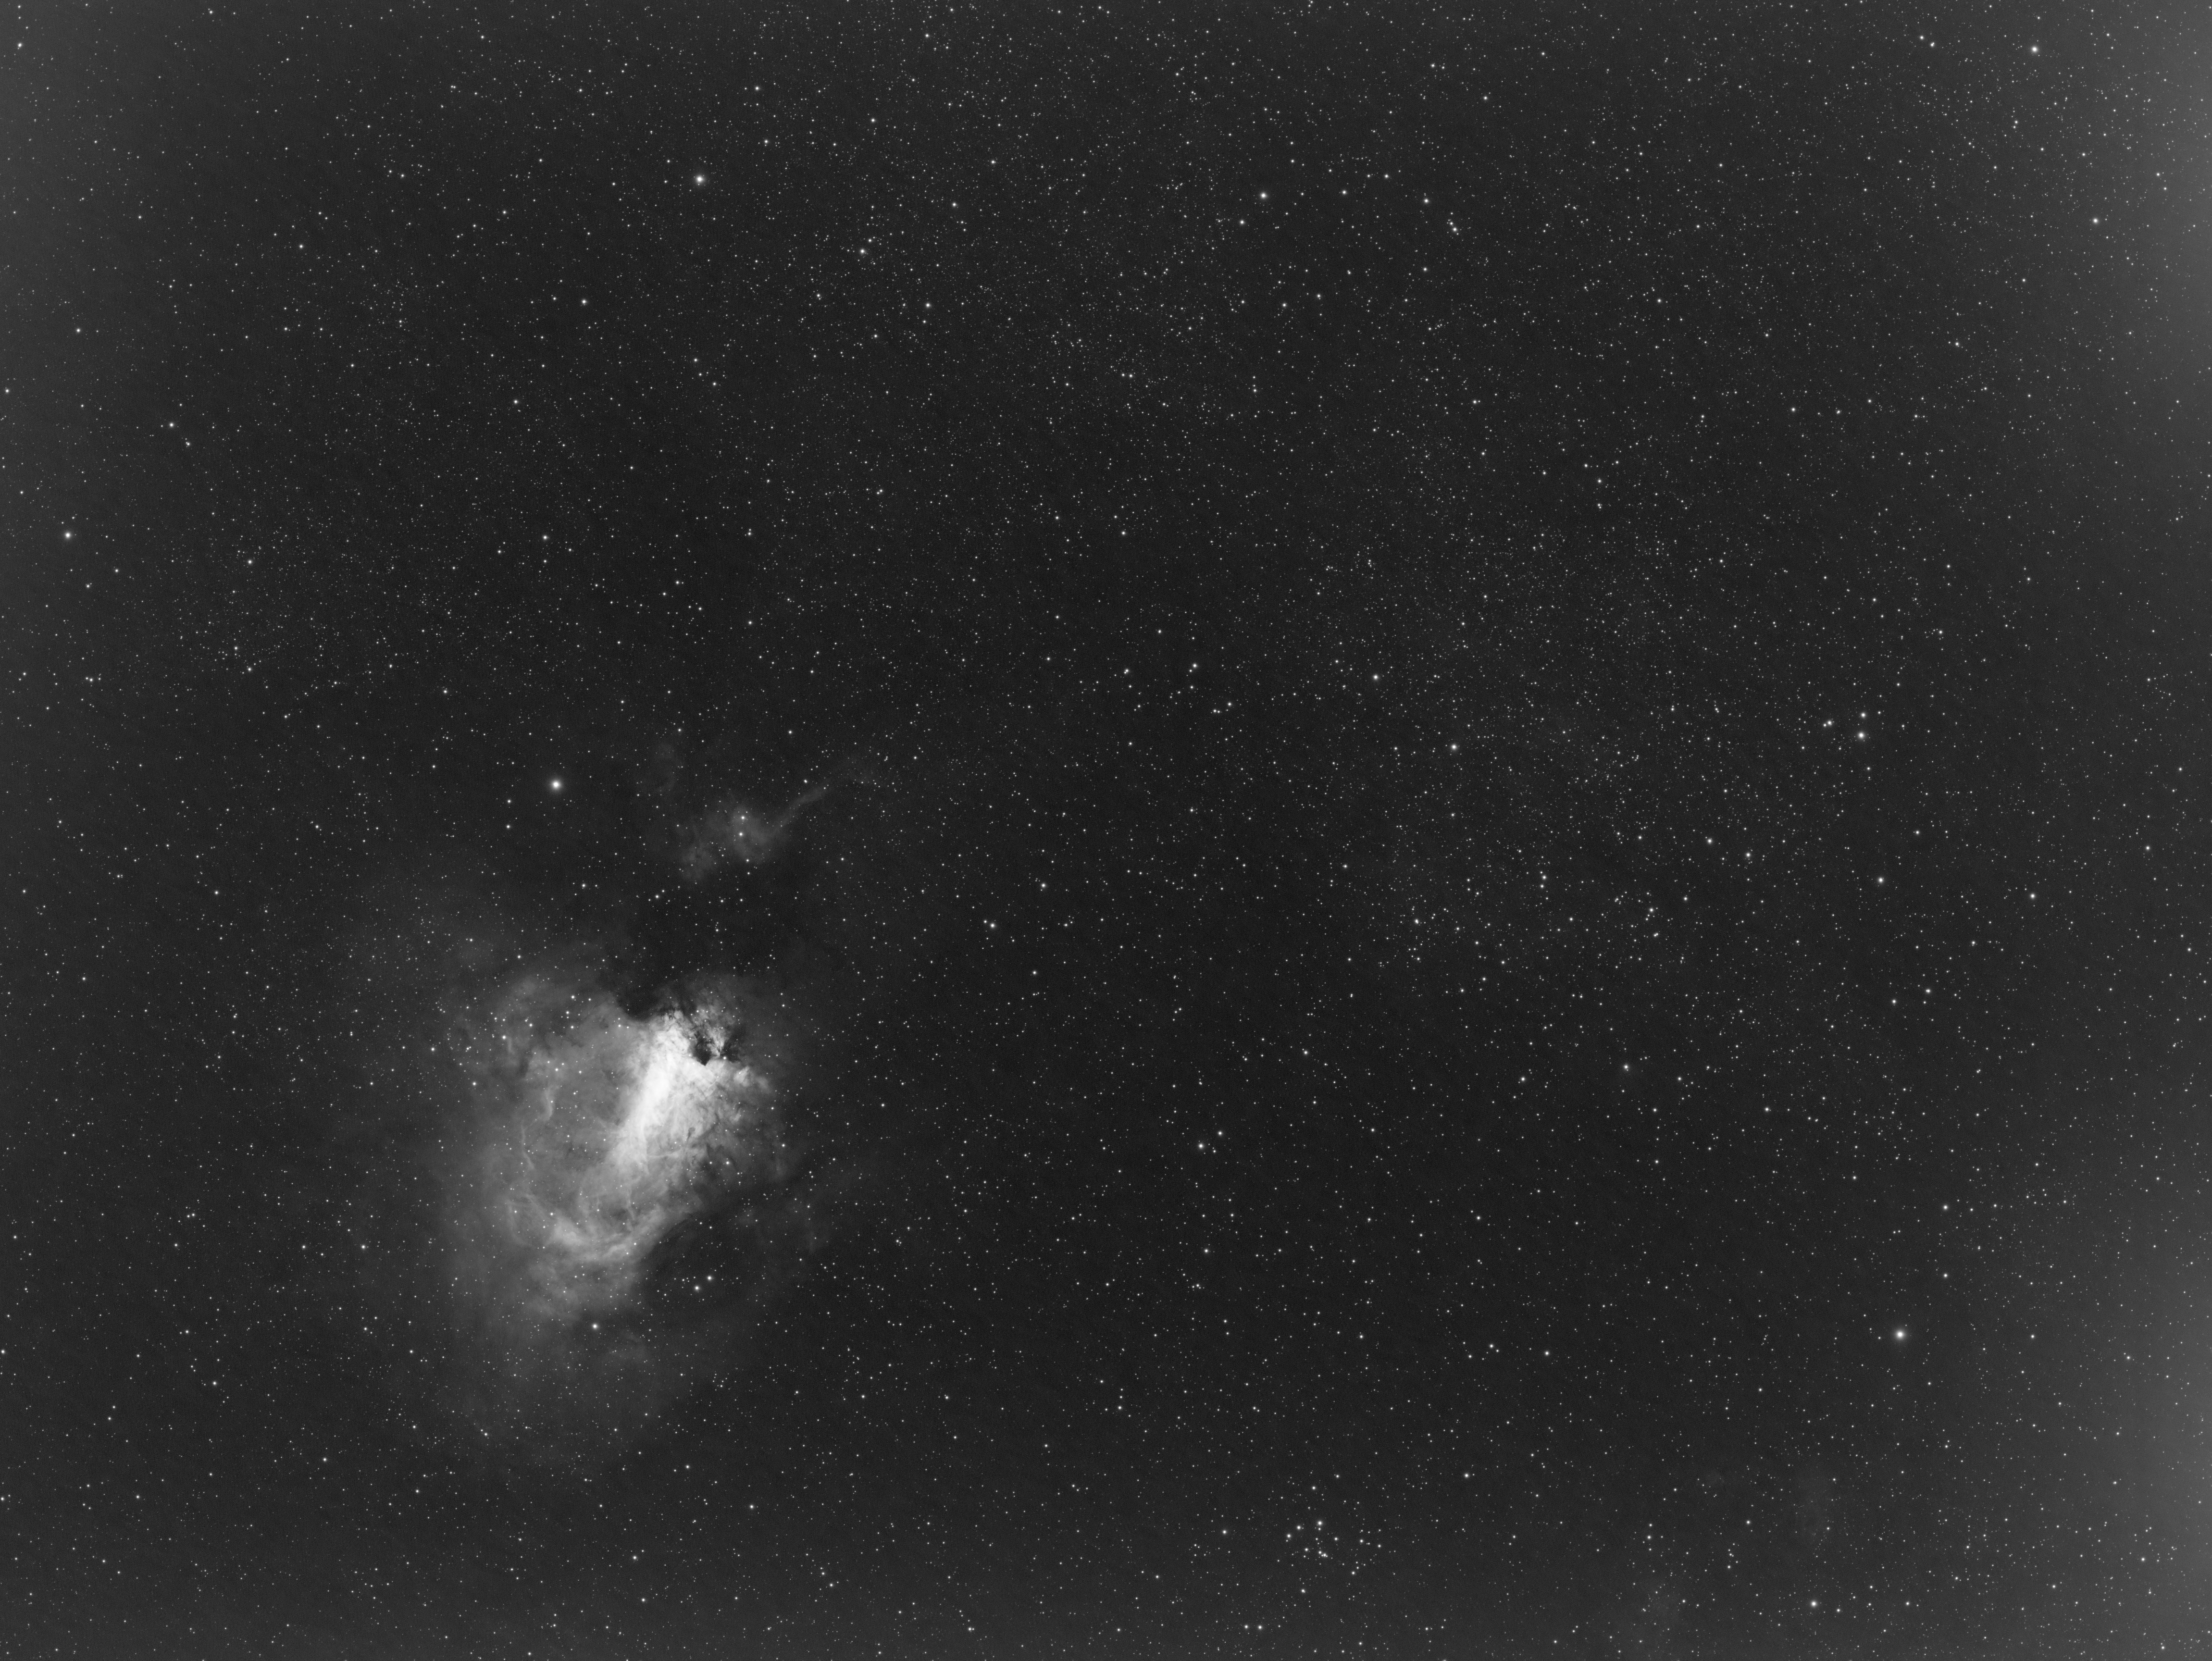
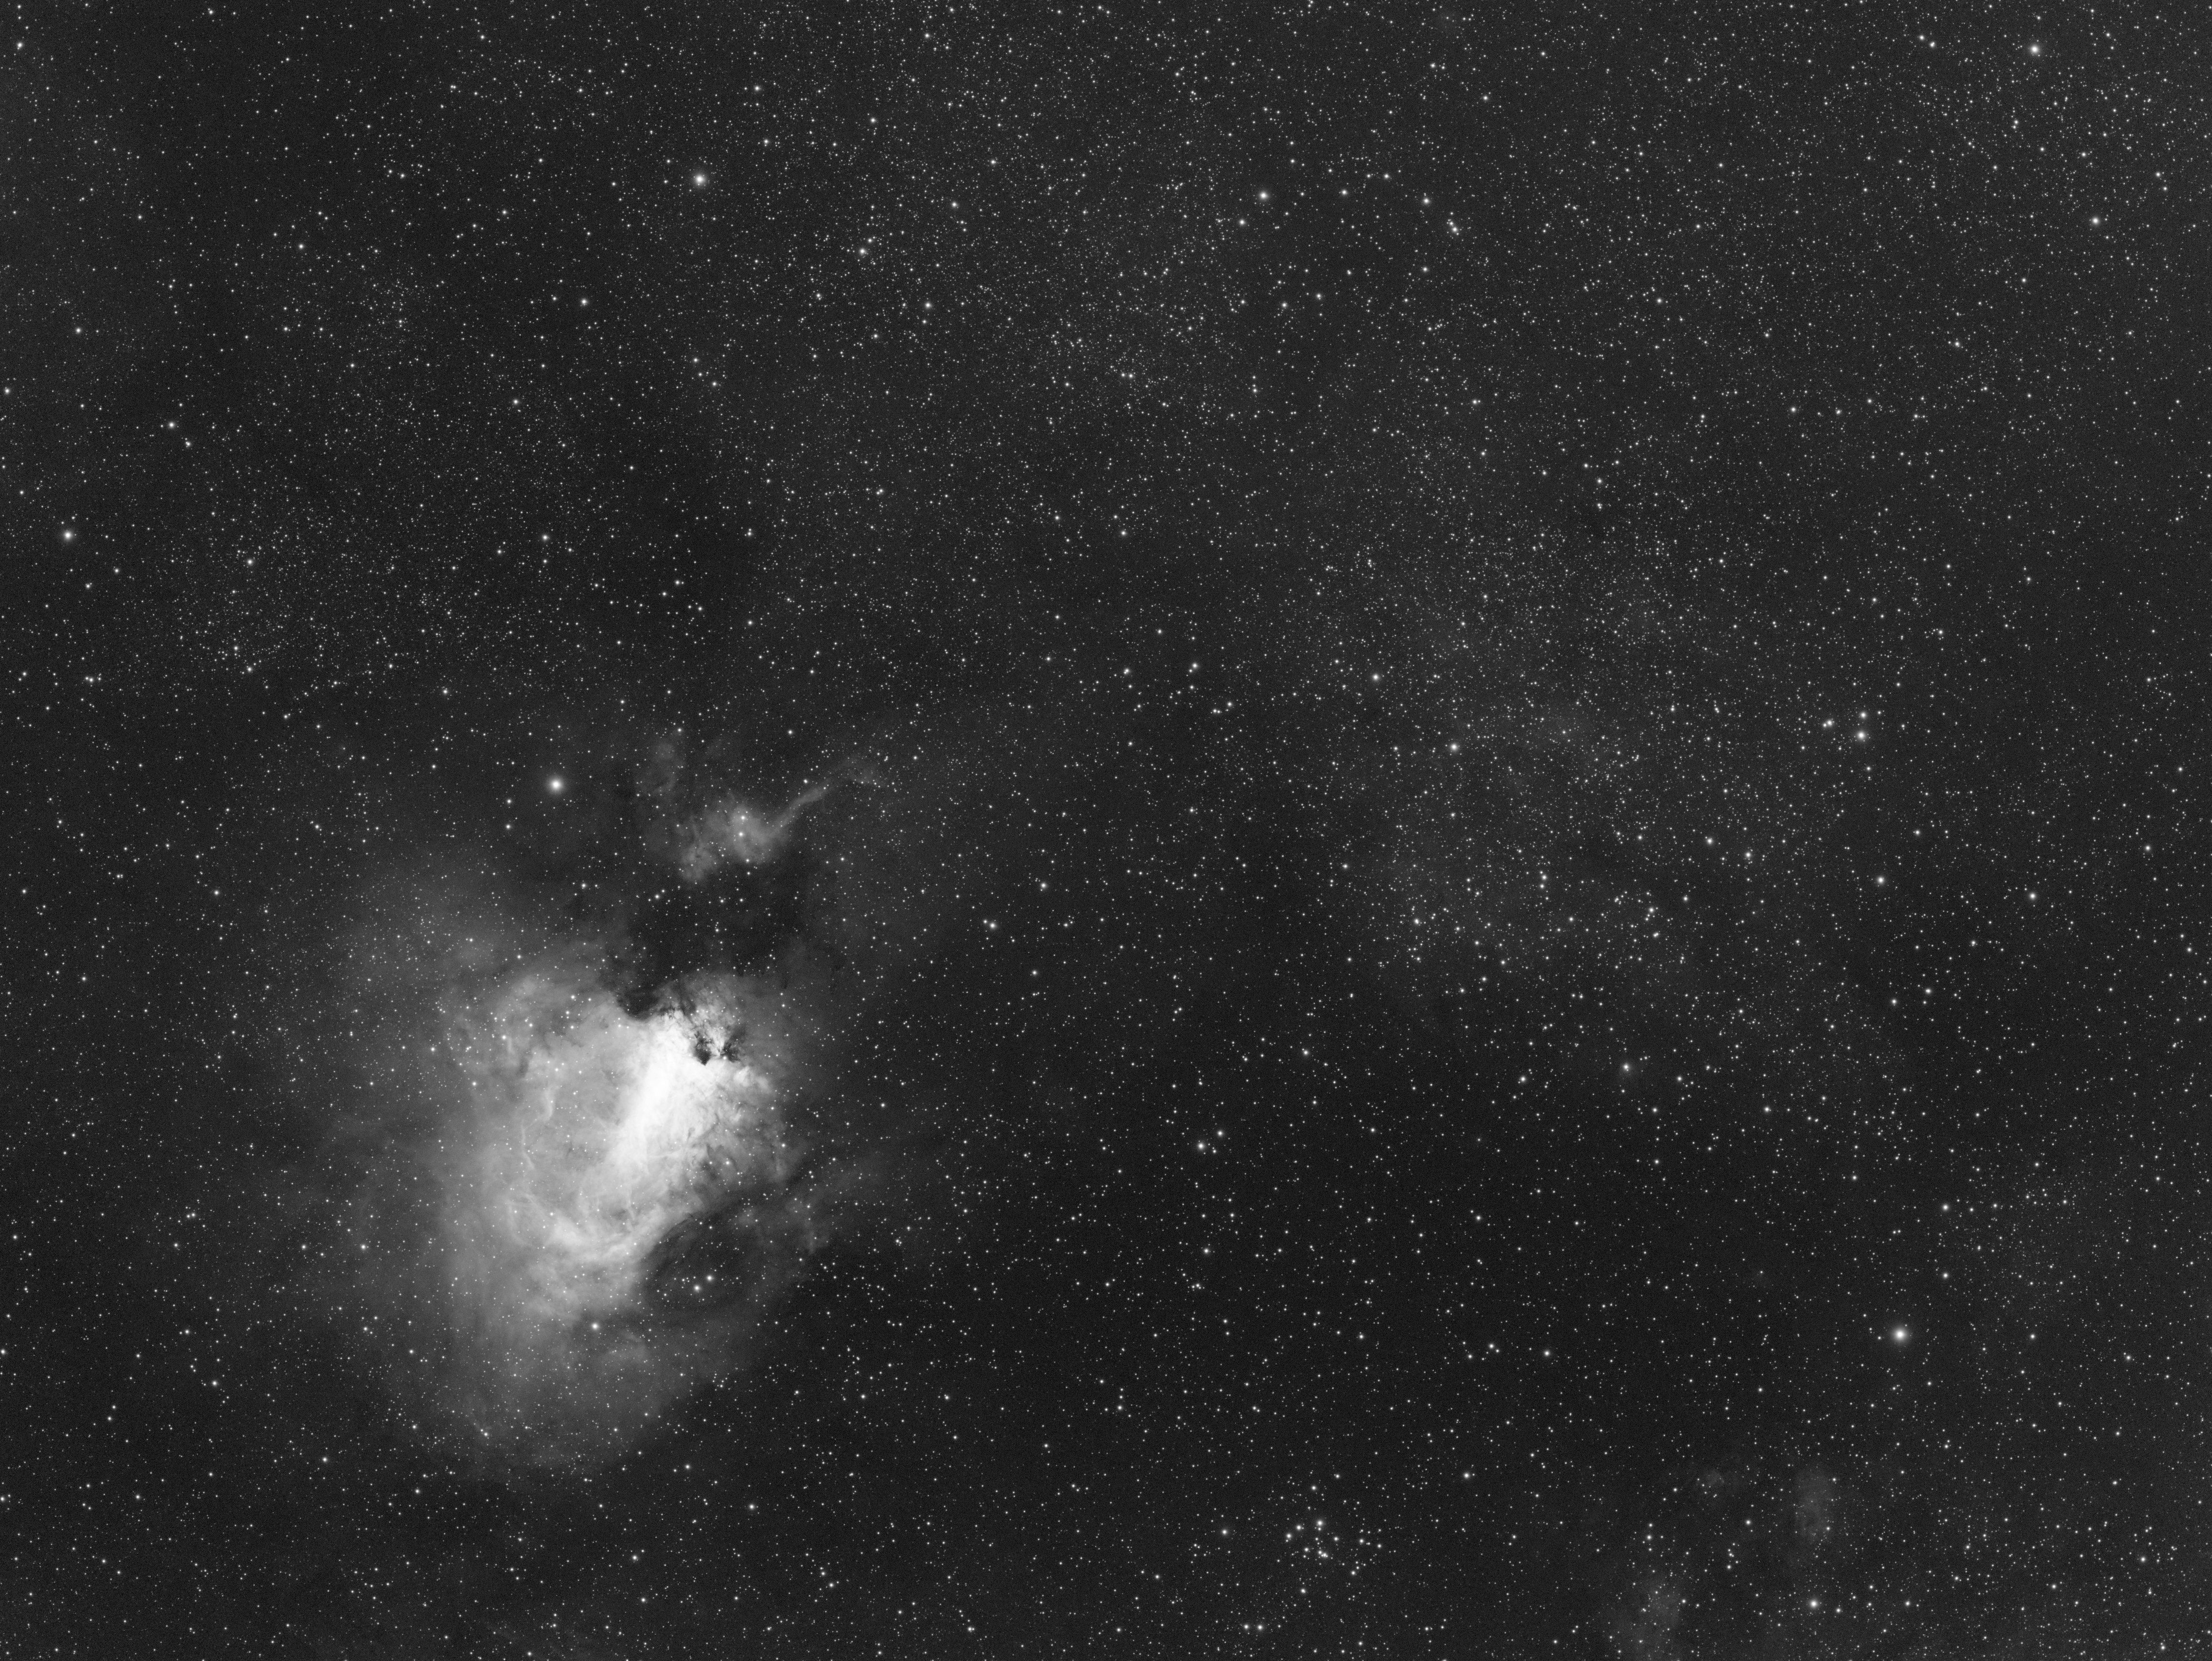
- Gradients are the bane of astrophotographers everywhere. They make data difficult to work with and can completely ruin an otherwise great image. Instead of fighting your data, you can better spend your time enhancing it by taking calibration frames. To really drive home just how important these are, I’ve provided two images using a single data set: one with calibration frames and without.
You can see the difference because the image on the right used calibration frames when stacking the image. So, what exactly are these calibration frames? They are made up of the following:
- Dark Frames: Dark Frames reduce thermal noise, hot pixels, amp glow, and other fixed-pattern noise from your camera sensor
- Flat Frames: Flat Frames correct vignetting, dust spots, dirt, and other uneven illumination in your optical system
- Bias Frames (sometimes called Flat Darks): Bias Frames help properly calibrate your Flat Frames by removing the camera’s baseline signal from those frames
Here are two example images: One without calibration frames and one processed with calibration frames.
How Can I Get Sharp Stars?
- When gathering data, there are some things you can’t control. There is a degree of that when attempting to capture sharp stars. While you can make stars sharper with proper guiding, equipment will play a major role here. Do your best with the equipment you already have. Once you’ve become more familiar with the entire process, if you still feel limited, then it may be time to upgrade your equipment.
Should I Saturate and Sharpen My Images?
- This is another subjective item, but what isn’t subjective is having more data to play with will make this process easier and the final touches look better. Many people are tempted to massively boost saturation and sharpness when it really just needs a little nudge in the right direction. Once again, use your best judgement!
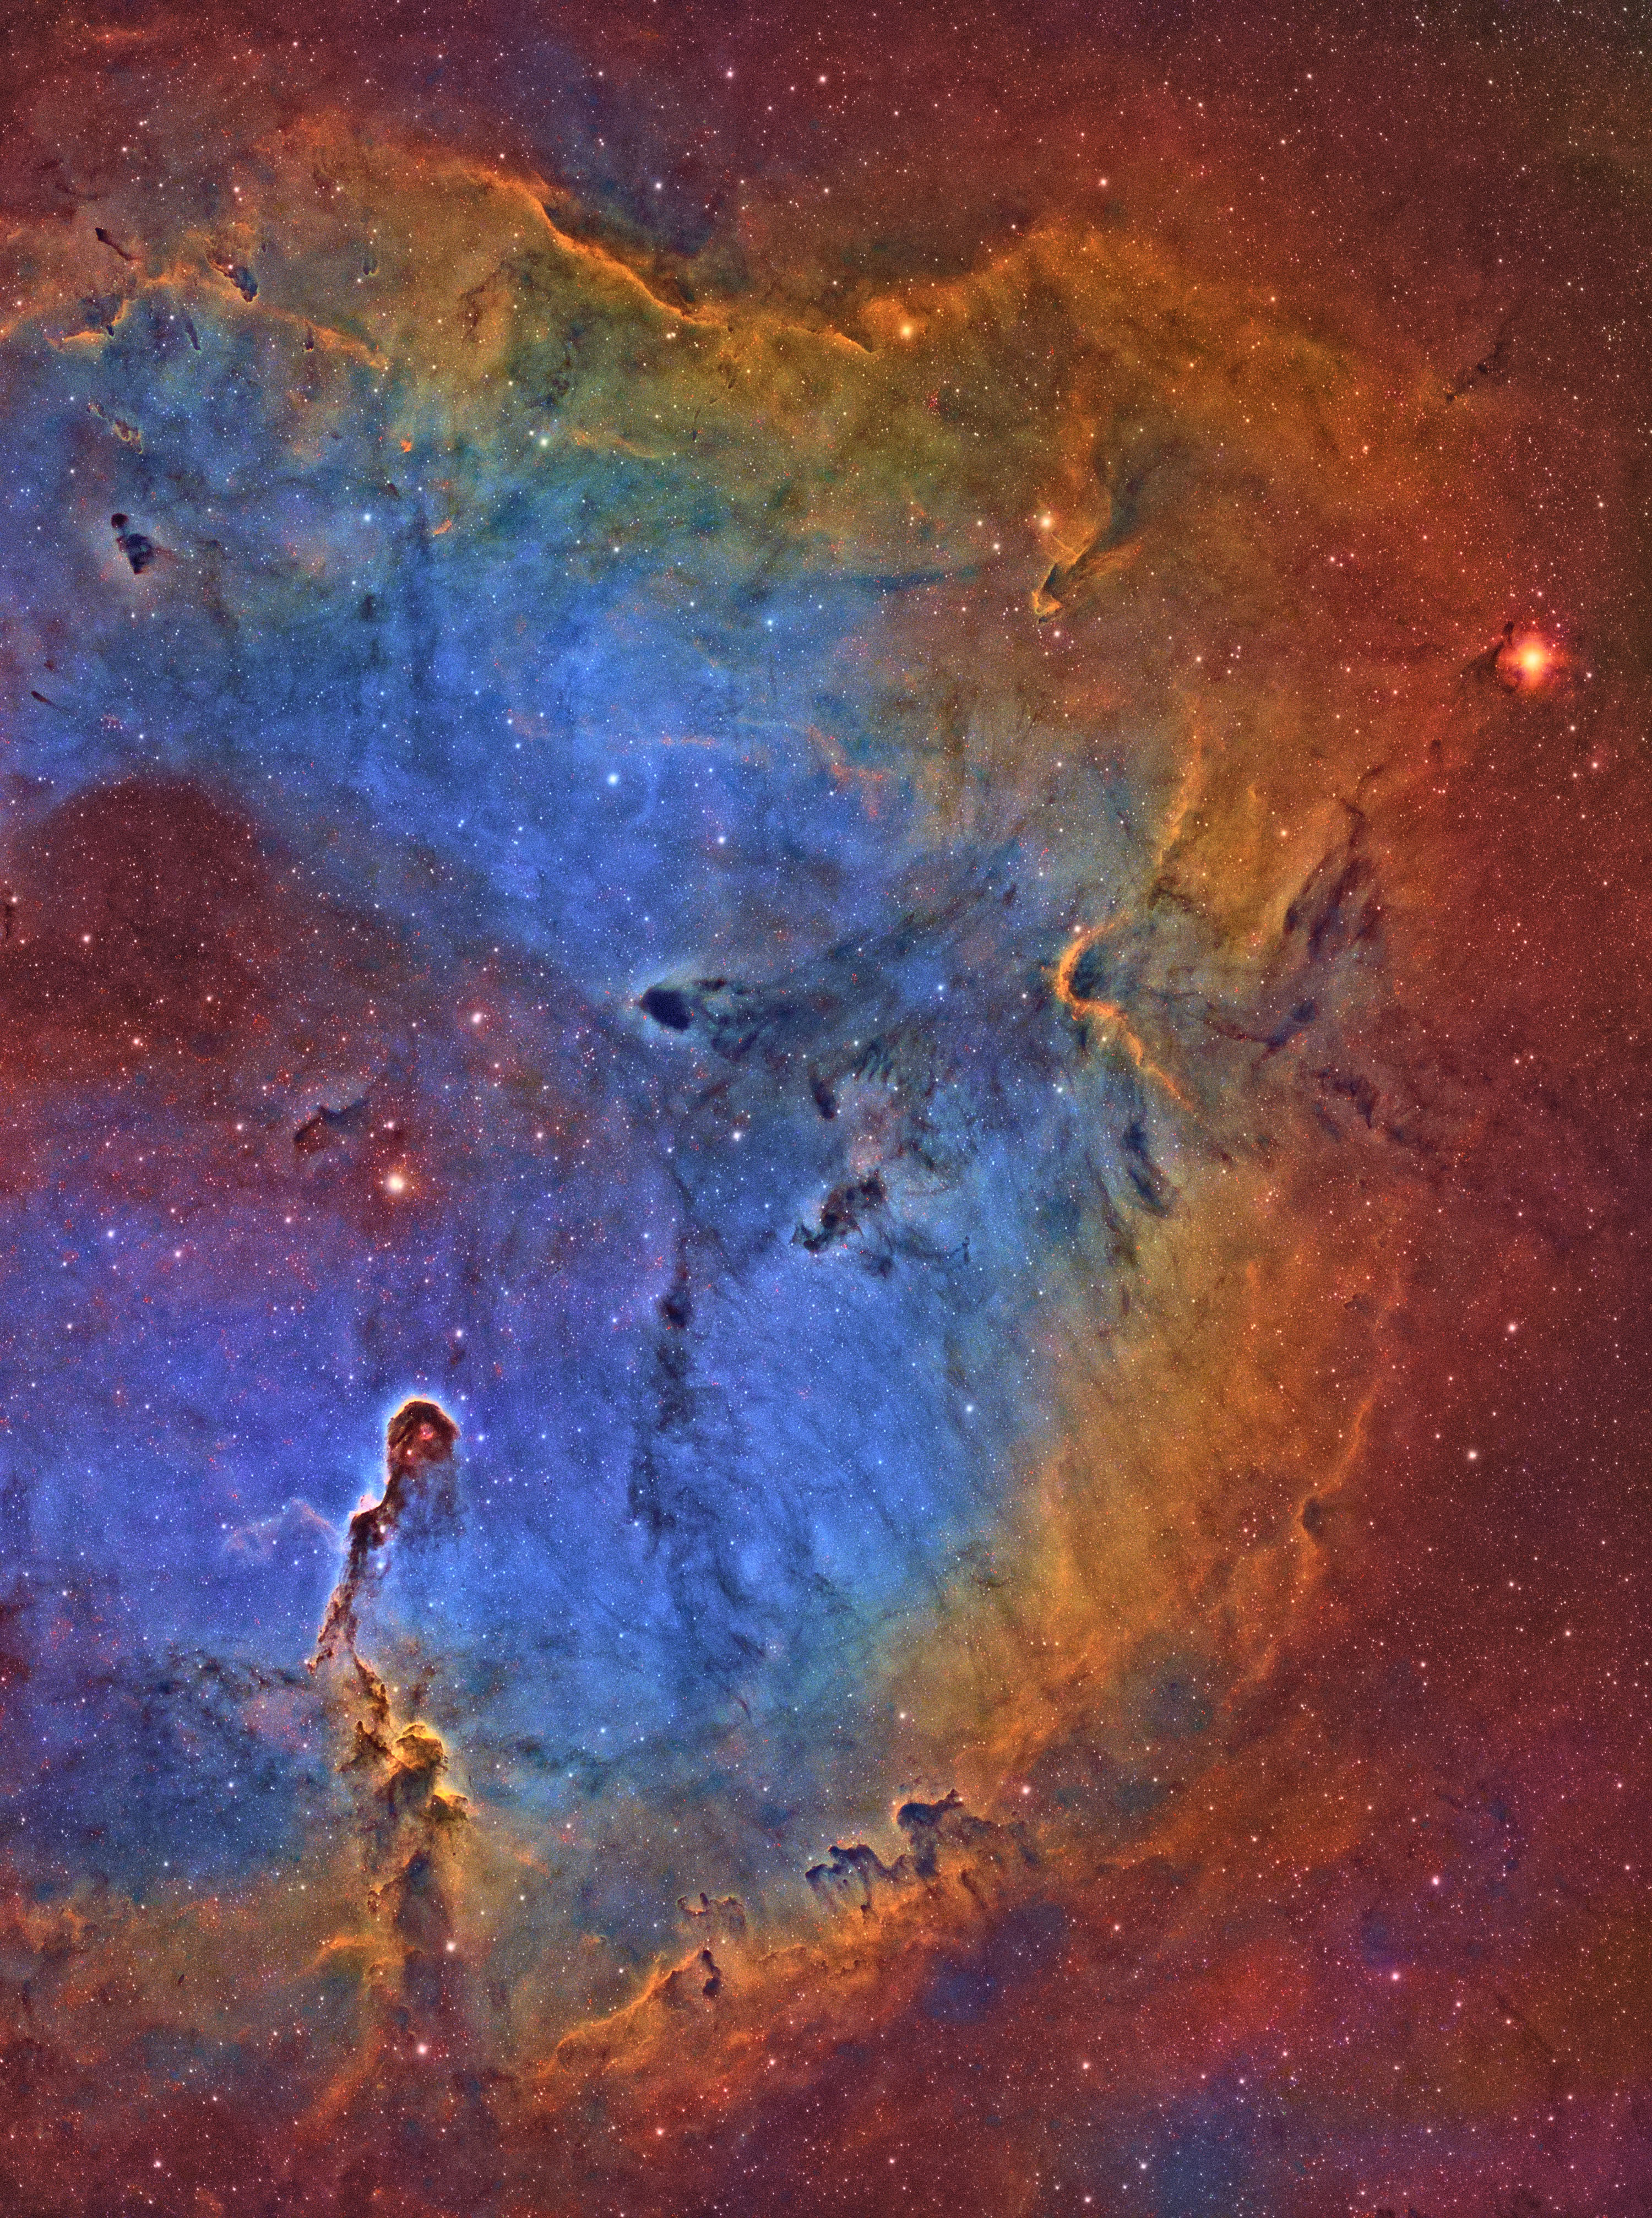
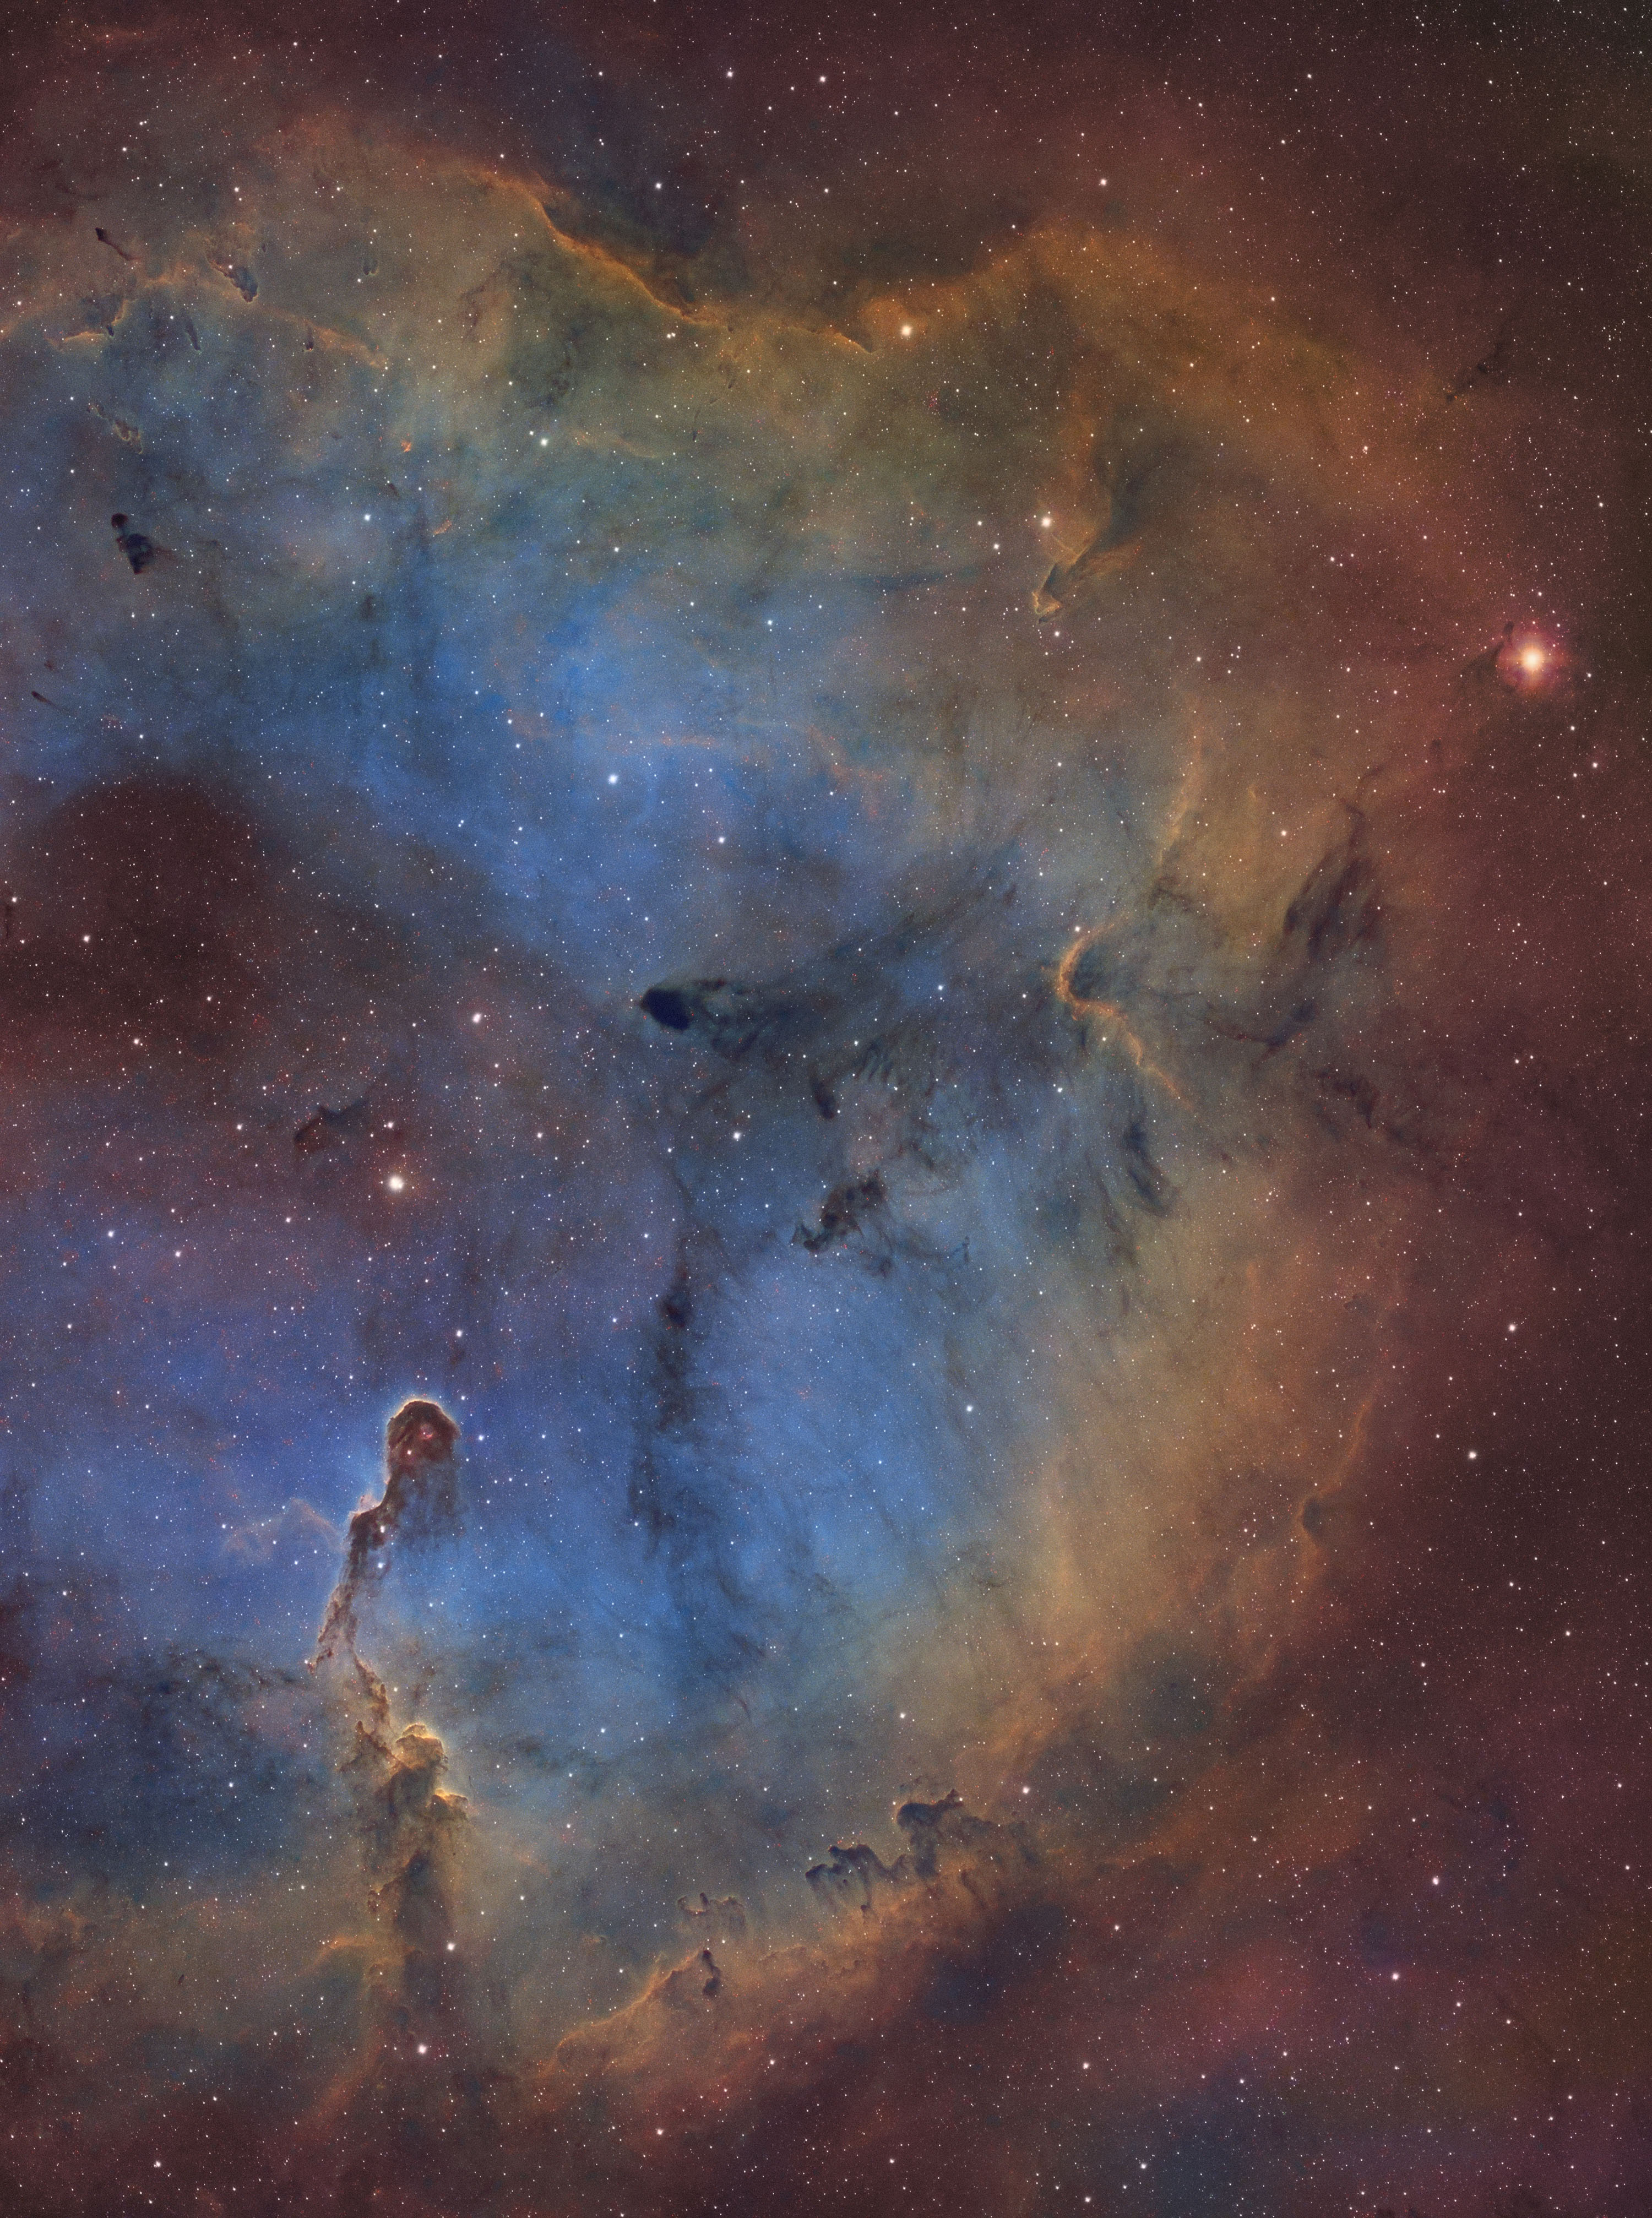
Now that we’ve planned a shot and gathered the data using our framework, let’s take a look at what that shot could look like with different total integration times. I’m really trying to emphasize just how important total integration time is. It’s a vital piece of the framework that takes the longest and is the easiest to skimp on. I’ll let these images speak for themselves.
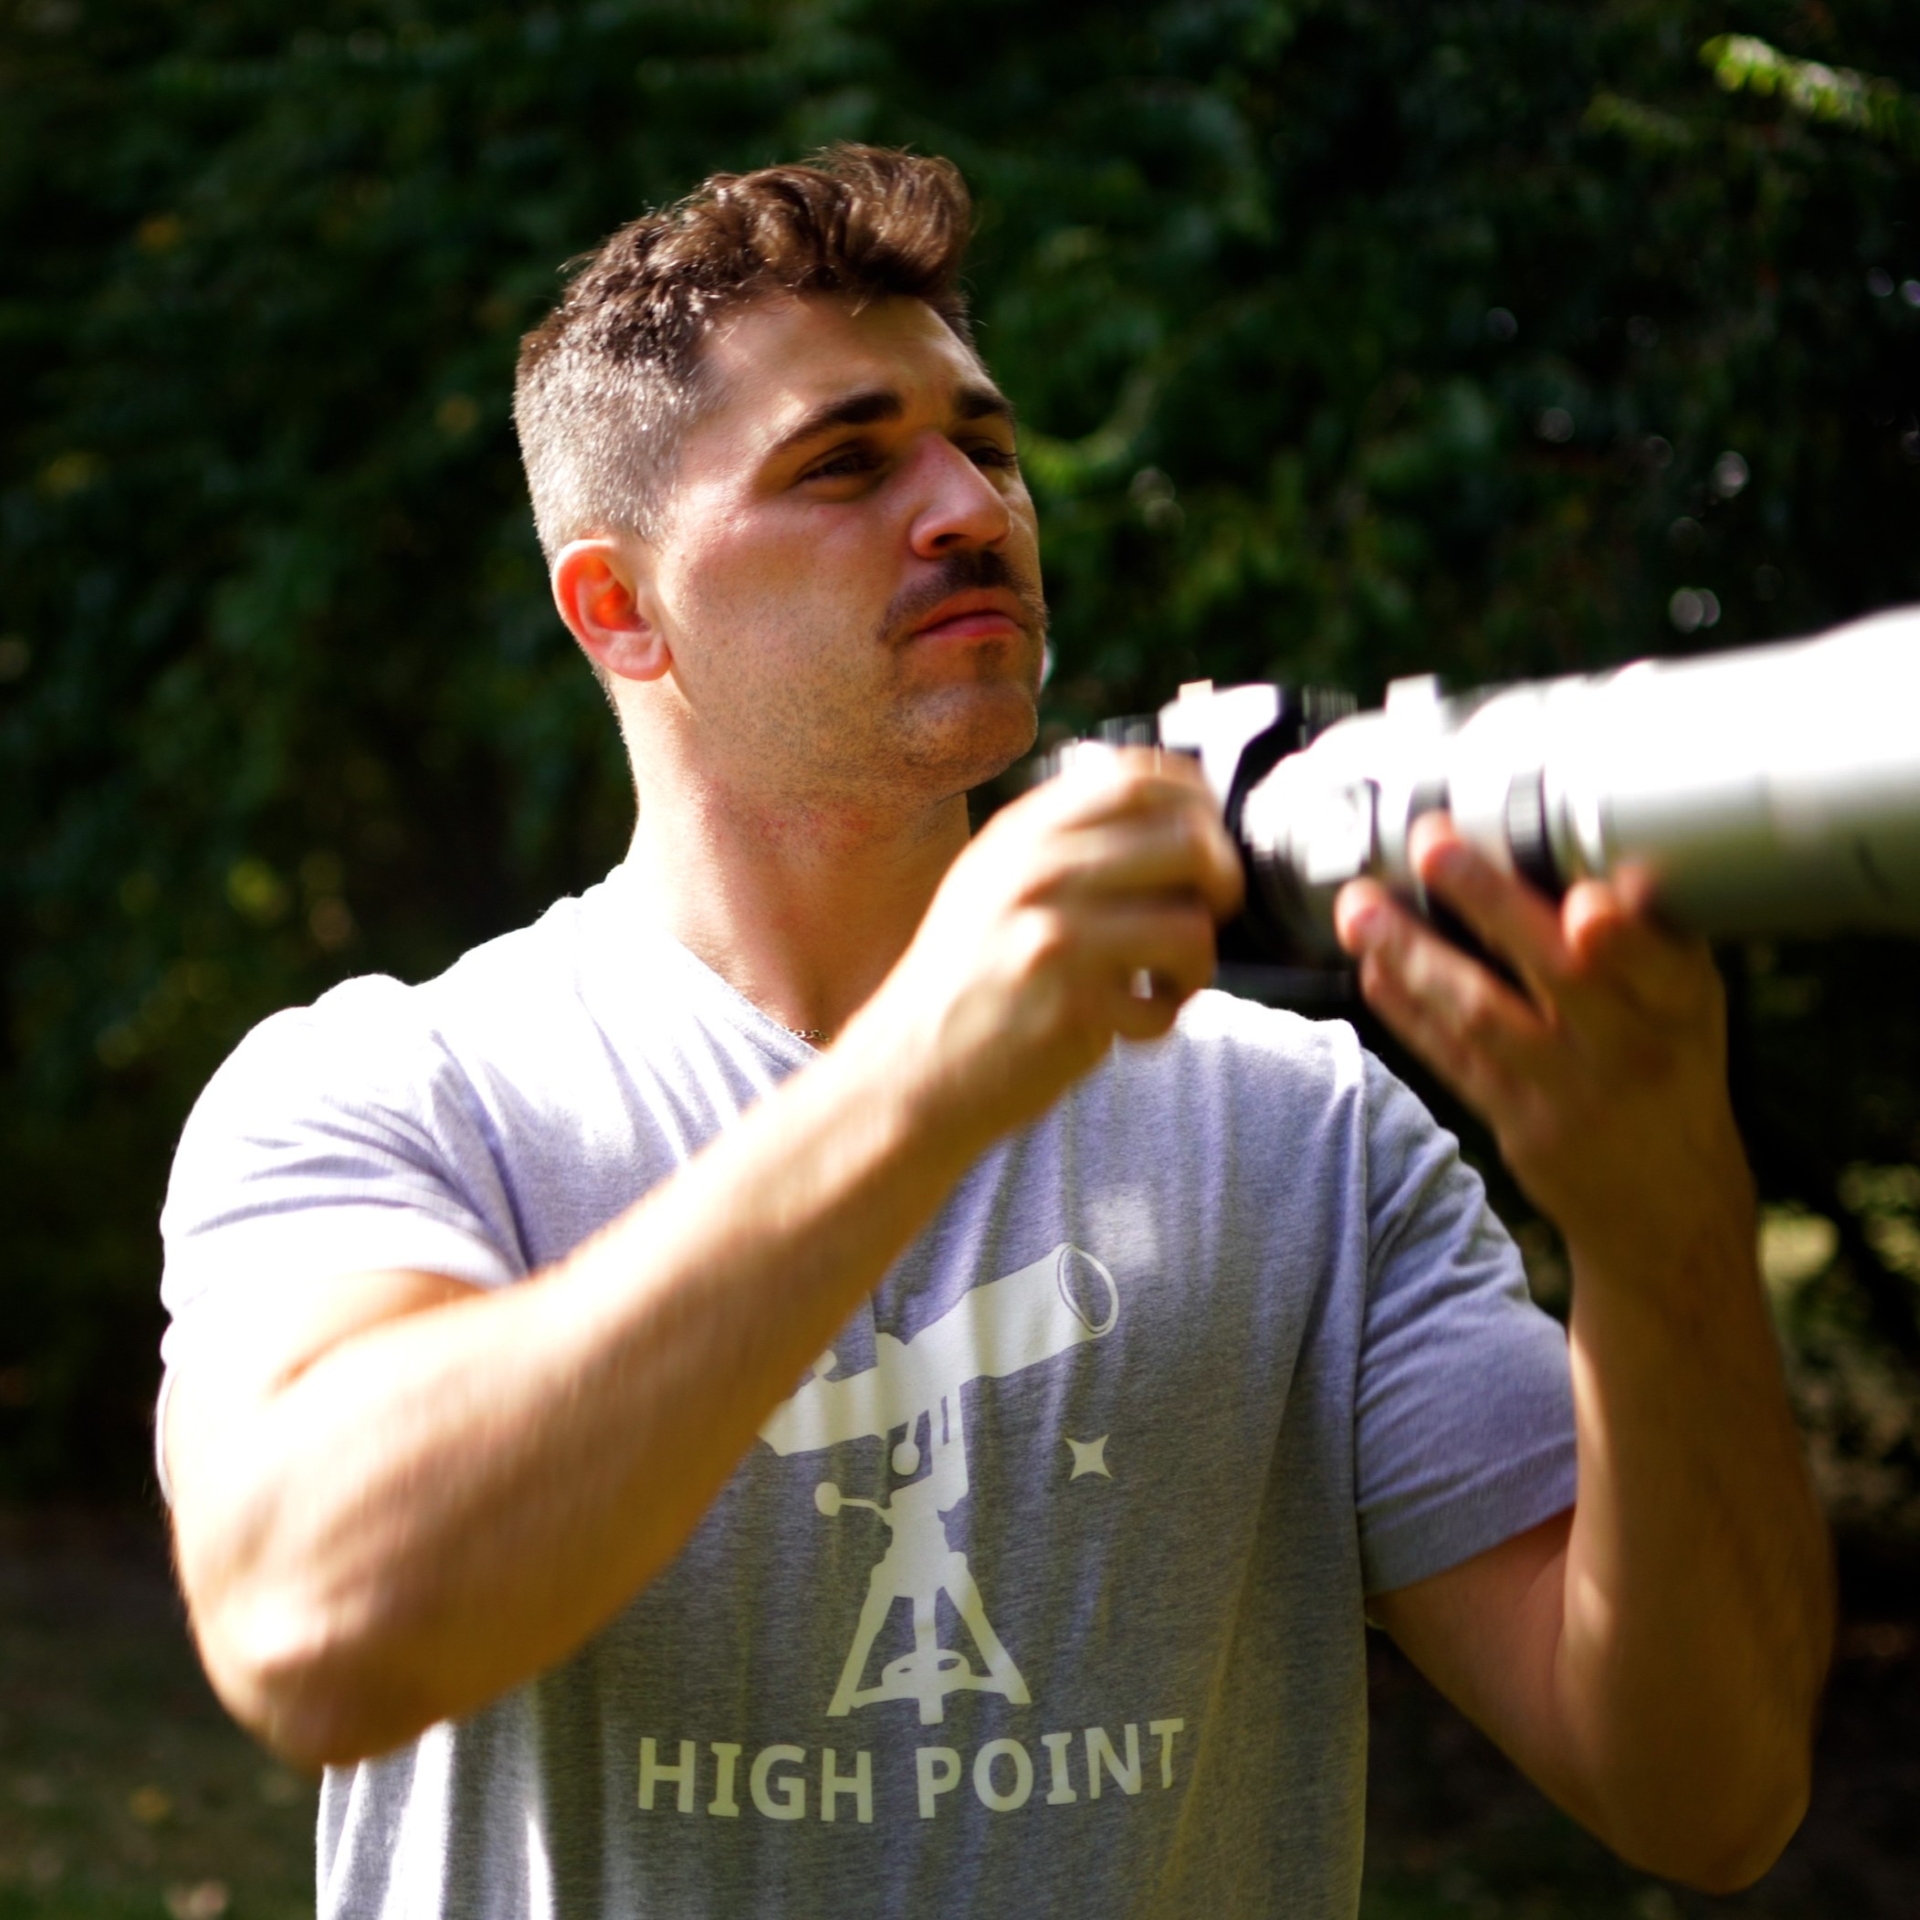
Teagan's Pro Tips After a Decade of Astrophotography
Now that you’re familiar with how to plan your shot and gather good data, you’ll probably be excited to get out under the night sky and put it into practice. First, I’d like to share some tips that I’ve learned from over a decade of astrophotography experience that could help you.
Use Filters When Possible
If you are in a position where you can use narrowband filters, it will completely unlock your imaging experience. They block out a significant portion of stray light pollution and moonlight. They will allow you to capture faint details within emission nebulae that would be nearly impossible to capture otherwise. If you’re limited to one shot color cameras and capturing the night sky from light polluted areas, dual narrowband filters are almost essential. It’s important to note that these filters only work for emission nebulae. They do not work with galaxies, star clusters, and reflection nebulae. Those objects all require that you carefully consider light pollution.
Get Out to Dark Skies If You're Able To
Most of the population lives in Bortle 6 or brighter areas. If you aren’t familiar with the Bortle Scale, it’s a rating system that classifies light pollution in the sky ranging from 1 to 9 where 1 is a pristine dark sky and 9 is a fully light polluted inner city sky. To see what your sky is rated and where you could realistically travel to reach a darker area, you can use free websites like Dark Site Finder. If dark skies aren’t an option for you, you’ll just have to make due with what you have. The good news is that amazing astrophotography images aren’t locked away from you if you’re limited to Bortle 6+ skies! The not so good news is that it will take you more total exposure time from a light polluted location to get a high quality photo. The fact that it's possible to get an amazing astrophoto from a light polluted city, despite it taking longer, is still amazing!
Stick to Your Imaging Plan!
Let’s say you’re planning out an amazing shot that requires 25+ hours of total exposure time to really make the image come alive. It’s incredibly tempting to get 10 hours of data, stack it, and call it good. No one wants to wait another 10, 15, or even 20 hours to finish their astrophoto and excitedly share it with the world. After all, that could translate to capturing the same object across 4 or 5 different nights for just a single image, but it’s worth it. Don’t stop at a good astrophoto. Stick to your plan and get a great astrophoto.
Reduce Stray Light from Hitting Your Lens as Much as Possible
Stray light can introduce nearly impossible to remove gradients and/or reflections in your imaging train. Identify these light sources: things like porch lights, street lights, and passing car lights. Do your best to prevent them from ever reaching your front lens. Blocking these out can be tricky depending on the source, but things like extra long dew shields, setting up cardboard boxes, or even parking your car in between the light source and your imaging rig can all work. Get creative and see what works for your situation.
Leave Your Telescope Set Up If Possible
Sometimes it’s tough to have the motivation to set up your entire imaging rig night after night after night. It can take a long time. Or maybe it’s really heavy. Or maybe it’s cold outside and you don’t want to deal with touching all that cold metal. Or… okay, you get the point. Leaving your telescope set up in a secure location with no rain or other inclement weather on the forecast is a great way to increase your chances of getting more images. I cover my telescope and mount with a long UV and water resistant cover tied off at the bottom. A good old fashioned tarp would probably work too, but that’s up for you to decide. It’s your gear, afterall.
Use Bug Repellant for Yourself AND Your Gear!
It’s a given to use bug repellent for yourself, but it’s worth mentioning. We want this to be an enjoyable experience, not one we associate with itchy bites. The real tip here comes from using some sort of bug repellent for your gear if it’s being left outside for long periods of time. All sorts of little creatures could try to make a cozy home right in your gear. I’ve once opened up a mount because it wasn’t behaving properly only to find hundreds of living ants inside the mount. There are many fun, odd experiences in the world of astrophotography. This wasn’t one of those. Use that bug repellent!
Use Longer Subexposures Over Shorter Subexposures
This tip is probably going to spark some conversation. In my 12 years of doing astrophotography, especially narrowband astrophotography, I have found that shooting longer subexposures is better. There are diminishing returns, but I personally like to shoot 10 to 15 minute long subexposures through my 3nm narrowband filters. If you aren’t comfortable taking longer subexposures like this, something like 5 minute long exposures should be plenty long as well. Just remember that a single 10 minute subexposure is a lot better than 10 one minute long exposures. That being said, you probably won’t see a huge difference between 20 total hours worth of 5 minute long subexposures versus 20 total hours of 15 minute long subexposures.
Putting It All Together
Now that you’ve read the above, it should be obvious that getting better astrophotos doesn’t come down to a single fancy trick, a magic piece of gear, or one quick setting tweak. It comes down to having a plan, choosing the right target, maximizing your total exposure time, collecting clean data, taking proper calibration frames, and being honest with yourself about what your image still needs. If you can apply this framework and refine it to your specific routine, then you will see an improvement in your images and confidence as an astrophotographer.
Planning
Use a planetarium application to find a suitable target
- Available high in the sky for an extended period of time
- Away from obstructions like trees
- Away from the moon and other sources of light pollution
- Suitable for your equipment’s focal length
Use a suitable weather & sky condition resource to ensure you’ll be getting good data
- Low to no cloud cover
- Low to no wind
- Good or better seeing
- Good or better transparency
Gathering Data
Target is framed/composed well
Total exposure time is ample to reduce noise, create depth, pull out a high level of detail
Stray light is reduced to prevent uncorrectable gradients
Calibration frames are taken
- Dark frames
- Flat frames
- Bias frames
Star sharpness is maximized
Image is properly saturated and sharpened
FAQs
What post-processing software should I use?
While picking the right post-processing software depends on experience and preference, some of the most popular are free processing tools, such as DeepSkyStacker or Siril. You can also use paid photo editing programs like Adobe Photoshop and Lightroom. Other popular choices are PixInsight, Affinity Photo, and Sequator. Each program has its own strengths, so doing research based on your budget, experience, and ease-of-use will set you up for success when processing your astrophotos.
How can I make my Milky Way photos better?
There are three main considerations when it comes to Milky Way photography: seeing conditions, camera settings, and post-processing. Make sure you are imaging somewhere with little to no light pollution, if possible, make sure to shoot in RAW, use the widest possible aperture, have a high ISO, adjust shutter speed to avoid star trails, and turn off autofocus. When post-processing your images, use noise reduction tools to compensate for the noise that comes with high ISO settings and make sure you are stacking multiple shots to ensure a clean image outcome. For more information on Milky Way photography, check out our 10 Things to Know About Milky Way Photography article.
What’s the best camera for astrophotography?
Choosing the right camera depends on various factors, including experience and the intended target. For example, if you are looking to do deep-sky imaging, then a cooled CMOS camera, like ZWO astronomy-dedicated cameras, would be ideal. If you are looking to do Milky Way photography or wide-field landscapes, then you would most likely want a full-frame mirrorless camera like one from the Sony A7 camera series.
How can I remove artifacts from my astrophotos?
The best option is to focus on using calibration frames to avoid artifacts altogether. However, if an artifact occurs in your stacked image, then you can use your selected post-processing software, such as PixInsight or Photoshop, to remove them from the stacked image. You can use tools like the clone stamp or spot healing brush to fix small artifacts. Also be on the lookout for stacking/alignment artifacts that can be fixed by cropping the rough borders of the image.
Can I take good astrophotos with my phone?
Modern smartphone cameras can take great photos of bright sky objects, such as the Moon, brighter planets, and the Milky Way. However, it is important to adjust expectations when using a smartphone versus dedicated astrophotography equipment. Stability, exposure settings, aperture, and seeing conditions are all important factors to consider.
Glossary
Artefact
An artefact, also spelled artifact, is a visible distortion or anomaly found in an image. This artefact was not present in what was originally imaged. It can be caused by image processing, lighting, or camera malfunction.
Astrophotography
This refers to photography of astronomical bodies and phenomena. Astrophotography is not new, for example the popular T threading still used today harkens from Tamron’s T-mount developed for their 35 mm cameras - however it has seen a notable increase in popularity with improvements in cameras, mounts, filters, and software making astrophotography much more accessible. This is not limited to celestial bodies such as nebulae, planets, or galaxies either, as solar imaging is now more within the reach of the average consumer than ever before.
Auto-Focus
Automatic focusing utilizes software to shift the focus of a telescope in and out to determine the precise focal point of the optics. It does this by reading the star size at each focus point, creating a graph of this data, then finds the minimum star size; bringing the optics into sharp focus.
Bias Frame
Bias frames are to try and capture just the noise inherent to the camera sensor, so you take them at as fast an exposure time as possible. Whether or not the camera is connected would be irrelevant, as again we're just attempting to profile the camera at this point.
Calibration Frames
Calibration frames are types of images that are applied to light frames to remove unwanted artifacts caused by a number of different factors. Dark frames are images taken at the same temperature as the light frames, and are necessary to remove hot pixels or other fixed noise for a cleaner image. Bias frames are similar in this aspect, though their purpose is to reduce the sensor’s readout noise seen within the light frames. Another type of calibration frame are flat frames, which remove dust motes or unwanted gradients for a uniform, even field.
Color Camera / One-Shot-Color Cameras (OSC)
Often referred to as One-Shot-Color (OSC) cameras, these cameras are able to produce an image in full color without the use of additional filters. This greatly simplifies the imaging process, and allows astrophotographers to complete a project in far less amount of time. They are especially useful for those who have limited clear nights, where they can go weeks to months without having an imaging opportunity due to their climate. These cameras are excellent choices to image the planets, the Sun, the Moon, and deep space.
Contrast
Contrast, in the context of astronomy, describes the difference in brightness between the celestial object(s) and the background of the sky.
Dark Frame
A dark frame is a type of calibration frame that aims to subtract sensor heat noise and hot pixels from your final image. These frames are taken at the same exposure length and ISO/gain settings as your light frames, though are taken with the lens cap or telescope cover on instead. In general, the more dark frames you take to subtract from the final image, the better.
DSLR / Mirrorless Camera
What one may consider a “regular” camera; used for everyday photography and feature an interchangeable (removable) lens system. Popular brands from this category that also enjoy wide support in the astrophotography hobby are Sony, Canon, and Nikon.
Exposure Time
Exposure time is the amount of time the camera sensor is allowed to collect light. In general, the longer the exposure time, the more light collected, and the brighter the image will become. This should be selected with caution though, as an exposure time that's too long can oversaturate the pixels and blow out the image, resulting in a loss of signal. Determining the correct exposure time is highly dependent on the aperture of the optics as well as the gain settings used. A larger aperture will produce a brighter image than that of a smaller aperture with the same exposure time. In a similar fashion, an image with a higher gain setting will be brighter than a lower gain setting image with equal exposure time. Finding the perfect balance between the aperture, gain, and exposure time will maximize image quality.
Filter
A filter is an accessory that is inserted within the imaging train. These accessories allow only select wavelengths through to the camera sensor. For instance, a blue filter will only allow the camera sensor to collect blue light, while all other light is blocked out. There are a wide variety of filters, from light pollution filters to narrowband filters. The combination of data from filters is a great way to create images that highlight certain wavelengths from celestial objects.
Light Pollution
Light pollution is the brightening of the atmosphere due to lights from streetlamps, other forms of artificial light, and even the Moon. As light enters the atmosphere, it washes out the night sky, making it very difficult to observe the stars, nebulae, and planets. In order to combat light pollution in astrophotography, special filters have been developed to cut through excess light and enhance images. These filters are known as City Light Suppression filters, commonly referred to as CLS filters.
Narrowband
Filters that only allow specific wavelengths of light to pass through. These are particularly useful for imaging emission and planetary nebulae since both types of nebulae emit their own light within those wavelengths.
Nebula
A nebula is a type of celestial body that is made up of gas and/or dust. There are 3 different types of nebulae within space. Emission nebulae have a “glowing” effect, where they absorb and emit light from surrounding stars. The colors emitted are entirely dependent on the gasses present within the nebulae itself. This type of nebula also includes planetary nebula and supernova remnants, produced by stars themselves. As opposed to emitting light itself, reflection nebulae reflect starlight from neighboring stars. Reflection nebulae are typically blue in color, such as the Pleiades or the Running Man Nebula. The last type of nebulae is dark nebulae, which blocks stars and other objects from our view, creating a dark silhouette.
Stacking
A method used to bring out what would otherwise be faint or invisible detail and contrast in an astrophotography image. When imaging a target, the longer an exposure is, generally the more faint detail will become visible. However as exposure time becomes longer several complications emerge - motion blur due to compounding small deviations or errors in tracking, increased sensor noise and glow, and overexposure of the bright areas of an image. Stacking mitigates these issues by combining a number of shorter exposure images, commonly called sub exposures, sub frames, or simply “subs”, into one image that effectively has a longer exposure time. The stacking process can further improve the resulting image with the use of calibration frames that help identify and compensate for visual artifacts introduced by the optics or sensor itself.

Contributing Writers
 Dylan
DylanMasters
Click the arrow above to see MLA, APA, and Chicago Manual of Style citations.
MLA:
DePrato-Grable, Teagan. "'Why Don't My Astrophotos Look Good?' | How To Take Your Astrophotography To the Next Level" AstronomyHub, High Point Scientific, 19 Jun. 2026, https://www.highpointscientific.com/astronomy-hub/post/why-dont-my-astrophotos-look-good.
APA:
DePrato-Grable, T. (2026, June 19). "Why don't my astrophotos look good?" | how to take your astrophotography to the next level. High Point Scientific. https://www.highpointscientific.com/astronomy-hub/post/why-dont-my-astrophotos-look-good
Chicago Manual of Style:
Bibliography:
Teagan DePrato-Grable. "'Why Don't My Astrophotos Look Good?' | How To Take Your Astrophotography To the Next Level" AstronomyHub (blog). High Point Scientific, June 19, 2026. https://www.highpointscientific.com/astronomy-hub/post/why-dont-my-astrophotos-look-good.
Footnote:
Teagan DePrato-Grable, "'Why Don't My Astrophotos Look Good?' | How To Take Your Astrophotography To the Next Level," AstronomyHub, High Point Scientific, June 19, 2026, https://www.highpointscientific.com/astronomy-hub/post/why-dont-my-astrophotos-look-good.