The April 8 2024 Eclipse - Why Is It Important?
For many in the USA, the April 8, 2024 solar eclipse offers a rare opportunity to see and photograph a total solar eclipse without making extensive international travel plans. For others, it represents something more - the opportunity to share the experience of witnessing a solar eclipse with friends and family. The last time a solar eclipse was visible in the United States was on August 21, 2017. There was, of course, a partial solar eclipse in 2021, and who could forget the stunning “Ring of Fire” eclipse in October 2023? But millions flocked to see the August 2017 eclipse because it represented the first opportunity in many lifetimes to see a total solar eclipse. But the April 8, 2024 total solar eclipse, for many, is the last opportunity to easily see and photograph a solar eclipse until the year 2045.
A total solar eclipse is unique when compared to a partial or annular eclipse, as it causes 100% of the light from the Sun to be blocked by the Moon. We recommend checking out this article on Understanding The Different Types of Solar Eclipses to understand the difference. The Sun, Moon, and Earth must be perfectly aligned in a straight line for a total solar eclipse to take place. As the Moon moves along its orbit and eclipses the Sun, the shadow it casts traces a narrow path across the Earth's surface - we call this path “totality”. In 2024, the path of totality will only be ~70 miles wide, depending on your location.
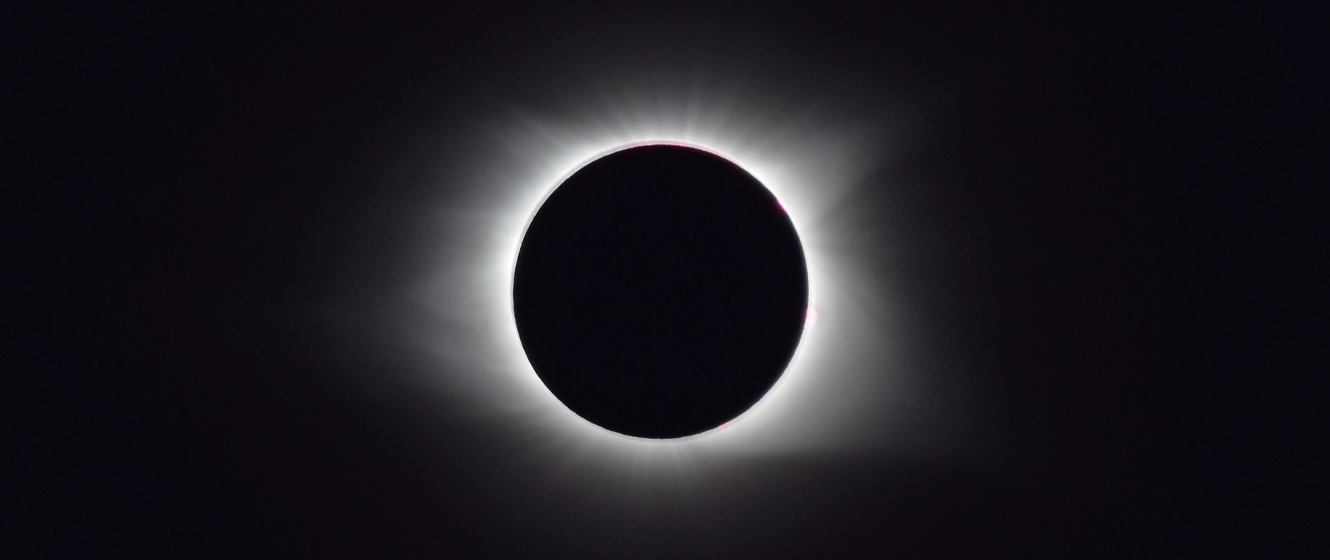
During a total solar eclipse, observers within the path of totality experience moments of darkness as the Moon completely covers the Sun. The Sun's outer atmosphere, known as the solar corona, becomes visible during this brief period. The Sun's intense brightness normally obscures the corona, but when the Moon obscures the solar disk, the eerie and stunning glow of the corona is revealed. This stunning display of the Sun's outer atmosphere, with its wispy tendrils and dynamic structures, yields an eye-watering and, admittedly, emotional display in the sky.
But how do we capture this moment? For some, a smartphone may be enough to relive the experience, but for others, you may wish to bust out your new mirrorless camera or DSLR and take hundreds of photographs. This article will cover ways to photograph the solar eclipse, using our experience of traveling to photograph both the August 21, 2017, total solar eclipse and the October 2023 annular eclipse.
Planning Your Photography
Understanding the Different Events During a Total Solar Eclipse
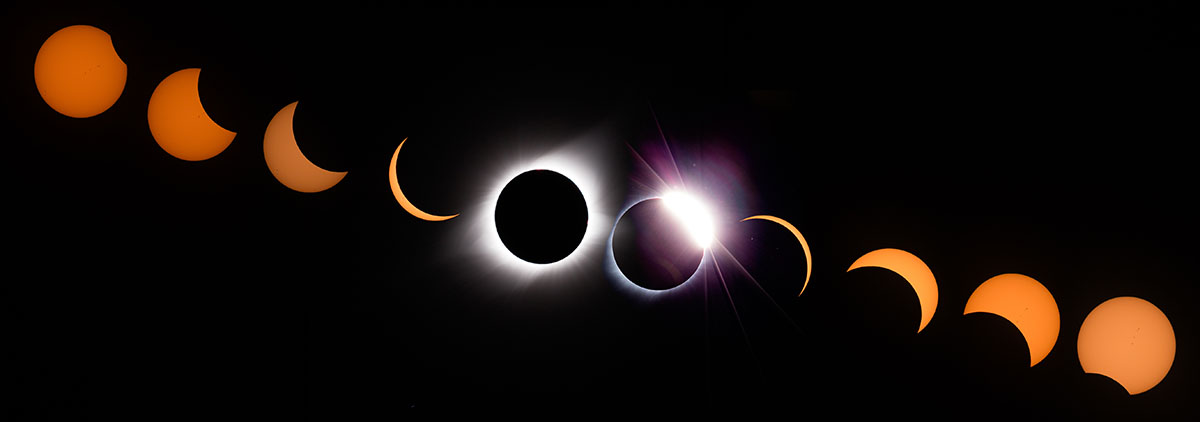
A total solar eclipse can be divided into two events: the partial and total phases. The beginning of the partial phase is called first contact. First contact (C1) marks the initial touch of the Moon's silhouette on the outer edge of the Sun, gradually obscuring a small portion of it. At this stage, a tiny crescent-shaped bite appears on the Sun's surface, signaling the beginning of the eclipse. Observers may notice a subtle dimming of the ambient light as the Moon commences its journey across the solar disk.
The second contact (C2) is a pivotal moment during a total solar eclipse. It occurs when the Moon fully covers the Sun, resulting in complete darkness at the eclipse's peak, known as totality. The sky darkens, revealing the Sun's outer atmosphere—the corona. This remarkable phase provides a rare opportunity for astronomers and skygazers to observe the Sun's outer layers, which are typically invisible due to the Sun's overwhelming brightness. The breathtaking sight of the solar corona and any accompanying phenomena, such as Baily's beads, becomes visible during this awe-inspiring moment.
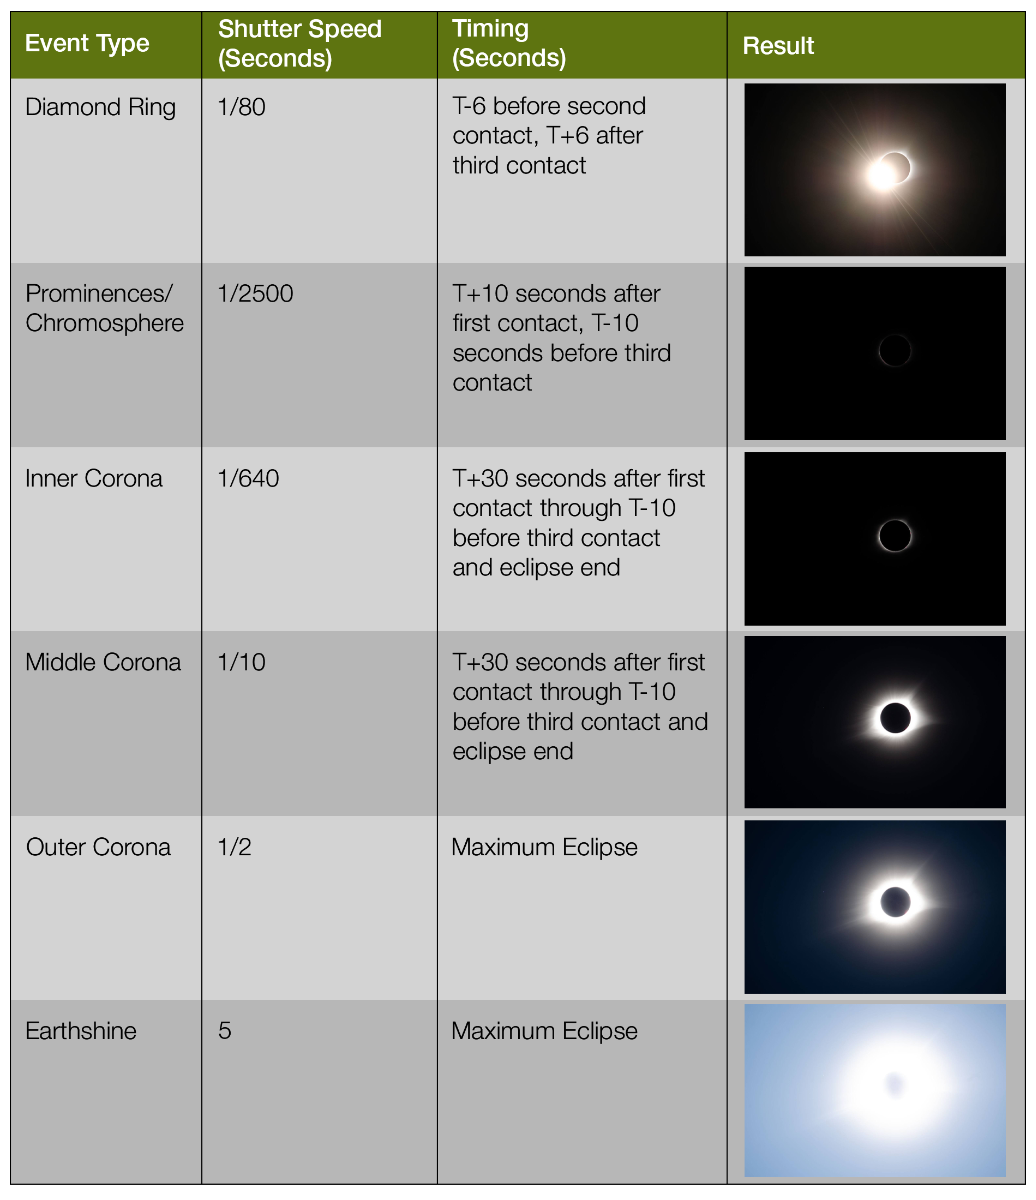
Just before second contact, when the Moon fully covers the Sun, observers can witness Baily's beads. This phenomenon occurs as sunlight passes through lunar valleys and hills along the moon's edge, creating a beady effect. Photographing Baily's beads requires the same settings used for the partial eclipse. We'll go over these settings in just a bit.
Moving beyond Baily's beads, an eclipse offers opportunities to photograph the solar chromosphere, a deep-red layer above the Sun's photosphere, visible around the Moon's edge. Employing the same camera settings as for Baily's beads and the partial eclipse ensures successful capture. During an eclipse, the solar corona also becomes visible—a faint yet massive layer of the Sun's atmosphere with temperatures exceeding 1,800,000° Fahrenheit.
Another aspect to capture during a solar eclipse is earthshine, which results from the reflection of Earth's light off the Moon's surface. This phenomenon appears slightly bluish due to the ocean's hues and can be captured with exposures exceeding 5 seconds, potentially capturing background stars as well.
After the brief but captivating totality, the third contact signifies the beginning of the Sun's emergence from behind the Moon, gradually revealing its brilliance once more (C3). Finally, fourth contact marks the conclusion of the eclipse as the Moon completely moves away from the Sun, ending the captivating celestial spectacle (C4).
Each of these events will have different photographic considerations that we will discuss in the section dealing with Photographing the Eclipse using a DSLR. However, even if you’re not using a DSLR for the eclipse, it’s still important to be on the lookout for these events and know what time they are for your viewing location.
Choosing Where to View the April 2024 Solar Eclipse
The 2024 solar eclipse, much like the 2017 solar eclipse, will be a cross-country and pan-continental event. However, the 2024 eclipse will sweep across the country in the opposite direction. Instead of crossing the coast over the Northwestern United States like in 2017, the 2024 eclipse will first make landfall over the coast of Mexico near Mazatlan and move northeast over cities like Durango, making its way to the Rio Grande River and the border of the United States and Mexico.
Mexico offers perhaps the best opportunity to view the solar eclipse. It will be over Mexico where the eclipse reaches its longest duration of 4 minutes and 28 seconds. Moreover, the weather prospects in Mexico are significantly better than in the United States. Mazatlan, for example, has only, on average, less than a 30% chance of cloudy skies compared to cities in Texas like Uvalde and Dallas, which are essentially a coin toss. As the eclipse progresses over the mainland United States, the duration will get slightly shorter, and at its shortest over Maine, it will last about 3 minutes and 20 seconds, or one minute shorter. The closer you are to the center of the eclipse line, the longer the eclipse will last compared to the full possible duration at your location.
Unfortunately, the United States is at a significantly greater risk of seeing substantial cloud cover than it was in 2017. This is because April is the peak of the Spring storm season for many regions across the path of totality. Indeed, this area of the United States is called “tornado alley” for the high number of tornadoes and severe weather outbreaks that occur in April. There is a non-zero probability, with an El Nino winding down in the Pacific and a likely La Nina taking its place, that a significant severe weather event with a trough tilted in the same axis could be sweeping across the direction of totality.
However, there is an equally likely chance of clear skies over the path. Statistically, Arkansas and Texas are the most likely regions to have decent skies. While many eclipse articles will encourage you to book your hotels and campsites months in advance, we personally believe that is a recipe for missing the eclipse if your main goal is photography due to the high chance of cloudy skies in April. This is especially true if you plan to photograph in cloudier states like Ohio, New York, or Pennsylvania. Instead, be prepared to travel and have highly flexible driving plans once the weather forecast begins to unfold.
Then there’s the traffic situation. 2017 saw massive gridlock in small cities whose infrastructure was not prepared for the high influx of traffic. The 2024 eclipse will likely be significantly worse. To avoid high traffic, your best bet is to avoid major cities in the path of the eclipse. Instead, focus on viewing the eclipse in small towns and local parks, especially if you are not planning to reserve a hotel. Be prepared to bring extra gasoline cans if you drive a gas car. And, of course, bring tons of snacks and water! You will likely be at your observing site for several hours, and the locations in the path of the eclipse will likely be short on resources to make your viewing experience comfortable. Put on sunscreen, bring a towel, and other basic needs to stay comfortable.
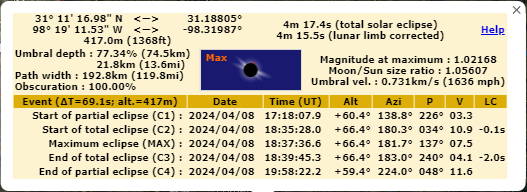
It’s also obviously important to know what time the eclipse takes place! But how do we know that? Several resources are available online to figure that out based on your location. Our favorite is Xavier Jubier’s Total Solar Eclipse Map. Simply click on your location on the map, and the times will appear! You will see options for the start of the partial eclipse, the start of the total eclipse, and so on. Note that these times are in Universal Time (UT).
Resources to Help Beat the Weather
There are tons of resources online that you can use to help plan your solar eclipse weather plans. We recommend against using the basic weather apps on your phone, as they are not detailed enough to provide a good, down-to-the-city idea if the weather will be clear during the eclipse. One good resource is called Astrospheric. Astrospheric is a free weather planning tool for all of your astronomy needs. It uses the Canadian (CMC) model, which has one of the highest-resolution cloud forecasts in the world. Astrospheric considers clouds, seeing, transparency, atmospheric smoke, etc. You can either use the website or the dedicated smartphone app to get your weather forecast from Astrospheric. Astrospheric will give you a rough idea of the weather forecast about three days out, giving you just enough time to travel and find a good spot to see the eclipse.
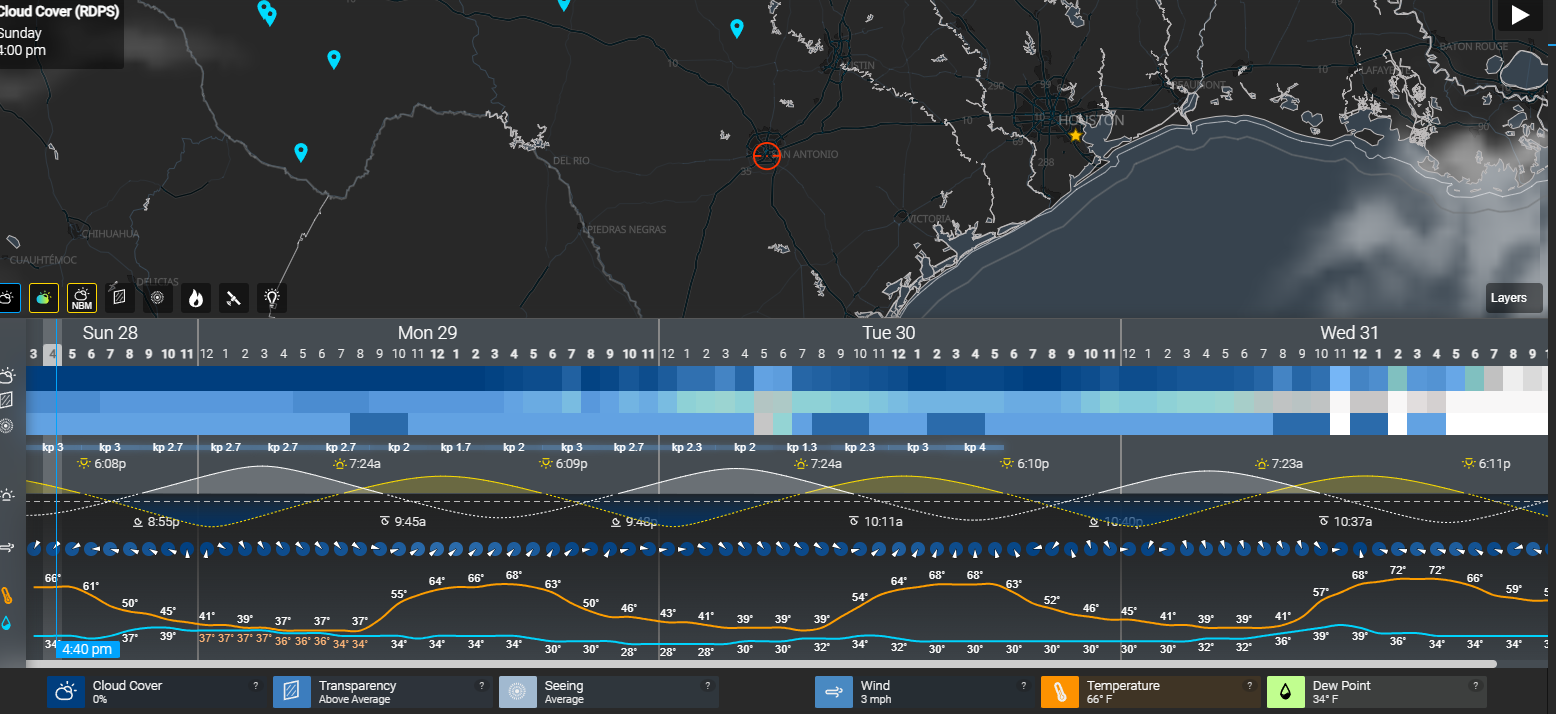
For an even higher degree of accuracy, we recommend checking out the High Resolution Rapid Refresh (HRRR) model the day of the eclipse. At about 06:00 UTC, April 8th, the HRRR will have an ultra-high resolution cloud forecast that will cover through the rest of the day until sunset. While this would be of little help if you’ve driven into a cloudy area that you can’t escape the day of the eclipse, using the HRRR will help you navigate to a better location if the eclipse viewing conditions are expected to be marginal. One way to access the HRRR is to use TropicalTidbits. While designed for tropical cyclone model viewing, it does offer some ability to see mesoscale models like the HRRR. Navigate to “Mesoscale” > “HRRR” and then select the Run Time (in UTC) in the upper right-hand corner. Under “Upper Dynamics” you will see a tool called “Simulated IR (Infrared) Satellite”. Another way is to use PivotalWeather’s interactive map.
In short, we recommend a two-fold approach. First, use Astrospheric to narrow down your region on the day of the eclipse. If the weather forecast is predicted to be absolutely clear in your entire viewing area, with no chance of clouds, then this will be all you need to use. If you are concerned that clouds may approach your viewing area on the day of the eclipse, use the HRRR model. This will give you the best odds. Also, consult with other eclipse photographers on social media - there are other eclipse photographers monitoring the weather every minute, many with years of experience.
Photographing the Eclipse with your Smartphone
You can get some stunning widefield images of the eclipse with just your smartphone that those with superzoom lenses and telescopes cannot see. For example, you can create a timelapse of the Moon’s shadow coming across your viewing location by using any timelapse app or one already built into your phone. With an iPhone, for example, you can record a time-lapse video showing the Moon’s shadow approaching your location. To do this, simply open the camera app, select time-lapse mode, and record until completion of the event. You will need a photographic tripod to be able to do this, as well as some way to attach your smartphone to your tripod.
Another idea could be to take photographs of the partial eclipse with your eclipse glasses. This is as simple as it sounds; however, it could yield some great photographs of the eclipse, especially if you want some zoomed-in shots of the partial eclipse phases. This could show you the partial eclipse in the sky through your eclipse glasses, as well as your surroundings.
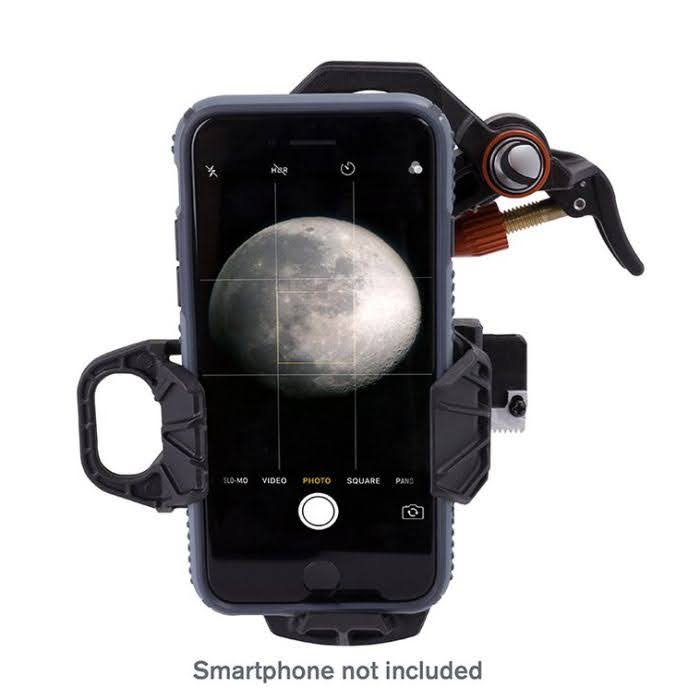
You could also do something similar to DSLR photography with telephoto lenses. It is possible to get decent photographs of any type of solar eclipse with your smartphone camera, as your smartphone’s camera app will automatically adjust for the proper exposure. You will need an adapter to place your smartphone into your eyepiece. We recommend the Celestron NexYZ Universal Smartphone Adapter to adapt your phone to your eyepiece.
Photographing the Eclipse using a DSLR
For camera considerations, we strongly recommend using a DSLR or mirrorless camera. These cameras are the easiest to use as they do not require external control for operation, as would be the case with a dedicated astrophotography camera. These types of cameras are usually fairly intuitive with their controls, allowing photographers to easily adjust settings such as shutter speed, aperture, and ISO to achieve optimal results quickly. The live view on a camera is also easy to get to, and you can quickly zoom in on the limb of the Sun to achieve a solid focus. Overall, the ease of use and versatility of these types of cameras make them ideal tools for capturing the magic of a solar eclipse with minimal effort and maximum impact.
But what settings should your DSLR be at to use it for the eclipse? We recommend setting the ISO fairly low, anywhere from 100-200. The eclipse will be fairly bright, so you don’t need a lot of shutter speed at all to capture it. In fact, too high of an ISO will ruin your photos as they’ll become noisy during post-processing, and you might find your shutter struggling to capture more than just the corona, as many shutter speeds are limited to only 1/4000 or, at best, 1/8000 of a second.
We also recommend turning autofocus to “off”, the camera settings to “manual”, turn off any built-in noise reduction tools, turn off any vignette reduction settings, vibration reduction, and perhaps most importantly, shoot in RAW instead of jpeg! Shooting in your camera’s RAW settings will help bring out much more detail, and you don’t have to worry about adjusting your camera’s white balance in the middle of the eclipse (JPEG files have their white balance already baked into the image). Mirrorless users should use their mechanical shutter to avoid any potential rolling shutter. However, recent mirrorless cameras like the Z8, A7C Mk2, and A7CR do not have a mechanical shutter, so keep that in mind if using a similar type of camera. Rolling shutter is unlikely to be a serious problem anyway unless you are going handheld, which we strongly recommend against.
Depending on your setup, we recommend not exceeding 900mm for a full-frame sensor or 600mm for a crop sensor or smaller. Going beyond these focal lengths may make it difficult to frame the Sun's corona in your shots, as well as any background stars your sensor might detect during the eclipse. However, the lowest focal length we recommend is around 100mm; anything smaller may result in losing precious details like Bailey's Beads or Prominences. If possible, avoid zoom lenses and opt for primes. Zoom lenses could change focal length in the moments leading up to totality, and the last situation you want to find yourself in is trying to reset your focus just as you remove your solar filter. Ideally, refocus about 10 minutes before the eclipse to ensure your lens doesn't lose focus due to daytime heating or similar effects.
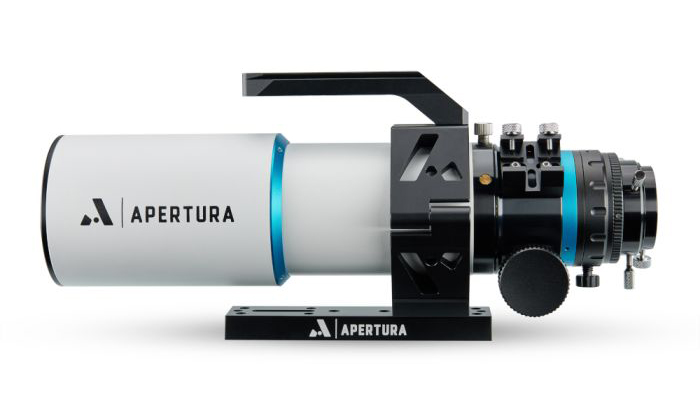
You can also use a telescope to photograph totality. Lenses can be heavy, and can experience focus shift during an extended period of time, especially fully zoomed out. Lenses can also be difficult to focus, as they do not have the fine focusing ability that Crayford focusers in telescopes can have. The Apertura 72 FPL-53 Doublet APO Refractor is a great option for photographing the eclipse. With its optional adjustable flattener, you’d have a focal length of 430mm - ideal for both full-frame and crop-sensors. Telescopes like this are designed to photograph targets in the sky, so you will likely struggle less with focus and other issues native to camera lenses. The Apertura 72 refractor also has an internal light baffle to increase contrast. The downside here is that telescopes like this can only work in one aperture, so if you want a faster or slower aperture, you’ll need to go with a camera lens. Telescopes can often be heavier as well, and you may have to use a heavier mount than just a photographic tripod.
Speaking of mounts, let’s talk about the best type of mount you should use for photographing a solar eclipse. If you’re looking for quick photographs without any fancy editing, you can probably just use a standard telephoto tripod. Keep in mind, though that the Sun and Moon will be moving during the 4 minutes of the eclipse, and with a standard telephoto tripod, you will have to make adjustments, perhaps constantly depending on your focal length and how much you want the Sun to be centered in your photos. For example, at 300mm, the Sun will take about 15 minutes to move across the field of view of an APS-C camera lens. However, the much larger corona will exit the frame in a shorter period. At 800mm with the same sensor, the Sun will move across the field of view in about 5 minutes, and that’s across the longer end of the sensor.
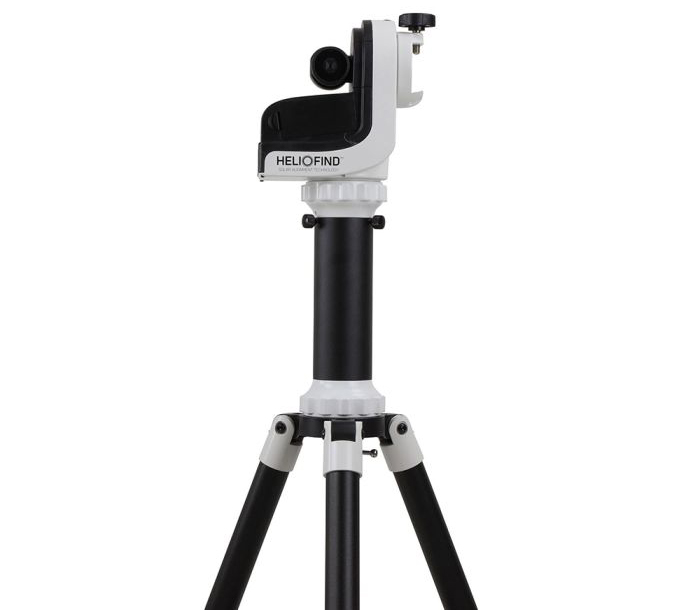
To avoid this headache, we recommend looking at some sort of tracking mount. A simple, altazimuth mount like the Sky-Watcher SolarQuest is the easiest to use. This requires very little setup and gives you the option to be portable. The only downside is that an altazimuth mount will result in some field rotation, so you may wish to consider using an equatorial mount like the iOptron Skyguider Pro. Heavier telescopes may require larger mounts, like the Celestron AVX or similar. However, the downside is that you lose the portability that star trackers offer. If you can, stick with smaller tracking mounts unless you are completely confident in your viewing location the day of the eclipse. Also, set your mount’s tracking speed to match the solar rate instead of sidereal. That way, you match the Sun's natural movement (also known as the solar mean rate).
BEWARE OF THE MERIDIAN FLIP! If you’re using a star tracker, a general photographic tripod, an altazimuth mount, or not planning to be out in Texas or Arkansas for this eclipse, you can safely ignore this paragraph. However, those with large equatorial mounts should consider the position of the Sun during the eclipse. Your mount may attempt to perform a meridian flip in the middle of totality! Be sure to either flip before totality or turn off meridian flip entirely on your mount.
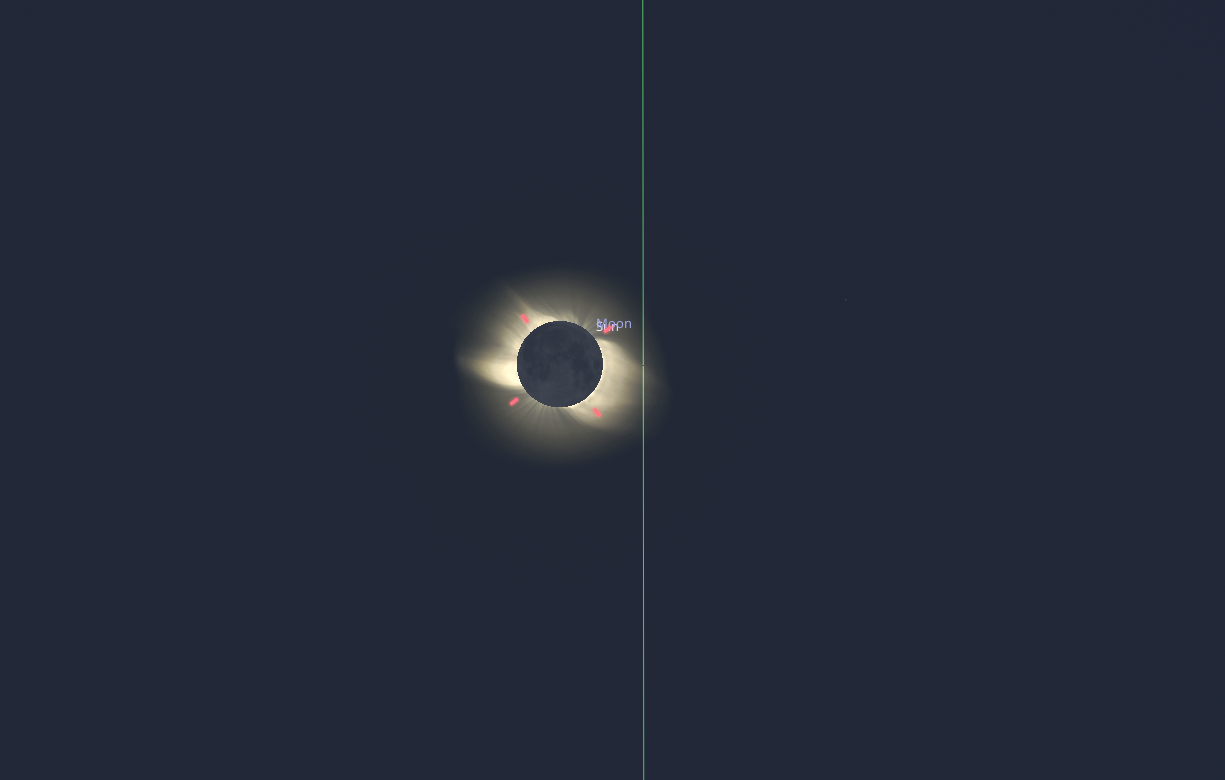 The position of the Sun seen from Kerrville, Texas during totality. Note the eclipse will be crossing the meridian just before the end of the eclipse.
Click to Enlarge Image
The position of the Sun seen from Kerrville, Texas during totality. Note the eclipse will be crossing the meridian just before the end of the eclipse.
Click to Enlarge Image
Need some help visualizing your settings? Here’s an example with an ISO of 200, f/8 camera lens at 300mm, using a Nikon D5100 APS-C sensor. This might help you understand what type of events you will focus on and some good settings for your camera as a rough starting point. A good tool to help calculate your eclipse settings can be found with Xavier Jubier’s Shutter Speed Calculator for Solar Eclipses.
Choosing The Right Solar Filter
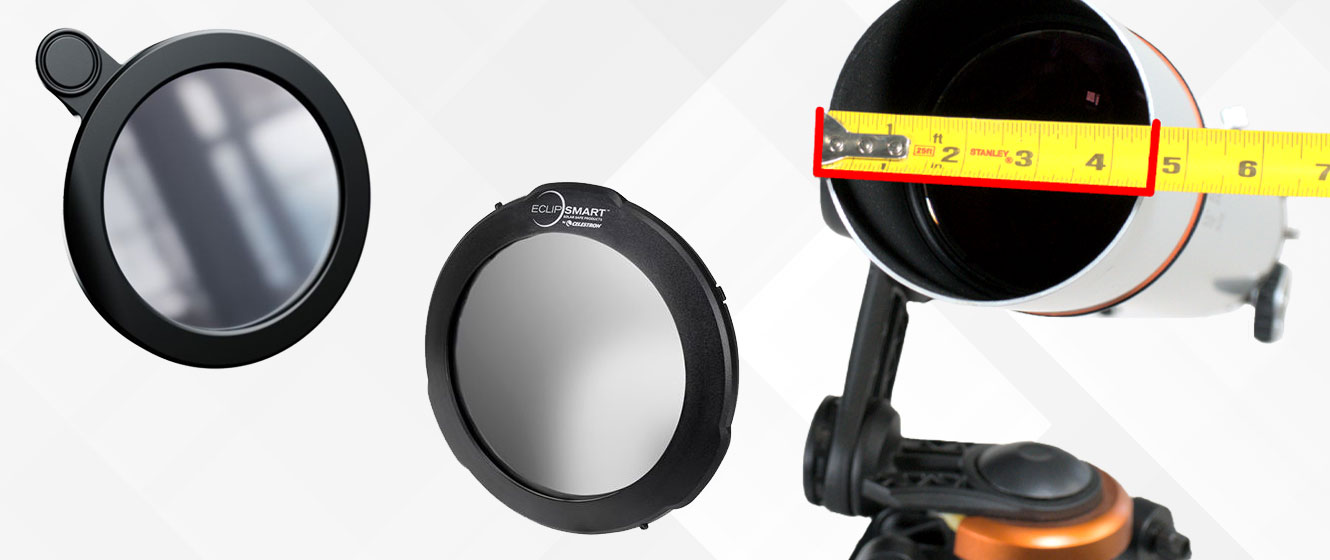
Choosing the right solar filter for the eclipse is very important, as you’ll need it to observe the partial phases before totality safely. Our experts have put together an entire article, complete with a calculator, to help you choose the right size solar filter for your eclipse photography. Measuring this is crucial, and failure to do so can seriously damage your eyes and the optics of your telescope. Do NOT remove your solar filter during the partial phase of the eclipse. Only remove the solar filter about 30 seconds before the total solar eclipse. The only time it’s safe to look at the Sun during a total solar eclipse is the 4 minutes of totality and no other time.
AND, OF COURSE – NEVER LOOK AT THE UNECLIPSED/PARTIALLY ECLIPSED SUN WITHOUT ISO-CERTIFIED SOLAR ECLIPSE GLASSES!!!!
Other Things to Photograph During an Eclipse
Believe it or not, the eclipse isn’t the only thing in the sky you can photograph during a total solar eclipse! The sky becomes a similar darkness to the sky about 20 minutes after sunset, and some brighter stars and planets will emerge. Indeed, checking Stellarium, one can see that Jupiter, Mercury, Venus, Saturn, and Mars will all be out and visible during the April 8, 2024 total eclipse! Your best bet to capture the string of the five brightest planets will be to use a widefield lens in a similar fashion to smartphone photography. A 14mm lens would be ideal, as you’d have just wide enough of a field of view to capture Mars through Jupiter in the sky. To capture them, we recommend increasing the exposure of your DSLR to about 2-3 seconds. This should be enough to capture the planets without completely washing out your images. Stacking the images after the fact will reveal even more detail, and you might capture just enough stars for a deep sky stacking software like DeepSkyStacker or PixInsight to be able to register them.
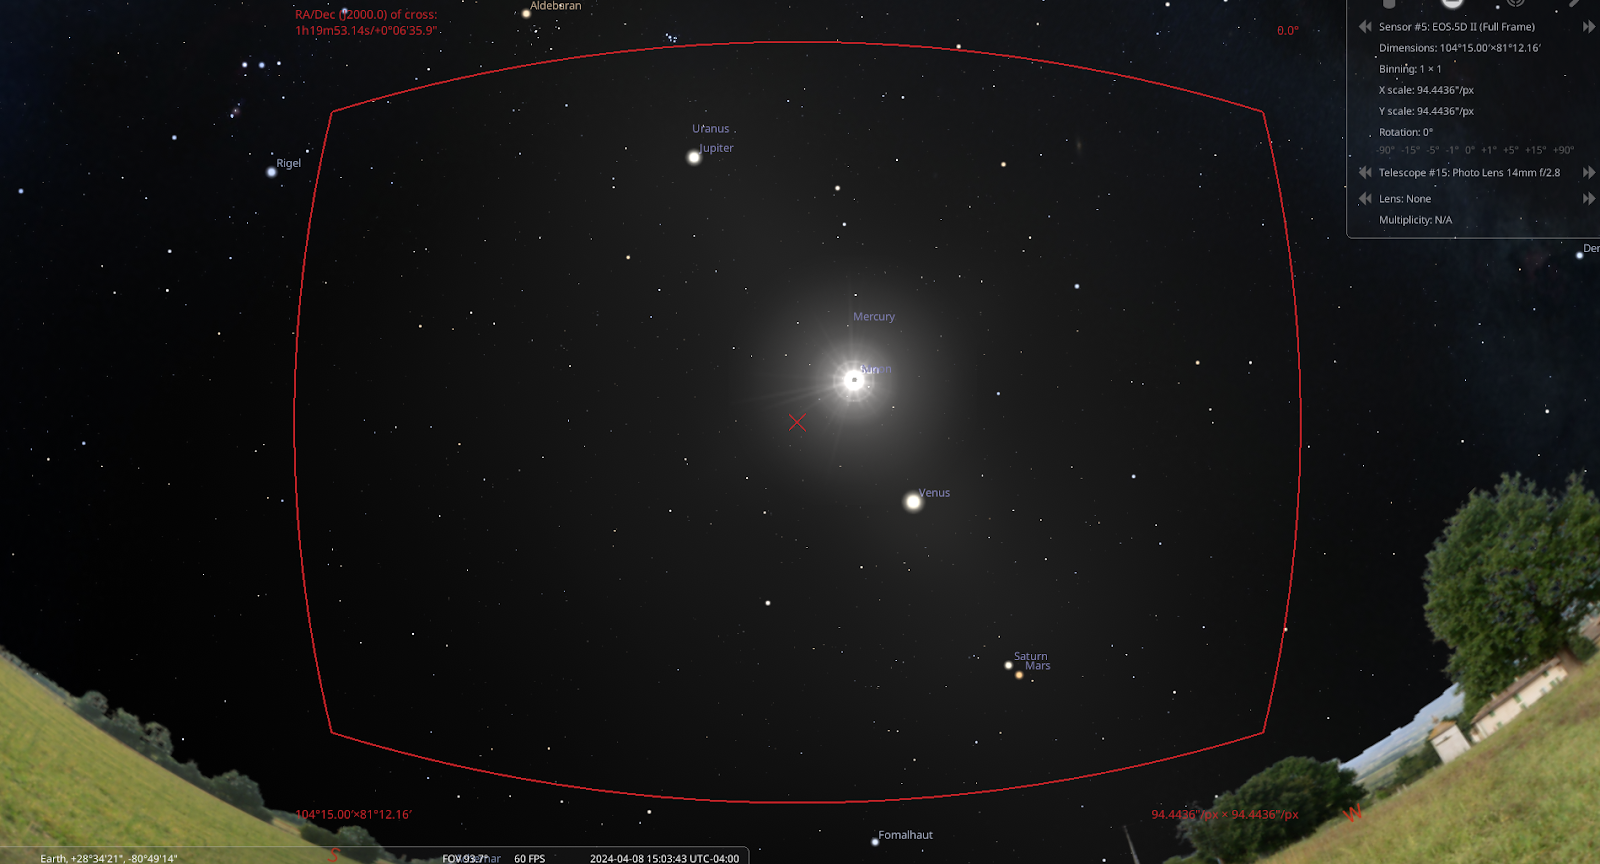 Simulated image of the sky during the April 8 Total Solar Eclipse and a 14mm lens with the atmosphere removed.
Click to Enlarge Image
Simulated image of the sky during the April 8 Total Solar Eclipse and a 14mm lens with the atmosphere removed.
Click to Enlarge Image
You can also photograph your surroundings as well. Colors lose their vibrancy, and shadows take on a sharper definition. One of the most striking effects is the emergence of crescent-shaped shadows cast on the ground. These tiny crescents form as objects allow small slivers of sunlight to filter through, creating a captivating play of light and shadow. Trees, with their branches and foliage, often serve as excellent subjects for showcasing this phenomenon, as they cast patterns of crescents on the ground, adding a surreal touch to the scene. Photographing these shadows can add to your collection of photography for this event, as even a smartphone can pick these up. A cute idea could be to take a cardboard box, poke holes in it to create an outline of a shape or word, and then project crescents on the ground!
Another elusive phenomenon that photographers strive to capture is the occurrence of shadow bands. These elusive bands manifest just moments before and after totality, adding an extra layer of mystique to the eclipse experience. Shadow bands present as thin, wavy lines that ripple across surfaces due to atmospheric winds interacting with the diminishing sunlight.
As the sun's light dwindles to a mere pinpoint, it becomes capable of casting intricate shadows of our dynamic, fluid atmosphere onto the ground. These gray ripples are seen over the ground within several minutes of totality. To best see them, lay down a white piece of paper, and you will be able to see the shadow bands projected on the paper about a minute before the eclipse. Witnessing shadow bands in their natural setting is an event reserved exclusively for those experiencing a total eclipse, making them a coveted subject for photographers seeking to capture the full spectrum of eclipse-related phenomena.
Practice and Have Fun!
The more complex your photography plan, the more likely you are to experience a failure at a critical point. You might forget to charge your camera; your battery to your mount might not work as long as you hope it would; your filter might not fit as you thought it would; or you might struggle at an awkward angle to photograph the eclipse. The key is to practice, practice, PRACTICE! Simulate the eclipse on Stellarium, and go outside and set up your equipment exactly as you would. Take some snaps of the Sun to practice safely pointing your telescope/camera at the Sun with a solar filter.
If this is your first solar eclipse and you’re feeling overwhelmed after reading all of this, don’t be. If you’re not confident in your abilities as a photographer to capture all of this, leave the camera at home and enjoy the experience with your own two eyes. No camera will ever be able to truly capture the experience of actually seeing a total eclipse. Besides, there will be a lot of photographs coming out of this eclipse. Trying to develop a potentially complicated eclipse photography plan can take away your enjoyment of the eclipse. The last place you want to be for your first solar eclipse is behind your camera screen adjusting settings. Leave the camera at home and have fun! A total solar eclipse is our wonderful sky's most beautiful celestial event. It’s extremely rare and can be a nearly transformative experience for those who witness it for the first time. If this is your first eclipse, unless you are 100% confident you know what you are doing, put down the camera lens, and look up!

Learn More
Interested in learning more about solar eclipses, or the sun in general? Not sure where to begin? Check out our Astronomy Hub!