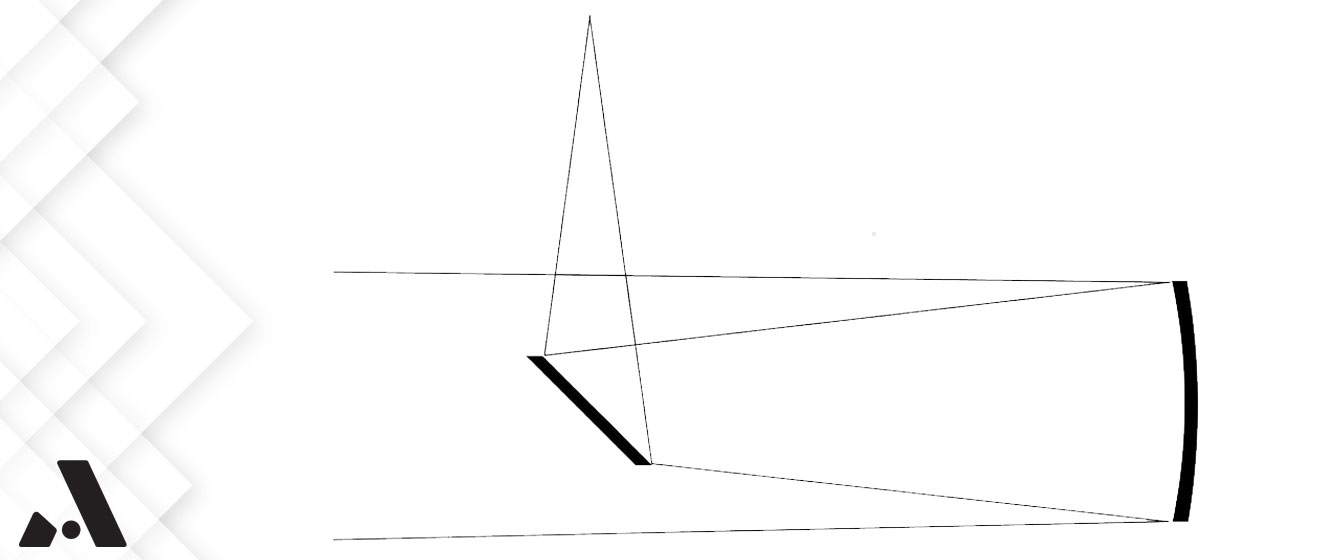
The Newtonian telescope design uses a primary mirror and secondary mirror to focus and direct light to the eyepiece or camera sensor. The primary mirror is the larger focusing mirror at the bottom of the telescope tube. The secondary mirror is the smaller elliptical flat mirror that sits just behind the focuser at the top of the telescope tube and redirects focused light to the camera sensor.
F/4 Imaging Newtonian telescopes are very popular and can offer a large leap in performance over small refracting telescopes while having a lower cost and being light and compact enough to work on many of the same mounts. This is especially applicable to the 6” Newtonian models. Imaging Newtonians offer “fast” optics at focal lengths that pair exceptionally well with today’s popular camera sensors, many of which have a 3.75um pixel size. They are generally not over sampled or under sampled and are around 1” per pixel, an ideal resolution.
Unfortunately, many of the telescopes leave a bit to be desired. The shortcomings are not inherent traits of the Newtonian design, but they can be fairly common in the industry. Some of these shortcomings are less than ideal collimation mechanics, poor performing coma correctors, mediocre build quality, and generally non-optimized designs. This can lead to frustration during use and can be downright discouraging for newcomers to the hobby, especially when compared to the simplicity of refractors, a reason as to why refractor recommendations have been so popular up until now. The general idea and quality of manufacture exists, but the designs lack the finesse and finishing touches necessary to take them from an economic consideration to a high performance premium telescope. The Apertura CarbonStar 150mm Imaging Newtonian does just that.
Click here to learn more about the all-new Apertura CarbonStar 200.
There were many improvements that could have a massive positive effect on the performance of the scope and those of us in the Apertura Product Development Team stepped forward to work through the possible improvements and create a fully optimized telescope for today’s popular camera sensors. These improvements combined resulted in 22% brighter images than the previously offered f/4 Newtonian, without changing the aperture of the telescope. The following paper documents these improvements.
Goals
The goals for this project were as follows:
- Fully illuminated field size optimized for the most popular camera sensors
- Focal plane closer to OTA
- Improved stray light control
- More modern look
- Premium materials and construction methods
- Excellent quality coma corrector
Technical Performance and Optimization
Field Illumination
Field Illumination can be described as the light intensity measured across the entire image produced by the telescope. The telescope optics will almost always have a reduction in light intensity as you move away from the center of the image, but we can control how quickly that happens by optimizing the size of the secondary mirror, the diameter of the OTA, and how high the focal point is above the focuser. Like most things, this is a balancing act. A slightly abstract view of telescope optimization can be seen as a series of sliding scales that are intertwined. We can not have all categories set to maximum as there is a “give and take” that must take place.
Secondary Mirror
The telescope can be designed so that there is minimal loss in light intensity across the entire field and shows a nearly evenly illuminated image across the entire camera sensor. Using a very large secondary mirror allows for more off-axis light to reach the camera sensor with less fall off, providing more even field illumination. Maximizing the secondary mirror size might seem ideal at first but after taking a closer look, it will be clear that by going to the extreme with this one aspect of the telescope’s performance, we greatly reduce the performance in other critical areas. By increasing the size of the secondary mirror, the central obstruction increases. While the industry often talks about secondary obstruction and how it can degrade image quality by reducing the fine contrast that the optical system can produce. While this is true, the major issue we experience in an imaging system is the overall reduction of signal due to the reduced on-axis light transmission.
Secondary Obstruction and Light Transmission
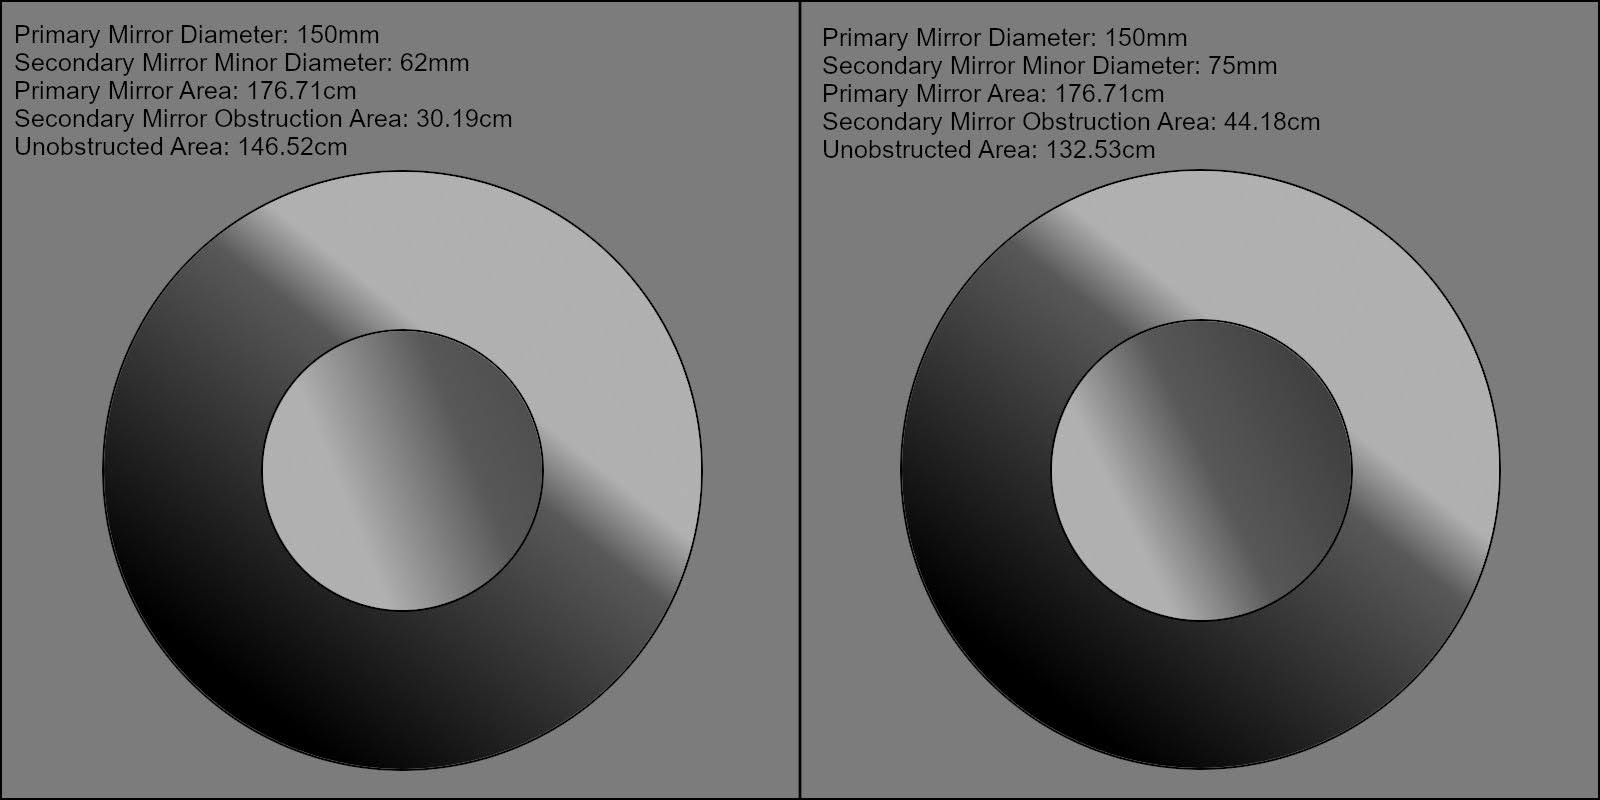
The primary mirror in the telescope focuses the light which forms a smaller concentrated image that can then be magnified by an eyepiece or recorded on a camera sensor. A 150mm diameter optic has an area of 176.7cm. The secondary mirror obstructs part of this light, slightly dimming the image by the equivalent area that the secondary mirror obstructs. This can be tested and recorded easily, proven mathematically, and demonstrated visually. The following image shows the mathematical reduction in light that reaches the primary mirror when increasing the secondary mirror size and shows the two systems visually. The larger secondary mirror will offer a more evenly illuminated field. The smaller will show more light intensity fall off towards the edge of the field compared to the other system, though there is a caveat. The smaller optimized secondary mirror will also have a higher signal in the center of the field!
In the following example, we compare a 62mm vs 75mm secondary mirror. The smaller option offers about 10% more unobstructed area, while the larger would offer less total signal but a more even field illumination. We used a 62mm secondary mirror on the CarbonStar 150mm Imaging Newtonian.
 Click to Enlarge Image
To recap, if the fully illuminated field is maximized, the total amount of light that actually reaches the sensor will be reduced. In other words, the absolute signal level that reaches the camera is reduced, even though we minimize the light fall off across the sensor. The reason for this reduction in absolute signal is the larger area of the primary mirror which becomes obstructed by the secondary mirror. By decreasing the size of the secondary mirror, the total amount of light that reaches the camera sensor can be increased, but the 100% fully illuminated field size is reduced. The 100% illuminated area can be reduced until we see light fall off in the center of the field, meaning the secondary is too small for the primary mirror and the aperture of the telescope is essentially reduced. This happens because the secondary becomes too small to see the entirety of the primary mirror from the camera’s perspective.
As mentioned earlier, there are many interacting parts of the telescope that can be optimized. The diameter of the optical tube plays into field illumination as well. By reducing the diameter of the OTA, the focal plane can be closer to the center of the optical tube, and this allows a smaller secondary mirror to offer a larger fully illuminated field size. If the OTA is too small, it will vignette the outer portion of the mirror and effectively reduce the size of the telescope. If the OTA is made larger, the total field of view the telescope can offer will be increased, so long as the secondary mirror and focuser ID can accommodate the field of view. The trade off with a large OTA diameter is the secondary mirror becomes unrealistically large in order to keep the field size large, which reduces overall signal. Additionally we have common camera sizes and focuser sizes which eliminate any practical use for a massive illuminated field.
As I’m sure you can tell by now, there are many things to consider when designing a “simple” Newtonian telescope.
Focal Plane
The focal plane is the location at which the telescope forms an image. This is the spot where we position our camera sensors so we can record a well focused image. The focal plane position plays into field illumination and vignetting as it relates to the primary mirror, secondary mirror, focuser inside diameter, and the telescope optical tube diameter. The closer the focal plane is to the telescope, the better the performance of the field illumination, all else being equal.
Moving the focal plane closer to the telescope can be achieved by using a shorter height, or low profile, focuser. Like most things, there is a trade off. A low profile focuser has a reduction in the spacing of load bearing parts within the focuser, which can lead to focuser sag. This can be negated to some degree by moving the focal plane even closer to the OTA which will reduce the leverage or moment arm of force that acts upon the focuser’s support surfaces. While we did redesign the telescope focuser, the height was not changed. We’ll cover more about the focuser later.
The focal plane of the CarbonStar 150mm Newtonian Reflector has been moved as close to the telescope as possible while allowing for a variety of equipment to reach focus, both with and without corrective optics in place. This was accomplished by slightly increasing spacing between the primary and secondary mirrors.
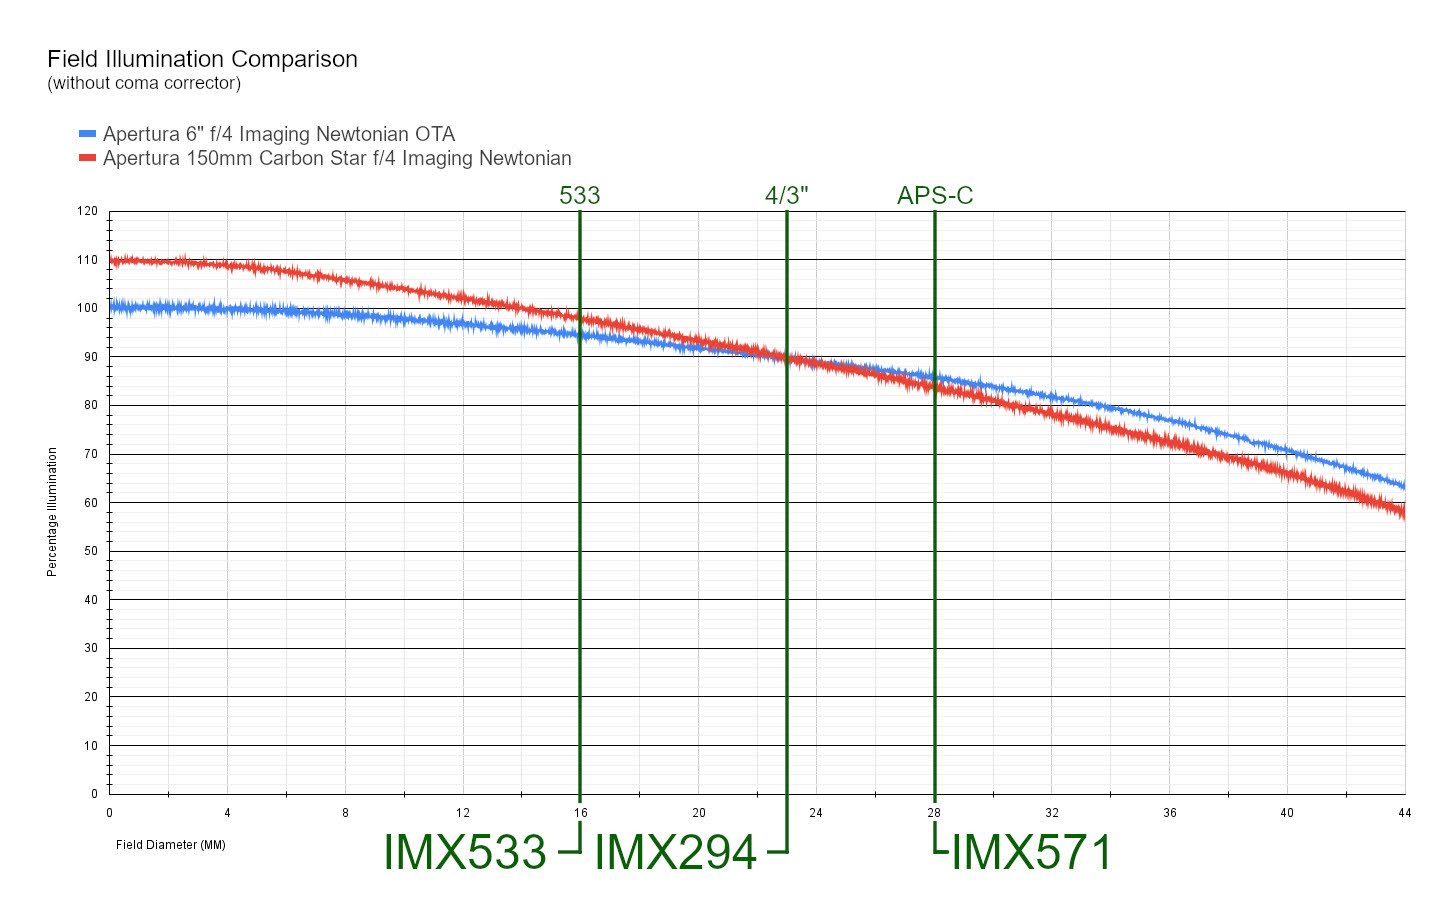
These improvements alone allowed for an approximate 10% increase in signal at the center of the image than the previous Apertura 6” f/4 Imaging Newtonian, with those gains tapering to the edge of a 4/3” IMX294 sensor.
 Click to Enlarge Image
Contrast and Stray Light
Unwanted internal reflections from mechanical parts of the telescope can cause stray light to make it to the focal plane, muddying the view and reducing the image contrast. There are many ways to reduce the negative effects of stray light. Typically, a flat black or very dark grey paint is used inside of the optical tube. This dark coating reduces reflections and light transmission off the mechanical parts. Optical flocking paper can be used as well.
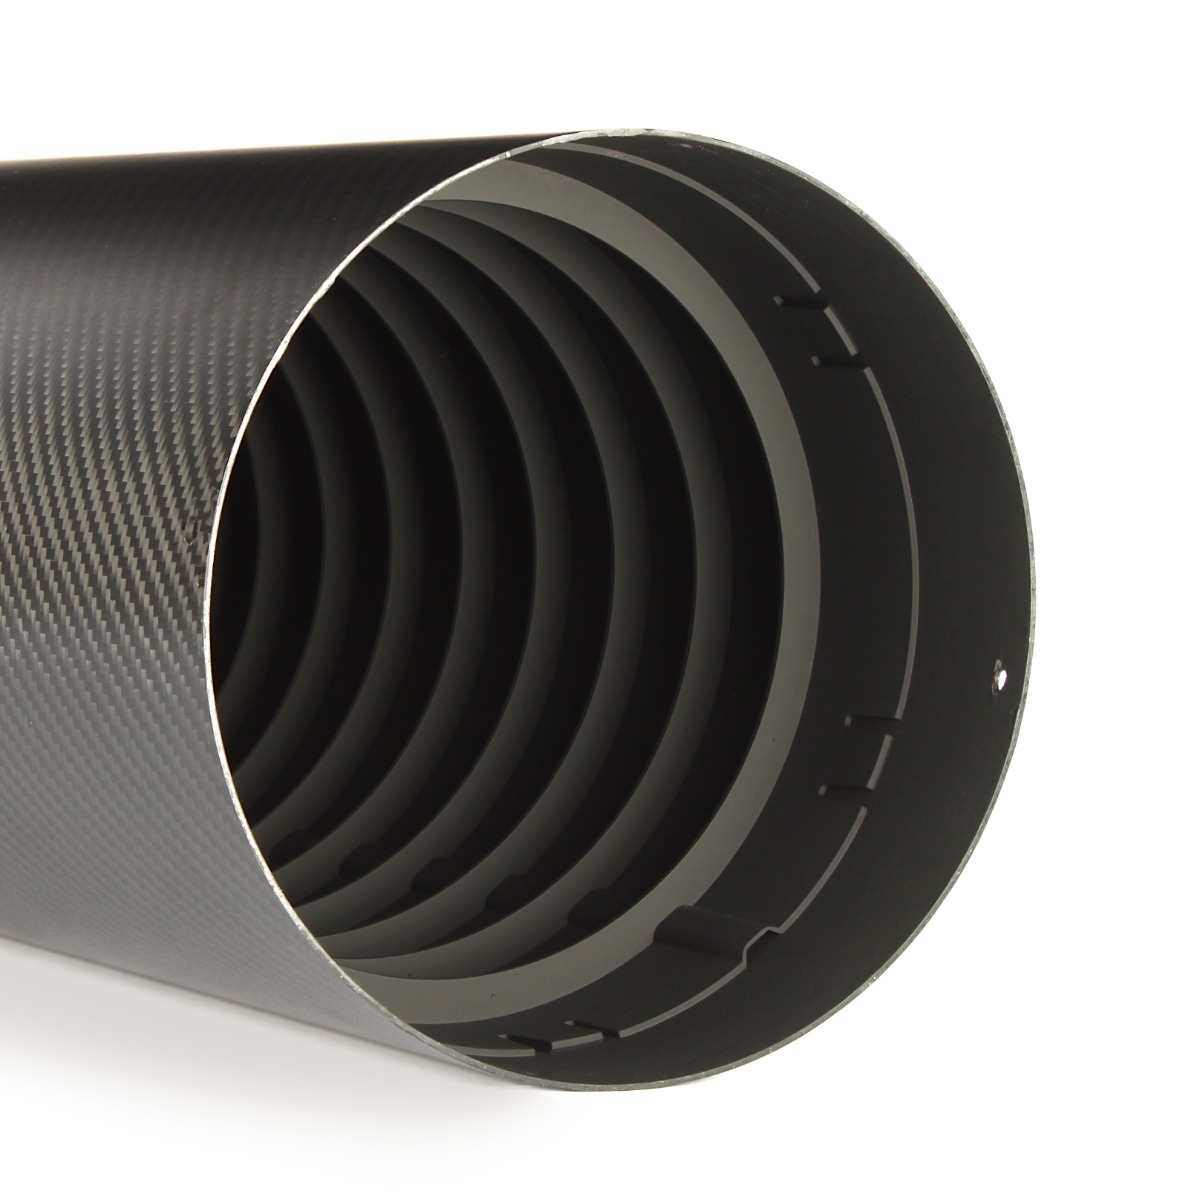
Knife edge baffles can also be placed strategically within the optical tube to physically block this unwanted light from reaching the optics and prevent unwanted light from reaching the camera sensor. Generally, this offers better performance, and the knife edge baffle system is typically seen in higher end telescopes and not necessarily common in Newtonian telescopes at this time. Unlike most imaging Newtonian telescopes, we decided to add a series 9 knife edge baffles along the interior of the tube to add a second layer of stray light reduction. A back cover plate further reduces the negative effects of stray light.
Through testing, we were able to see a small reduction in the overall ADU of our flat frames for a given exposure time by using these stray light control methods, when compared to the same exact telescope without making any other changes. When we consider that this reduction in ADU from adding the knife edge baffles was even across the entire frame and was not a result of aperture reduction from the baffles themselves or any form of vignetting, we can deduce that this slight reduction in signal evenly across the frame was from a reduction in unwanted light.
Construction Materials and Methods
Here at Apertura, we wanted to pair the improved optical and mechanical properties of this telescope with modern construction techniques and materials. For the optical tube, we chose carbon fiber over painted steel or aluminum. Not only does it look great and help decrease weight, but the thermal stability of the material lends itself to reducing focus shift from temperature changes.
For the parts that were previously made of cast aluminum, we chose CNC machined aluminum with a very high quality aluminized finish. The flexible spider vanes of the telescope were replaced and integrated into the front ring of the telescope tube. This thicker and more robust spider system offers more rigidity to hold and center the secondary mirror. This should help hold collimation better and reduce flexure. The tradeoff for more repeatability and reliability is brighter diffraction spikes within the image. Again, this is a balancing act of goals and priorities.
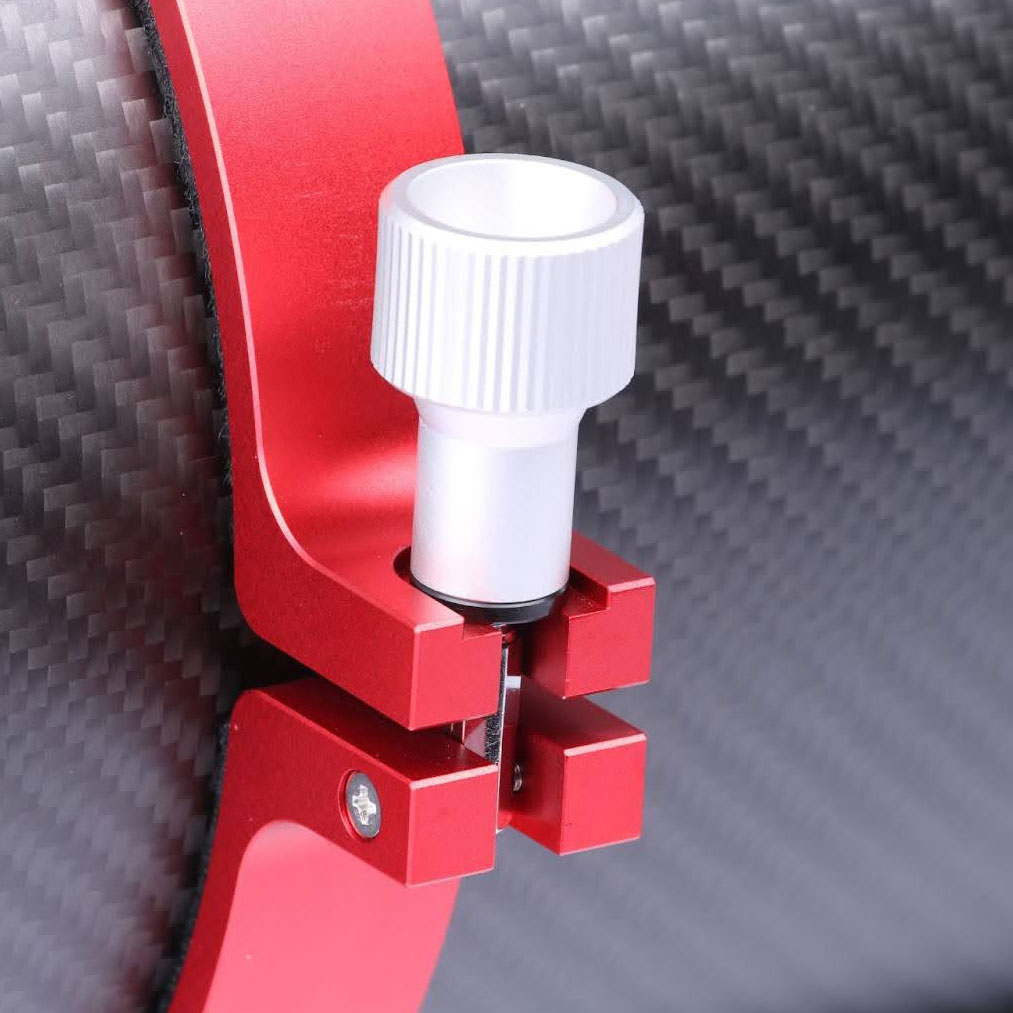
The tube rings which were previously cast aluminum are now beautiful CNC machined aluminum rings with locking knobs of equal quality. The telescope comes with a D-style and V-style dovetail bar already installed.
New Rack & Pinion Focuser
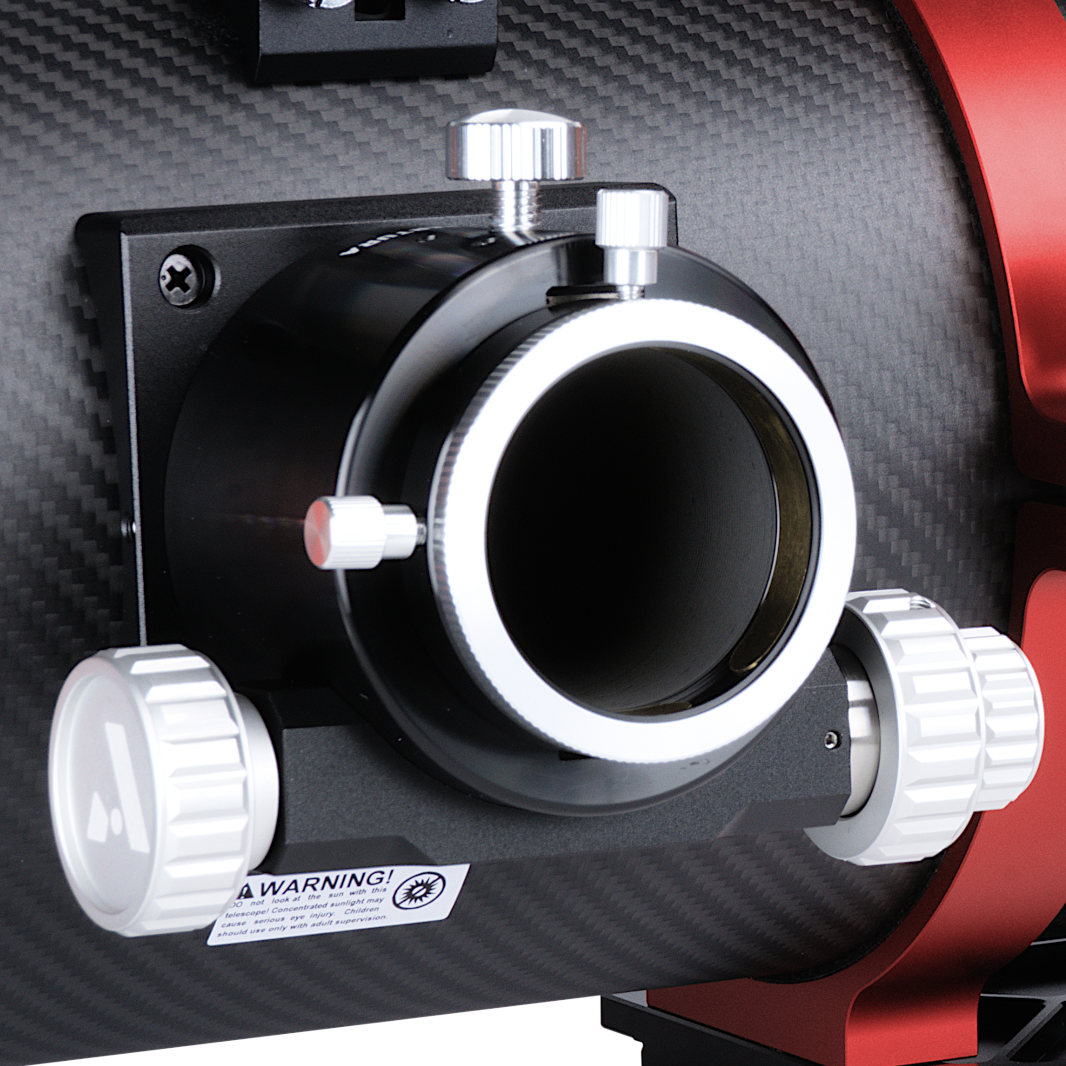
The CarbonStar Imaging Newtonian has an all new focuser! It is a rack and pinion focuser which is strong and easy to use. Unlike a linear crayford focuser which requires proper adjustments to be made, this rack and pinion focuser is low maintenance and can support a cooled astronomy camera, electronic filter wheel, off-axis guider, and coma corrector.
What exactly is a rack and pinion focuser? This focuser design uses a 100 mm toothed rack which engages a dual pattern gear on the focuser shaft. This toothed engagement prevents any possibility of slip. It is supported by a 100 mm long linear motion rail that uses dozens of precision ball bearings that ride in a track. The design allows for a rigid and smooth function by distributing the focuser load across the high number of ball bearings. This focuser requires no regular adjustments or maintenance, unlike crayford focusers.
Electronic focuser users can connect most popular options right out of the box, with no modification or 3D printed adapter necessary. For those who still wish to focus manually, the focus knobs have been redesigned to offer a better tactile feel with improved styling. The focuser can be rotated by loosening the two hex screws at the base. Additionally, the focuser has a threaded ring at the top, offering M56 threads which are covered by a beautiful thread protector. This allows for future adaptation of thread-on accessories. The focuser has a tension knob as well as a lock knob. This updated focuser is imaging ready!
Coma Corrector
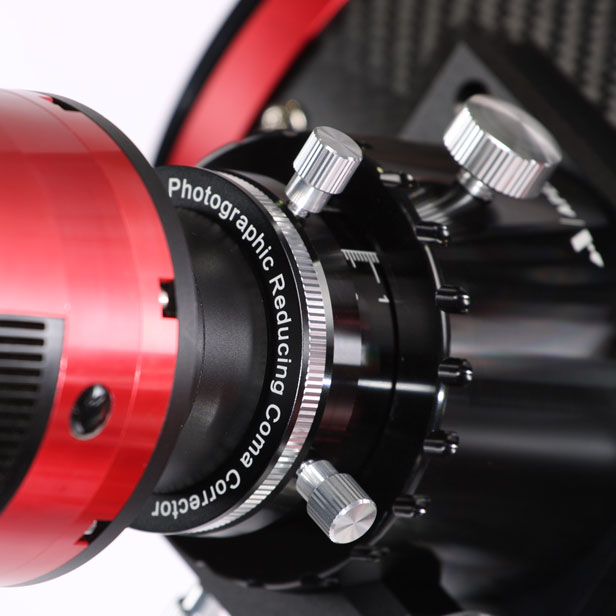
The Apertura CarbonStar 150mm Imaging Newtonian, with its new improved materials, optical layout, and physical design improvements needed an excellent coma corrector. Many corrector designs were considered; Two element, three element, and reducing. We settled on a focal reducing 3-element design. This corrector is well paired to the 4/3 sensor optimization that was performed on the other parts of the telescope. So far, we have increased the signal to the camera sensor by 10% without increasing the aperture or reducing the focal ratio from the standard f/4. Adding the increased signal per pixel from the slight 0.95x reduction of the NEW Apertura multi-element element coma corrector further increased the signal to the camera sensor. When combined with this coma corrector, the Apertura CarbonStar 150mm Newtonian now offers an f/3.8 focal ratio and a measured increase of 20% in the signal per pixel compared to the original Apertura 6” f/4 telescope with its coma corrector, with those gains tapering just shy from the far corners of an APS-C sensor.
 Click to Enlarge Image
Results
In order to provide the highest absolute signal to the sensor and offer the most field illumination for popular camera sensors (385, 533, & 294), Apertura has optimized the secondary mirror size to match the optical tube diameter which is well balanced to the focuser draw tube's inner diameter. Additionally, the Carbon Star telescope performance has been balanced so it still works well with camera sensors as large as a full frame, though the targeted sensors for maximum performance were those models previously listed. We have implemented stray light control from knife edge baffling and internal blackening. The focuser has been redesigned. We have implemented premium CNC machined components and modern materials and finishes. An all new coma corrector has been released. We’ve increased the signal per pixel on the more common sensor sizes allowing for a massive increase in performance without actually changing the primary optical components of the telescope. Thus, optimization at its finest!
Meet the highly optimized and game-changing
Apertura CarbonStar 150mm Imaging Newtonian
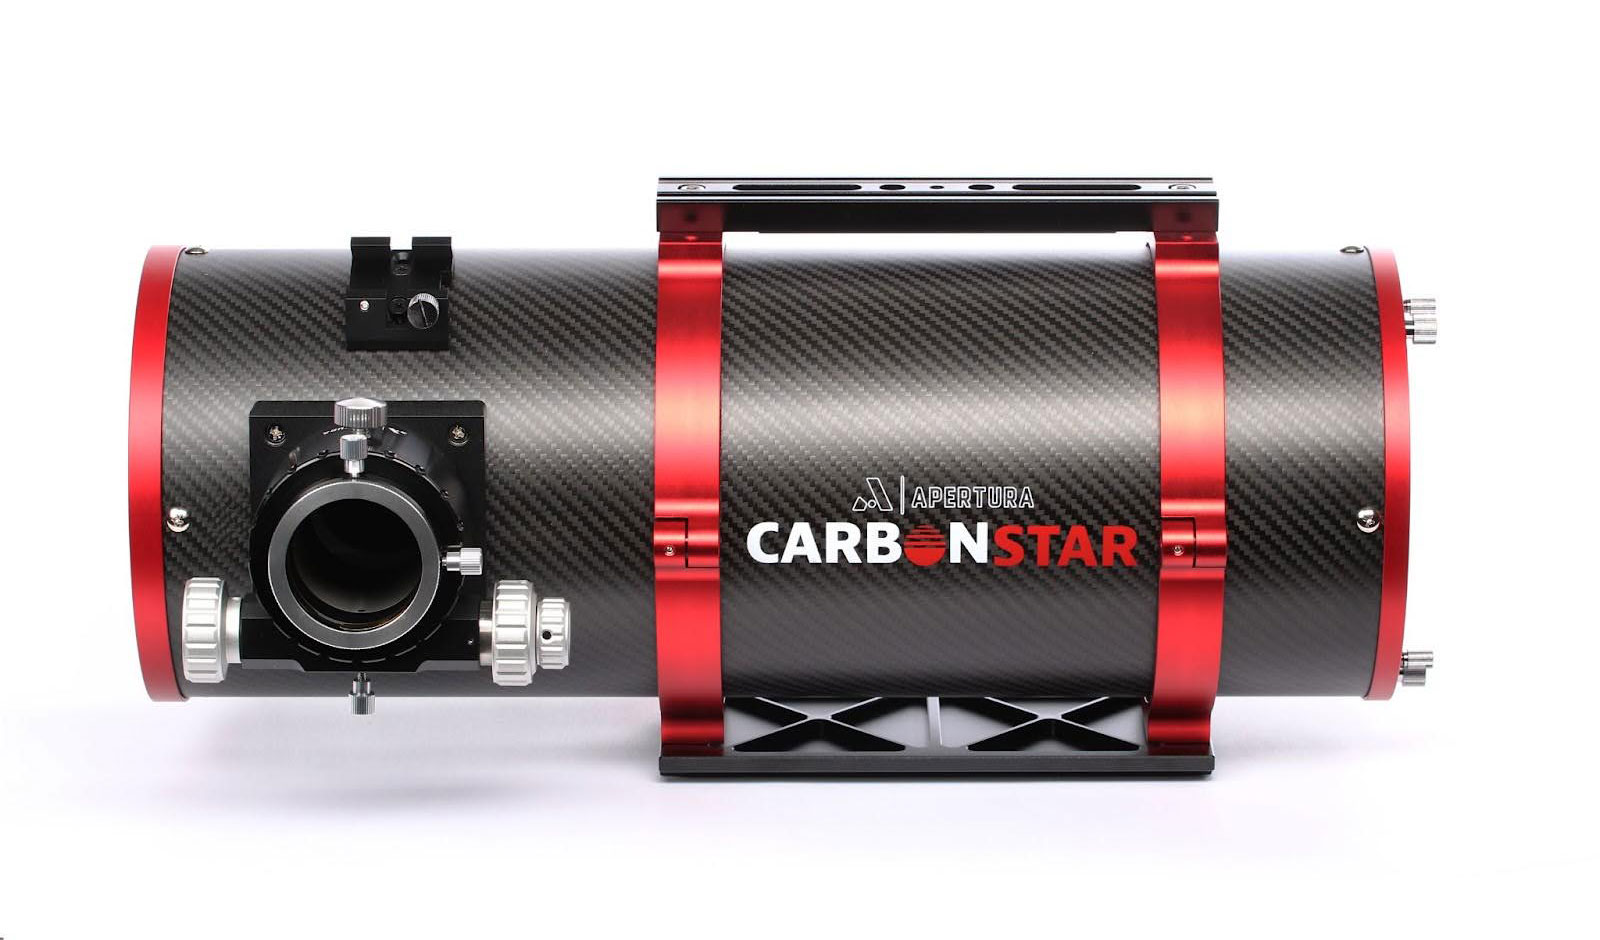
CarbonStar 200mm Imaging Newtonian
Apertura has taken the concept of the 150mm CarbonStar Imaging Newtonian and scaled it to the next level. This time, optimizing the telescope’s performance for APS-C sized camera sensors, rather than the smaller micro 4/3 sensor size that the CarbonStar 150 was optimized for. Let's take a look at the changes that were made to optimize the 200mm f/4 Imaging Newtonian for maximum APS-C Performance!
Field Illumination
The optical design of this telescope is unique in that field illumination is optimized for APS-C sensors. It has a slightly larger secondary mirror than other 200mm (8”) f/4 Newtonian telescopes on the market, and the focal plane sits a little bit closer to the telescope than other Newtonians. While too large of a secondary mirror can reduce the overall field illumination levels by blocking more of the primary mirror, too small of a secondary mirror can also limit the maximum field illumination. Apertura has optimized the secondary mirror size by increasing it from the standard 70mm to a slightly larger 74mm minor diameter. If you image with an APS-C or smaller camera, this telescope is designed for you!
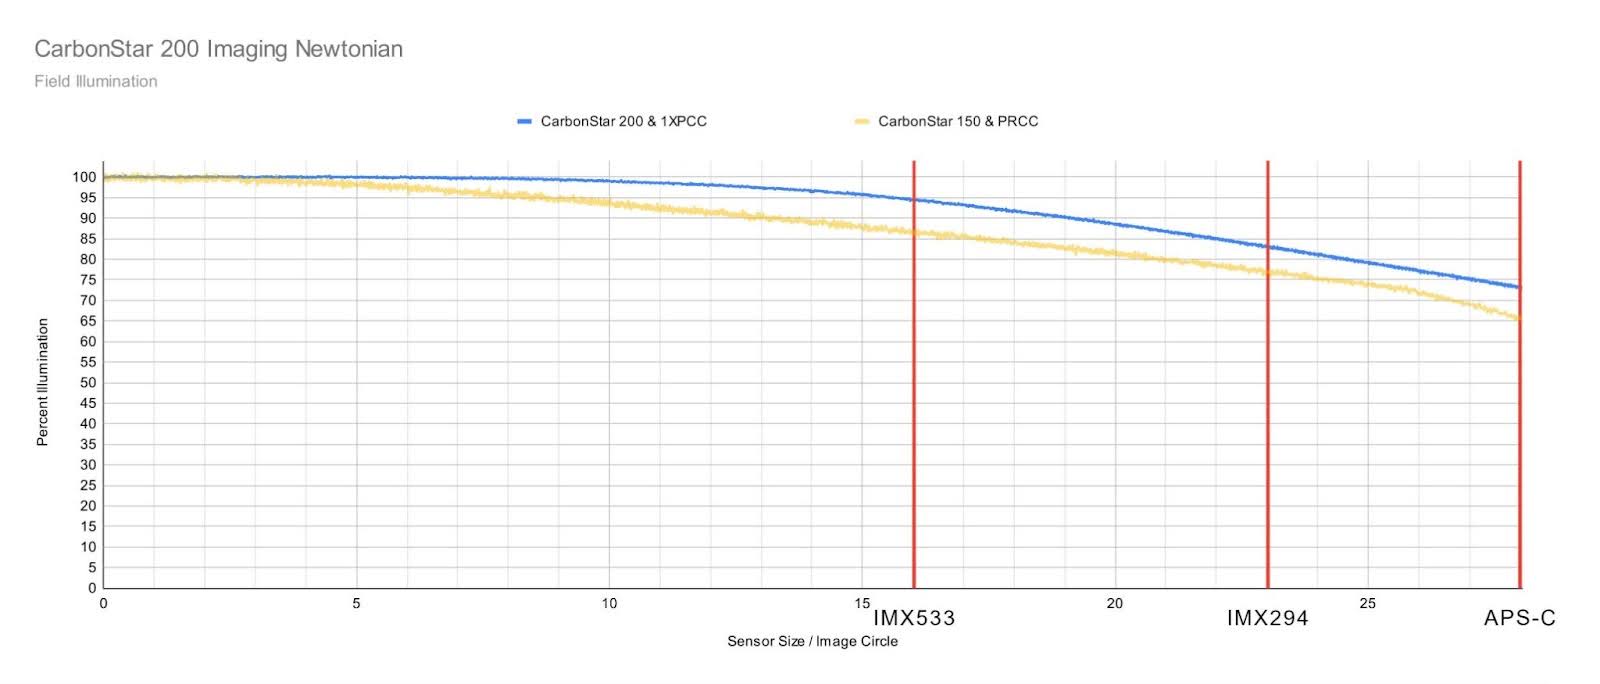
The following chart shows the measured field illumination of the CarbonStar 200 Imaging Newtonian when compared to the CarbonStar 150. There is roughly an 8% gain across the field. The blue line is the CarbonStar 200 telescope and the yellow line is the CarbonStar 150. This demonstrates the much larger fully illuminated area of the 200 mm scope when used with their respective coma correctors.
 Click to Enlarge Image
Stray Light Control
Many Newtonian telescopes suffer from the extremely degrading effects of stray light, which makes calibration frames nearly impossible to take, and this stray light lowers gross contrast in images. Apertura has addressed this problem by building the carbon fiber optical tube around thirteen knife edge baffles. These baffles control stray light by blocking internal reflections and reducing its ability to reach the focal plane. We’ve also included a cap for the primary mirror cell which can be inserted to further reduce the ability of stray light entering the optical tube from the back side. These two key features are rarely seen on Newtonian reflectors
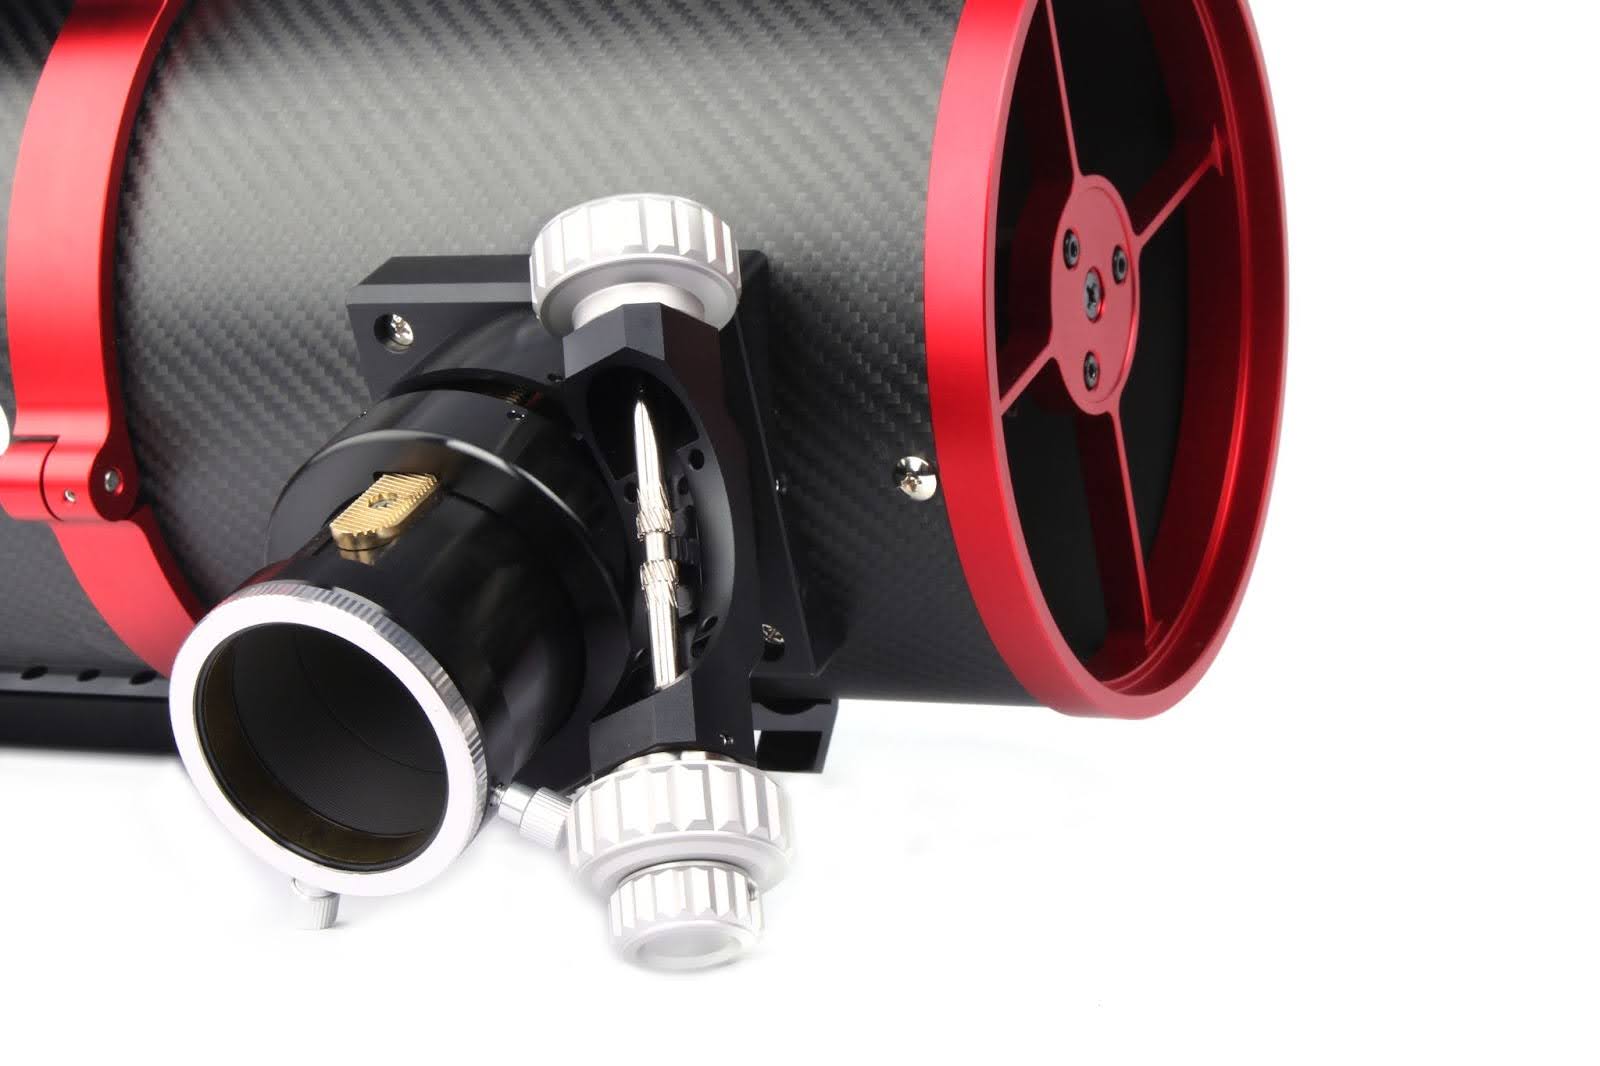
Rack & Pinion Focuser
The CarbonStar 200 Imaging Newtonian features a rack and pinion focuser to ensure you can carry the larger imaging equipment these optics support without concern. Its toothed mechanism maximizes holding power while still providing plenty of precision and smooth motion.
The focuser block is ready to accept most of the popular Electronic Automatic Focusers (EAF) on the market, using a simple bolt-on installation. No modification or 3D printed adapter is necessary with the CarbonStar! For those who still wish to focus manually, the focus knobs have been redesigned to offer a better tactile feel with improved styling. There is a 10:1 slow motion control knob on the right hand side of the focuser. The telescope comes with a 1.25” to 2” adapter which is useful when adapting 1.25” collimation tools to the 2” focuser draw tube. Coma correctors and other imaging accessories are held in place with a brass compression ring utilizing two thumb screws. This is an extremely secure method, and the precise inner diameter of the draw tube prevents axial misalignment that can be seen with some other telescope focusers on the market. The focuser can be rotated and the drawtube has a threaded ring at the top, offering M56 threads which are covered by a beautiful thread protector. This threading allows for possible future adaptation of thread-on accessories. The focuser has a lock knob for those who focus manually.
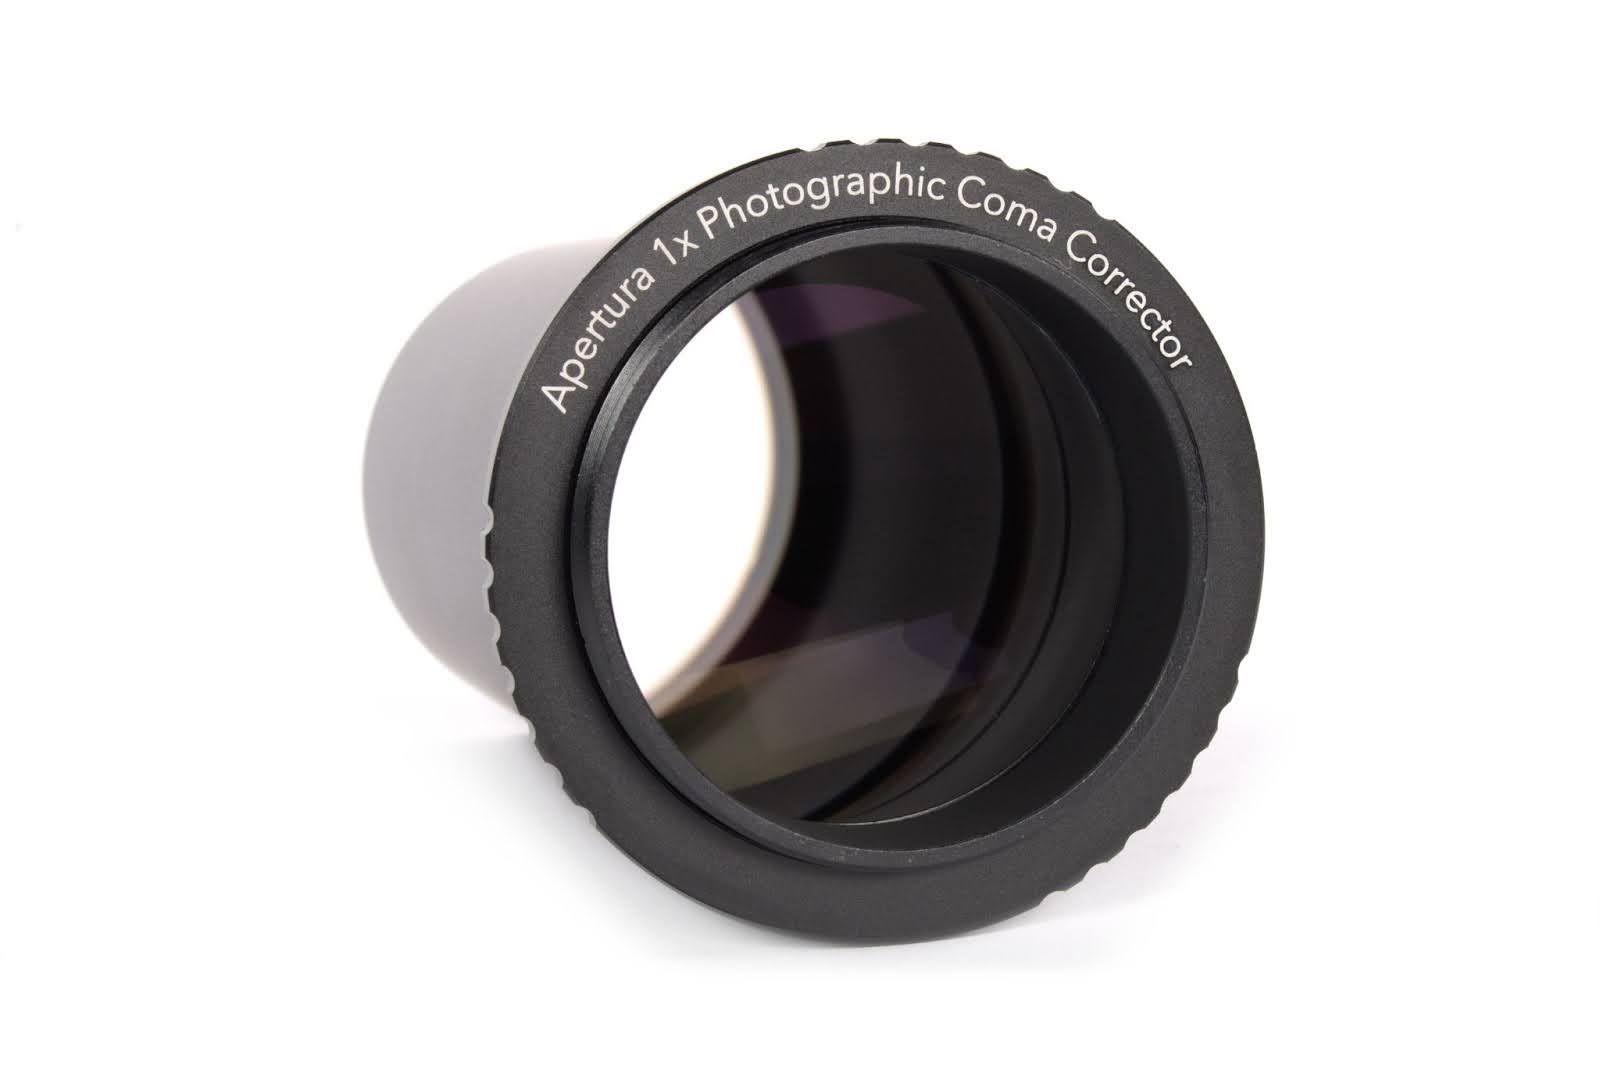
Coma Corrector
We highly recommend using this telescope with the Apertura 1x Photographic Coma Corrector, though the telescope will work with most other coma correctors on the market, the 1XPCC uses a 4 element design and has a very well-corrected and illuminated image circle of 28 mm, which makes it perfect match for APS-C sensors.
Results
In order to provide the highest absolute signal to the sensor and offer the most field illumination for APS-C sensors, Apertura has optimized the secondary mirror size. Additionally, the Carbon Star telescope performance has been balanced so it still works well with camera sensors as large as a full frame, though the targeted sensors for maximum performance were those models previously listed. We have implemented stray light control from knife edge baffling and internal blackening. The focuser has been redesigned. We have implemented premium CNC machined components and modern materials and finishes. An all new coma corrector has been released. We’ve increased the signal per pixel on the more common sensor sizes allowing for a massive increase in performance without actually changing the primary optical components of the telescope. Thus, optimization at its finest!
Meet the highly optimized and game-changing
Apertura CarbonStar 200mm Imaging Newtonian

 Moryah
 Vincent
This article was originally published on 03/12/2024.