Optimize The Performance Of Your Telescope!
Much like process of picking a telescope, deciding which accessories you need can be a challenging task. There are so many different options and types of accessories to choose from! Whether you’re looking to magnify your view with a new Barlow lens, protect your scope from the elements with a dew heater, or test out a new filter, this comprehensive guide will point you in the right direction.
We have broken this article up into multiple sections, and have added a table of contents for easy navigation. From eyepieces to smartphone adapters and everything in between, lets jump right in!
Eyepieces
While your telescope is instrumental in capturing light from space, your eyepiece acts as a bridge between this light and your eye and translates the image into something we can perceive. Eyepieces come in a wide variety of different focal lengths, fields of view, build qualities, and more. Understanding the ins-and-outs of eyepieces is essential in making the most out of your telescope’s light gathering power. This small, yet vital, instrument can mark the difference between sharp, striking views and a lackluster night under the stars. Choosing the right one can seem overwhelming at first, but no need to fret. We’re here to help! Whether you plan to view the beauty of our solar system or the more obscure yet fascinating deep space objects, we have broken down the key aspects to look for when choosing your next eyepiece, highlighting the focal length, eye relief, exit pupil, the field of view, and the barrel size.
Focal Length & Calculating Magnification
Just like your telescope, your eyepiece also has a focal length. The ratio of telescope focal length to eyepiece focal length helps you determine your system’s magnification, how large an object will appear in relation to the naked eye. Not only does magnification help determine what you can view but also how clear your image will be. The formula for magnification is as follows: Telescope Focal Length ÷ Eyepiece Focal Length. The larger the magnification, the larger the target will appear to be.
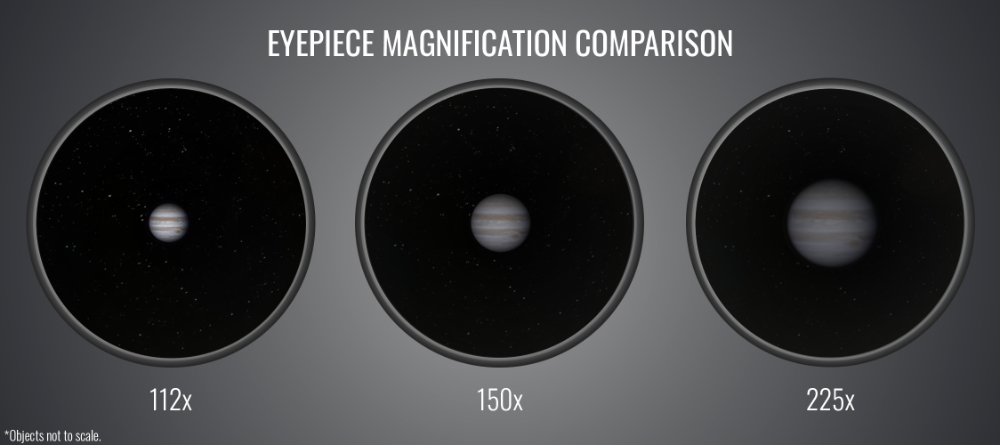
You may ask, why not find an eyepiece that provides the highest amount of magnification for deep looks into space? While high magnification is great for up close views of small and bright celestial objects, it’s important to remember your optical system magnifies everything within the field of view, including Earth’s atmosphere. If the overall clarity and stability of Earth’s atmosphere (also known as your local seeing conditions) are unfavorable, the slight ripples in the air and soft distortions will be more apparent at higher magnifications. Under good seeing conditions, it’s best to capitalize on this still air by utilizing higher magnifications, while lower magnifications help you make the most out of poor seeing conditions. If you’re looking for a high magnification setup, it’s best to stay under 300x magnification, unless the stability of your atmosphere is excellent, as anything higher will likely yield subpar results due to atmospheric blur. 150x-200x is an ideal range for high magnification under average seeing conditions.
Importance of Eye Relief
Eye relief refers to the distance your eye must sit from the eyepiece in order to view the full field of view. It’s an important factor in determining the overall comfort of your nights under the stars, especially during extended viewing sessions. Short eye relief (
Overview of Exit Pupil
Exit pupil is the diameter of beam of light that departs from the eyepiece, projecting the image to your eye. It’s an important aspect to consider when pairing your eyepiece with your telescope as it determines the brightness of your image and the comfort of your viewing experience. This term is analogous to our very own pupils, hence its name. As the pupil within our eye expands, more light is brought into our retina. This same concept is applicable to eyepiece exit pupils.
We measure the exit pupil by its diameter in millimeters, with the larger the exit pupil, the more light throughput and the overall brighter the view. In general, deep sky objects become visible with an exit pupil of 1-1.5 mm or greater with fainter and fainter targets becoming more and more visible as the exit pupil increases. A rate of 2 mm is typically considered the “sweet spot,” offering sights on a wide variety of celestial objects. Larger exit pupils are great for viewing dim, deep sky objects such as nebulae and galaxies, and offer effortless alignment with your eye’s pupil thanks to the size. Smaller exit pupils, on the other hand, are ideal for viewing bright, compact objects, such as the planets or our Moon. Since these objects are bright themselves, smaller exit pupil diameters are sufficient in resolving fine detail on Saturn’s rings, the cloud bands on Jupiter, countless lunar craters, and plenty more solar system wonders!
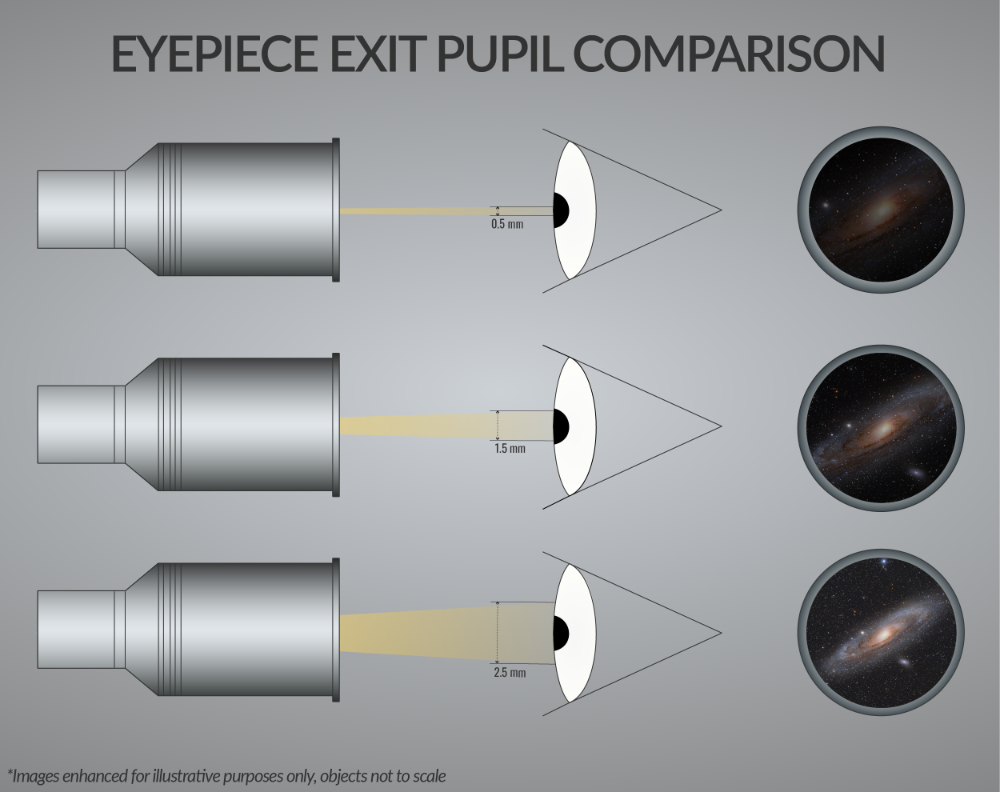
We discussed magnification and its impact on target selection, and it’s important to keep in mind that a higher magnification will typically yield a smaller exit pupil (dimmer image), while a lower one will often result in a larger exit pupil (brighter image). Understanding the relationship between these two factors will assist you in choosing the right eyepiece for your specific observing goals.
To calculate exit pupil of your eyepiece/telescope combination, use either of the two equations: Exit Pupil = Telescope Aperture (mm) ÷ Magnification or Exit Pupil = Eyepiece Focal Length ÷ Telescope Focal Ratio. Check out this table to help you determine the best objects to view based on your calculated exit pupil!
| Exit Pupil Size (mm) | Celestial Objects |
|---|---|
| 0.5-1.0 | The Moon |
| 0.5-1.0 | The Planets |
| 1.0-2.5 | Globular Star Clusters |
| 3.0-7.0 | Open Star Clusters |
| 2.0-7.0 | Galaxies |
| 2.0-3.0 | Planetary Nebulae |
| 2.0-7.0 | Diffuse Emission Nebulae (H II Regions) |
| 2.0-7.0 | Reflection Nebulae |
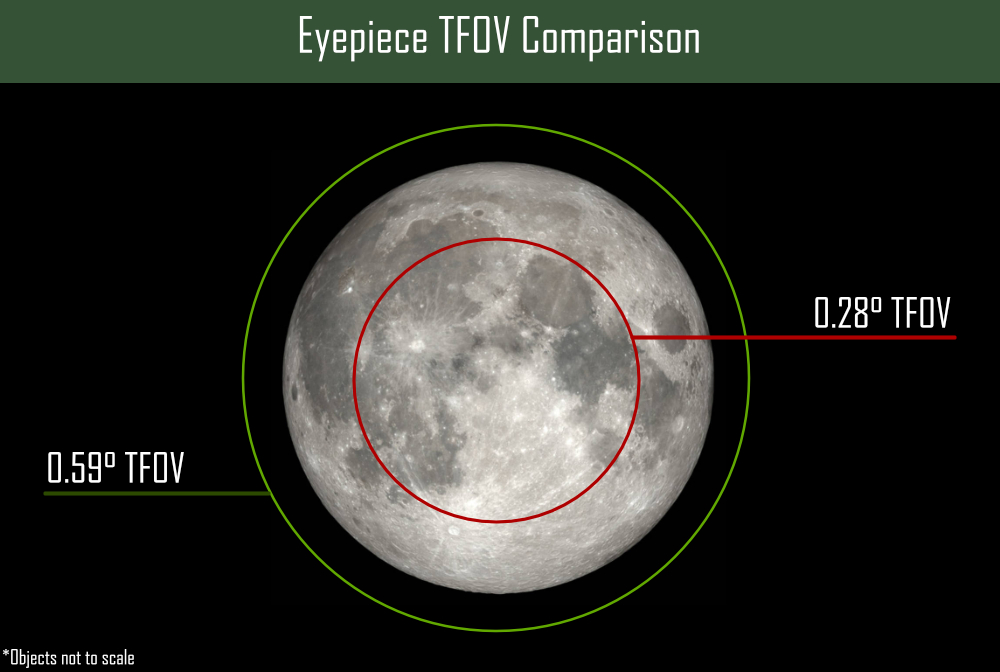
Apparent Field of View vs True Field of View
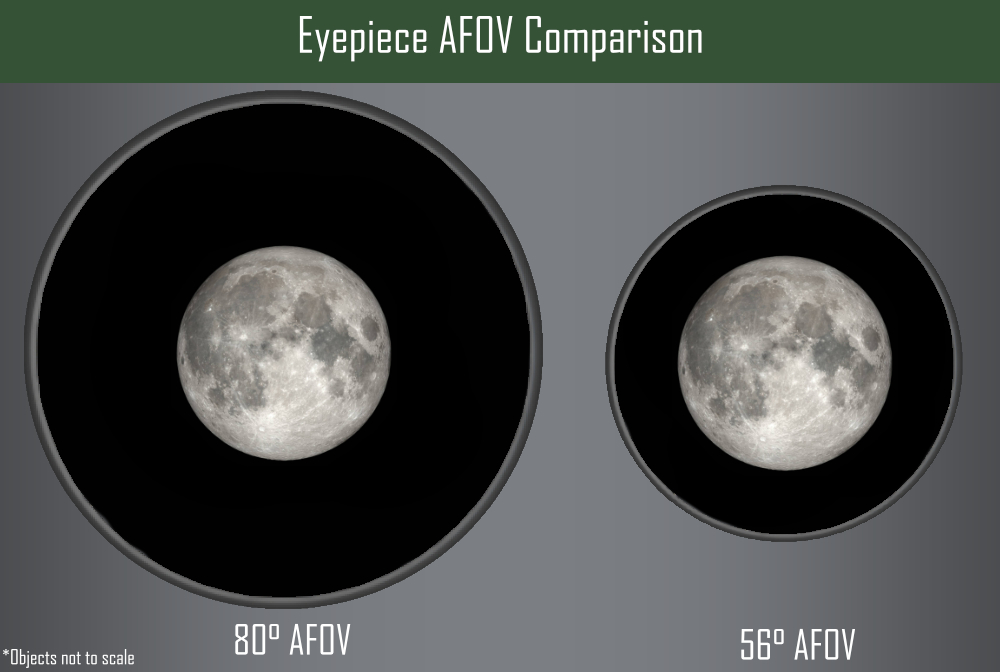
When searching for eyepieces, you’re sure to come across two different depictions of field of view: the apparent field of view (AFOV) and the true field of view (TFOV). Though closely related, these two aspects differ in which field of view is represented. One is fundamental to the eyepiece and one is based on the eyepiece/telescope combination.
As its name suggests, the apparent field of view is how large the field of view is as it appears to our eye and is measured in degrees. This angular width gives insight into how immersive your experience will be, not how much of the actual sky you’re viewing. Larger AFOVs provide a more enveloping, captivating sensation. This is good to know considering a singular, bare human eye has a field of vision of roughly 150°. As a good analogy, you can think of AFOV in terms of the size of a movie theater screen, with the larger the screen, the more immersive the experience.
TFOV, on the other hand, is dependent on your telescope’s focal length. The true field of view denotes how much of the actual celestial planisphere is available for observation through your eyepiece and is dependent on both the AFOV and the magnification of your optical system. It’s measured in degrees, arcminutes, or arcseconds with varying telescope/eyepiece combinations revealing different sized “chunks” of the sky. This measurement is key in helping you determine what celestial objects are available for viewing. A wider TFOV enables vast options of observable objects, offering expansive sights of star clusters, nebulae, and even large galaxies, while a smaller TFOV is great for viewing various solar system wonders! To calculate the TFOV of your optical system, use the following formula: TFOV = AFOV ÷ Magnification.
Choosing the Right Eyepiece Size
In general, two standard barrel sizes are offered on the market today: 1.25” and 2”. Choosing the right size will not only depend on the diameter of your telescope’s focuser, but it will also depend on the type of viewing experience you're looking to achieve and the field of view you’re aiming for. Each size comes with their own unique strengths and weaknesses, making it an important aspect to consider when selecting the right eyepiece.
1.25” barrels are the most common and widely used. This can be accredited to their compatibility with nearly all telescopes, as most telescopes come standard with a 2” to 1.25” adapter out of the box. Also, 1.25” eyepieces are highly cost effective thanks to their small, compact build. Typically shorter in focal length, these eyepieces are well suited for viewing the night sky at higher magnifications, making them optimized for observing our solar system wonders.
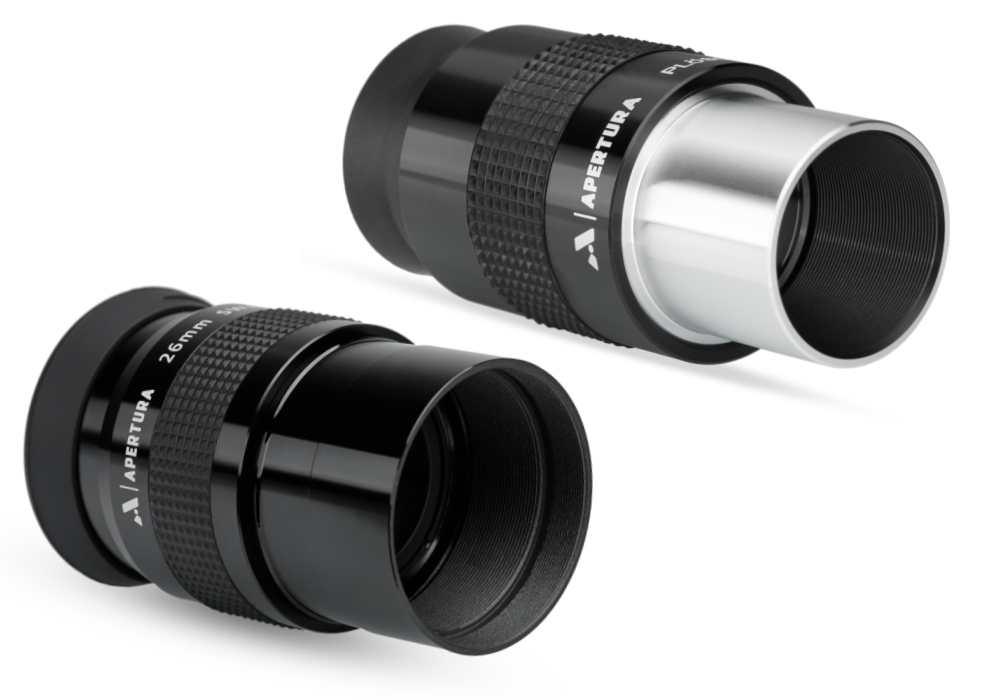
2” barrels, on the other hand, are capable of harnessing a long focal length without a sacrifice in field width. This is made possible by the increased physical size, giving way to a wider field of view for stunning, expansive sights on a host of celestial objects. Though generally more costly than 1.25” eyepieces and not recommended for use with 1.25” focusers due to performance inefficiency, many view the larger form factor of 2” eyepieces as a worthwhile investment based on the extended field of vision!
Barlows
Barlow lenses are a great way to expand your viewing opportunities, essentially doubling your arsenal of focal lengths available! By increasing the effective focal length of your telescope by a specified amount, typically 2x, 3x, and so on, the magnification of your system is amplified by that same rate. These accessories are generally used for planetary viewing where high magnifications help fine detail become more apparent within the field of view. With a wide variety of powers and performances, let’s take a deeper dive into the aspects of Barlow lenses below!
2x, 3x, 4x: What advantage does A Barlow offer?
As one of the most useful accessories for your stargazing adventures, choosing a well-matched Barlow lens for your specific optical system will help optimize your viewing experience. Many telescope manufacturers cite a “highest useful magnification” for their models, offering a ball-park estimate of the peak magnification your telescope can achieve without a sacrifice in resolution. While insightful, it’s important to not fixate on this rate and consider the alternative factors that play a role in determining which Barlow is right for you: your local seeing conditions, the quality of the eyepiece you’re using, and above all, your telescope’s overall optical performance.
Under poor seeing conditions, your optical system is less proficient at resolving detail at higher magnifications. This is important to consider if you live in areas with consistent subpar seeing, as using too powerful a Barlow may lead to substandard, underwhelming results. Additionally, it’s important to note that your views will only be as good as the lowest quality of glass within your optical system. Higher quality eyepieces can support higher resolution of detail when paired with more powerful Barlow lenses, helping you enjoy up close sights of many celestial wonders. Following this logic, the key defining factor in choosing the right Barlow lens is the optical quality of your telescope itself. Premium glass and well-constructed lens configurations are better suited for high magnifications. With powerful telescopes, higher powered Barlows are available, enabling close inspection without a sacrifice in visual clarity.

Why Optical Quality Matters
As an optical accessory, the glass used within Barlow lenses has a significant impact on the degree of detail resolved. As mentioned above, it’s important to remember your views are only as good as the lowest grade of glass within your optical train, which is why selecting a Barlow lens with quality construction is paramount. Higher quality glass, such as extra-low dispersion (ED) glass is better adept at correcting incoming light for sharper, higher contrast views. This material is renowned for its ability to correct the incoming light with a great deal of precision, and is commonly found within high-quality Barlow lenses. ED glass significantly reduces chromatic aberration, delivering sharp, tightly focused detail.
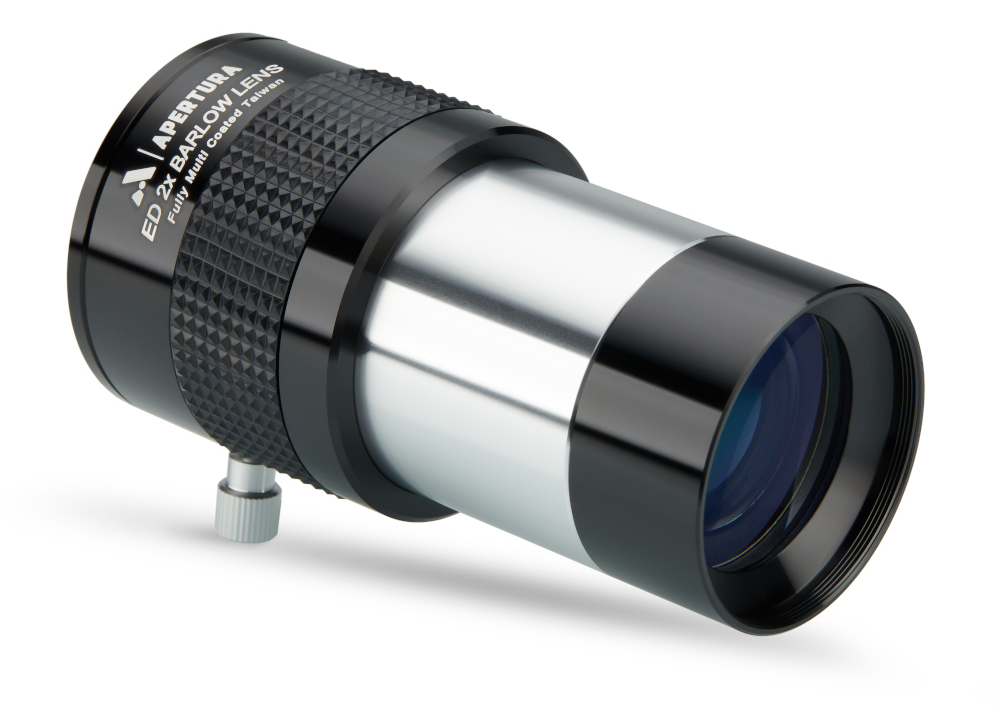
In addition to optical quality, it’s also important to consider the number of glass elements found within the Barlow lens. With the more lenses, the better the performance and the sharper the views. Apochromatic Barlow lenses typically house three or more lenses that offer exceptional color correction for superb, vivid sights. Another aspect to consider is the presence of specialized coatings. Optical coatings not only reduce reflections, but they also work to enhance light transmission for improved clarity and detail definition.
An evolved form of the traditional Barlow lens design, the Tele Vue Powermates are a great example of high end magnifying systems! Four fully multi-coated internal elements work together to dramatically reduce vignetting and aberrations, providing top-notch views at high magnifications.
Barlow Stacking
Though not particularly efficient, Barlow lenses can be stacked to help you achieve higher magnifications. It’s a great off-hand solution if you need increased reach for viewing the planets or the Moon when your eyepiece collection is limited. During stacking, the total magnification will be the original powers of each Barlow multiplied together. For instance, a 2x Barlow and 3x Barlow stacked will result in a theoretical value of 6x magnification. It’s important to remember, however, stacking Barlows can unintentionally introduce optical issues such as chromatic aberration or even dim, soft images.
Telecentric Systems
Similar to Barlows, telecentric amplifiers extend the focal length of your telescope for closer views of celestial objects. These two optical accessories differ, however, in their ability to maintain the distance of the exit pupil and therefore uphold image quality. Because Barlow lenses alter the light path, the exit pupil is pushed further outwards, a matter that can lead to vignetting when used with long focal length eyepieces. Telecentrics, on the other hand, are specially designed to keep the incoming light rays parallel, delivering incredible flat field performance and minimal distortion. The Tele Vue Powermates are prime examples of telecentric amplifiers, offering the magnifying power of Barlow lenses without its limitations!
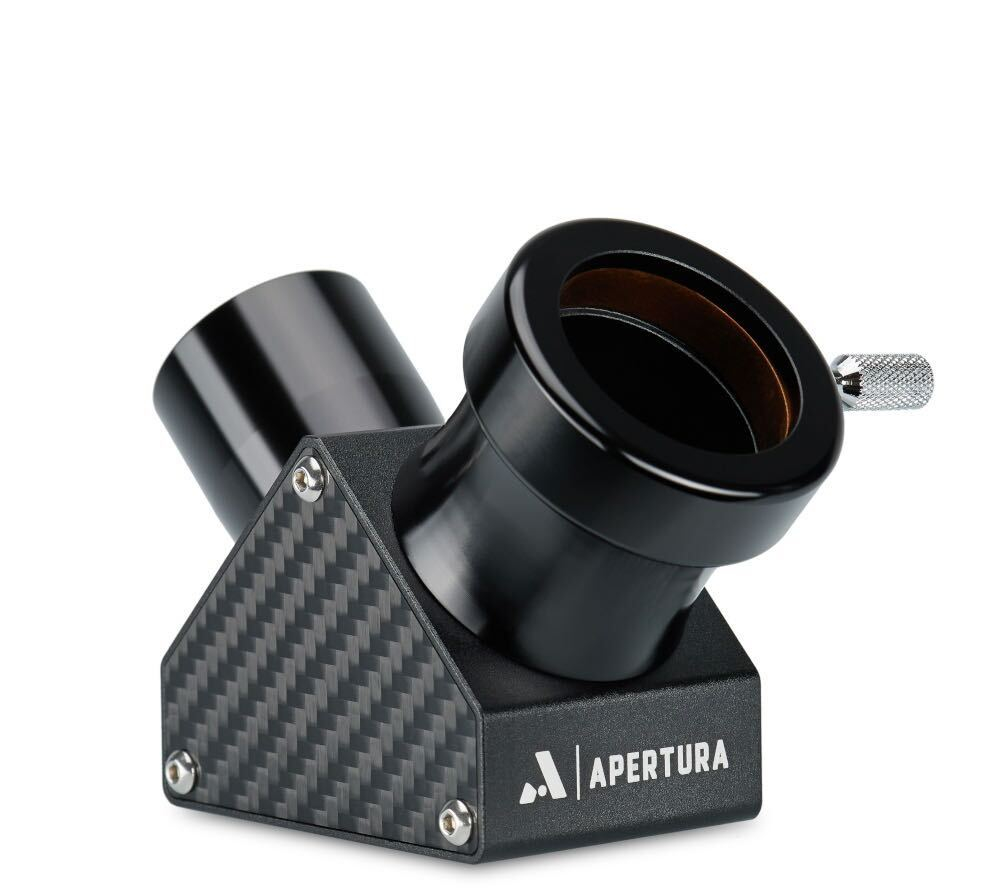
Diagonals
Making your observing sessions as comfortable as possible is key to getting the most out of your nights under the stars. Alleviating neck strain, star diagonals reroute the incoming light to an angle better suited for viewing, which is typically 90° or 45°. With heightened comfort at hand, these optical accessories can mean the difference between quick glances through your eyepiece and a captivating, immersive astronomy experience. Star diagonals are typically used for refractor and catadioptric telescopes where the eyepiece isn’t already at a 90° angle, as seen with Newtonians. Two different forms are available: prism diagonals and mirror diagonals. With different strengths and weaknesses, choosing the right diagonal for your specific setup is essential in maximizing your views and ensuring a sustained, meaningful viewing session!
Prism Diagonals
Prism diagonals utilize glass to redirect the incoming light, most often at 90°. Thanks to the phenomenon of total internal reflection (TIR), a key feature of prisms, you can expect near 100% efficiency in light transmission. This high efficiency gives way to stunningly sharp views with excellent contrast and sharpness. Prism diagonals perform exceptionally well when utilized with slower telescopes (f/7 or higher), making them a great option for viewing lunar craters or planetary details.
One drawback to using diagonals is the reversed orientation of the image. Standard prism diagonals producing a left-right mirrored image. This is not the case with correct image prism diagonals (also known as erect image diagonals or Amici prism diagonals), as these versions correct the image both in the up-down and left-right orientation. Correct image diagonals utilize a specialized roof prism to achieve this effect, however, keep in mind that the image quality will generally suffer when using a correct image diagonal and therefore they are best reserved for low to medium power terrestrial viewing. Additionally, the upright image orientation is ideal for terrestrial viewing, offering heightened versatility.

Mirror Diagonals
While prism diagonals perform exceptionally well for slower telescopes, use with faster telescopes can oftentimes lead to the introduction of chromatic aberration. Mirror diagonals do not give rise to chromatic distortions, making them a great choice for a broader range of telescopes. The singular, flat mirror found within these diagonals reflect the incoming light into your eyepiece with a high degree of precision, bending the light path for a more comfortable viewing experience. High-quality mirror diagonals are equipped with specialized coatings to deliver maximum light transmission. Dielectric mirror diagonals, in particular, are some of the highest quality mirror diagonals available. As opposed to utilizing a simple metal coating, multiple layers of dielectric matter are used to coat the mirror. These non-metallic, ultra thin coatings offer exceptional light reflectivity (99%+) for images brimming with clarity!
Filters
Filters are highly beneficial accessories to have for visual astronomy, as they open the doors to details that otherwise would have been overlooked. Designed to selectively permit specific wavelengths of light, these optical tools help to refine subtle structures, enhance clarity, and greatly improve contrast. There are a wide variety of filters to choose from, each helping to isolate specific details on various celestial objects. Visual filters are typically formatted in 1.25” or 2” bodies, and are designed to thread into the bottom of your eyepiece, Barlow lens, or your diagonal, offering seamless integration within your optical system. Whether you plan on isolating details on the Moon, looking to reduce the effects of light pollution, or yearning to resolve fine intricacies within nebulae, filters help you do so with ease!
During filter development, manufacturers produce a transmission graph, a visual to denote the percentage of light permitted through at certain wavelengths. To help you better understand these graphs, our team has put together a detailed article on How to Read a Transmission Chart!
Filters for Viewing the Moon
As the brightest object in the night sky, cutting down on the Moon’s brightness is key in enhancing your lunar viewing experience. Moon filters act as “sunglasses,” blocking a large portion of the Moon’s light from reaching your eye. Not only is this highly beneficial for preventing eye strain from the sheer brightness, it also significantly increases your ability to enhance details on the lunar surface! This is especially true when viewing the Moon during its fuller phases. The minimization of glare and increase in contrast give way to clearer, crisper views of the maria, craters, mountains, and valleys that make up the lunar terrain.
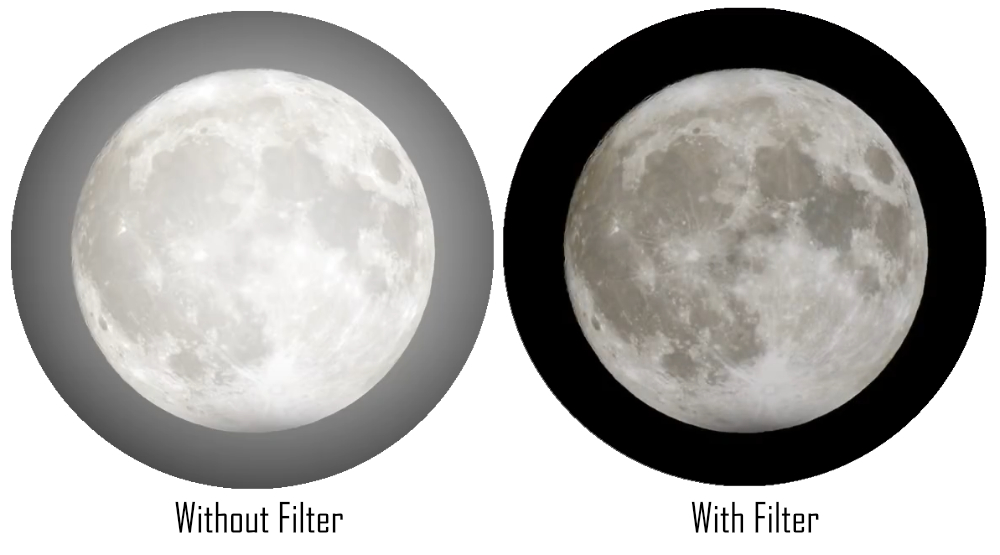
Most Moon filters on the market today are a subclass of neutral density filters, a photographic tool used to limit the amount of light throughput. Moon filters are designed specifically with the Moon’s brightness in mind, typically allowing 13%-25% light transmission. Higher opacities are greatly beneficial during gibbous Moon phases, while lower opacities prove effective for crescent phases. Thankfully, a special type of filter exists that lets you alter the opacity, helping you make the most of every phase! Variable polarizing filters offer dynamic filtration; by rotating the top portion of the filter, you can fine-tune the amount of light allowed through.
Light Pollution Filters
Light pollution is an ever growing issue, making it more and more difficult to view the wonders of our night sky. Thankfully, dedicated filters can help combat this challenge, assisting you with experiencing the beauty of the universe, even under the glow of light pollution! While the Moon and the planets within our solar system are bright enough to be unphased by surrounding light pollution, these filters are highly beneficial for viewing deep sky objects.
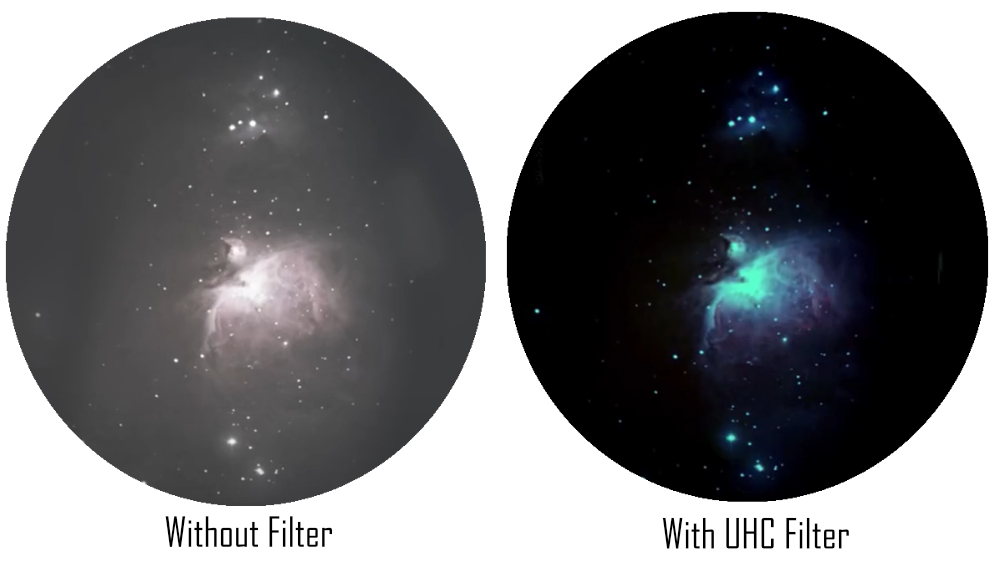
Two main types of light pollution filters are available, each providing varying levels of light suppression: light pollution reduction (LPR) filters, also called Moon & SkyGlow filters, and ultra high contrast (UHC) filters. Both types are designed to cut out unwanted wavelengths, particularly those from sodium and mercury vapor lamps, while still allowing transmission of targeted wavelengths emitted by emission nebulae. While both LPRs and UHCs can both be described as broadband filters, LPR filters are less aggressive, meaning they’re better suited for a wider range of targets. UHC filters, on the other hand, are much stronger and feature slimmer bandwidths, making them most appropriate for emission nebulae. This is due to the nature of emission nebulae—emitting light at specific wavelengths—whereas other celestial objects like star clusters, galaxies, and reflection nebulae radiate light across a wide spectrum.
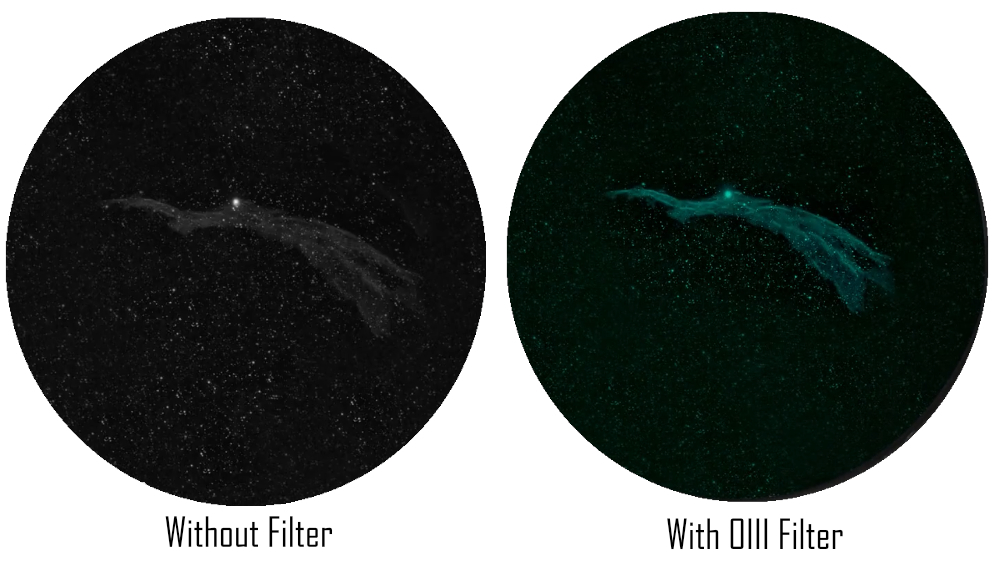
Narrowband Filters
Narrowband filters are designed for one particular type of celestial object in mind: emission nebula. As their name suggests, emission nebulae are those that emit light, with Ha, Hb, OIII, and SII being the most common wavelengths radiated. Isolation of these specific wavelengths mean all other light is effectively blocked out, leaving behind striking detail on the nebulous structure. This makes narrowband filters a powerful tool for those that reside in city environments where light pollution washes out subtle detail on these glowing nebulae. Popular targets like the Orion Nebula, the Veil Nebula, the Rosette Nebula, and plenty more, are considerably more detailed with the inclusion of narrowband filters within your optical train.
Color Filters for Planetary Viewing
Color filters are a great way to enhance subtle details on our solar system neighbors. There are a wide variety of color filters available, each helping to refine specific features like surface structures and cloud definition. For instance, a blue filter is ideal for enhancing detail within the cloud bands of Jupiter, while a red filter helps improve contrast on the Martian surface. The specific color of these filters are sometimes classified using a standardized system called Wratten numbers, though this is becoming less and less common. Check out this comprehensive chart below of some of the most popular color filters, outlining the key benefits of each color:

| Filter Color | Wratten Number | Recommended Aperture | Use Cases |
|---|---|---|---|
| Light Red | #23A | 8” or more | Increase in contrast and better definition between blue-green and red-orange areas of Mars; useful for viewing Mercury during daylight or dusk |
| Red | #25A | 8” or more | Eliminates blue and green wavelengths for strong contrast on Mars, Jupiter, and Saturn |
| Orange | #21 | 6” or more | Clarifies delineations between blue-green and red-orange areas of Mars; brings out more detail in belt and polar areas of Jupiter |
| Light Yellow | #8 | 3” or more | Great for bringing out details within the red and orange regions of Jupiter's belt; improves the contrast on the surface of Mars and the Moon; Improved detail on Uranus and Neptune when used with large apertures (10" and more) |
| Yellow | #12 | 3” or more | Boosts contrast for Saturn and Jupiter, especially the red and orange areas; enhances contrast of the blue-green features of Mars and can help increase contrast when observing the Moon |
| Green | #58 | 8” or more | Brings out details in the lighter colored areas of Jupiter; provides high contrast on the polar ice caps of Mars |
| Light Blue | #82A | 3” or more | Splits binary stars; useful for enhancing the galactic structure of bright galaxies |
| Blue | #80A | 6” or more | Excellent contrast on the cloud belts for both Jupiter and Saturn; highly useful for the lunar surface |
| Dark Blue | #38A | 8” or more | Heavily blocks red-orange wavelength; can bring out details of storms on Mars; excellent for increasing cloud contrast on Venus |
| Violet | #47 | 10” or more | Isolates polar ice caps on Mars; brings out subtle details in Venus's upper atmosphere |
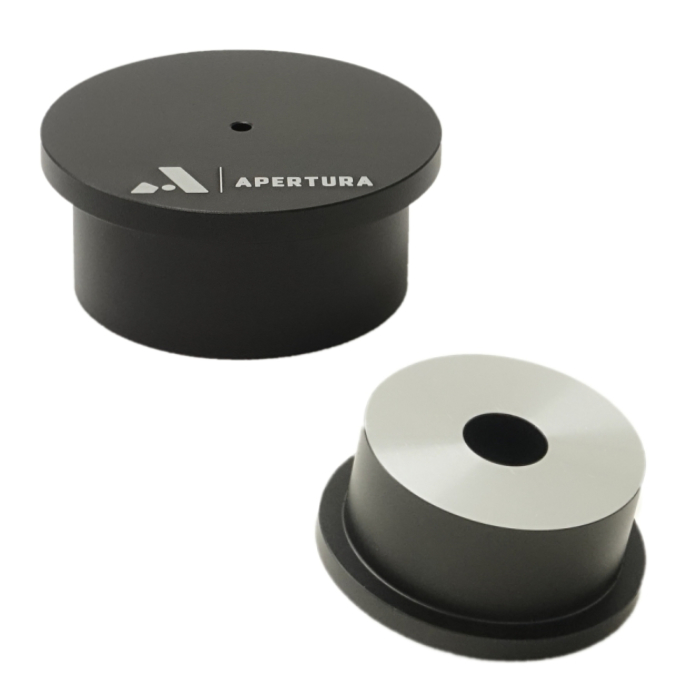
Solar Filters
There’s nothing quite like viewing our nearest star through a telescope. The ever changing surface of the Sun makes every solar observing session unique and exciting, though it must be done with extreme caution. A properly sized high quality solar filter must be firmly attached to the front of your telescope in order to ensure your safety, with two basic types to choose from: film and glass. These two filters are both classified as white light filters, helping you view the Sun’s photosphere, which is the Sun’s visible surface. While solar flares, prominences, and other phenomena of the chromosphere and corona will be out of view, you will be able to see intricate sunspots, faculae, and possibly even some surface granulation! To help you choose the best filter for your observing goals, let’s take a look at the key aspects of each type.
Remember to NEVER look at the Sun without a properly installed solar filter. It can and will permanently damage your eyes.
Solar Film
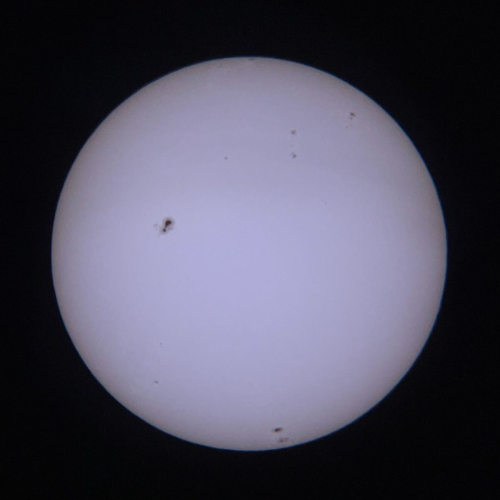
Solar film filters are made from ultra-thin polyester material with a reflective metallic coating to block out 99.999% of sunlight for safe viewing. These filters fit over your telescope’s aperture, filtering the Sun light before it reaches the internal optics, ensuring the utmost protection. While both solar filter types are considered white light filters, glass filters tend to present the Sun with a yellowish-orange tint This is not the case with solar film. You’ll view the Sun in its true white color. As a result, sharper detail and better tonal contrast will be apparent within your eyepiece as all wavelengths are transmitted evenly. If your goal is high resolution of detail and maximum surface texture definition, solar film is the way to go. Additionally, the lightweight design adds little bulk to your setup, and its inexpensive price makes it a great choice for any astronomy enthusiast. It’s important to note, however, due to its thin, delicate build, solar film is more prone to damage than glass filters. Careful handling is of utmost importance when utilizing film filters to ensure your safety, with even cleaning not recommended due to its delicate nature. Never use torn, wrinkled, or scratched solar film. Test for light leaks prior to use to avoid permanent eye damage.
Glass Filters
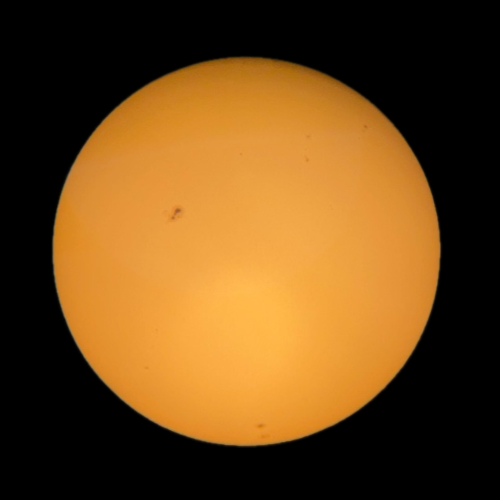
Much like film filters, glass solar filters fit over your telescope’s aperture to filter the sunlight before it enters your optics. The metallic coatings on the surface of the glass are to thank, blocking nearly all (99.999%) of the Sun’s radiation to make viewing safe. Glass filters are much more durable than film filters, offering improved scratch resistance and heightened longevity. If your solar glass filter needs to be cleaned, you can gently wipe it down with a proper lens cloth, a task not feasible when utilizing film filters. Glass filters do, however, tend to add a yellow-orange hue to the Sun. While this tint may result in slightly less clarity during observation, many find it to be more pleasing to the eye, giving a fiery, “solar” feel to the Sun.
How to pick the correct size
Measure twice, buy once! Ensuring your solar filter is a good fit for your telescope is paramount. Some of these filters are non-refundable so while the initial measurement is crucial, it is also simple. You'll want to measure the outside diameter of your scope where the solar filter will be installed. Most solar filters will fit a small range of diameters (for example: 144 mm-156 mm). There is a little bit of leniency in these, but be sure the outside diameter of your scope fits within the range of the advertised diameter of the solar filters.
Our experts have created this in-depth article, How To Choose A Solar Filter: Measuring Your Telescope & Solar Filter Calculator, to help make things much easier. Featuring step-by-step instructions, a thorough video, and a plug-and-play calculator, finding the right solar filter for your scope has never been easier.
Finderscopes
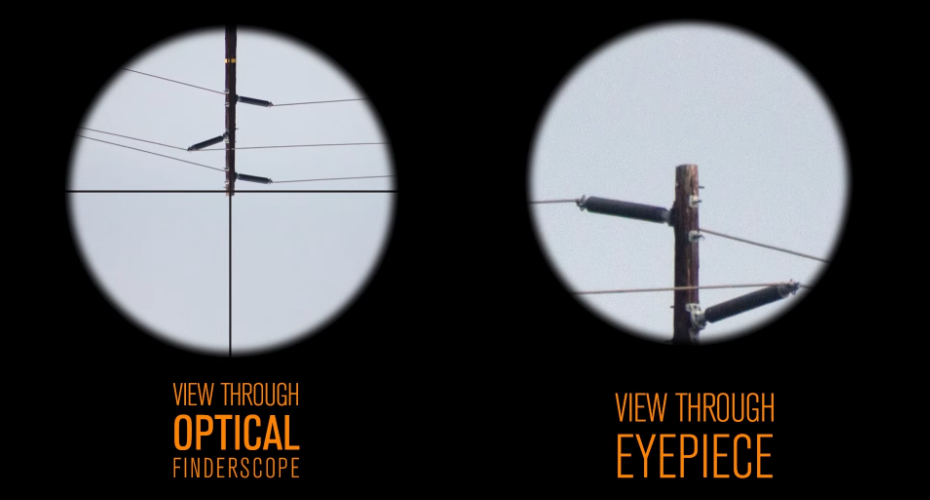
A crucial component to have while out under the stars, a finderscope makes navigating the night sky effortless. This small accessory rests atop your main telescope, providing a wider field of view and helping you center your target within your main scope. Finderscopes are especially useful for high magnification optics where the field of view is narrow and tightly zoomed in. These optical accessories are easy to install, easy to align, and save you a great deal of time and frustration during your observing sessions! Two main types of finderscopes are available: optical finders and red dot finders. Each excel in their own right, and determining which one is suitable for you will depend on your specific setup.
Optical Finders
Optical finders are small, compact refractors that ride atop your main telescope. As telescopes themselves, optical finders offer both magnification and light gathering power. This makes them better suited for longer focal length telescopes which require heightened accuracy during target locating.
Optical finders are often marketed with the following format: rated magnification power x rated aperture in mm (8x50, 10x50, 9x60, for example). These two specifications help give insight into how zoomed in your view will be and the light gathering power of which the finder is capable. Choosing the right one for you will depend on two main factors: the level of visibly required for your particular observing goals and any weight restrictions your setup may possess. If your main objective is to view bright objects, a lower aperture and lower magnification may suffice in accurate target locating. Centering dimmer targets, however, will greatly benefit from optical finders with larger apertures and increased magnification, as their elevated light gathering power enables faint objects to be resolved more clearly. It’s also important to keep in mind that larger optical finders generally weigh more. This can prove to be an issue if your setup cannot handle additional bulk or if balancing becomes a difficult feat with the added mass. Ultimately, the best optical finder for you will blend your needs for visibility, performance, and practicality.
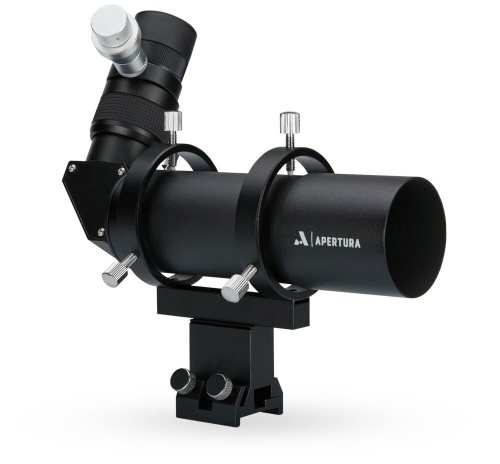
To assist with viewing comfort and convenience, a great majority of optical finders on the market today include a right angle, correct-image diagonal and eyepiece. As opposed to a straight-through optical finder which present an upside down, left/right reversed image, the true-to-life orientation from the right angle diagonal makes navigating the night sky intuitive and effortless. Furthering precision, most optical finders come equipped with built-in crosshairs to help you center your targets with ease. Many manufacturers furnish their optical finders with a battery-powered illuminator—a small, red LED bulb to brighten the reticle for a clearer view of these crosshairs. Illuminating the reticle is highly beneficial when under very dark skies, and the red hue helps to preserve your night vision. Separate illuminators are available for easy add-on if yours does not come standard with one.
As a mini refractor, focusing your optical finder is key to ensuring precise target centering. Some common focuser types you’ll come across are a threaded front objective lens, a helical focuser, and a rear-focused push-pull mechanism to adjust the position of the eyepiece. If your optical finder includes a reticle, an additional focusing apparatus helps you bring these crosshairs into sharp focus for accurate target locating.
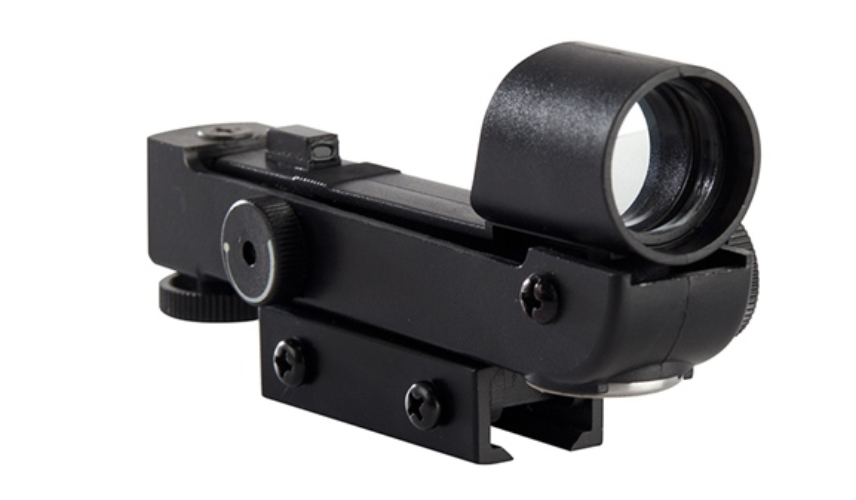
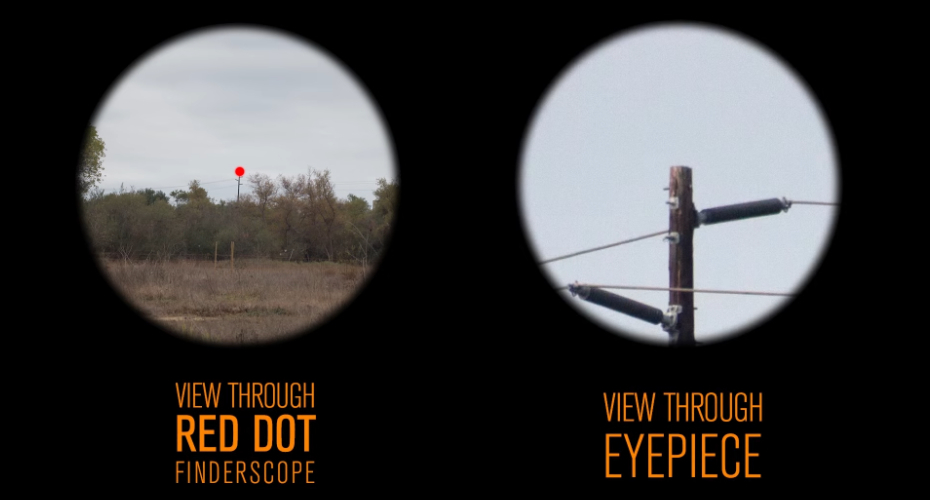
Red Dot/Reflex Finders
The most common type of finder, and much simpler in design than optical finders, red dot finders are extremely easy to operate and useful for a wide variety of telescopes. Non-magnifying in nature, these accessories provide a natural naked-eye field of view. They simply project a red dot onto a transparent window; wherever the red dot is placed is where your telescope is aimed. Without magnification, both eyes can be kept open while scanning the night sky, helping you prevent eye strain and providing heightened comfort while locating targets. Red dot finders are battery-operated, very lightweight, and highly affordable, offering seamless integration into your observing assembly. This type of finder is ideal for quickly locating bright objects such as stars, the planets, our Moon, and even some bright DSOs if your surroundings are dark enough. While ideal for bright targets, the absence of magnification makes it more difficult to center your telescope on faint objects, such as diffuse nebulae and dim galaxies.
Aligning Your Finderscope
Prior to your observing session, it’s necessary to properly align your finderscope with your main telescope to ensure they’re pointed at the same object. It’s best to perform this alignment routine during the day so you do not waste precious clear sky time. This process is quick and simple: After installing your finderscope atop your main optical assembly, point and center your main telescope on a distant object, such as a far away light post or distinguishable building. Lock your scope’s position, ensuring it is secure and won’t shift its pointing angle. Next, adjust the orientation of your finderscope with the crosshairs or red dot centered on the object within your main telescope’s field of view. You are now properly aligned! For a more detailed look, be sure to check out our in-depth video on this subject.
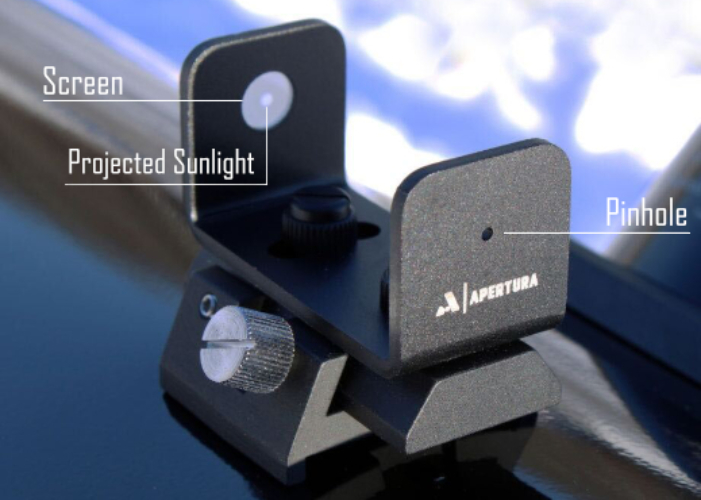
Solar Finders
During solar observing, centering the Sun within your telescope can prove to be a difficult task. Thankfully, a simple, yet effective solution is available! Solar finders utilize a pinhole projection method to assist you with locating the Sun. This way, you won’t have to risk damaging your eyesight nor will you have to rely on frustrating trial-and-error in locating the Sun. Like a finderscope, these accessories mount atop your telescope using a bracket and dovetail base. Solar finders, however, do not house any optics; one side features a pinhole while the other has a “screen.” The goal is to aim your telescope in the general direction of the Sun then adjust your telescope’s positioning to center the projected sunlight from the pinhole onto the screen. Once the small circle of sunlight is centered, the Sun will be within your telescope’s field of view! This method prevents accidental glances at the Sun, keeping your eyes safe and saving you time and frustration during solar observing.
Dew Prevention
A problem you’ll likely come across during your stargazing endeavors, especially if you reside in humid climates, is the issue of dew. Dew forms when the air temperature drops below the dew point, that is, the point in which moisture within the air condenses on external surfaces. Condensation forming on your telescope’s lenses or mirrors can shroud your view, making it difficult to discern subtle detail on celestial objects. Two types of dew solutions are available: passive and active. While passive dew solutions act as a physical barrier to prevent moisture from reaching your optics, active dew solutions utilize powered heaters to keep your telescope condensation-free. Lets take a look at the most common types of dew prevention accessories you’ll come across:
Dew Shields
Simple in design, dew shields fit around the aperture of your telescope, providing a barrier that extends past your objective. This physical barrier reduces the rate at which your telescope cools down, thus keeping the temperature of your scope above the dew point for a longer period of time. Dew shields are generally constructed from absorbing and insulating material to both wick away moisture and prolong heat retention as well! Some dew shields are fitted with active heating to keep your optics above the dew point all night long. These solutions are especially beneficial for those observing from humid environments where the dew point is reached more quickly than drier climates. Dew shields can also be fitted with internal heating elements for both passive and active dew protection!
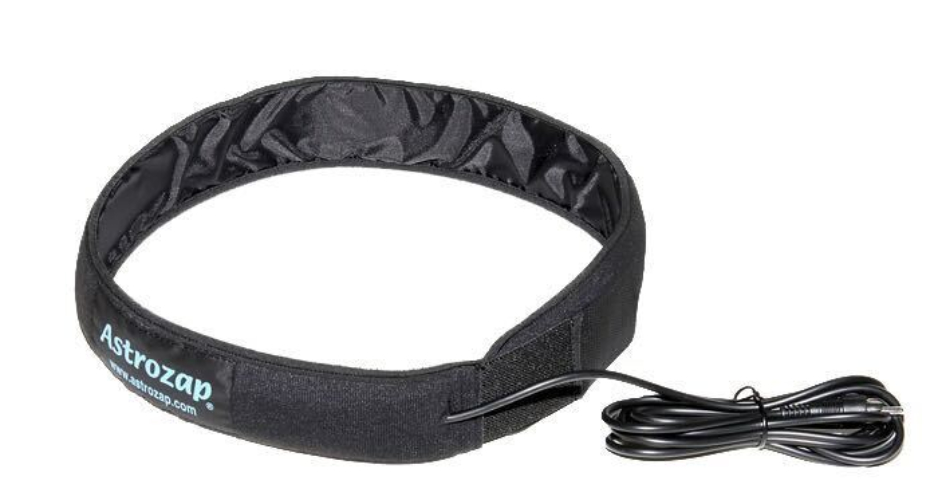
Dew Strips
As an active dew solution, dew strips have built-in heating elements to prevent condensation from forming on your optics. These flexible bands wrap around the front of your telescope, keeping the surrounding air a few degrees above the dew point. Handy for just about any telescope, dew strips come in a wide variety of different lengths, gently warming your front corrector plate, secondary mirror, or objective lens. Small dew strips are also available to keep your eyepieces and finderscopes dew-free as well! A 12V power supply is typically required to power these accessories, with many observers choosing to operate them via dew controllers for precise heating.
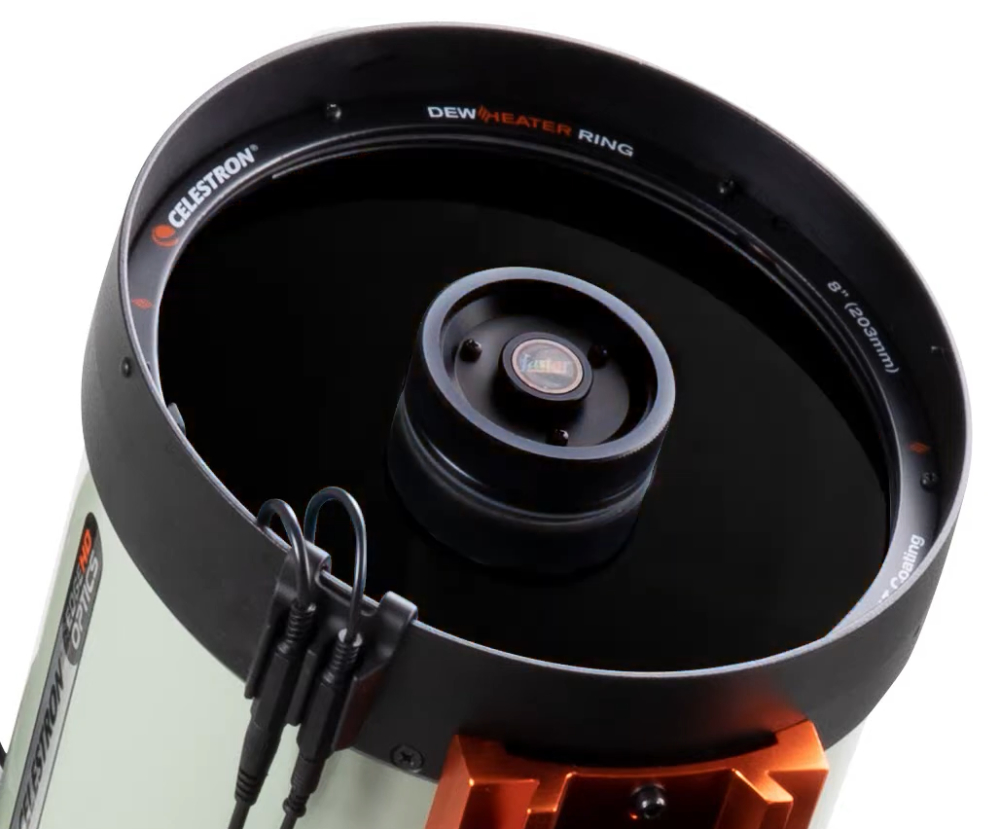
Dew Rings
Dew rings are another active dew solution, though these accessories are tailored specifically for Celestron Schmidt-Cassegrains and EdgeHDs. These rings are to be physically on the front corrector plate of your Celestron telescope, providing gentle heat directly to the surface of the glass. This firsthand contact makes dew rings more effective at evenly distributing the heat across the surface for heightened dew prevention. Ranging in sizes from 5”-14”, rest assured there’s a dew ring for your specific telescope model.
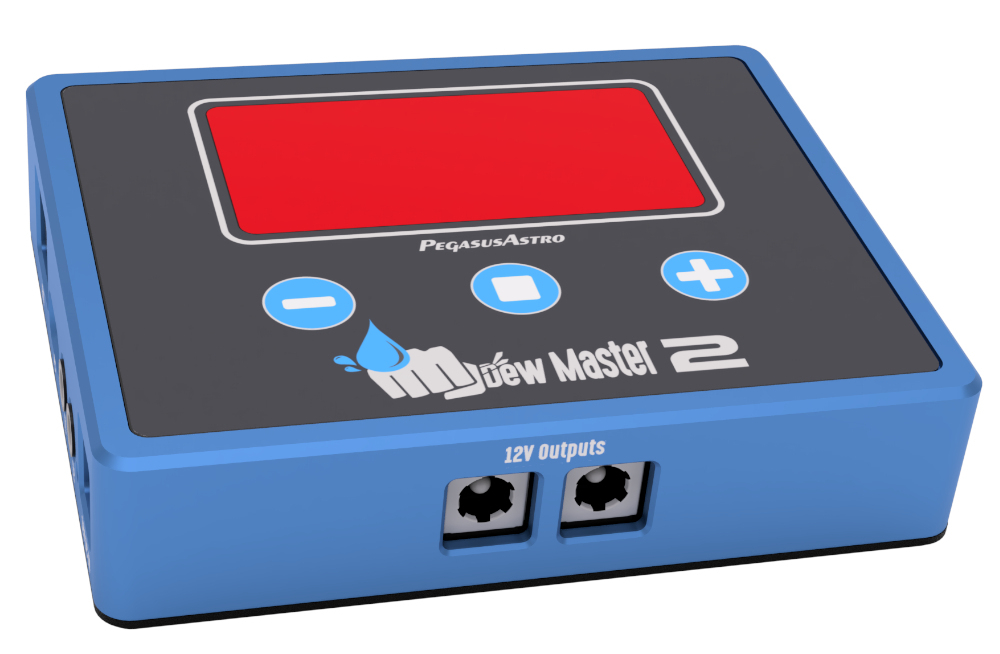
Dew Controllers
While out on the field, conserving your portable battery’s power is of utmost importance. Unnecessary energy consumption can cut your observing sessions short, leaving you feeling underwhelmed and disappointed. Dew controllers help combat this issue, providing regulated power to your active dew prevention systems. These devices are to be operated via PC or hand controller, and are typically powered with a 12V power supply. Some dew controllers are also equipped with sensors or sensor ports to provide a reading on your current location’s conditions. This greatly assists with fine-tuning your power usage, as you can easily supply just the right amount of power needed to keep your optics dew-free! As an alternative to dew controllers, some powered hubs include RCA dew heater ports for complete power and temperature control.
Observing Aids
While they may seem like minor accessories, red flashlights and green laser pointers have a big impact on your observing sessions. Red flashlights assist with navigating your surroundings while preserving your built-up night vision, and green laser pointers make locating objects in the night sky a breeze. Small in size though big in impact, take a look below as we take a deep dive into the benefits of these must-have observing aids!
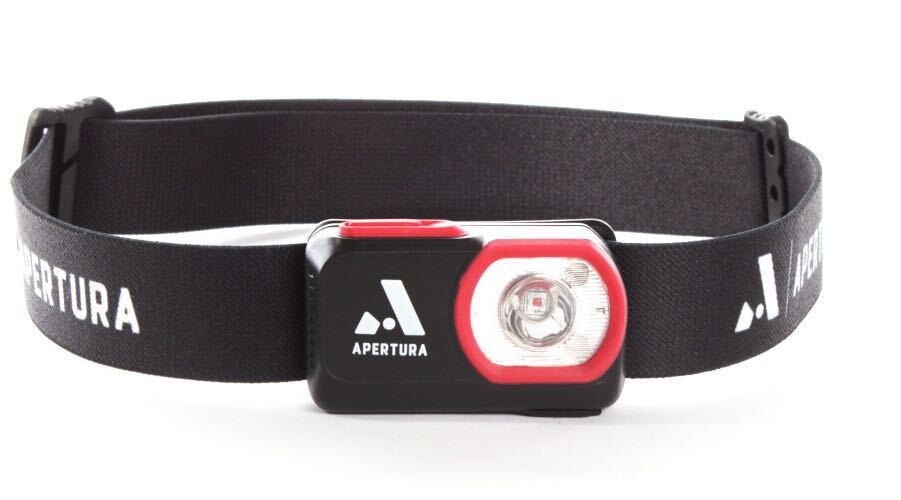
Red Flashlights
When observing from a dark sky site, fully adapted eyes are better at picking out fainter detail and seeing fainter objects through your telescope than you would ever be able to with unadapted night vision. Preserving this night vision is key, as white light coming from headlamps, phones, or headlights on vehicles will ruin your dark adaptation, and it can take anywhere from 20-30 minutes for your eyes to fully adapt to the dark again. Red light has the longest wavelength in the visible spectrum, therefore it is less harsh on your eyes than blue or white light. With a red flashlight/headlamp, you can both preserve your night vision and easily navigate the space around you. Effortlessly locate accessories/cables, reference your sky atlas handbook, and swap between eyepieces with ease!
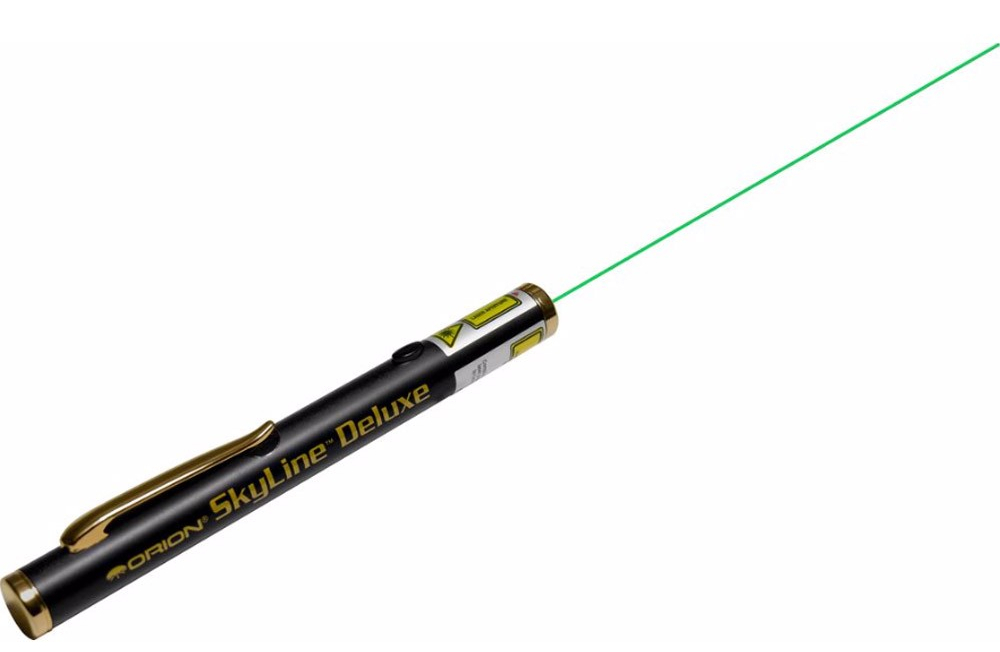
Green Laser Pointer
While we discussed finderscopes and red dot finders, green laser pointers are another great option, especially for star parties! These accessories emit a nice, solid green beam into the night sky and attach to the side of your scope similar in the way a finder scope or red dot finder would. Alignment is simple: point the laser at the object visible in your eyepiece. With its traceable beam, you can now accurately point your scope to a specific location in the sky, knowing your eyepiece will be centered on your selected target. Green laser pointers are also highly beneficial for naked eye stargazing as well, particularly within a group setting. Thanks to its highly visible beam, they’re great for pointing out stars, planets, constellations, and more for others to clearly see!
- PLEASE NOTE: Green laser pointers are highly powerful and can cause permanent damage to your eyes. DO NOT point these devices at incoming aircraft. It is illegal and highly dangerous. Keep out of reach of children.
Power Supplies, Cables, & Connections
While not the most exciting components to an astronomy rig, power supplies and cables are the backbone of your setup, delivering electricity to your gear and providing a means of communication between each element. Understanding the ins and outs of these essential units will help ensure smooth operation during your stargazing sessions. Read on as we take a deep dive into the basics of power supplies and the various types of cables and connections available!
Power Supplies
Have a computerized telescope? Or perhaps a few electronic accessories that require external power? If so, a portable battery is a must-have accessory, granting access to energy no matter where you go! With a power tank, you have the freedom to move anywhere in your yard without worry of wrestling with an extension cord. Additionally, a portable power supply makes setting up from remote locations a breeze. These accessories typically house various ports, supplying USB, DC, and AC power to just about any astronomical device you connect. This includes telescope mounts, dew heaters, your smartphone, and even astroimaging cameras if you’d like to dabble in astrophotography. The Apertura 155Wh Portable Telescope Power Supply, for instance, is a small, lightweight (just 3.5 lbs.!) option for powering your setup. With its lithium-ion batteries housing a capacity of 155Wh, you can expect sustained, reliable energy for an extended period of time. Whether you’re streamlining your astro-rig or observing on-the-go, be sure you’re powered for the night ahead.

- Pro Tip: Based on the internal construction of batteries, cold weather can cause a drop in performance. This means your battery will die faster when under cold temperatures as opposed to normal operating conditions. It’s important to keep this in mind to ensure you have sufficient power for your observing setup. Additionally, if you’re powering a computerized telescope mount, it’s important to note that the act of slewing from target to target drains more power than simply tracking an object. Ensuring adequate power for your rig will help you make the most out of your nights under the stars.
Cable Types & Functions
With a wide variety of astronomy devices available, so comes a broad range of cables needed to get your equipment up and running! Small, but vital, these essential components are necessary for data transmission, power management, and linking elements together. Some of the most common forms are DC power cables, USB cables, auxiliary cables, and various adapter cables. It’s important to invest in quality cables to ensure maximum performance. With how many varying forms there are, we’re here to break it down for you, going into depth about the most common types you’ll come across in your astronomy journey.
⮞ Power Cables
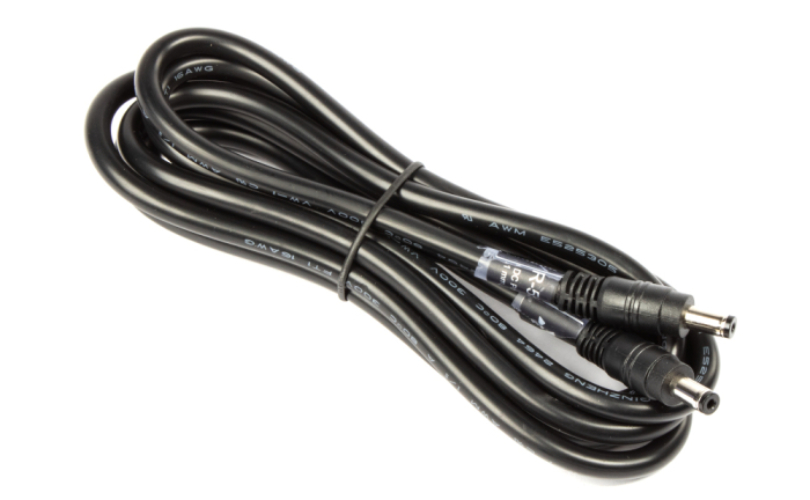
Power cables come in many different forms, delivering electricity to your telescope mount, dew heaters, electronic focusers, and more. It’s important to get an understanding of the type of cable you need to power your electronic device for maximum performance and longevity of your gear. Most all astronomy devices require DC power. DC power cables with a cylindrical plug are some of the most common power cords you’ll come across. Ensuring a proper fit, the cylindrical tips are listed with their outer and inner diameters, with 5.5 mm outer and 2.1 inner measurements being highly common. You’ll also come across the phrase “tip positive.” This just means the central pin within the cylindrical tip is designated as the positive terminal. The specific measurements you require should be listed within the manual of your device.
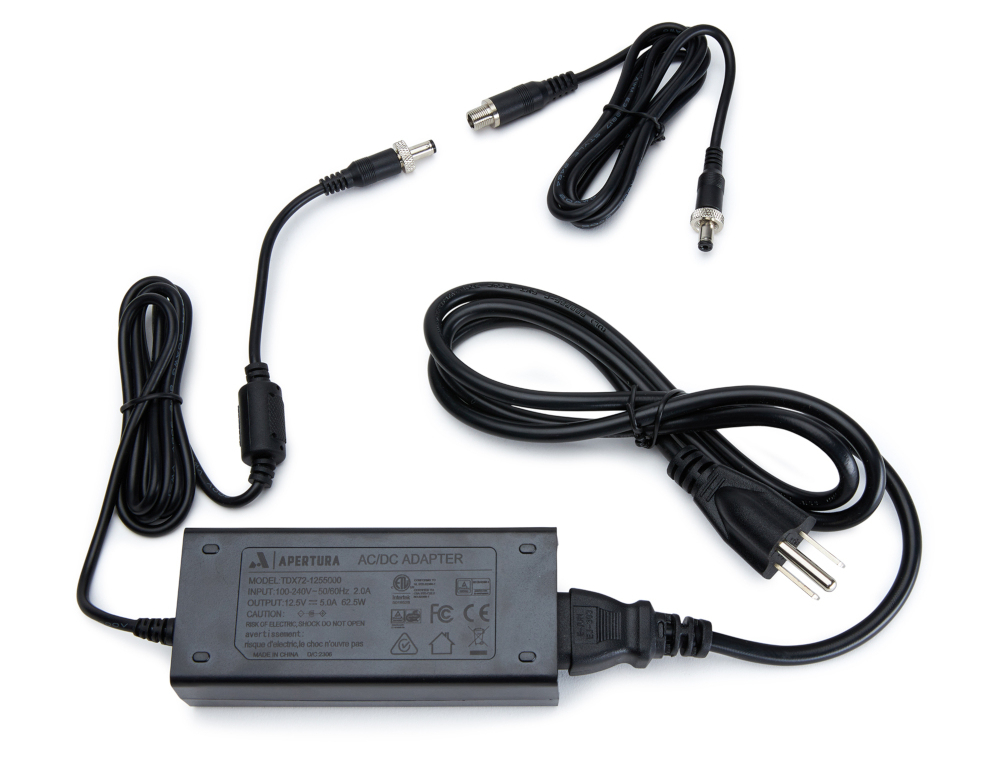
⮞ AC/DC Power Adapters
If you’d like to power your devices with an outlet, various AC/DC Power Adapters are available to transform AC current into DC current to power your device. These adapters are highly beneficial for those who are observing from home, where a wall socket is readily accessible for steady power all night long. These accessories are also useful for those utilizing a portable battery with AC outlets, offering a supply of power while out on the field. The Apertura Universal 5 AMP AC Adapter, for example, is a highly popular choice, providing maximum efficiency and bridging the gap between AC power and DC demand. Designed to deliver electricity to telescope mounts, cameras, focusers, and more, AC/DC adapters are an incredibly useful tool to have on hand when it comes to long nights of observation.
⮞ USB Cables
USB cables are common cables used for various functions. These cables can either provide a bridge of data transfer between two devices, power certain electronics, and are sometimes responsible for both! Three interface types of USB are available: type A, B, and C. This diagram indicates the physical differences between the three options. In the current state of the market, both within and beyond the field of astronomy, USB type C is becoming more and more common. This is great news, as a universal interface provides a more streamlined means of device connection.
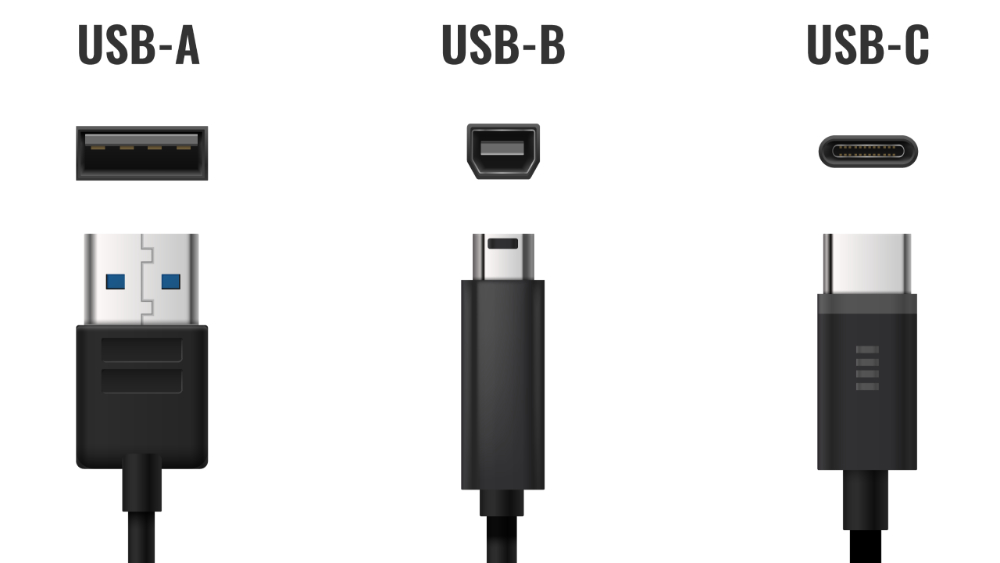
In addition to the type of USB interface, you’ll also come across numbered rates for the specific USB in question, with 2.0 and 3.0 cables being the most common. These numbers indicate the speed at which the USB is able to transfer data—2.0 transferring 480 Mbps compared to 3.0’s much faster 5 Gbps. This transfer speed is important to consider, especially for certain applications such as firmware upgrades, where large data files can take a considerable amount of time to download. Additionally, USB 3.0 cables provide increased energy to your devices, making them more suitable for power-hungry electronics. Prior to choosing the right USB cable for you, it’s necessary to ensure what rated transfer speed your device is compatible with. Always use the recommended speed for maximum performance.
Supplementary Connections
⮞ Power Hubs
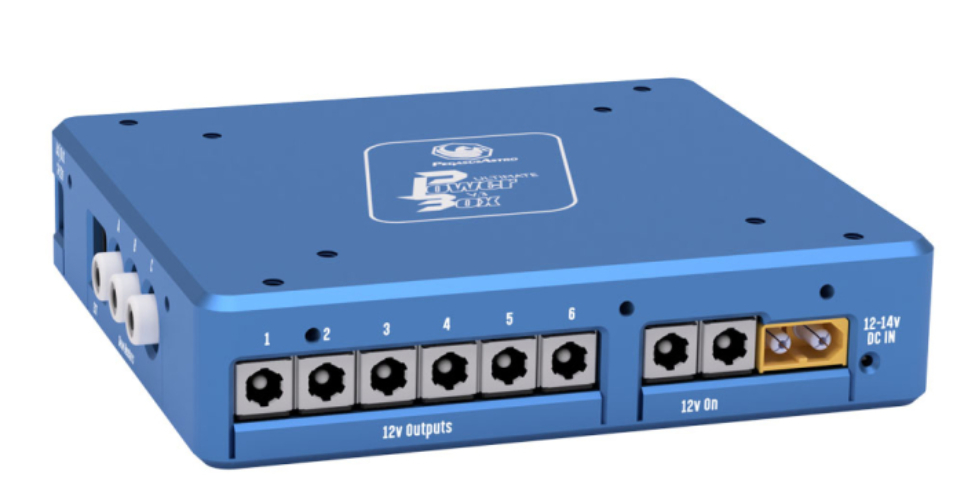
Providing a streamlined way to organize your power cables, a power hub helps you feed electricity to all of your electronic devices from a singular, compact box. They work by a supply of power directly to the hub (typically 12V DC), which you can then deliver charge to your gear with a wide variety of output ports onboard. Some of the most common output ports on these devices are 12V DC, dew heater ports, and USB ports. Additionally, power hubs are oftentimes fitted with a PC port to connect your computer for elevated control. These accessories can ride atop your rig, securing to a finder shoe and keeping your setup tidy and efficient. Thanks to their versatility, almost any astronomy rig can benefit from a power hub!
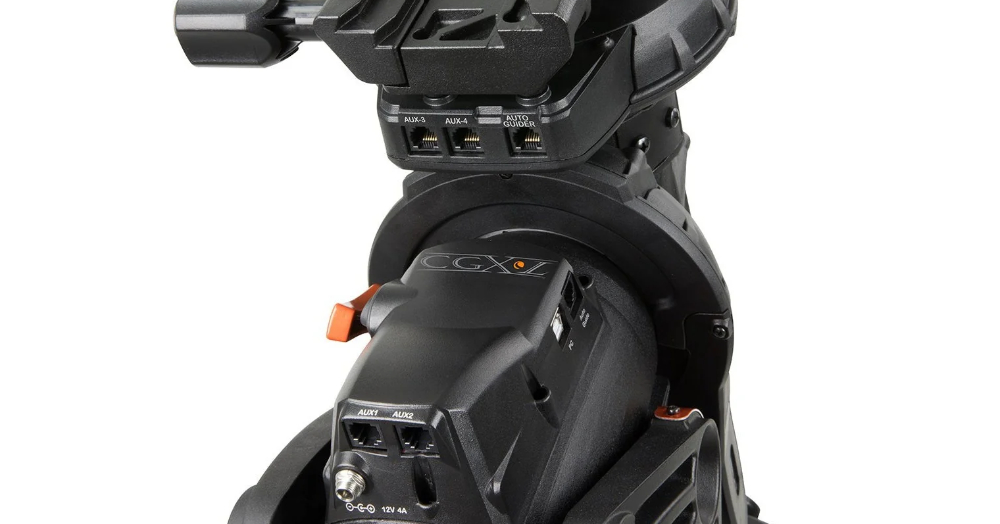
⮞ Auxiliary Connections
Auxiliary ports, oftentimes shortened to “AUX ports,” are helpful in connecting additional devices to a telescope setup to expand its functionality. These connections help your equipment “talk” to one another, sending data to and from device to device. Particularly popular for Celestron computerized telescopes and mounts, auxiliary ports and auxillary cables help connect accessories like the SkyPortal WiFi module, the Focus Motor, Dew Heater Controllers, and plenty more, to your system for streamlined accessory management.
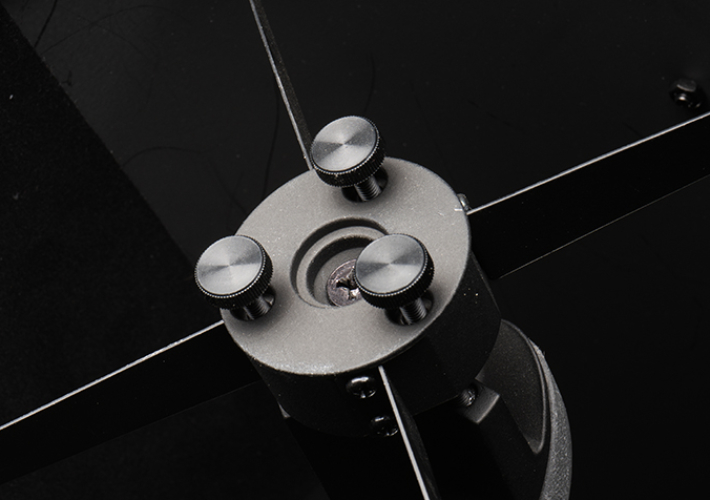
Collimation Tools
Newtonian Reflectors are incredibly versatile telescopes, providing users with beautiful views on a host of celestial objects. Though as Newtonians are designed with mirrors, these mirrors must be periodically aligned to ensure maximum performance and clarity. This process is called collimation, and while it may seem intimidating at first, it becomes easier and easier with practice! Don’t be discouraged if your telescope is not perfectly aligned within your first few attempts, especially if you are new to astronomy. In this section we will take a deep dive into the different types of collimation tools you’ll come across, helping you understand which one makes the most sense for your specific setup.
Before we get started, here are some helpful pointers to assist you with the collimation process:
- During collimation, it’s best to point your telescope at a bright surface, such as a well-illuminated white wall. Avoid aiming your scope directly at a light source, and ensure you cannot accidentally aim your scope towards the Sun.
- Your focuser should be racked in during collimation when utilizing the following tools, with the exception of an artificial star.
- Typically, the secondary mirror is collimated first, then the primary mirror.
Cheshire eyepieces
One helpful tool for collimation is the Cheshire eyepiece. Like a typical eyepiece, Cheshire eyepieces drop into your focuser and feature a small hole at the top to peer through. Instead of optical elements, however, these tools are specially designed with a 45° reflective surface and cross hairs to assist with mirror alignment.
So, how do Cheshire eyepieces work? After insertion into your focuser, peering into the hole will show a couple of things: a blurry, superimposed view of the eyepiece’s crosshairs, the central spot of your primary mirror, and the reflection of the Cheshire eyepiece (a large circle with a dot in the center of two crosshairs). Two goals are afoot: (1) adjusting your secondary mirror’s screws to align the central spot with the superimposed crosshairs, and (2) adjusting your primary mirror’s screws to align the reflection of the Cheshire eyepiece with the superimposed crosshairs.
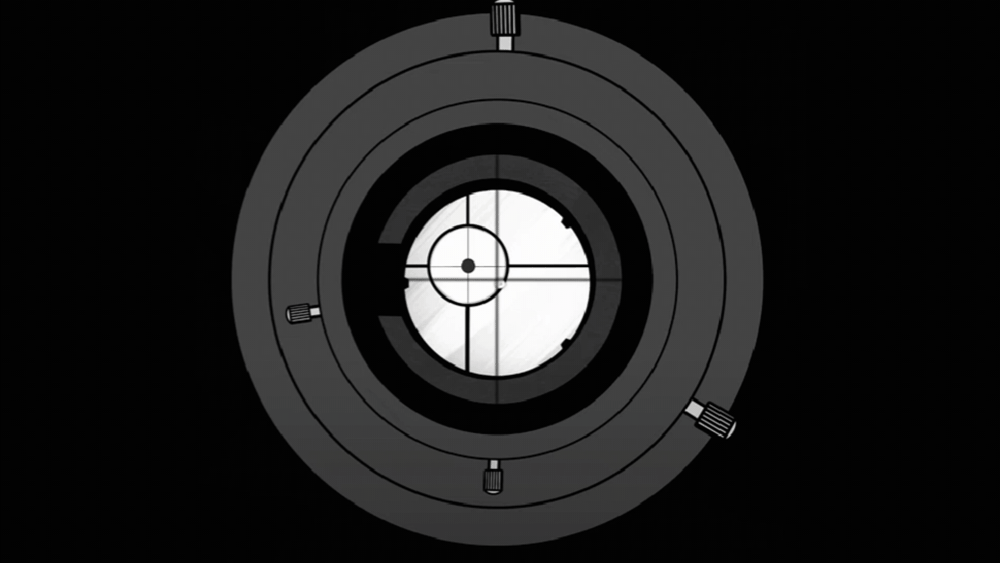
- Pro Tip: Rotating the Cheshire collimation tool such that the the 45° reflective surface is positioned towards a bright surface, such as a white wall or sheet within a highly illuminated room, will help immensely when collimating.
For a deeper understanding of this process, be sure to check out our comprehensive article on Collimating Your Newtonian with a Cheshire Eyepiece. Equipped with step-by-step instructions, an easy to understand video, and highly useful graphics, this article is your ultimate guide to collimating with this tool!
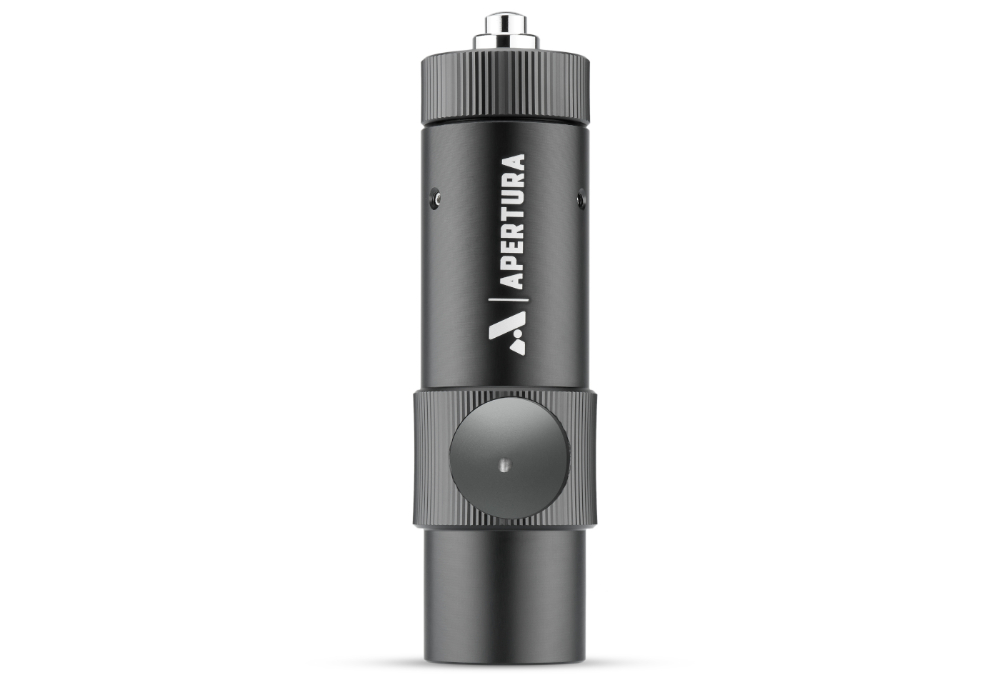
Laser Collimators
Probably the most common collimation tool, laser collimators are simple and easy to use! These instruments fit inside your telescope’s focuser and project a laser beam throughout your optics to assist with mirror alignment. Similar to a Cheshire eyepiece, laser collimators feature a 45° surface on the top of the tool. This surface includes a small “target”, one that is to be aligned with the projected laser beam.
Using a laser collimator is a straightforward process. First, insert this tool into your focuser with the 45° surface positioned towards the primary mirror. Next, adjust your secondary mirror screws to center the laser beam within the central spot of your primary mirror. After this has been achieved, you’ll next adjust your primary mirror screws to center the laser beam within the “target” found on the laser collimator itself. Thanks to our gear experts here at High Point, we have a detailed article demonstrating this process on a Dobsonian telescope!
- Important Notes: While laser collimators are user-friendly and simple in design, it’s important to bear in mind that the laser collimator itself may need to be collimated in order to ensure proper mirror alignment. Also, a cautious approach is necessary when utilizing these tools, as permanent eye damage can occur with direct eye exposure to the laser beam itself. Keep out of reach of children.
Collimation Caps
An incredibly simple and highly affordable tool for collimation, a collimation cap is ideal for quick and effective alignment of your optics! The underside of a collimation cap features a bright surface to serve as a reference for centering your telescope’s mirrors. While this reflective side gets inserted into your telescope’s focuser, the other side features a small opening for us to peer through. This aperture is minimal in size to assist with accurate mirror alignment.
After placing the collimation cap into your focuser and peering through the aperture, you should be able to see the entire primary mirror centered within the secondary mirror. If this is not the case, adjust the secondary mirror collimation screws until the entirety of the primary mirror is visible. Next, the goal is to adjust your primary mirror screws so the center spot of your primary mirror is aligned with the reflection of the collimation cap (the small dark spot within the polished brighter ring). For a more in-depth look at this process, check out our comprehensive article on the subject: Collimating A Newtonian Telescope with the Apertura Collimation Cap. This step-by-step guide will help you align your mirrors with ease and get you collimating like a pro!
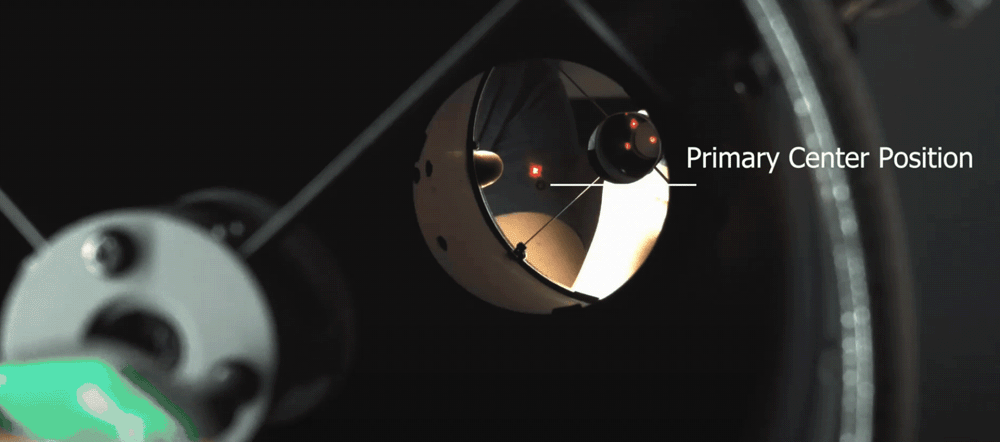
Artificial Stars
Artificial stars take the place of real stars, enabling star collimation of your reflector telescope during the day. These collimation tools are mainly designed to assist with primary mirror collimation, making them generally used for Schmidt-Cassegrain reflectors where only the primary mirror is adjusted. Near-perfect collimation can be achieved when used with Newtonians as well, however it may be best to utilize one of the above methods for the most accurate results. The main advantage of an artificial star is the ability to preserve your observing time, enabling collimation during daylight hours, which you can then fine-tune your alignment while out on the field.
As with utilizing a real star for collimation, the goal is to defocus your telescope so the artificial star within the field of view is presented as a donut-like shape. The middle hole of the “donut” is the shadow of your secondary mirror cast onto your primary mirror, and with ideal collimation, this shadow will be directly centered within the outer ring. If the middle hole is not centered, adjust your telescope’s primary mirror screws to center this dark inner circle within the brighter outer circle. Once achieved, you can then fine-tune while out on the field! This method can be performed with either an eyepiece or a camera attached to your focuser, with its field of view displayed on a laptop.
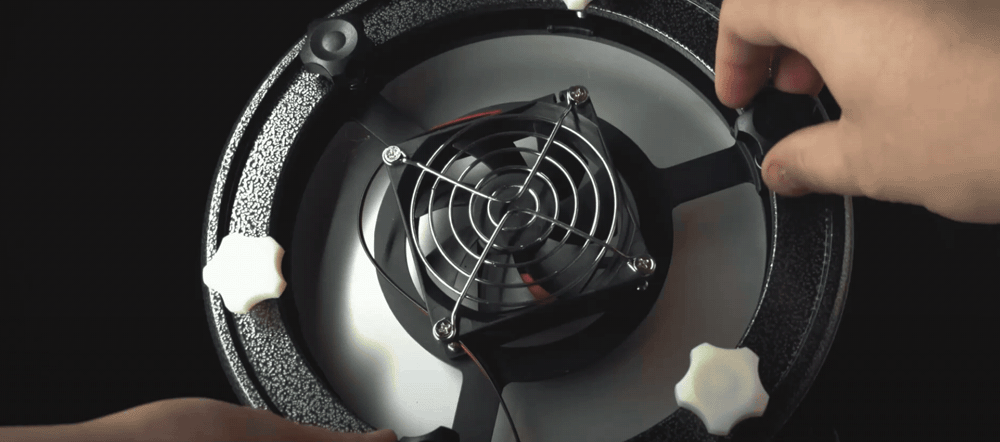
Easier Collimation with Collimation Knobs
If you’re looking to make your collimation routine even easier, consider upgrading your scope with the addition of collimation knobs! These enhancements take the place of the standard screws on your telescope’s primary and secondary mirrors, enabling quick adjustments without the need for a screw driver or hex wrench. In addition to higher precision, the ability to simply tighten or loosen these knobs with your hands make them perfect for when you’re out on the field and need to make on-the-fly modifications. With the wide selection of collimation knobs we carry here at High Point Scientific, you’re sure to find the right fit for your telescope!
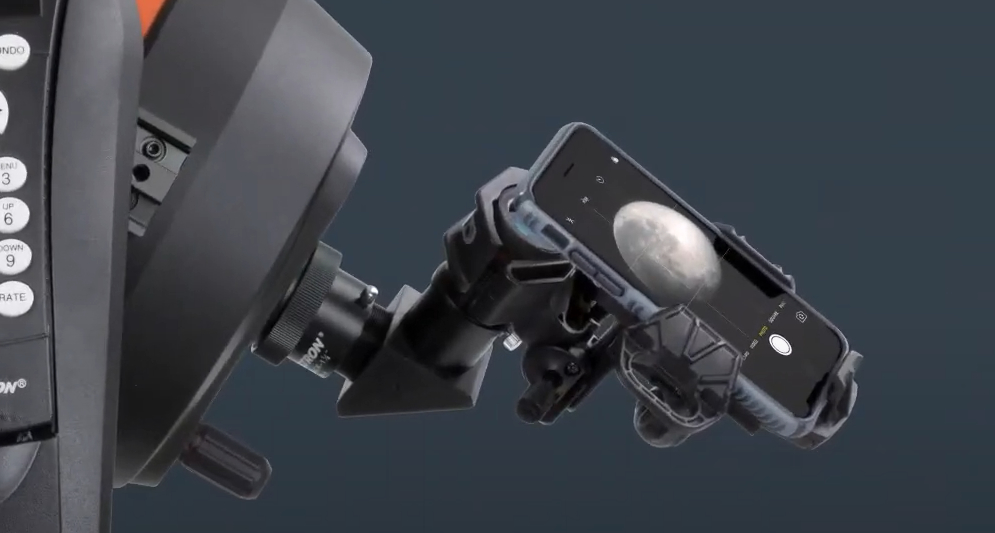
Smartphone Adapters
Looking to dip your toes in the world of astrophotography? A smartphone adapter is the perfect place to start! By clamping around your eyepiece and aligning your smartphone's camera with the exit pupil, these little gadgets enable you to capture quick shots of our Moon, and maybe even some planets. Read on as we take a look at the two most popular models:
Apertura Smartphone Adapter
The Apertura Smartphone Adapter is the best accessory for those who want to get a start at lunar/planetary imaging! Simply fasten the adapter around your 1.25" eyepieces and secure your smartphone in the adapter's clamp with the phone's camera lens centered over the eyepiece. Before you know it, you'll be taking quick, single-shot images of the Moon that you can easily share with your friends and family. Compatible with all smartphones, everyone can get started in astrophotography!

Celestron NexyZ
The Celestron NexYZ allows you to attach your smartphone to virtually any 1.25” eyepiece (as well as some 2” eyepieces) providing awe-inspiring views of the planets and the lunar surface. This smartphone adapter gives you the ability to take great photos through high or low magnification eyepieces. Whether you want to photograph Jupiter and its Galilean moons, or the intricate details of our own Moon, The Celestron NexYZ is a great way to start!
Helpful Extras
Now that the basics are covered, let’s explore the host of extras available to make your observing sessions even more enjoyable! While minor, these accessories help to elevate your experience, putting the final touches on your stargazing adventures. From cases to star charts, let’s take a look at these helpful extras!
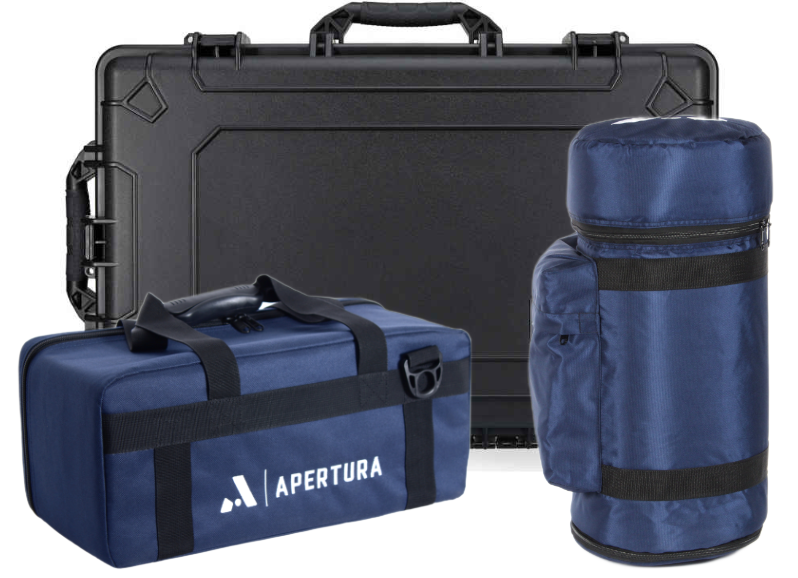
Telescope Cases
After a night of observing, proper storage of your telescope is essential for preserving its longevity. A high quality case keeps dust, moisture, and bugs off of your scope, keeping it nice and clean for your next night under the stars. Additionally, a telescope case ensures safe transport to and from your observing site. Not only will your scope be shielded against bumps and dings, a proper case makes hauling your equipment far easier with straps and handles! Soft telescope cases, typically constructed of tightly woven polyester, provide a durable barrier between your scope and the outside elements. These cases are light in weight and easily manageable for transport. For maximum protection and extended storage, however, a hard case is the way to go. These rigid, robust cases provide the ultimate protection for your scope, keeping it safeguarded from accidental damage. Be sure to check out the host of Telescope Cases, Covers, & Shrouds we carry here at High Point Scientific!
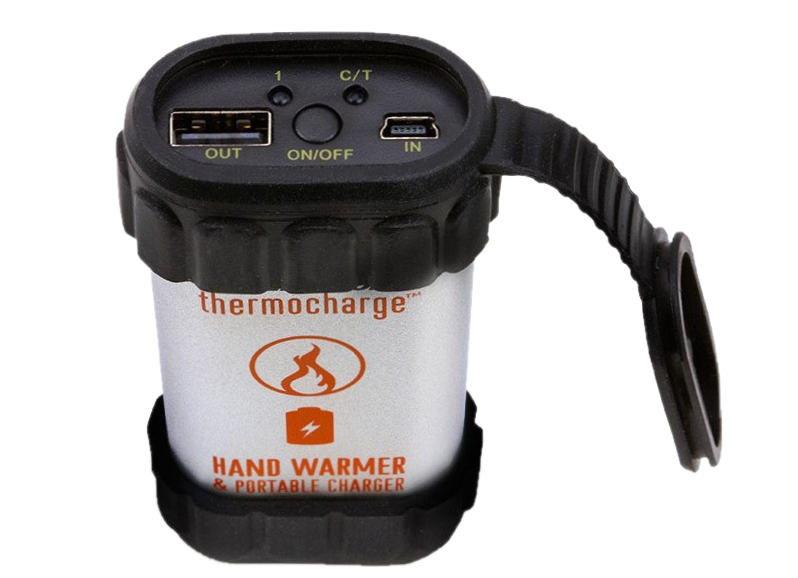
Hand Warmers
With the significant temperature drop as the Sun goes down, keeping your hands nice and toasty is key in maximizing comfort and prolonging your observing session! The Celestron ThermoCharge, for instance, keeps your hands pleasantly warm in between eyepiece swaps and telescope slews. Additionally, this hand warmer doubles as a power bank to ensure your devices stay fully charged and operable. The small, compact size offers effortless probability. Put it in your backpack, laptop case, glove compartment, or your pocket to ensure comfort no matter where you go!
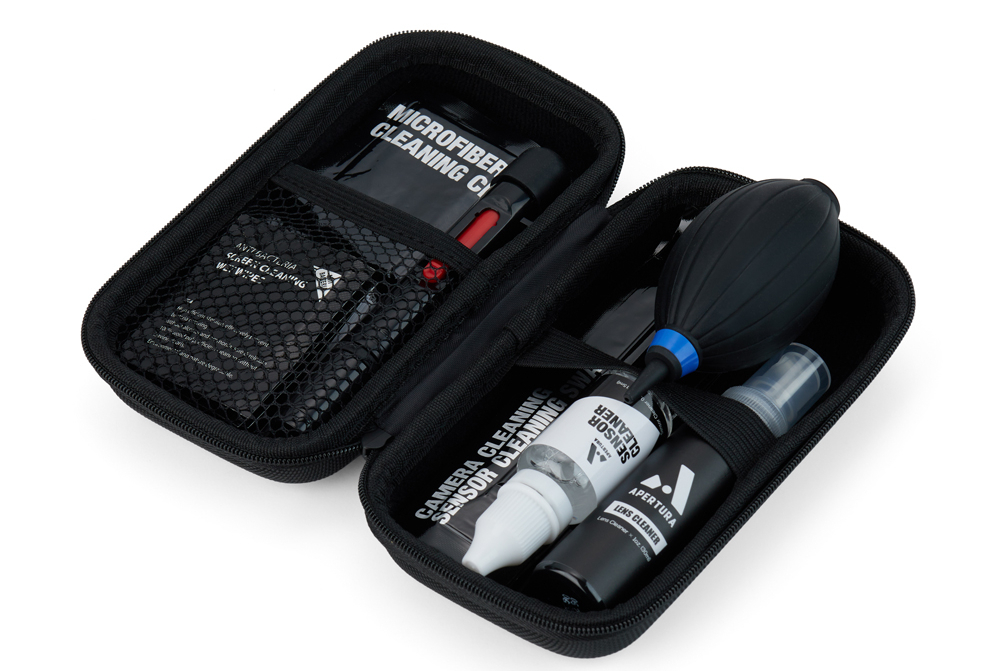
Keeping Your Optics Clean
As an outdoor hobby, proper care and upkeep of your astronomy equipment is key in ensuring proper performance. If not regularly maintained, the outside elements can slowly but surely erode the efficiency of your gear. Routine care not only helps you get the most out of your equipment, it also prolongs its life for years to come! Here at High Point Scientific, we carry a variety of cleaning tools to choose from. The Apertura Optics & Sensor Cleaning Kit is a comprehensive package of everything you need to safely remove dirt, fingerprints, and smudges from your telescope and other accessories. It’s important to remember, however, over cleaning your gear can cause more harm than good. If you’re unsure if your optics need cleaning, it’s best to leave them alone to avoid accidental scratching or damage. It’s also best practice to not disassemble or remove your scope's optics, as this can void your warranty.
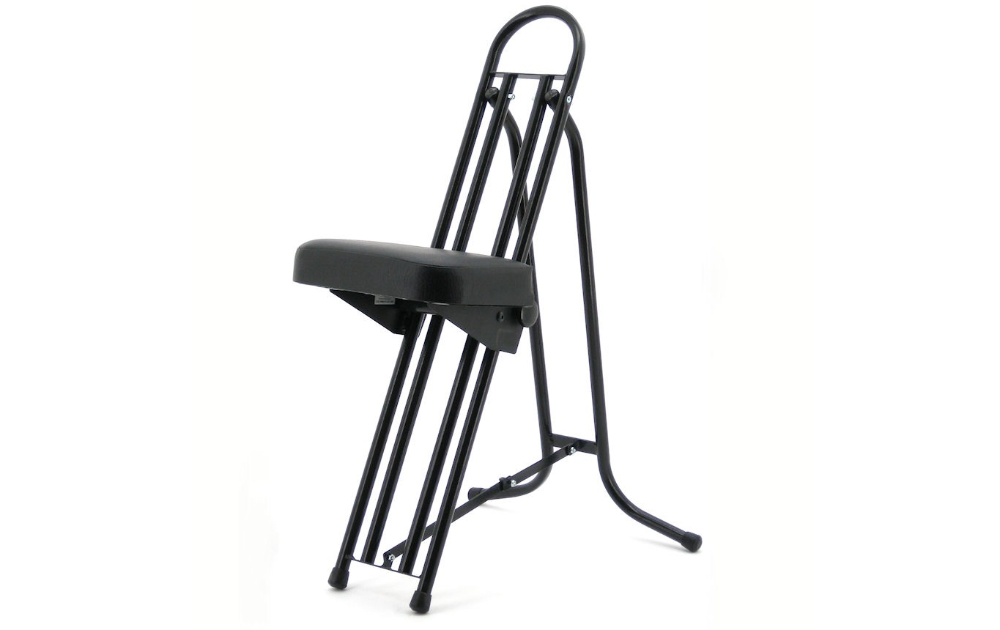
Observation Chairs
The varying angles of telescopes can have us straining our neck while looking through your eyepiece or kneeling in the dirt for hours at a time can certainly put a strain on your body. As an ailment to these awkward positions, having a sturdy, comfortable chair for your observing sessions makes a world of a difference! The StarBound Adjustable Observing Chairs, for instance, are a great tool for astronomers. This chair is equipped with an adjustable seat to accommodate the varying heights of your telescope during different pointing positions.
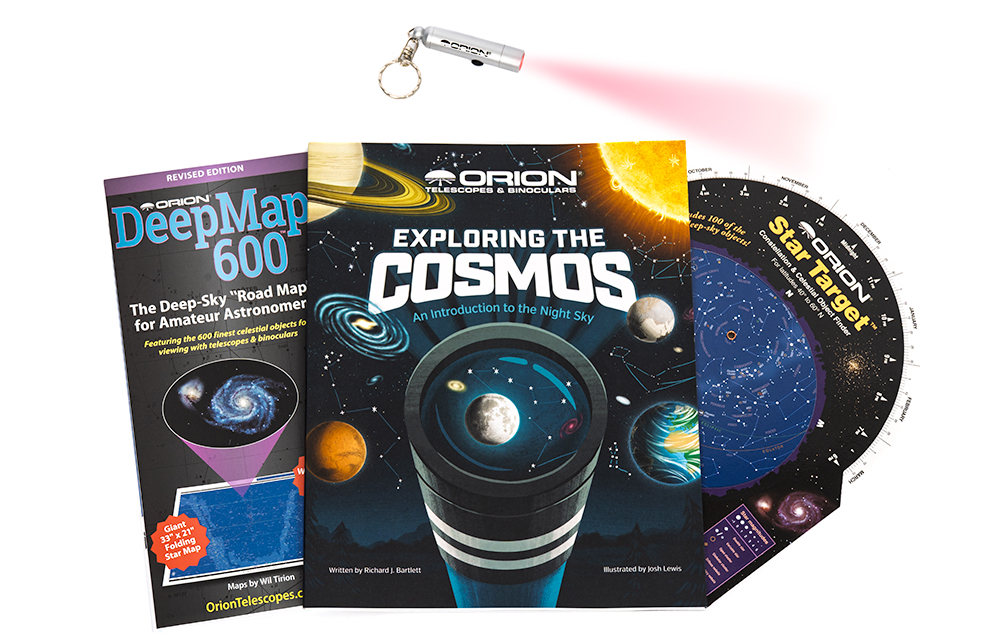
Moon Maps & Star Charts
While they may seem outdated, physical moon maps and star charts are highly beneficial tools for beginners and those who enjoy hands-on learning. These charts provide a tactile experience, offering meaningful engagement with the night sky. The simple design is easy to use and is ideal for streamlined observing sessions while the educational content fosters increased enthusiasm for astronomy. Even if you know your way around the constellations and are familiar with the major craters on the Moon, these maps are great to have on hand to deepen your understanding of the celestial dome and our natural satellite. This Orion Stargazer's Starter Kit is the perfect package to get started. Including a battery powered red LED flashlight, a durable folding star chart with a catalogue of 600 celestial objects, a seasonal star target planisphere, and a copy of Exploring the Cosmos: An Illustrated Introduction to the Night Sky, you're backed by in-depth, comprehensible literature for educational and engaging nights under the stars. Ideal for outreach events and for teaching children about the cosmos, get your hands on a Moon Map or Star Chart today!
Useful Apps
To help you within your astronomy journey, a number of highly useful apps are available for download! Planetarium apps are at the top of this list—opening the doors to a simulated version of the night sky to assist you with getting familiar with our celestial sphere. One popular choice is Stellarium. This mobile software allows you to point your smart device at the sky and easily locate stars, constellations, the planets, satellites, and more. Additionally, a host of information is available to help further your knowledge on the vast sea of celestial objects viewable from Earth. Another planetarium app is none other than SkySafari, a powerful program that features augmented reality, interactive graphics, and loads of information. Using your phone’s camera, this app lets you merge your surroundings with a simulated star chart for a unique, personalized planetarium experience!
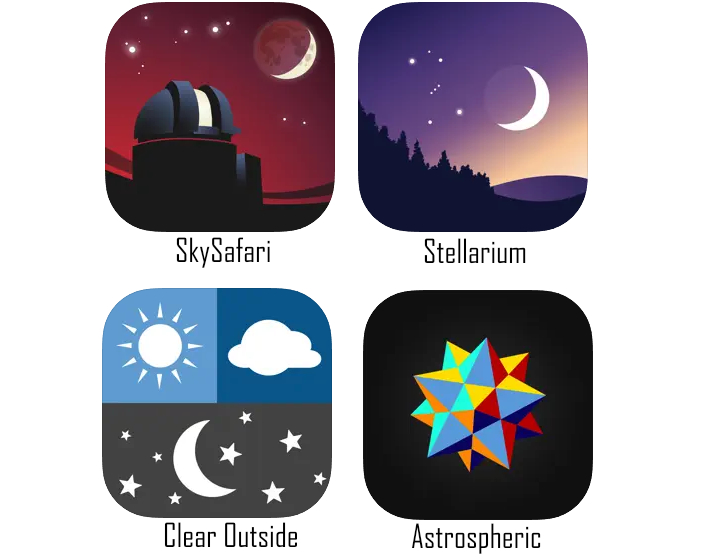
As a weather based hobby, keeping tabs on your local forecast is highly beneficial for planning your observing sessions. Weather apps, particularly for astronomy, help give you an idea of the amount of cloud coverage expected hour by hour—helping you prepare accordingly. These programs are also often equipped with information about your local seeing conditions, wind speeds, the current phase of the Moon, and other factors that can affect the quality of your observations. Many backyard astronomers have multiple weather apps on their smart device to cross reference forecasts and gain a better understanding of what can be expected. Clear Outside and Astrospheric are two highly popular choices favored by astronomers!
Our AstronomyHub
Here at High Point, we’re dedicated to helping you further your knowledge on anything astronomy related. This is why we have hundreds of in-depth articles centered around topics ranging from how telescopes work, which equipment is suitable for you, gear reviews, celestial objects, space news, and plenty, plenty more. Our Beginner’s Guide to Using a Telescope, for instance, houses in-depth material on the ins and outs of everything you need to know about getting started with your telescope, while the What’s in the Night Sky? series helps you gain an understanding of the celestial objects visible each month. With our goal of making the night sky more accessible and enjoyable regardless of your experience level, be sure to take a look at the wealth of information we have available within our AstronomyHub!
Contributing Writers
 Edward
 Daniel
 Moryah
 Vincent
Click the arrow above to see MLA, APA, and Chicago Manual of Style citations.
MLA:
High Point Scientific Team. "Ultimate Telescope Accessories Guide," AstronomyHub, High Point Scientific, 30 Jul. 2025, https://www.highpointscientific.com/astronomy-hub/post/best-telescopes-and-accessories/ultimate-telescope-accessories-guide.
APA:
High Point Scientific Team. (2025, July 30). Ultimate Telescope Accessories Guide. High Point Scientific. https://www.highpointscientific.com/astronomy-hub/post/best-telescopes-and-accessories/ultimate-telescope-accessories-guide
Chicago Manual of Style:
Bibliography:
High Point Scientific Team. "Ultimate Telescope Accessories Guide," AstronomyHub (blog), High Point Scientific, July 30, 2025. https://www.highpointscientific.com/astronomy-hub/post/best-telescopes-and-accessories/ultimate-telescope-accessories-guide.
Footnote:
High Point Scientific Team, "Ultimate Telescope Accessories Guide," AstronomyHub, High Point Scientific, July 30, 2025, https://www.highpointscientific.com/astronomy-hub/post/best-telescopes-and-accessories/ultimate-telescope-accessories-guide.