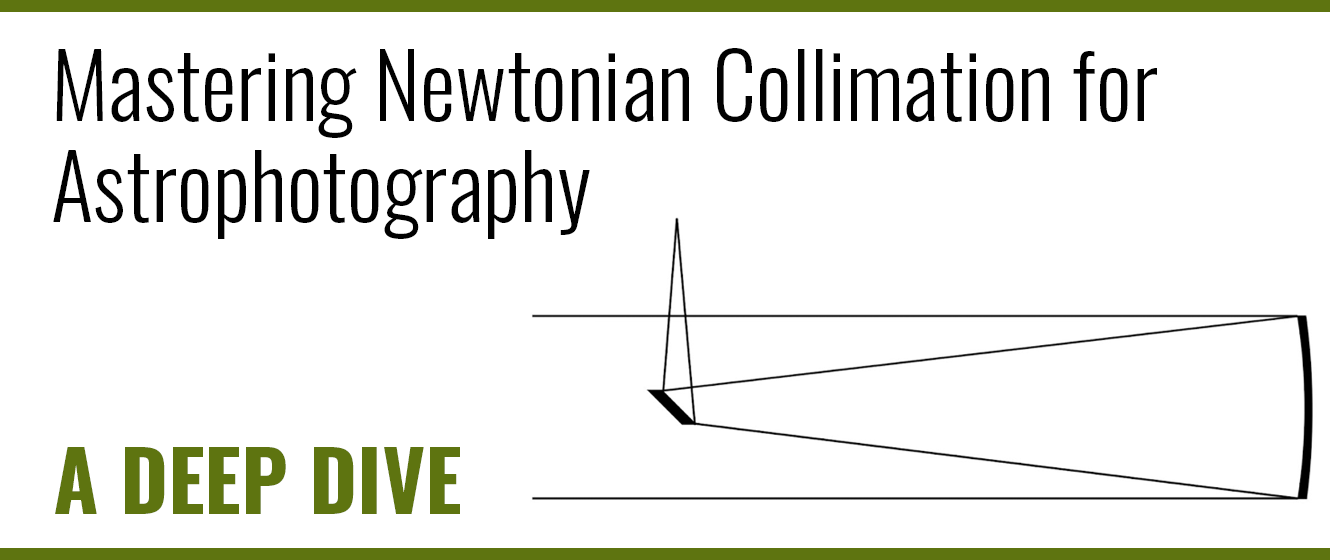
In recent years imaging Newtonian telescopes have become extremely popular due to their “fast optics” and high-performing value per dollar when compared to refractors or other more complex optical systems. Like any optic, their performance is limited by the accuracy of their optical alignment. Newtonian telescopes are extremely adjustable by the user. This article will cover everything you need to know in order to get the most out of the imaging Newtonian.
Collimation can be intimidating, especially for the first time after your new telescope makes a trip from our facility to its new home, and we understand that. Knowing the process of collimation, as well as the intended goal is extremely helpful. We will cover how the two mirrors interact with each other, and you’ll learn how to finish collimation using a star test. This is not an optional step if maximum performance is desired!
A Step Back In Time
To fully understand the Newtonian telescope, we must first go back in time. Optics are devices that modify light. We must understand that there are two types of optics used for astronomy: those that pass light through the optic and those which reflect light.
Transmittive or Refractive optics use a transparent substrate, like clear glass, in order to focus and modify the light. Generally, these types of optic have spherical surfaces.
When manufacturing optics, two surfaces are rubbed against each other with abrasive grit or polish. The surfaces are rotated as they are rubbed back and forth on each other. To summarize the process, a spherical surface is the natural state of an optic after working it by hand.
Refractive optics work well in spherical form, though simpler designs can struggle to focus all colors of light equally due to the unequal refractive/prismatic nature of glass. The result is some colors of light are focused further away from the telescope, and some colors focus closer. To counter this issue, multiple glass types and lenses are used together to form a good refracting telescope optic. It allows the objective to bring the different colors of light closer to the same focus, while also correcting for other aberrations such as coma, field curvature, and astigmatism. A “perfect” refractive objective would focus all the visual spectrum at exactly the same place. While no perfect objective exists, modern multi-element refractive objectives do a fantastic job at focusing the different wavelengths (colors) of light at nearly the same exact location.
A refracting telescope uses an objective that is relatively lightweight and compact in smaller apertures. Usually the largest refracting scopes you will ever see will be a 5”-6” objective, with most being in the 2”-3” range. These are tiny when compared to other styles of telescopes. Generally, refracting objectives do not need to be adjusted by the user due to their lightweight and compact size, and they hold the factory alignment well.
Reflecting telescopes focus light using a reflective surface known as a mirror. Reflecting telescopes focus all colors of light, including ultraviolet and infrared at the same exact location. Reflecting telescopes are completely free from any chromatic aberration. Early versions of reflectors did not use glass substrate with a reflective overcoating like we see today. They used speculum metal, a polished bronze-like alloy of copper and tin.
Early reflecting telescopes struggled with spherical aberrations. Since optics want to naturally form into a spherical shape, this was the general shape of an astronomical mirror after polishing. Light hitting the outer part of the mirror focused closer, and light hitting the center part of the mirror focused farther away. The spherical shape of the reflective optic needed to have its shape adjusted for best performance. The center of the mirror’s curve needed to be deepened so the light focusing farther away focused a little bit closer, and the edge of the mirror needed to be flattened some so the light focused too close would focus a little farther away. This formed a parabolic mirror. A parabolic mirror focuses all the light which is coming from an “infinite distance,” like a star, to the same position.
While the refracting telescopes focus and form an image behind its objective and behind the telescope, where it was easily accessible, reflectors use concave mirrors to focus light forward. This places the focal position in front of the main optic. The focal point is not visible to a person because their head looking into the eyepiece blocks the light from coming into the telescope. William Herscial accounted for this by tipping the mirror so his head did not interfere with the view, and the mirror looked a bit to the side. The epitome of optical tilt. Another aberration, or optical flaw, of the parabolic mirror is coma. Coma can be seen on the outer parts of the telescope's image as distorted elongated stars. Some consider the stars to be shaped like a flying bird, specifically a seagull. Coma is not good for astrophotography as it elongates and distorts the star shape. It spreads the light out and gives poorly shaped star images.
Sir Isaac Newton decided to place a small flat mirror in the path of the primary mirror. This directed the light out of the side of the telescope where it could be accessed with an eyepiece without blocking the light path. The primary mirror is parabolic, and the secondary is a zero power flat mirror. Think of the secondary mirror as something like your bathroom mirror where it does not focus or modify the light in any way, it simply shows you a reflection of the room. This is an over simplification because the secondary mirror in a telescope is not only physically flat, but optically flat. In the case of the Newtonian, the secondary shows you a view of the primary mirror’s focused light cone.
Newtonian scopes also have an aberration known as field curvature. Field curvature is when the image formed by the telescope forms in a shape more reminiscent of a salad bowl, rather than a flatter shape, like a dinner plate. This combined with coma make for stars that are larger and more diffuse and elongated the farther away they are from the image center. This is why we use coma correctors with imaging Newtonians.
Collimation
Collimation is the process of aligning the telescope's optics so they offer the highest level of performance possible. Proper collimation is important for a balanced image with the best star shapes and maximum illumination.
In a Newtonian telescope, collimation is fairly straight forward because the secondary mirror does not modify the light cone. So, if there is a slight decentering or tilt to the secondary mirror in a Newtonian, the end result is quite subtle and typically seen as uneven field illumination or a slight amount of tilt to the image plane. In a Newtonation, many users mistake miscollimation of the secondary mirror as focuser tilt. When collimating a Newtonian, first the secondary is aligned to point at the primary mirror, and then the primary mirror is adjusted to return the image centered on the alignment point.
There are as many ways to collimate as there are days in a week, but we almost always start with a bench collimation. This is an optical alignment that relies on physical alignment points and reflected images. Bench collimation is a rough start that should get us close and is not the final step of aligning optics. Collimating a Newtonian telescope does not need to be difficult or overly complex to produce decent images.
Bench Collimating the Telescope
The Apertura Cheshire Collimation Eyepiece is the basic recommended tool for bench collimation because it is cost effective and provides good results. Other tools can be used, but oftentimes, they are as costly as the telescope itself. No matter the tool, the process is generally the same as what is listed below. Make sure to adjust the secondary, then the primary mirror.
To collimate a Newtonian telescope with the Apertura CCE, start by removing any cameras or accessories attached to the telescope. Remove the front cover of the telescope. Looking through the front of the telescope, take note of the doughnut shaped center spot on the primary. Now, look through the empty focuser and take note of the center spot on the primary mirror, as reflected in the secondary mirror.
Insert the CCE into the 2” to 1.25” adapter supplied with the telescope with the angled reflective side facing up. Then, insert this into the focuser and clamp it in place. Look through the collimation tool and compare the primary mirror center spot to the collimation tool crosshairs. If adjustments are needed, use the three collimation screws on the secondary holder and spider. Adjust the collimation hardware to place the CCE crosshairs at the center of the primary mirror center spot.
DO NOT ADJUST THE SECONDARY MIRROR CENTER SCREW!
Doing so will alter the field illumination of the telescope, among other things. The secondary offset of Apertura telescopes are preset when the scopes are Quality Control Checked and at the factory. It is not necessary for the end user to adjust this setting as it will not change. Even if the telescope is knocked out of collimation, the secondary offset will remain correct.
For a long lasting collimation, it is important that the hardware has some preload on it. Never adjust collimation by only loosening the hardware. All final adjustments should be made only by tightening the three screws. If you find they will not turn anymore without damage occurring, then back off just a little bit. Tension is the key to a lasting optical alignment, and it is often overlooked. Sometimes, it might seem logical to tighten the center screw to account for the looseness of the three secondary mirror collimation screws, but this is never a good solution and only leads to problems. If you find you have a good collimation but the screws remain a bit loose, try to tighten each screw a little at a time, moving in a circle from screw to screw, until the secondary mirror is once again secure and locked in position.
Now that the secondary mirror has been adjusted, it’s time to move to the primary mirror. Look into the CCE and take note of the reflective circle from the Apertura CCE as seen in the telescope's mirrors. By covering and uncovering the reflective portion of the CCE with your hand while looking through the telescope, it will be apparent which part of the reflection is from the CCE. If the change is not readily apparent, make sure the angled reflector of the CCE is pointing towards a bright light source like a ceiling light or white wall. If you are working in a dark area, a small handheld flashlight can be used to illuminate the reflector. For more information on collimating with the Apertura CCE, check out the comprehensive Collimating a Newtonian Telescope with the Apertura Cheshire Collimating Eyepiece Guide in our AstronomyHub!
Before adjusting the primary mirror collimation hardware, the small locking knobs will need to be released. Then, adjust the primary mirror until the reflective target is centered on the crosshairs and the secondary mirror center spot. After the primary has been adjusted, lock the primary mirror hardware back in place by tightening the small locking knobs. Do so just a little at a time, moving from one locking knob to the next. The goal is to secure the mirror cell without changing the overall collimation once the knobs have all been tightened. When tightening each knob, you will see the mirror move, but by tightening each knob the same amount, the final result should remain the same.
Recap:
- The secondary mirror is adjusted to point at the center spot of the secondary mirror.
- The primary mirror is adjusted to return this image to the center.
Star Collimation
Now that the telescope has been bench collimated, it’s time to move to a star test. Start by attaching your camera to the telescope. Then, set up your imaging rig and achieve focus with the system. During star testing, we’ll only adjust the primary mirror.
Step One
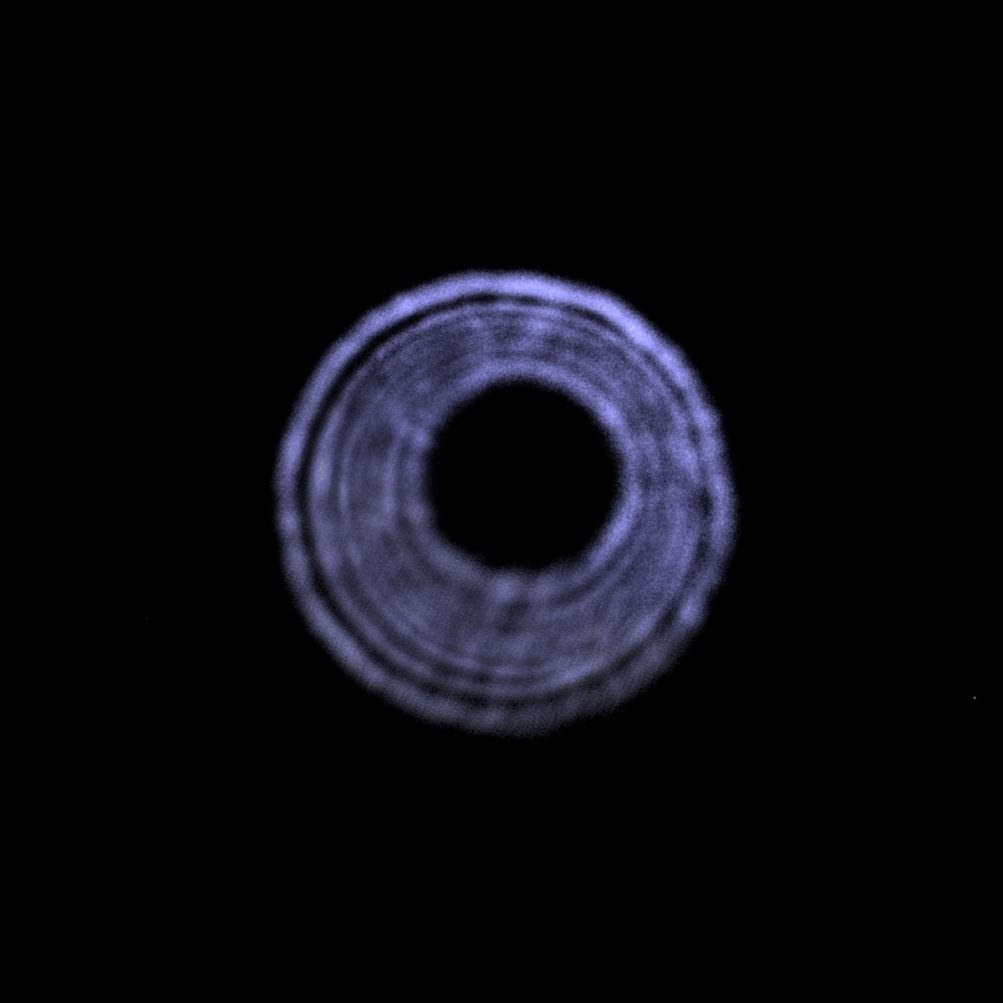
- Center a moderately bright star, such as a constellation star, in your field of view. Using a live view or looping short exposure, center this star perfectly in your camera. Then, ever so slightly defocus the star. You’ll need to zoom in using your imaging software to see the details necessary. If the star is defocused too much, the detail necessary to perfect the collimation will not be visible. If the shadow of your secondary is not centered in the unfocused star image, you will see something like this:
Step Two
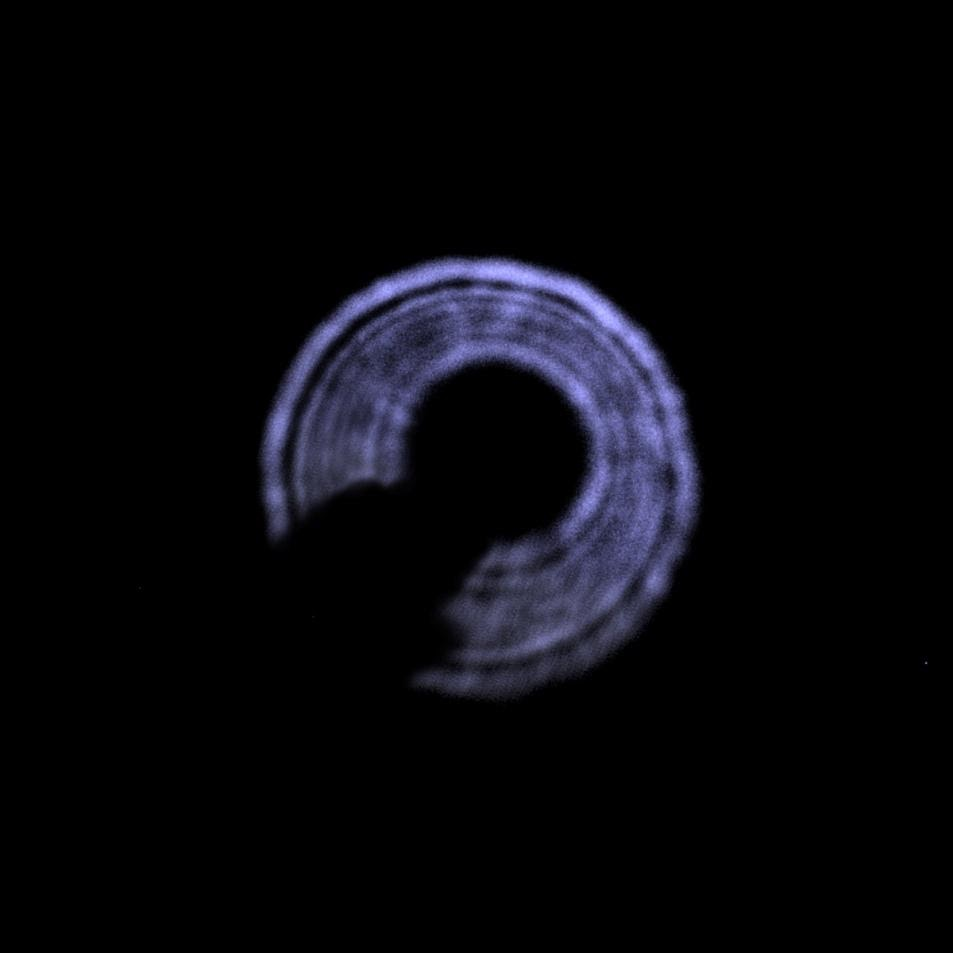
- This telescope is in poor collimation. The question now is which of the three screws do you need to adjust to bring the telescope into a better state of alignment. To find out, simply reach your hand around and place it in front of the telescope’s aperture. Then move your hand’s orientation so its silhouette is seen in front of the widest portion of defocused light between the shadow of the secondary and the edge of the star. In doing so, you will see something like this:
Step Three
- Once this is accomplished, look at the primary collimation hardware (at the back of the telescope) and see which one of those screws best aligns with your hand placement. If you are lucky enough to find a collimation screw in the same orientation, then you will need to adjust that particular adjustment screw. If, however, your hand is between two collimation screws, then adjust the screw on the opposite side. The goal is to find a screw that is closest to the imaginary line that your hand creates across the telescope.
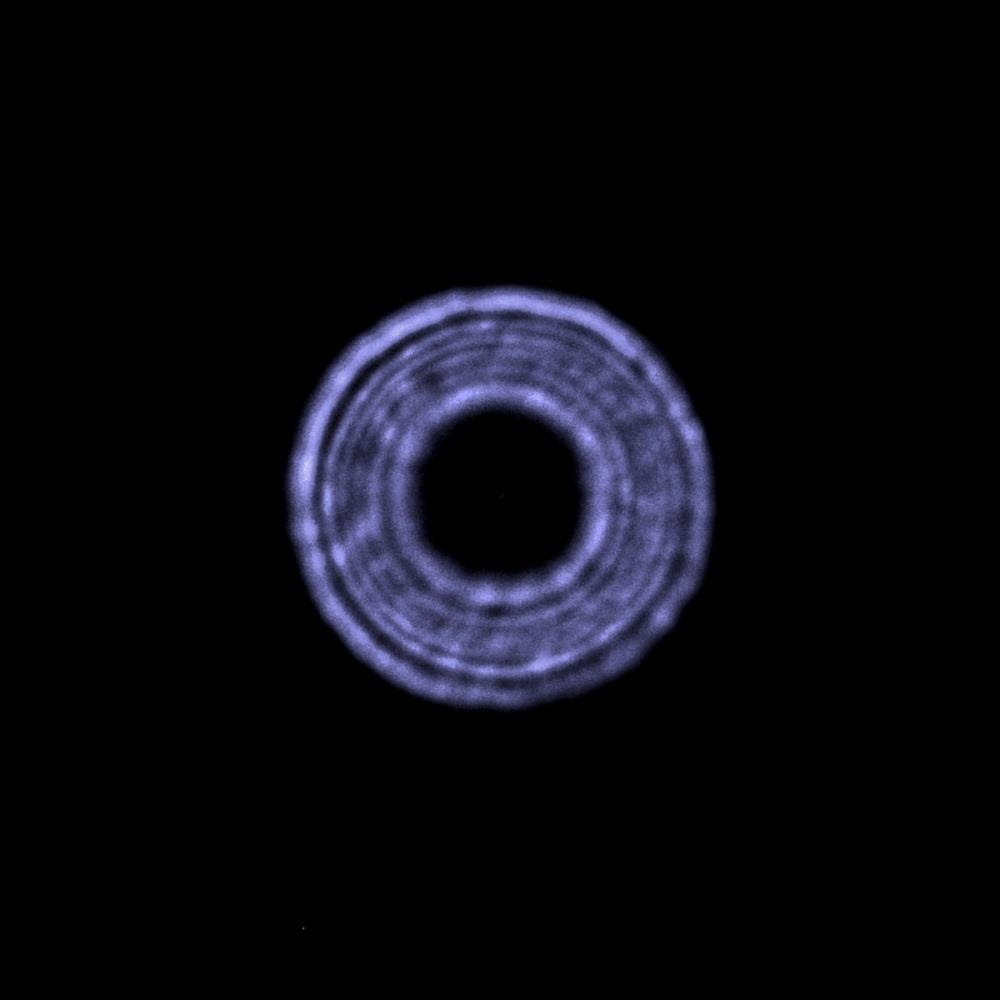
- Make very small adjustments to the collimation screw, always recentering the star within your view to see the results of your efforts. If the collimation looks worse, then you are turning the screw in the wrong direction. You may need to adjust more than one screw to finalize collimation. However, you can use the trick mentioned earlier to see exactly which screw needs to be adjusted. Be patient and make small changes until you see something like this:
Step Four
- Short focal ratio imaging Newtonians will have a secondary mirror that is physically offset from the center of the tube. It might be a small amount, but it is offset. This offset can show in a star test if the star is defocused too far, and because of that fact, it is important to work through the following final step.
- For some extra precision, tweak your focus a bit so that the star is just slightly outside of perfect focus. If your telescope is perfectly collimated, you should see a tiny white dot centered within the shimmering diffraction pattern. This small dot is called “Poisson’s Spot,” and it determines the true center of your diffraction pattern. Only when this spot is precisely centered can you call your work done. If it is off slightly, just keep making small tweaks to one or more of your collimation screws while keeping the star image as well centered as you can. If you are patient and persistent, you will end up seeing something like this:

Proper collimation is essential to getting the best performance from your imaging Newtonian. While the process may seem complex at first, following the outlined steps, starting with bench collimation and finishing with a star test, ensures accurate optical alignment. Taking the time to align the secondary and primary mirrors, and fine-tuning with Poisson’s Spot, will result in sharper stars and better overall image quality. With practice, collimation becomes routine and is key to making the most of your telescope.

Learn More
Interested in diving deeper into the world of astronomy? Check out our AstronomyHub for a wealth of articles, guides, local resources for planetariums and observatories near you, and more to enhance your stargazing experience.


