The Sun just set, and it looks like the forecasts were correct: there isn’t a cloud in sight. You set everything up, including your ZWO camera, which whirs to life. After you reach your target cooling temperature, you start the image capture program… only for the first image to come through with a huge bright patch in the corner. Perhaps you don’t even make it that far and instead receive an “Exposure Failed” message. Maybe you don’t even reach your set cooling temperature. Or, your image capture program doesn’t see the camera at all.
Even with ZWO being the leading astrophotography camera brand and offering fantastic products, there will occasionally be situations where something goes awry. Often times however, while these issues may seem and feel catastrophic, actual camera defects and failures are exceedingly rate, with the vast majority being simple things you can resolve with this guide!
The steps outlined in the article below have been compiled by our experts and are based on hundreds of successful troubleshooting interactions over the years, and tips we’ve received while working with ZWO’s excellent support team! We highly recommend reading the Most Common Issues section regardless of what your issue is. Not only do the steps here resolve the vast majority of issues, but in the event your issue does need to go to ZWO, these are some of the steps they will ask that you perform if you haven’t already.
A Note About This Guide: At the beginning of each section, we’ve included a summarized version of the testing procedure. We recommend reading through the full section first and then using the summary as a guide while walking through the troubleshooting steps.
Most Common Issues Summary
Checking Power: Ensure you are using a high-quality 12V power supply rated for at minimum 3A. If at all possible, test the camera while powering it directly from the power supply, cutting out power distribution boxes or hubs. We recommend using the Apertura 5 Amp AC Power Supply as it is a high-quality option that we have verified can actually reach its rated amperage. Check that the power supply and cables are working, with another piece of equipment if possible. Ensure the red LED near the power connection is illuminating.
USB Cable/USB Port: Even if the USB cable is brand new, try swapping this out with another USB 3.0 cable. Additionally, if possible, use another device for a few minutes with the cable to verify that it is functioning properly. Be sure to move the cable around while testing, just in case there is a position-dependent failure. If all these steps fail, try using the camera with another USB port on your PC or ASIAIR.
Software Troubleshooting: Make sure you’ve installed any drivers available for your operating system on ZWO’s software page. Install and test the camera with ASI Studio (available for free on the same page as the camera drivers). Consider double-checking by installing and testing the camera in the 3rd party program SharpCap (Pro membership is not necessary for testing).
Remove Any USB Hubs or Extensions: Remove any USB hubs, USB extension cables, and any extended-reach USB cables (such as those over ~2.5 meters long) when testing.
Remove Any Other Equipment: If you are using a ZWO Pro camera and have accessories attached to the USB hub on the camera, disconnect them while testing the camera. Additionally, ensure any connected accessories are appropriate to use with the camera. This is meant for accessories like electronic focusers, filter wheels, and USB thumb drives, not USB dew heaters, full-size external hard drives, or other high-power draw devices.
Most Common Issues: A Deeper Dive
Exposure failed messages, oddities in images, and failure to recognize the camera are among the most common issues our gear experts see. If you’re experiencing one of these issues with your ZWO camera, or anything in between, the following steps are the place to start!
First Steps
Checking Power: It may seem like this is only relevant for cooling issues; however, ZWO Pro models are more than just an uncooled model with a separate cooling system slapped on. These designs require more power than USB alone can usually provide and accordingly will not function without 12v 3A DC power. Some earlier Pro models could be used without external power if the cooler was turned off, but this is no longer the case and external power is required regardless of whether you will be using cooling or not.
While it truly should be as simple as just verifying that your power supply is rated to 3A, an unfortunate reality our experts have encountered again and again are power supplies that don’t actually meet their rating. It is for this reason, we recommend ensuring you are using a high-quality power supply from a reputable manufacturer. If you’re using a power distribution solution, try removing this from the equation and powering the camera directly if possible. If you are unable to do so, double-check the output is rated for 3A output and the supply in use can comfortably cover the demands of the camera and all other equipment connected.
A final failure point within the power system are the actual cables. Inspect the cable for fraying/cracked insulation along its length, and replace any cords or AC adapters that show damage. It is rare, but on occasion, these can fail without being visibly damaged. A good way to test that the cable is passing power along is with another piece of equipment.

While running through the above tests, be sure to keep an eye on the red status LED next to the power input. When the camera is receiving power, this will illuminate. If, after verifying you’re using a high-quality, properly rated power supply and the cable (or supply itself) has not failed, you cannot get the LED to illuminate, then stop here and contact ZWO. If, however, you are seeing illumination but are still experiencing an issue, then move on to the next section.
USB Cable/USB Port: After power concerns, issues with the USB cable are the next most common culprit of camera issues. They’re also some of the most frustrating to deal with, as there is rarely any visible sign that a cable has failed. So, when something suddenly stops working, it is common for suspicion to fall on the more delicate/intricate components like the camera rather than a simple cable. This often leads to a lot of time and effort spent trying to fix a camera that isn’t broken. That being said, if you believe you’ve ruled out cable issues, we highly recommend double-checking—even if the cable is brand new!
The two methods of checking a cable are fairly straightforward and are as follows: swapping it out with another cable or swapping out the camera for a different device. Of course, there is always a chance (though it is very small) you have two bad cables, so we recommend checking with a separate device if you continue to have issues after a cable swap. One thing of note with faulty cables is sometimes the failure is position-dependent, so be sure to move the cable around while testing. We’ve seen plenty of cable failures where a cable will work long enough for a device to show as connected and work briefly, only to fail after a few minutes of use, so be sure to be thorough with this troubleshooting technique.
Though USB port failures are less common, it is still something to check. First, examine the USB port on the camera and the PC to ensure there are no broken plastic pieces or obviously bent pins. Then, try connecting the camera to a different USB port and re-testing.
If you're still having issues after checking the USB port and cable, this does not mean the camera is broken or defective, just that you will need to do a bit more digging. So far, we’ve been focused on hardware troubleshooting, but now, let’s take a look at software!
Software Troubleshooting: It may seem pretty straightforward. If the software lists ZWO cameras as compatible, it should just work. These are the most popular brand of astronomy cameras, so things should just be plug-and-play. However, the reality is some software suites are less “turn-key” than others. The way programs interact with a certain model could have bugs as well, so one camera may work while another does not. Software updates especially can introduce these bugs.
Note: If you’re using your ZWO camera with an ASIAIR, you can skip this section.
First, if you have not already done so, make sure that you visit the software section on ZWO’s website and download and install the native camera driver, if available for your operating system, as well as the ASCOM driver, if the imaging program you’re using requires it.
For the reasons listed above, it is always a good idea to test your ZWO camera with ZWO’s first-party software suite. By using first-party software, you can just about eliminate the chance an issue is caused by a third party’s implementation of drivers. While ZWO ASI Studio may not be your imaging tool of choice, starting here will inform whether you need to pursue further troubleshooting with the camera or contact the software developer. The suite is available for free on ZWO’s website, so it won’t cost you anything, and in the event you need to contact ZWO for further assistance, they often require that you check with this suite if you haven’t already.
An additional resource to check with is the free program SharpCap. There is a paid Pro tier, but for checking images, or whether the camera can even successfully take images, you don’t need to purchase this tier. While this is a third-party program, many of our users and experts have had great success using it with ZWO cameras, and accordingly, it is a great way to do a “double-check.”
If you’re still encountering issues with the camera when using ZWO’s ASI Studio and SharpCap, then you likely will need to review our more specific troubleshooting sections, but first there are a few more simple checks you can perform.
A Few More Simple Checks
Remove Any USB Hub/Extensions: While there are hubs, particularly powered ones, that will work just fine for astronomy equipment, we occasionally do see some do not. In addition to this, it is always possible the hub itself is malfunctioning or failing, so we suggest testing your camera when it is directly connected to your computer to rule out this possibility.
Extensions are similarly known for occasionally causing issues, especially over longer and longer distances, whether it is a powered extension or not. Again, to rule out this possible failure point, we recommend trying the camera directly connected to your PC.
Remove Any Other Equipment: Though other equipment interfering with your camera connection is not a common issue, it is still worth isolating the camera as much as possible when troubleshooting a ZWO Pro camera with USB 2.0 passthrough ports. If the camera works when accessories are disconnected from it, then it is worth investigating if the equipment itself is working properly. Additionally you will want to assess if the device itself is suitable for the hub on ZWO Pro cameras. Devices using the USB port for power only, such as USB dew heaters, draw more power than the ZWO camera USB port is designed for and should not be used.

If you’re able to verify the accessories and their cables are appropriate for the Pro camera hub, as well as functioning properly, but still experience exposure failures or connection issues, then you will need to see our section about contacting ZWO for assistance with the USB hub specifically.
Still Having Issues? If, at this point, you are still experiencing exposure failure messages, connection issues, or if the camera is not being recognized, then jump to our section about contacting ZWO. If, however, you are able to take an image but are seeing artifacts/oddities in it or are experiencing issues with the camera not reaching the desired temperature while imaging, then you’ll want to move on to the more detailed sections below.
Image Issues Summary
Obvious Digital Artifacts: If you are seeing perfect squares, rectangles, straight lines, or other blocky patterns, these are digital artifacts and are occurring either due to an issue with the software, USB/power cables, power source, attached devices, or the camera itself. Follow the troubleshooting steps in the Most Common Issues section if you haven’t already.
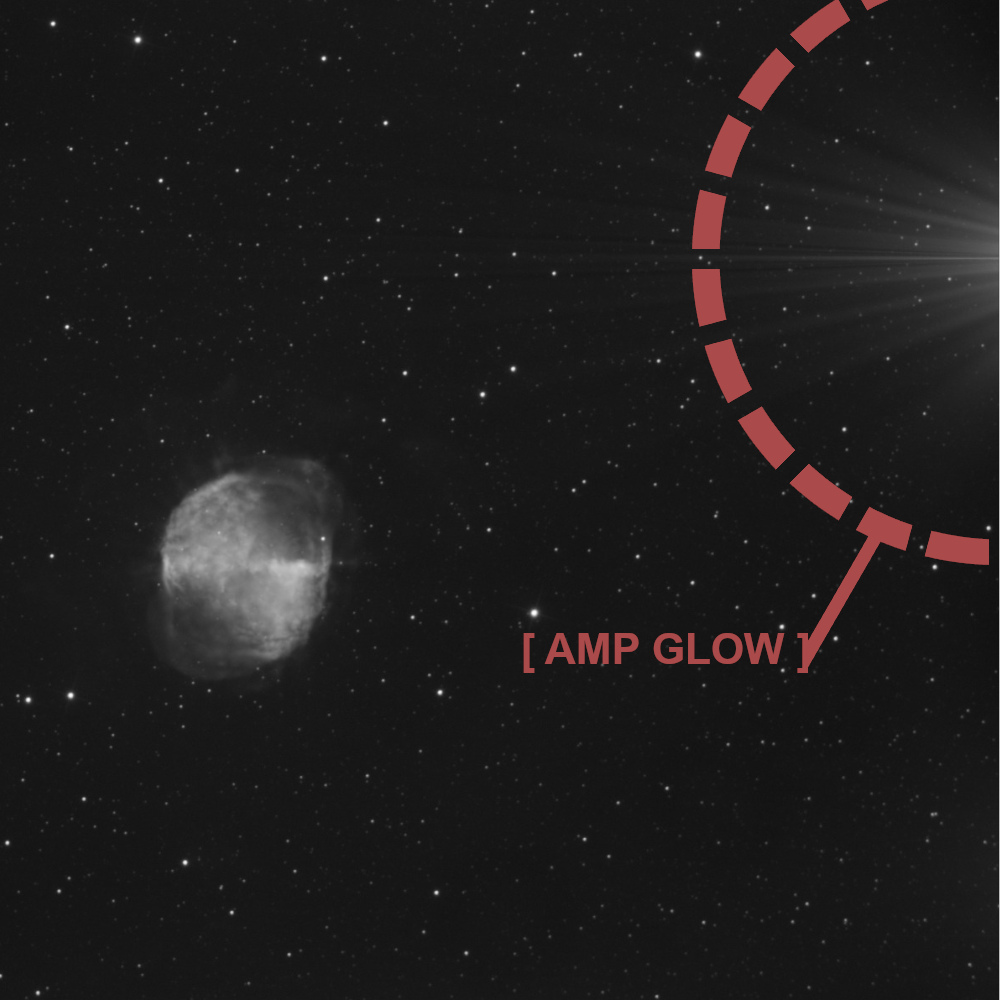
Amp Glow: This presents as bright white patches in the frame, usually around the edge. It may look like a light leak, but unlike that issue, this will be present when bench testing the camera as well. It is also fairly consistent for all chips of a certain model, so searching “[Your Camera Model] Amp Glow” and comparing what you’re seeing to those results should confirm this. This is not a defect and can be mitigated with “dark” calibration frames.
Assessing Tilt: This usually looks like a corner or perhaps a whole side that is out of focus. To check whether the tilt is with your camera or elsewhere in the imaging train, begin by taking an image. Then, rotate just the camera about 45-90° and take a new image. Check to see if the same section of the image frame is out of focus between the two shots. For example, if the top left corner is out of focus in the first shot, is the top left corner out of focus in the next shot, or has the out-of-focus section shifted along with the image?
One-Shot Color Camera Issues: If the color looks drastically wrong across the entire image, then check what “deBayering” algorithm your image viewer/editor uses. Search for what Bayer pattern your camera uses (will be something similar to “RGGB”), and ensure the algorithm your image viewer/editor matches.
Troubleshooting Other Image Issues: To isolate other image issues to either the camera or elsewhere in the imaging train, you will want to perform a bench test of the camera completely detached from the rest of your equipment:
- Point the camera at a flat, evenly illuminated surface like a wall or ceiling. Adjust your exposure time until the frame isn’t pure white or pure black (around the middle of the histogram). Take an image.
- Put the lens/dust cap on the camera, and place it in as dark a location as possible, something like inside a bag zipped almost closed, under a towel, etc. Then, adjust the exposure time to something around 2-5 seconds. Take another image.
- Check your first image for any signs of dark spots, splotches, or other such artifacts. If you find any, then inspect the camera for dust or particles on the sensor/sensor window. Follow proper cleaning procedures, then take another image.
- Check your second image for obvious gradients. If these are present, double-check that your camera is in an adequately dark environment.
If you are able to generate these two images without issue then chances are very good there is nothing wrong with your camera. To diagnose the issue further, see some of the tips/examples provided in the full section.
Image Issues: A Deeper Dive
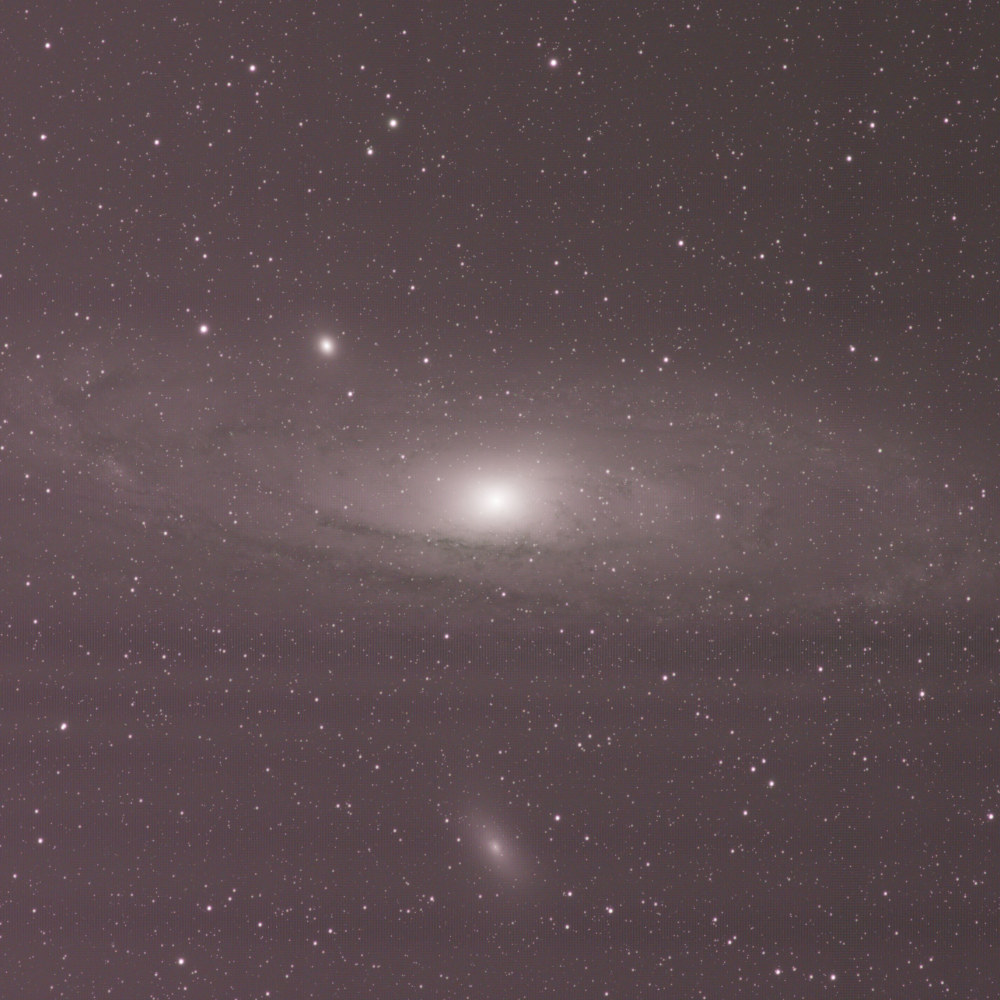
So, you’re able to take images with no problem but find they have odd artifacts? While camera failures/malfunctions can be the culprit, it is more common for the issue to lie elsewhere in the imaging train. It may seem like a daunting task at first, chasing down the source of an image issue, but with these tips, you’ll be diagnosing these issues like a pro in no time!

Obvious Digital Artifacts: These are pretty easy to spot and are characterized by straight lines and sharp corners such as perfect squares, rectangles, or big blocky patterns that are much lighter/darker than other parts of the frame. If these are present in your image, and you’ve followed all the troubleshooting steps in the Most Common Issues section, then you will need to see the section at the end of this article about contacting ZWO. Please note this does not apply to things that appear amorphous, blob-like, soft, or gradients.
Amp Glow: This is a type of artifact caused by the camera sensor itself. Amp glow presents as bright patches of light around the edges of the frame and can look almost like a light shining on the side of the sensor in some cases. The location of these patches depends on the sensor model, with amp glow presenting in much the same pattern for all chips of a certain make. Classically, this was caused by CCD amplification circuitry, and while the source of glow is different with modern CMOS sensors, the name has stuck.
While CMOS technology continues to improve and manufacturers like ZWO have developed amp-glow suppression technology, it is the case that some sensors are more prone to amp glow than others. If you are seeing this issue, it is important to understand that this isn’t a defect but rather something inherent to that particular sensor model and something that can be addressed through calibration!
Calibration is a topic on which we could spend quite a bit of time. That is why we created an article, Understand Calibration Frames. For calibrating out amp glow specifically, we recommend checking out the Dark Frame section of the linked article, which covers capturing and applying these frames.
Assessing Tilt: When part of your image is in focus, but a corner or side is not, this is known as tilt. This occurs when part of the camera sensor is tilted away from the image plane formed by the optics. How this occurs is a bit more involved as it is possible the sensor itself is tilted, or the imaging train itself is flexing/sagging slightly, or perhaps the sensor has a bit of tilt introduced from an adapter/spacer/accessory.
Adjusting for tilt can be done with accessories known as tilt plates/tilt adapters, and for a number of ZWO cameras, these are even included with the camera. However, if you are looking to assess if tilt is coming from the camera sensor itself or the imaging train, then proceed with the following test:
- Point your telescope at an object and focus on it.
• This does not have to be done at night with stars; you can absolutely do this assessment during the day. Just ensure whatever you point the telescope at fills the whole frame, is relatively flat, and has enough detail that you’ll be able to spot any out-of-focus sections. - Take an image.
- Slightly rotate the camera only. This does not need to be drastic, 45-90° of rotation is plenty to check for sensor tilt.
• The best way to do this is to unscrew the camera slightly. This ensures you’re not rotating any optical elements, spacers, adapters, or accessories that might be introducing tilt along with the camera. Make sure you are careful when doing this, and you stay with the camera at all times when it is not fully screwed down/attached. You want to be present to catch the camera, but don’t add any pressure, which may artificially introduce tilt. - Refocus.
- Take another image.
- Compare the two images.

If focus falls off in a different corner or on a different side of the frame, then the issue is with one of the other components in the imaging train. However, if the focus falls off in the exact same place, then the tilt is with the camera itself. Should you be using a camera with an integrated tilt plate, check it is “zeroed” out and not erroneously adding tilt. If you are able to ascertain your camera has significant tilt, you will need to see our section at the end for contacting ZWO.
One-Shot Color Camera Color Issues: If the color looks drastically wrong across the entire frame, you may want to check the “deBayering algorithm” your image processing program is using. In very basic terms, a color sensor is a monochrome sensor with a color pattern over top of it. In order to get a color image from this, your image editing program needs to know what specific pattern your sensor has over it. This should be written into the file itself, however, breakdowns have been known to happen with programs properly writing or reading this data. Accordingly, you may need to manually adjust the deBayering algorithm being applied.
The process varies from program to program, so you will need to do a bit of research on how to adjust this in your program of choice. One thing you will need, regardless of what image editing program you’re using, is the “Bayer pattern” of your camera. You will need to search for this as well, and it will be listed in a set of four letters, which will be R/G/B, i.e. “RGGB”.
Troubleshooting Other Image Issues
Gradients. Soft/amorphous spots. Splotches. Images without stars. What these all have in common is most of the time these are caused by some physical phenomena: dust, dew, spacing issues, issues with filters, focus, etc. While you may feel you’ve ruled these out, we strongly recommend you read through the following to double-check before reaching out to ZWO’s warranty support team.
The Bench Tests: Before looking at anything else, you’ll want to assess the performance of the camera on its own. Accordingly, you’ll want to do the following to establish a baseline:
- Remove the camera and any connected accessories from your imaging train.
- Connect your camera to your PC or ASIAIR, and open the image capture software of your choice.
- Point the camera at a surface as flat and uniformly lit as possible. A ceiling or wall is perfect for this.
- Adjust the exposure time until you’re seeing a gray image in the preview; if you have a program with a histogram, aim to put the “hump” or “curve” towards the center.
- Take an image. We’ll call this one the ‘Light’ image.
- Now, put the lens cap on the camera and place it in as dark an environment as possible. You want to eliminate as many possible places for light to get in as you can; think inside a bag covered by a towel, if possible.
- Adjust the exposure time to something short, but not too short, like 2-5 seconds.
- Take an image. This one we’ll refer to as the ‘Dark’ image.
The Light Image: Check this for any signs of splotches, blobs, or other similar artifacts. If any are present, then physically inspect the “window” that protects the sensor chamber, as well looking at the sensor inside the chamber, for signs of dust, particulates, smudges, etc. Clean these using a kit like the Apertura Cleaning Kit. If there's dust or particulates on the sensor itself, please refer to ZWO’s cleaning guide and ensure you are using cleaning solutions/tools specifically for cleaning these delicate chips.
The Dark Image: Check this for signs of obvious gradients. Should one be present, double-check check your testing setup is adequately blocking out stray light.
If you are able to generate the two above images without issues (or are able to track down the source of the issue as outlined), then chances are very, very good your camera is fine! But that begs the follow-up question: Where is the issue coming from if not the camera sensor?
While diagnosing other issues in the optical train could likely be its own separate article, we’ll go over some common issues, what they look like, and how to address them!
Back Spacing
Presentation: Not able to see stars at all or can only see large splotches of white; images look poor in general, with notable distortions on the edge of the frame that the corrective element should be addressing.
Cause: With field flatteners, coma correctors, and focal reducers, there is a very specific distance between the camera sensor and the corrective element. If it is not at this distance, optical performance will be impacted.
Fix: We have a whole article dedicated to this subject: How to Connect a Camera to a Telescope! However, if you find you can’t see anything at all, try the following:
- Bring your imaging train out during the day and point it at a distant object. The further away the object, the better.
- Attempt to focus on this object.
- If you can focus, take note of where the focuser position is (if you don’t have an SCT) or perhaps even lock your focuser in place. Then, at night, try starting from this position.
• If you can’t focus, then you will want to review the linked article for tips on setting your camera spacing.
Dust or Particulate in the Imaging Train
Presentation: Out-of-focus dark spots/blotches.
Cause: Particles in the optical path block light, but since these are not what the optics are focused on, they appear as large and transparent blobs rather than small, sharp, solid specks of black.
Fix: Inspect the optical train for signs of dust or particulates, including the scope and any field flatteners, coma correctors, focal reducers, or filters. If accessible, you can try cleaning this with something like the Apertura Cleaning Kit. You also can use flat calibration frames to “fix it in post”. The reality is you usually will want to use both. See our article on calibration for more information on taking and applying your flats!
Dark Gradient Around the Edges of the Frame
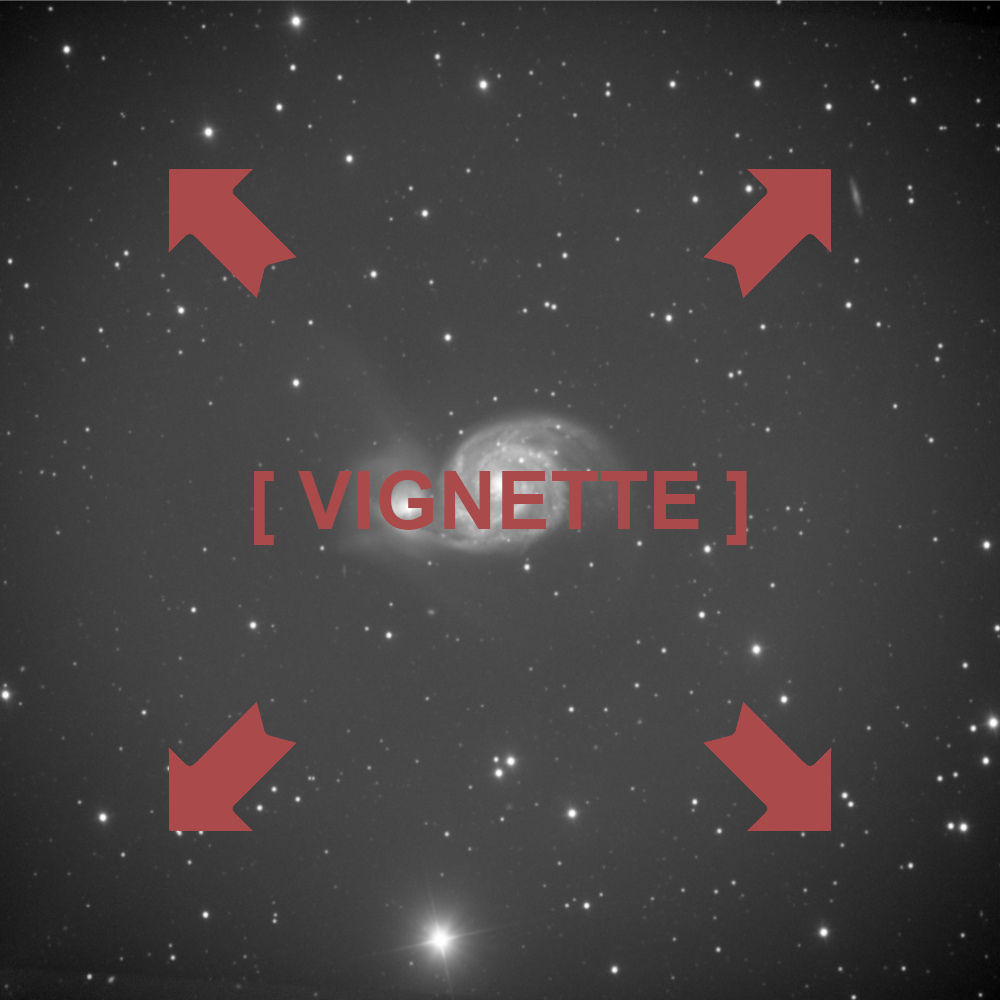
Presentation: A dark gradient around the edge of the frame that appears to be following a circle, called vignette.
Cause: The optics, filters, and/or spacers are not capable of supporting the sensor size in use.
Fix: Light fall-off is not wholly unexpected, and telescopes, field flatteners, coma correctors, or focal reducers that claim to support a certain sensor size will usually have a small amount of light fall-off towards the edges. This can be calibrated out with flat frames as seen in our article, Understanding Calibration Frames. However, when using spacers/adapters, filters smaller than your sensor size (especially when they are close to the camera), or optics not designed for your sensor size, the vignetting will be very noticeable. To resolve this type of optical issue, you would need to change the offending piece or pieces of the imaging train.
Halos
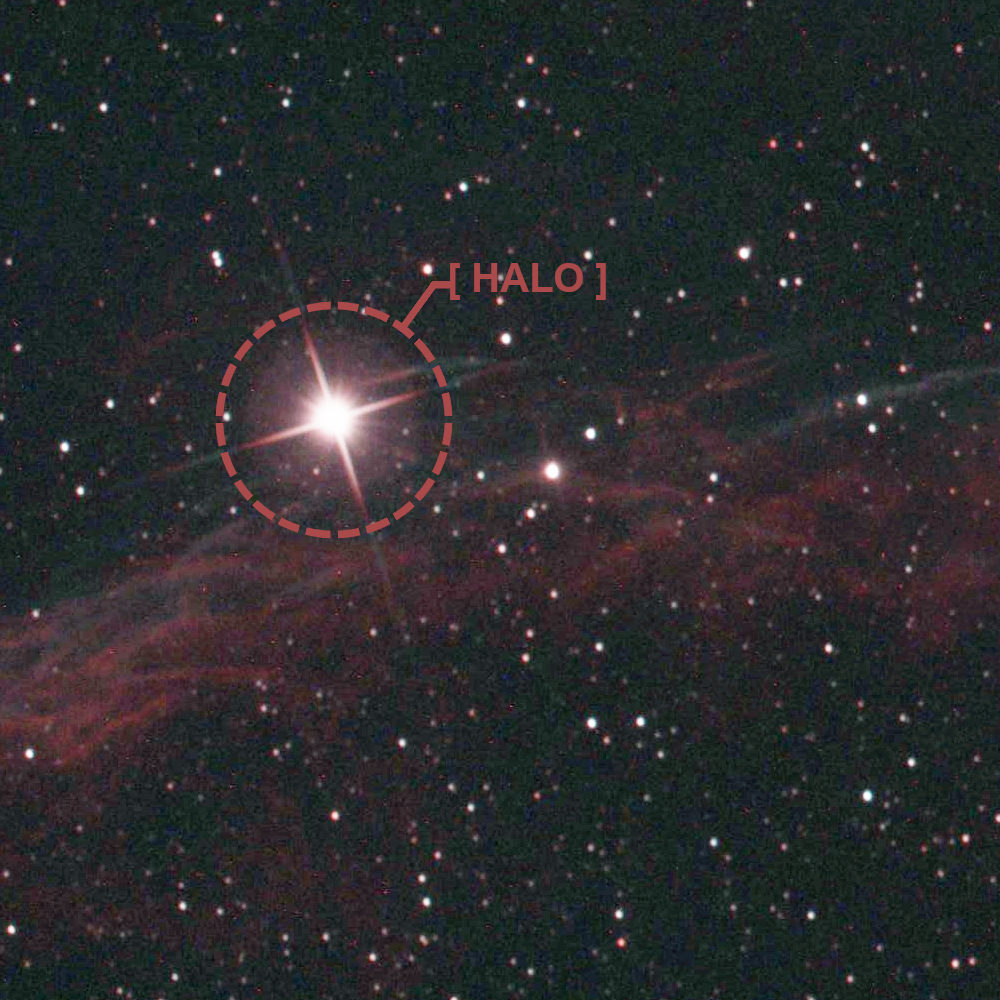
Presentation: Large circles/spots in the frame that are notably brighter than others, particularly present near very bright stars.
Cause: Light from a bright star reflects off a surface like the optics, filters, camera sensor window, or protective cover of the camera sensor itself. The sensor then picks up this reflection.
Fix: Try imaging without a filter installed. If this resolves the issue, then you may want to assess moving its location to a different location in the imaging train (if possible). In some cases, however, such as when the filter cannot be moved or when a different component is causing the reflection, this may need to be addressed by trying to frame targets in a way where bright stars are not in or near the image.
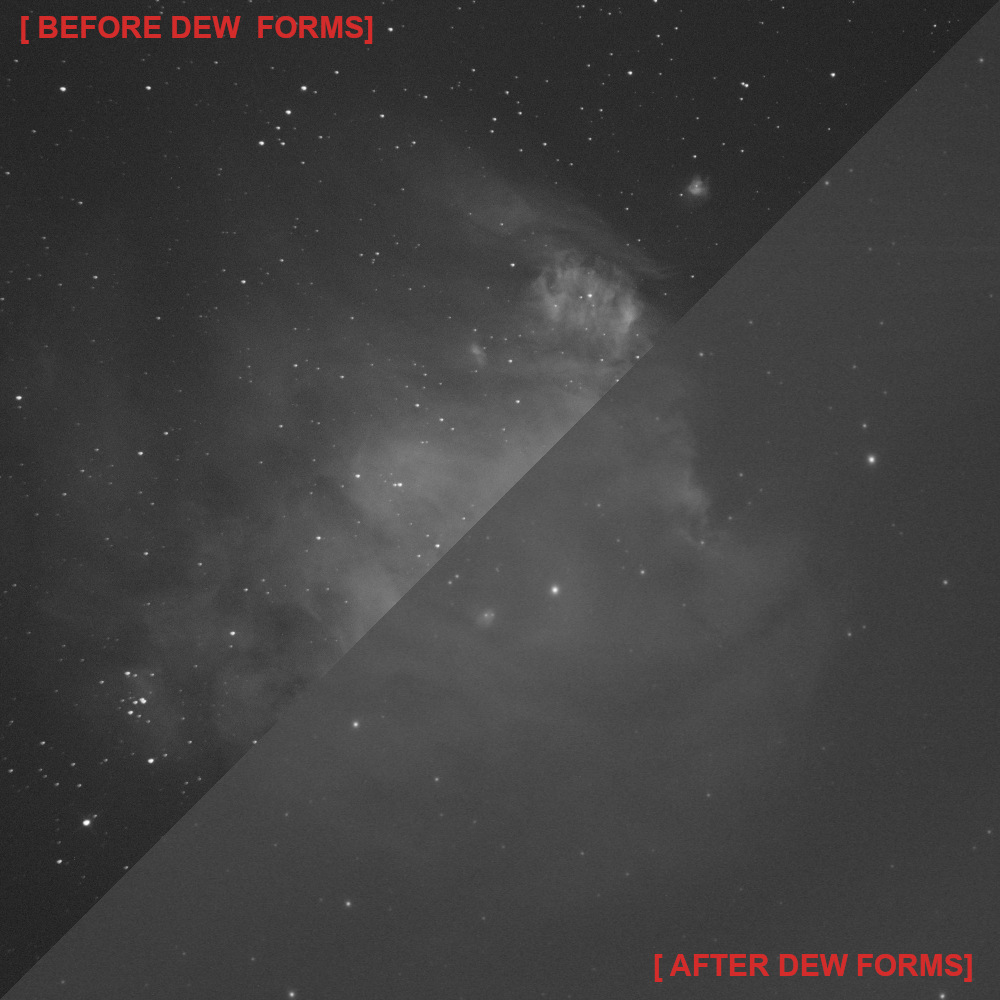
Dew
Presentation: Small-ish circular artifacts that look almost like “water spots” or blobs where the camera almost appears to be looking out from underwater.
Cause: This most commonly occurs when the front of the optics is colder than the dew point, at which point dew forms on the optics and impacts your image. Dew can also form inside the sensor chamber. This happens when moist air gets into the chamber, where it can then form on the sensor or sensor window.
Fix: Use dew prevention measures like a dew shield and dew heater. Additionally, engage the anti-dew feature on your camera if it has one, and dry out (or “recharge”) the internal desiccant tablets as outlined in ZWO’s camera cleaning guide.
Light Leaks
Presentation: Bright patches beginning towards the edge of the frame or odd “mottling” in the frame. When taking a dark frame, the bright patches or patterns will persist.
Cause: Gaps between components like the focuser and drawtube, a bolt-on filter wheel and camera, etc., where light can shine through. Since this only occurs when light is shining through these gaps, it can seem intermittent because as you move to another section of the sky, you may coincidentally tilt the gap away from a light source, and the light leaks will disappear or fade noticeably.
Fix: Most focuser designs nowadays are designed to avoid this issue, but you can try wrapping something around the focuser if this is identified as the source of your issue. When using bolt-on components, like a ZWO 2” filter wheel and ASI2600 Pro camera, ensure you’re using the masks included in the box between components.
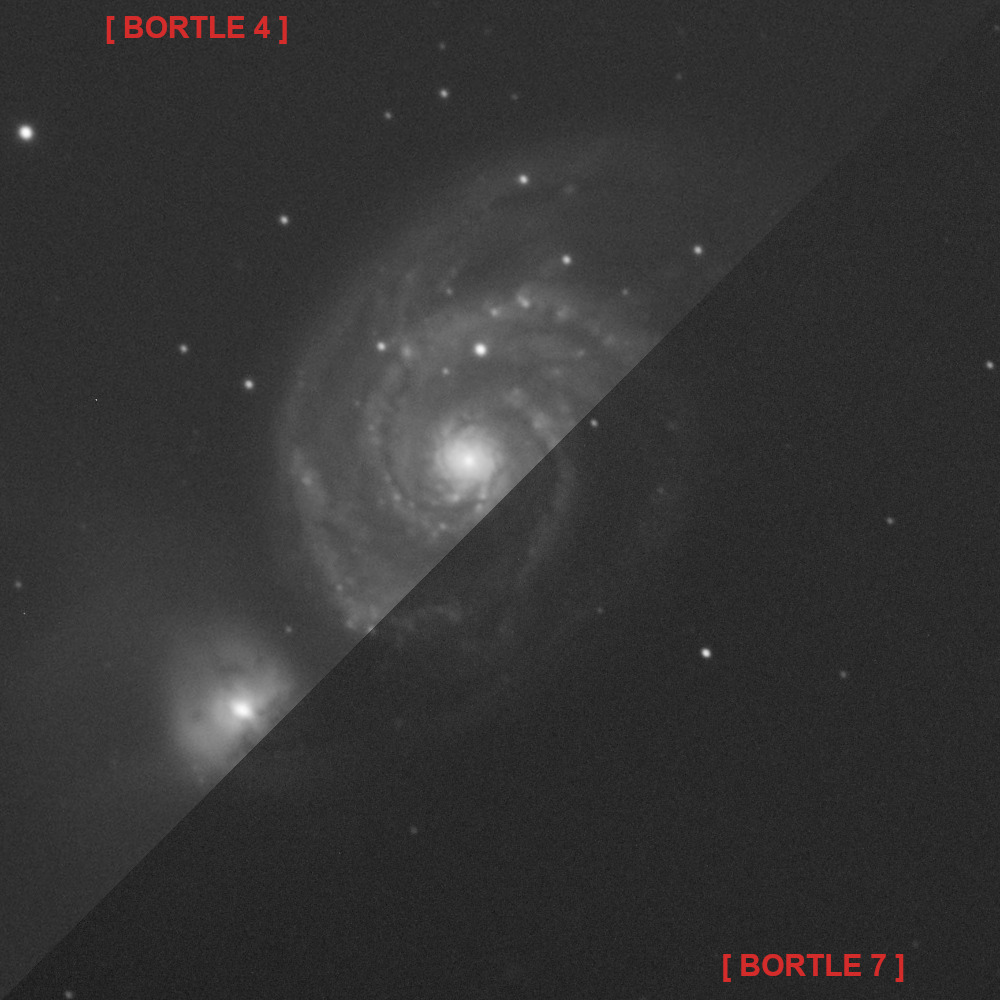
Off-Axis Light/Light Pollution
Presentation: Bright patches of light or a gradient in the image. When taking a dark frame, these disappear.
Cause: Light from street lamps, porch lights, security lights, etc., that shine into the optics or just illuminate a section of the sky so you get hotspots or gradients of glow. As this is dependent on whether your telescope is pointed near these light sources, it can appear as an intermittent issue.
Fix: Point your telescope away from sources of artificial light. If you have an SCT, use a dew shield. For refractor users, you will want to ensure your dew shield is as extended as possible. Newtonian users should cover the rear of their telescope if their design features a “porthole” like primary mirror cell design. These all help alleviate off-axis light. To fight light pollution, you will need to investigate filter options, objects in another part of the sky, or an alternate imaging location.
If none of the above feels applicable to your issue, or if these steps do not resolve your issues, then we advise a systematic approach if possible: remove the filter wheel, take an image, and check for improvement. If it doesn’t improve, remove the field flattener/coma corrector/focal reducer, take an image, and check for improvement, etc. This may not solve your issue immediately, but it will give you a big advantage in narrowing your search for a solution, as well as troubleshooting with support.
Cooling Issues Summary
Camera Can Not Reach Target Temperature: The cooling figure provided is often the maximum cooling that can be achieved under perfect conditions, so understand the total cooling you are able to achieve may be several degrees less than this. Additionally, this figure shows how many degrees the cooling system can cool the camera sensor down, not how cold it can get. With these facts in mind, understand whether the cooling target set in your program of choice is how many degrees you want to cool the sensor or if it is the temperature you want the sensor to be, and set your cooling accordingly.
Cooling Issues: A Deeper Dive
While not unheard of, actual failures of the cooling system are fairly rare, and the distance between occurrences has only been increasing with recent production ZWO cameras. When issues do occur, typically following the steps in the Most Common Issues section will resolve them. If they don’t, then you will need to contact ZWO. Before you move on to that step, be sure to read this one first!
In lieu of actual defects, more often, there are misconceptions about how the cooling system operates and what it can do. We’re happy to relay that knowledge, and the way manufacturers advertise these systems has been improving. To clarify, the cooling figure listed by manufacturers like ZWO, QHY, etc., is a delta. This figure refers to how much the cooling system can lower the starting temperature, not what temperature it can ultimately reach. For example, a camera advertised with a -35° C cooling feature can cool a camera sensor starting at 40° C to 5° C, not -35° C.
In addition to understanding the figure is a delta, it is also important to know this figure is not absolute but rather what the cooling system can achieve under optimal circumstances. It is not uncommon to see a cooler only providing 32° C of cooling instead of the full 35° C.
PSA: If you are going to push your cooler to the max cooling or close to it, ensure you are cooling and disengaging cooling in stages. For example, if you’re aiming for 30° C of cooling, cool 10°, wait a few minutes, cool another 10°, wait a few minutes, then cool the last 10° (and then follow this in reverse when you’re done). Cooling your camera sensor down or warming it up too fast can damage the camera.
One last thing to understand is how your software handles cooling. Some programs will allow you to set a target temperature, in which case you’ll need to note the starting temperature and calculate just how low you can go with the cooling. Other programs, however, will allow you to set the target amount of cooling you want, or in other words, what delta you want. Usually, these programs will show your starting temperature as ‘0’. It’s important to determine which system your software uses because a target temperature of -20° C is a lot different than -20° C delta if you’re starting at 30° C!
I’m Still Having an Issue—Contacting ZWO
If you’ve made it to this section, then you have unfortunately exhausted all the common remedies for ZWO camera issues and will need to engage ZWO’s technical team for more in-depth troubleshooting and possible repairs. We know how frustrating it can be to reach this point, so we’ll be providing a few more tips to help move the support process along as quickly and smoothly as possible!
Step 1. Gather Your Documentation: Manufacturer support processes can be tedious at times, so to cut down on the amount of back-and-forth emails (and thus cut down the time this takes), you’ll want to check off as many of their “need to have” boxes from the start. This includes:
- A copy of your receipt, either a scan of the physical invoice or a screenshot of your digital receipt email.
- Images of the issue in question. This should include images from the camera showing the issue, screen captures from your computer or program showing the issue, and/or any images of your physical setup that may help demonstrate the issue or confirm your setup is correct.
- A detailed description of what issue you’re experiencing, along with information such as:
• Did this suddenly occur or has it seemed to develop over time?
• If it was a sudden occurrence, did anything else noteworthy happen around that time?
• All of the troubleshooting steps you’ve tried from this article and any individual research you’ve done to resolve the issue. This is an important part. Take your time to be thorough here. The clearer you can be that you’ve isolated the issue to the camera and have tried all the basic troubleshooting steps, the sooner you can get to the advanced steps and/or send the camera in for repairs. - A list of your equipment and, if you’re using a computer, a list of the programs you’re using. Also include what OS your computer runs (Windows, Linux, or Mac).
- Your contact information, including your current address.
Step 2. Contact ZWO: You will want to navigate to ZWO’s official website to ensure you’re using the most up-to-date contact form or email. While drafting your first outreach to them, be sure to include all the above information, pictures, and documentation. There are many ways to approach this initial outreach. We’ve created a template to make things easier:
Step 3, Keep An Eye on Your Inbox: Once your case is submitted to ZWO, keep an eye on your inbox for their reply (and your spam folder). Their agents will be able to advise what further steps to take from there, whether it be further troubleshooting or camera repair.
Wrap Up
While losing clear skies to gear issues is frustrating, hopefully by this point, you’re ready to get back out under the night sky or on the fast track through ZWO’s support process! For more troubleshooting advice, guides on gear, workflow tips, and more be sure to check out our Astronomy Hub!
Glossary
Backfocus/Backfocal Distance/Backspacing
All optical systems have a point at which an in-focus image is formed, and for astrophotography it is at this location that the camera sensor should be placed. When the telescope is used without corrective elements, this is done easily with the focuser mechanism; and so long as an image can be brought into focus, optimal optical performance will be achieved. However with corrective elements, oftentimes there is a certain distance that the camera sensor needs to be placed away from the rear of the corrector for optimal performance. This will be listed as the backspacing or backfocal distance for the corrective element.
Calibration Frames
Calibration frames are types of images that are applied to light frames to remove unwanted artifacts caused by a number of different factors. Dark frames are images taken at the same temperature as the light frames, and are necessary to remove hot pixels or other fixed noise for a cleaner image. Bias frames are similar in this aspect, though their purpose is to reduce the sensor’s readout noise seen within the light frames. Another type of calibration frame are flat frames, which remove dust motes or unwanted gradients for a uniform, even field.
Image Circle
This specification refers to the area where an image is formed by the optics/ corrective element. This is useful for assessing whether a certain camera sensor size will be supported by the optics, or if vignetting/ poor performance will be seen in frame.
Sensor
A camera sensor is the main component of a DSLR, deep sky camera, or smart telescope that turns incoming light into data that can then be displayed on digital devices like mobile phones or computers. Accordingly, these are just as important as the optics of a system for a quality image. There are a wide variety of specifications that are important for a sensor - physical size, pixel size, resolution, dynamic range, amounts of image “noise”, and other technologies such as back-side illumination. As a result there is also a wide variety of sensors available that attempt to balance these in differing ways for different applications and price points.
Sensor Size (Full Frame, APS-C, Micro 4/3, Etc)
Imaging sensors come in many different proportions, such as 4:3 or 1:1, and physical sizes. There are some common combinations that have received a name - full-frame, APS-C, micro four thirds (4/3). The most important component of sensor size for astrophotography is the measurement from corner to corner (diagonal) of the sensor, which can then be compared to a telescope/ corrective element's image circle to assess how well the two may pair.
Vignetting
Vignetting is seen as the darkening of the corners of the frame within an image. This happens when the camera sensor is not exposed to enough light, resulting in a shadow effect along the borders of the image. This issue presents itself for a number of reasons, though most commonly occurs when using incompatible sensor sizes and image circles, and using too small of filters for the imaging assembly.
Visual Back
The visual back is the connection from the focuser where visual accessories are attached. Typically this is used to describe a component of a refractor or SCT, which can be removed to allow for a corrective element (or a different visual accessory) to be connected.
Exposure Time
Exposure time is the amount of time the camera sensor is allowed to collect light. In general, the longer the exposure time, the more light collected, and the brighter the image will become. This should be selected with caution though, as an exposure time that's too long can oversaturate the pixels and blow out the image, resulting in a loss of signal. Determining the correct exposure time is highly dependent on the aperture of the optics as well as the gain settings used. A larger aperture will produce a brighter image than that of a smaller aperture with the same exposure time. In a similar fashion, an image with a higher gain setting will be brighter than a lower gain setting image with equal exposure time. Finding the perfect balance between the aperture, gain, and exposure time will maximize image quality.
USB
Universal Serial Bus or USB is a protocol for data transmission, and is by far and away the most common way astronomy equipment will communicate with a PC in a wired capacity. There are a number of USB connectors, such as USB-A (the rectangular port you’re likely familiar with), USB-B, USB-C, and micro USB; as well as a number of different revisions (2.0, 3.0, 3.1, etc.) that have brought more speed, power, and reliability to the protocol.


