The rate at which technology has progressed over the past few decades has been nothing short of miraculous and considering that Astrophotography is a hobby built on cutting-edge technology, there should be no surprise that it has progressed along at a similar rate. It was not long ago that film cameras were being cooled by dry ice and auto-guiding was done by hand, but everything from the recording media itself to the computers and mounts to the processing techniques seems to be evolving at a pace that is hard to keep up with. Portability and ease of use have always been paramount in this hobby throughout its technological evolution, and the technology of the day is finally such that both of these attributes are now available in an affordable, user-friendly, and genuinely enjoyable package.
Other companies have made slightly similar products in the past, but never has one of these other portable imaging setups felt quite as main-stream as the ZWO ASIair. The most immediate alternative is the venerable Primaluce Labs EAGLE, but this unit aims to be in a completely different class and it has a price tag/complexity level to match. Other comparable examples tend to be more on the DIY side, and often times these portable imaging computers are designed, built, and coded by individuals with much higher-than-average computer science abilities. As such, the market for this product has been growing as people have begun seeing what is possible, but until the ASIair was released nobody had really made the leap to a commercially viable product. The ASIair is ZWO's first foray into remote imaging control, and the concept for this product was announced just before the North East Astronomy Forum (NEAF) in April of 2018.
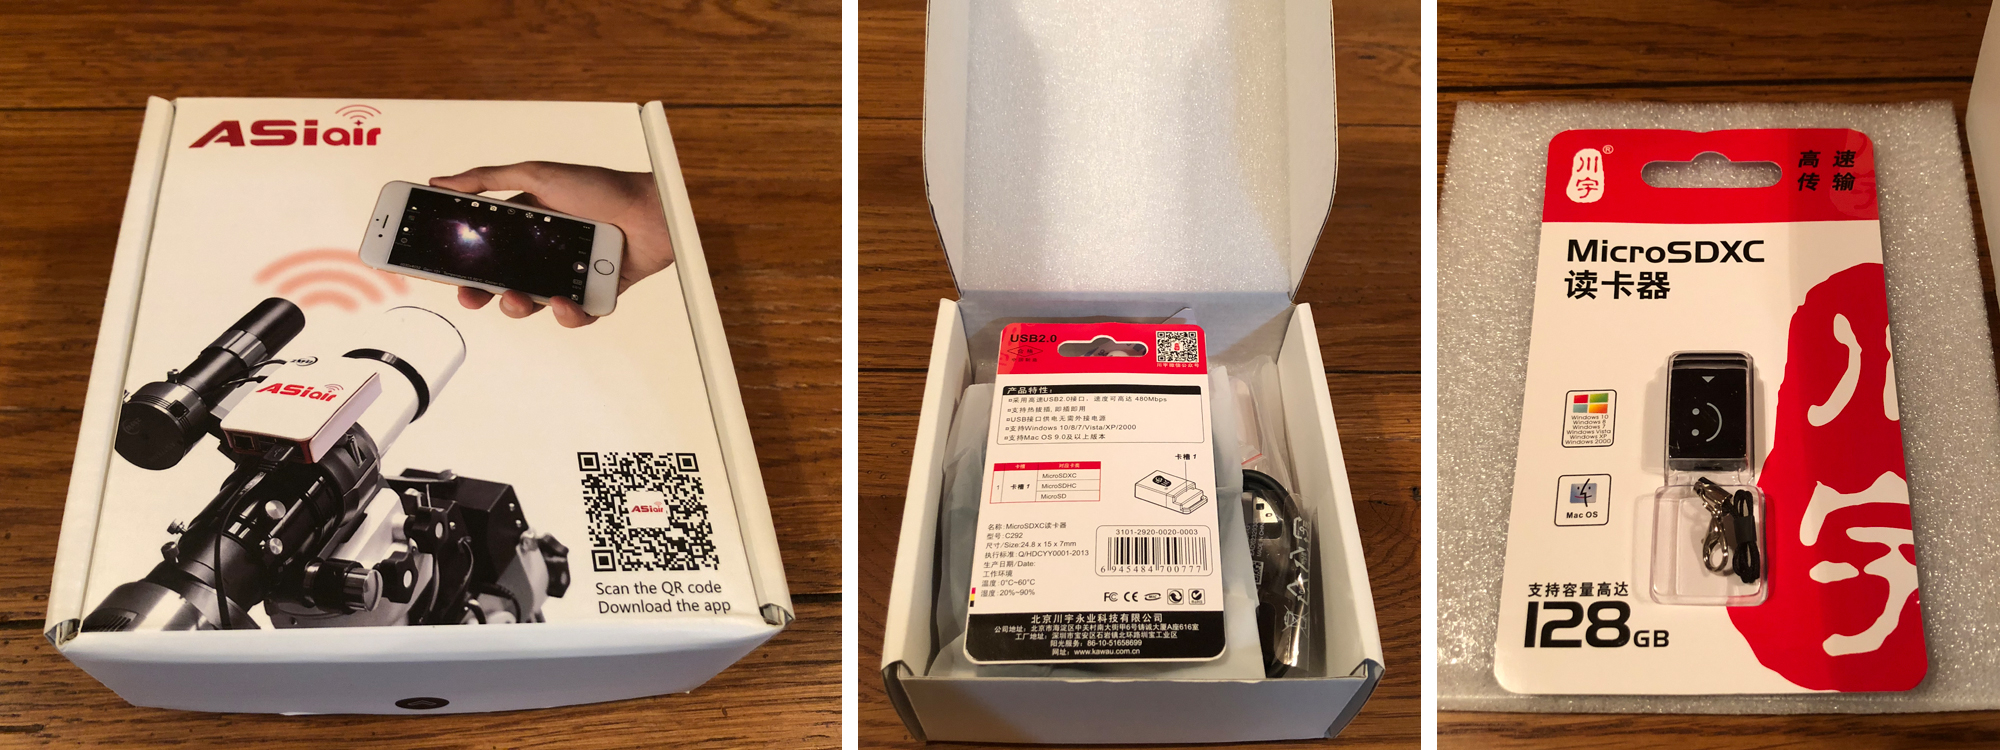
ASIair Beauty Box and Contents
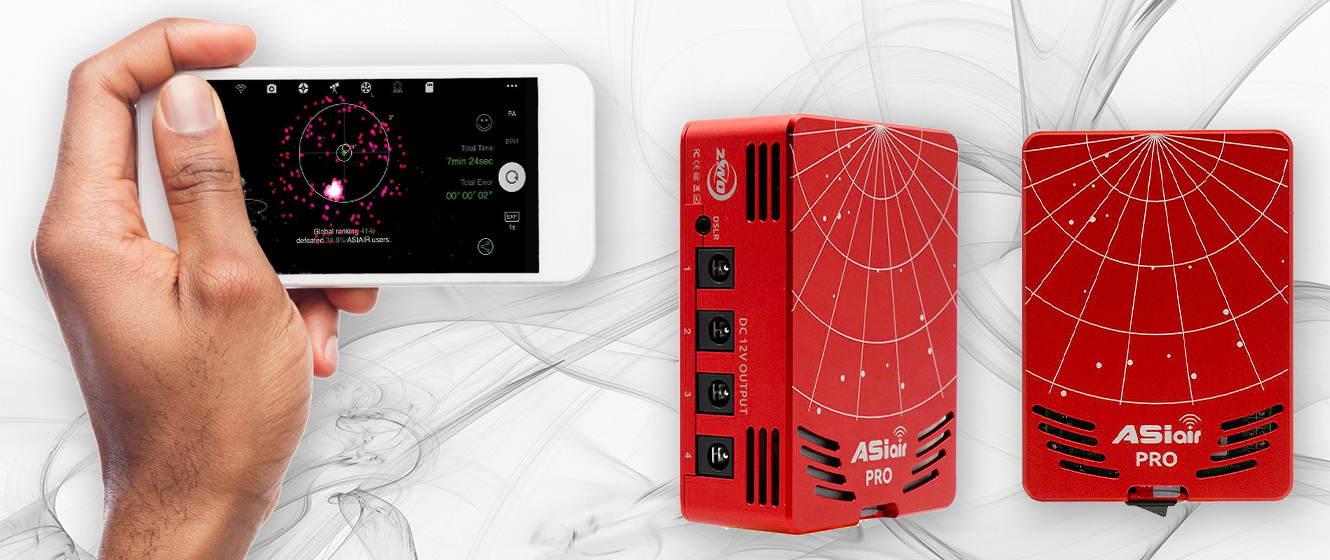
As with all ZWO products, the ASIair was shipped in a very well-packed box with the unit and all its accessories arriving in immaculate condition. The unit itself is a Raspberry Pi computer housed in a plastic body, and ZWO provides four powered USB 2.0 ports to connect to your imaging accessories. There is also one Ethernet port which can be used to plug the ASIair directly into a wired network (presumably in case there are too many other WiFi signals in the area), but right now there is no option to control a focuser. The ASIair unit is powered by a USB C cable, and ZWO has provided a small metal converter that will work with a 12v 2.1 mm center positive plug (like the one ZWO makes) to step it down to 5v/3amp instead of 12v/5amp. Because the cable itself is a standard USB C cable you can use any USB-based power supply that provides enough juice, just make sure it has at least 2.5amp.
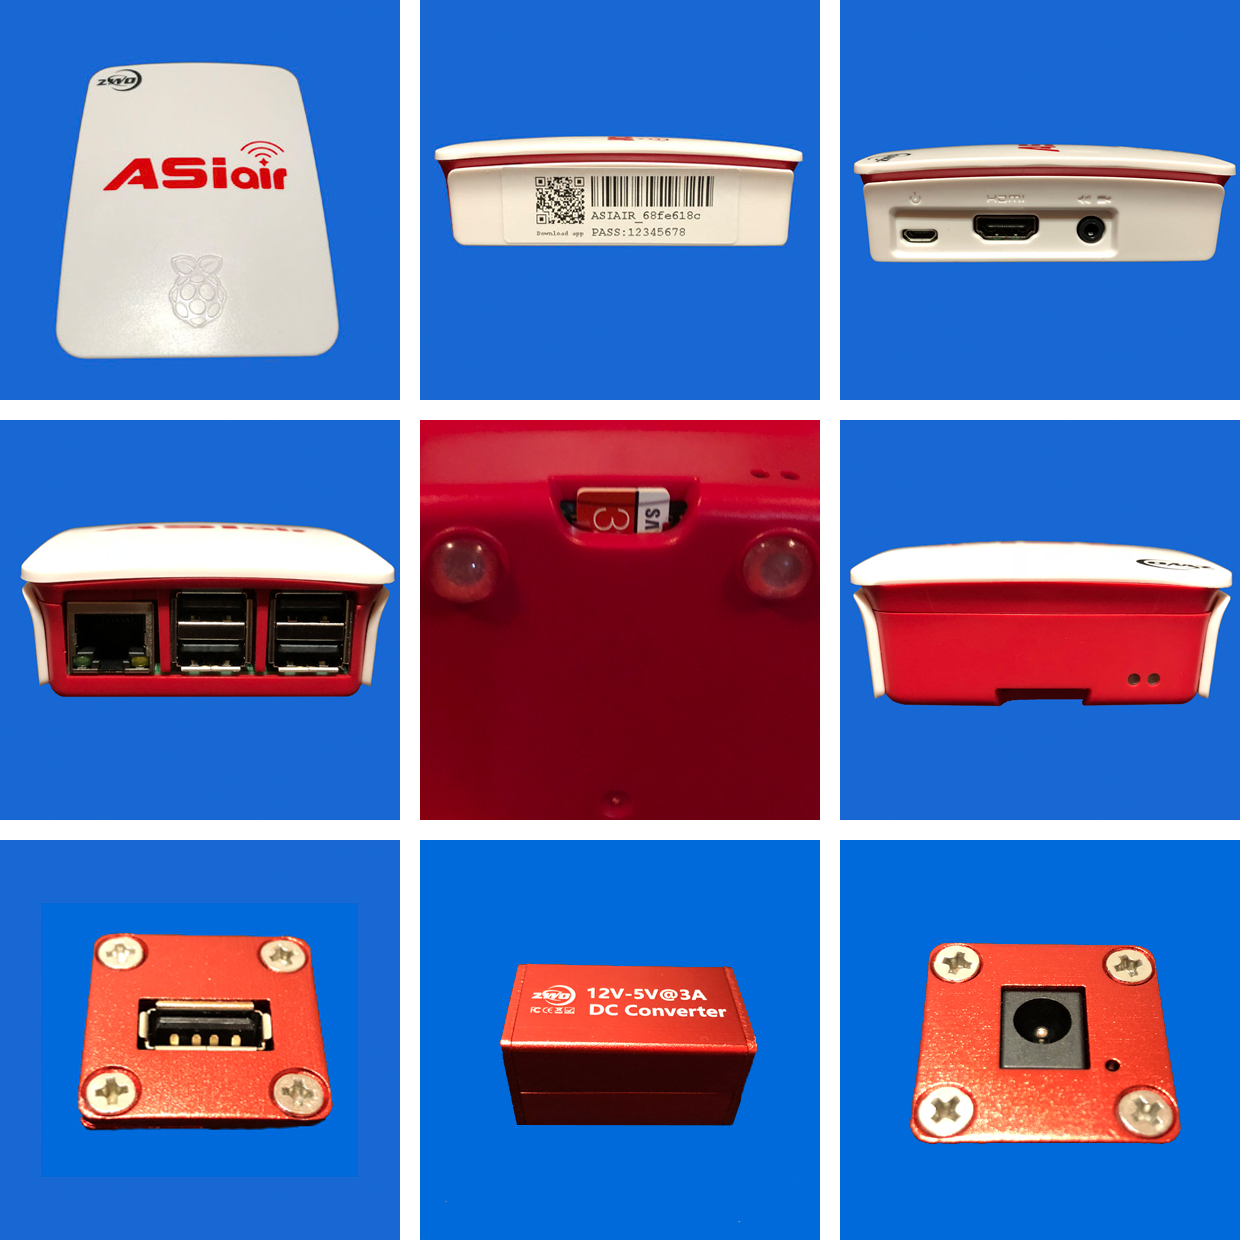
Views of the ASIair & DC Converter
The unit does not include the USB cables you'll need to connect to your current ZWO hardware (since ZWO provides these with the cameras themselves), but they do provide velcro tape and a USB-to-RS232 cable to connect with your mount.
After making all the physical connections with the ZWO ASIair, the process then turns to digital connections and this is where things really got impressive. The ASIair app is available on both Apple and Android platforms, and after a quick download, you are asked to join the network listed on the side of the ASIair unit itself. The password is also supplied on this same sticker, and once you've joined the network you can switch back over to the app and the software automatically detects the entire setup. All you have to input from this point are the physical details of the optical train, including focal length and aperture of both the main imaging tube as well as the guiding system. The connection was instantaneous with the devices, and the ASIair was able to immediately detect which cameras and accessories were connected.
ZWO provides a 32gb MicroSD card along with a USB card reader, and its worth noting that the manufacturer has stated this is the only size card you should use. Despite not being able to upgrade the storage to a larger size down the road I have not found it necessary if you unload the card after every session or two (even when using a full-frame sensor).
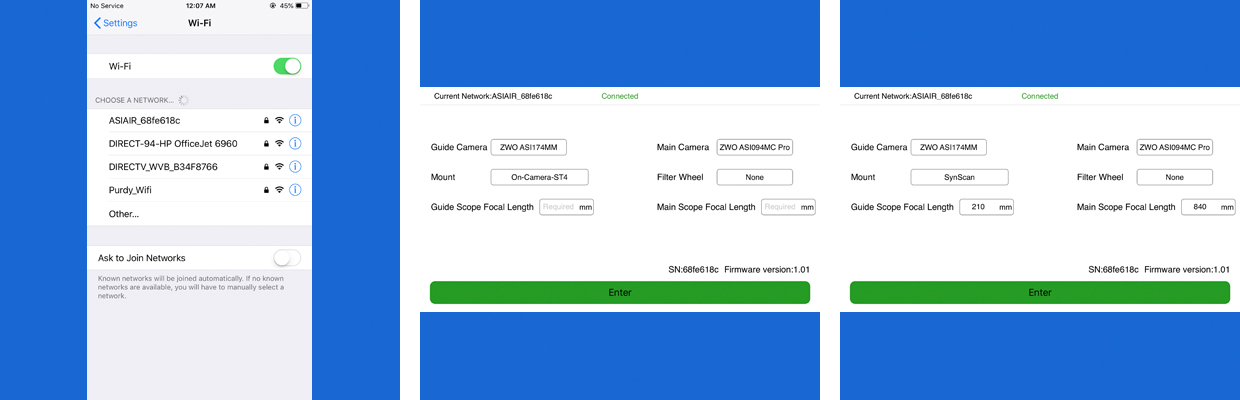
WiFi Connection Screens
The build quality of the ASI is solid enough, but be careful not to apply too much pressure to the unit as the top and sides are removable. This came in handy at one point when the SD card was inserted about a millimeter too far forward and slipped into the body of the ASIair, eventually requiring a slight disassembly to recover. All the parts go back together easily enough, it just takes a minute. The USB ports all provide very solid connections with their respective cables, and aside from the power supply hanging off awkwardly, the cable management provided by the ASIair was fantastic! The WiFi signal emitted by the ASIair was strong enough to be available even 50-100 feet away inside the house, so come winter this setup may get even more interesting.
At the moment, the ASIair only works with ZWO cameras and filter wheels, but there is a full library of supported mount options to choose from. Because the ASIair is running on a Raspberry Pi they are theoretically able to connect with any mount compatible with the INDI library (http://indilib.org/), and hopefully, that will someday expand to include other brands of cameras and accessories as well.
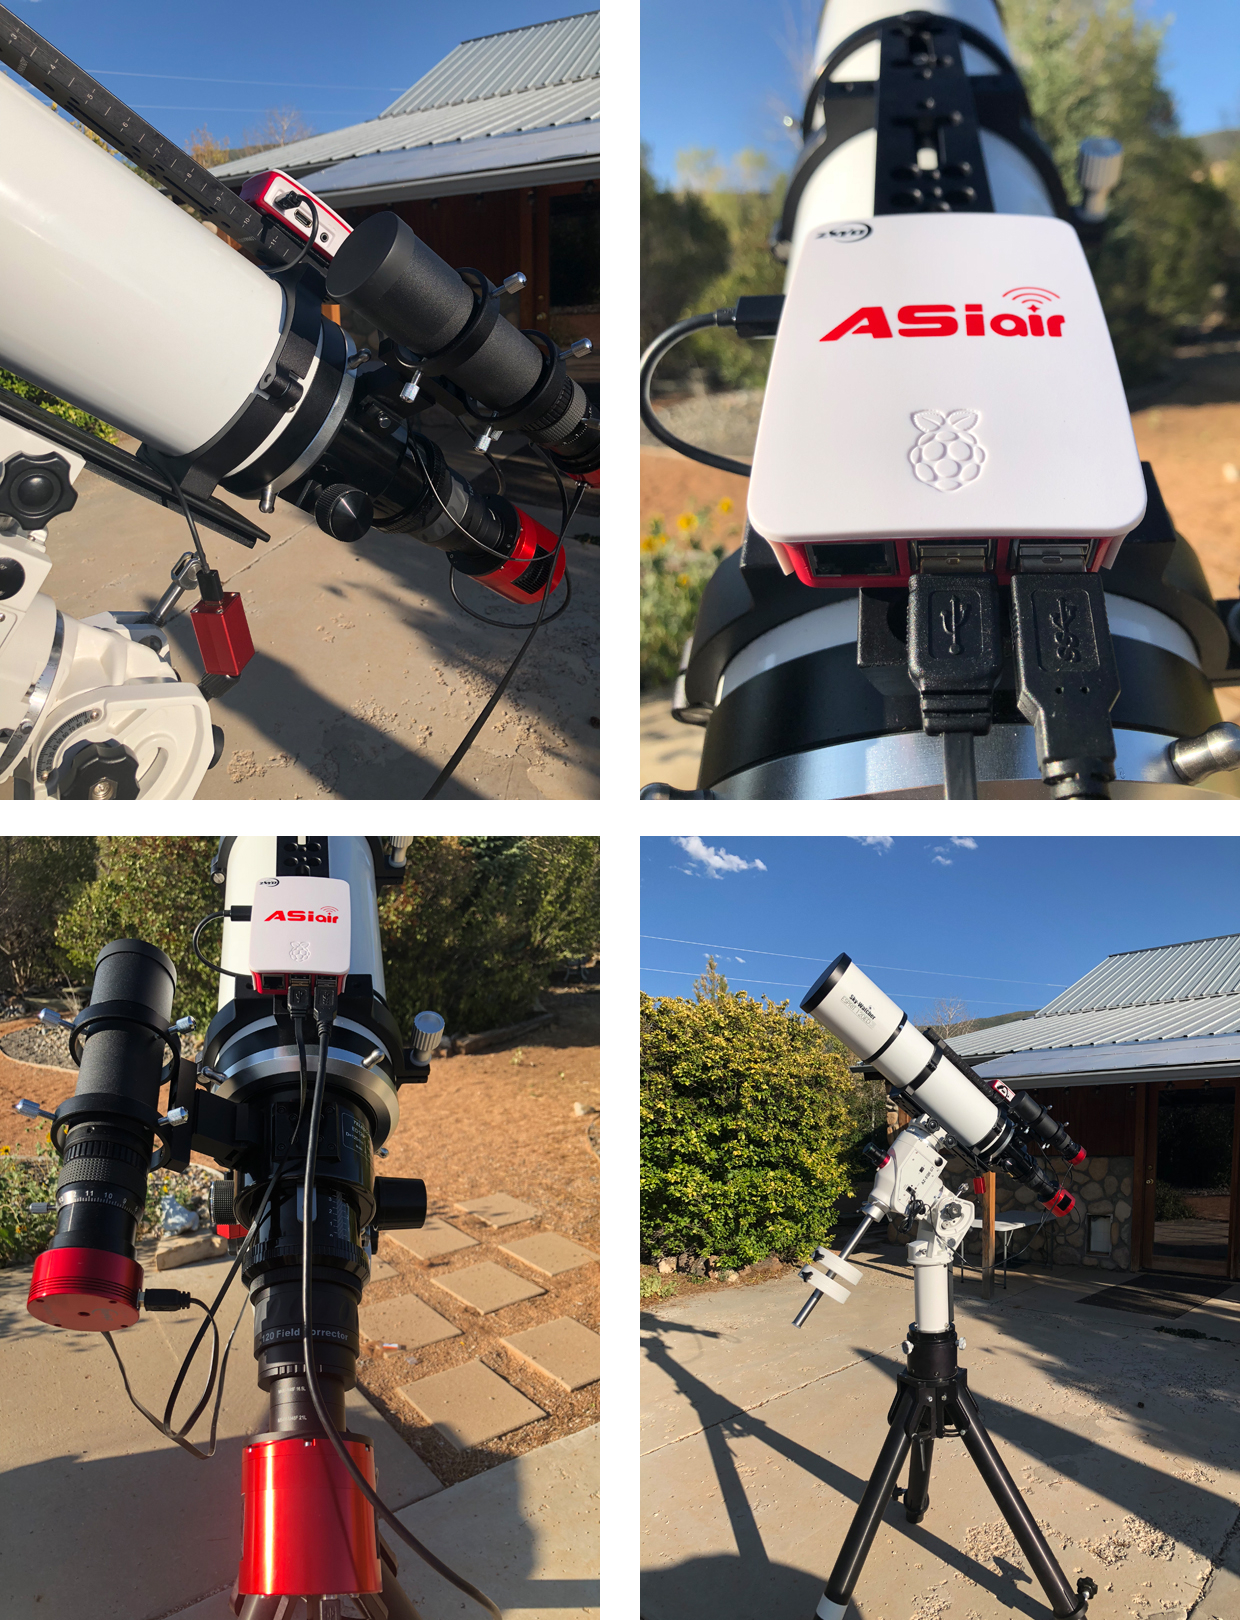
For this test, the ASIair was connected to a ZWO ASI 174mm for guiding and an ASI094MC-P (on loan) for the main imager. The main imaging scope was a Sky-Watcher Esprit 120, and the guider was a Stellarvue F050G. All of this was mounted on a rebuilt Sky-Watcher AZ-EQ6 mount, although unfortunately at the time of writing it was not able to connect aside from the ST-4 option for guiding. This particular mount is a very old unit (which was neither sold nor repaired in the USA) so it is likely more of an issue with the mount than it is with the ASIair itself. In terms of physical connections to the rest of the hardware, the ASIair uses a Velcro tape to be held in place and although the tape they provided was very nice quality, it did leave some residue on my dovetail. As such it would probably be best not to mount the ASIair to a piece of your setup that is cosmetically significant.
Conditions were not particularly favorable for these tests, with high winds, some nights at >75% illumination on the moon, and high-level clouds often came in to play; however, aside from the winds the AZEQ6 and Esprit 120 setup had no issues with the elements (no dew, rain, frost, or anything else). In moisture-rich locations like the East Coast, it might be best to cover the ASIair with something like a bag to prevent anything from getting into the housing, especially considering how easily the housing can be disassembled.
The guiding was a cinch to set up and easy to monitor, thanks to the on-screen graphical display which is easily read and which can be moved around the screen for better positioning. Although there wasn't nearly as much control as with PHD2 or some of the other programs used for guiding, it definitely felt nice being able to guide more simplistically and have it just be in the background. The plate solving was very impressive too, and it always resulted in a solved image with times ranging from just over 4sec to just over 15sec. Unfortunately, the mount needs to be connected using the genuine INDI drivers rather than the "On Camera ST-4" option in order to sync the plate solving data, so despite successful tests of the plate solving routine itself, I was not able to send that data to the mount. If this happens with your setup then it just means that you have to do your alignments the old fashion way using a hand controller, but with the "focus" setting in the ASIair app this ended up being a breeze as well.
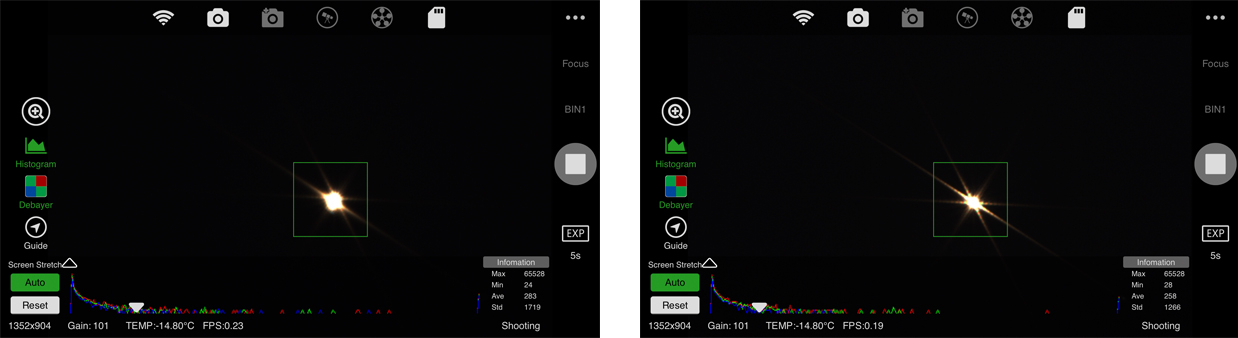
Focusing in the ASIair App
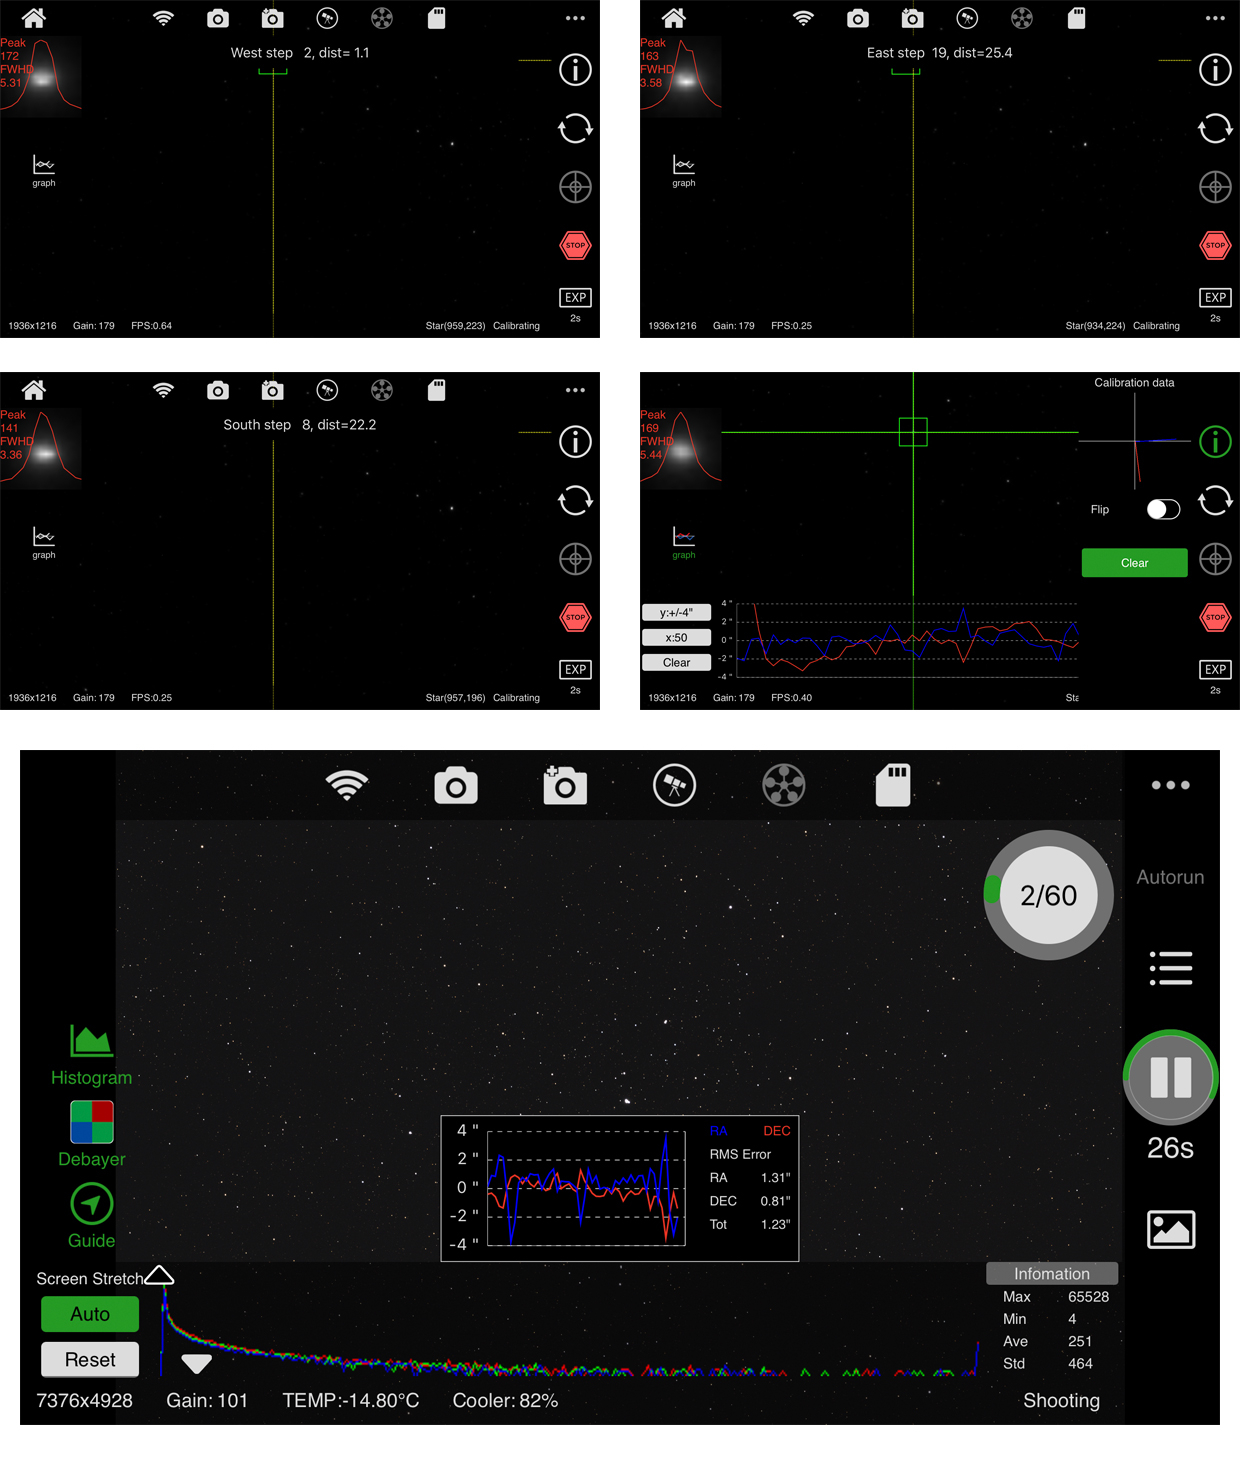
Guiding with the ASIair App
As noted, the ZWO ASIair saves its data to a 32gb Micro SD card, the first of which is included at the time of purchase. The quality is not affected at all by saving to this medium, and when pulled off for stacking and processing there was absolutely no difference from data saved straight to a computer. The files are saved in the default FITS format, and when setting up the "Autorun" sequencer you can choose the file type (Light, Dark, Bias) which is automatically written into the file name. Fair warning that since the ASIair currently employs USB 2.0 it will be better suited to longer exposure imaging rather than video or EAA astronomy. Images can also be saved directly to your mobile device from within the app itself, although they will only be single, compressed PNG or JPG images with no stacking or processing applied instead of high-resolution RAW images.
The ASIair app allows for full control over settings like gain and temperature, and within the app itself, you can adjust the histogram stretching of the preview to see what your results look like. The app provides a full histogram of the main image as well as a debayer option for OSC cameras and a sequencer for those who may be imaging with different filters. For more in-depth controls, the buttons for each function are available from the home screen, and all of the parameters for the cameras, filter wheel, and SD card can be found in their respective sub-menus. Navigation is very fluid in the ASIair app, and although I did get lost in the menus once or twice it's always easy to navigate back to the home screen. Data on the card itself can be accessed using the included SD card reader, although take care when moving or deleting your image files as some of the other licensing files are important and need to be left on the card.
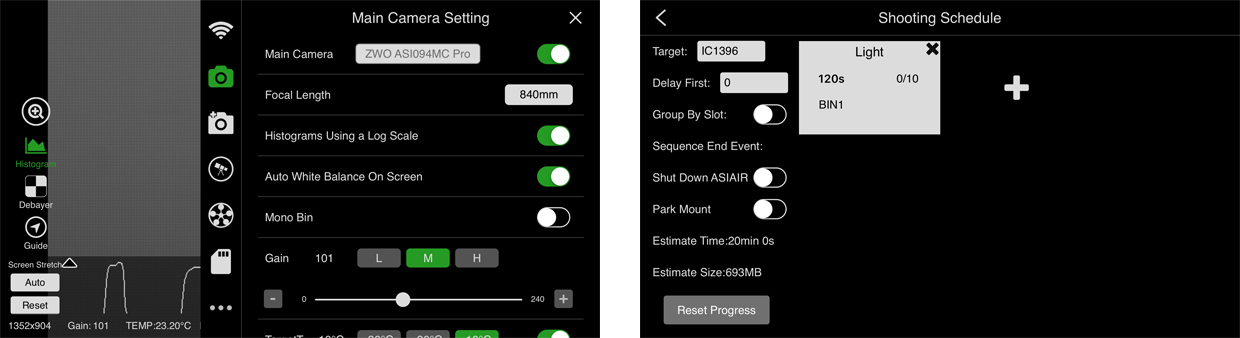
Settings & Image Sequencing with the ASIair App
After extensive testing, it would be fair to say that everything about this unit was easy to use and it was functional right out of the box. Aside from one or two minor issues related to build quality and the INDI driver question, the ASIair is just about perfect, with every other aspect working perfectly on the first attempt.
With the exploding popularity of astrophotography and the shrinking size of adequate computing systems, this is almost certainly the direction our hobby will take going forward, but with all it has to offer the ASIair is also a great place to start for many up-and-coming mobile astronomers. This unit will be most beneficial for people looking to significantly improve portability in their systems, as well as for those who may be looking to simplify their setups a bit or cut down on complex software and power-hungry laptops. It will definitely reduce cable clutter as well, and it should also help to increase the "WOW!" factor for those who may be setting up at public outreach events.
The ZWO ASIair is set to change the way we approach astrophotography, and assuming this device someday evolves to allow for live stacking, it will undoubtedly become a fixture at star parties and observing sites around the world.
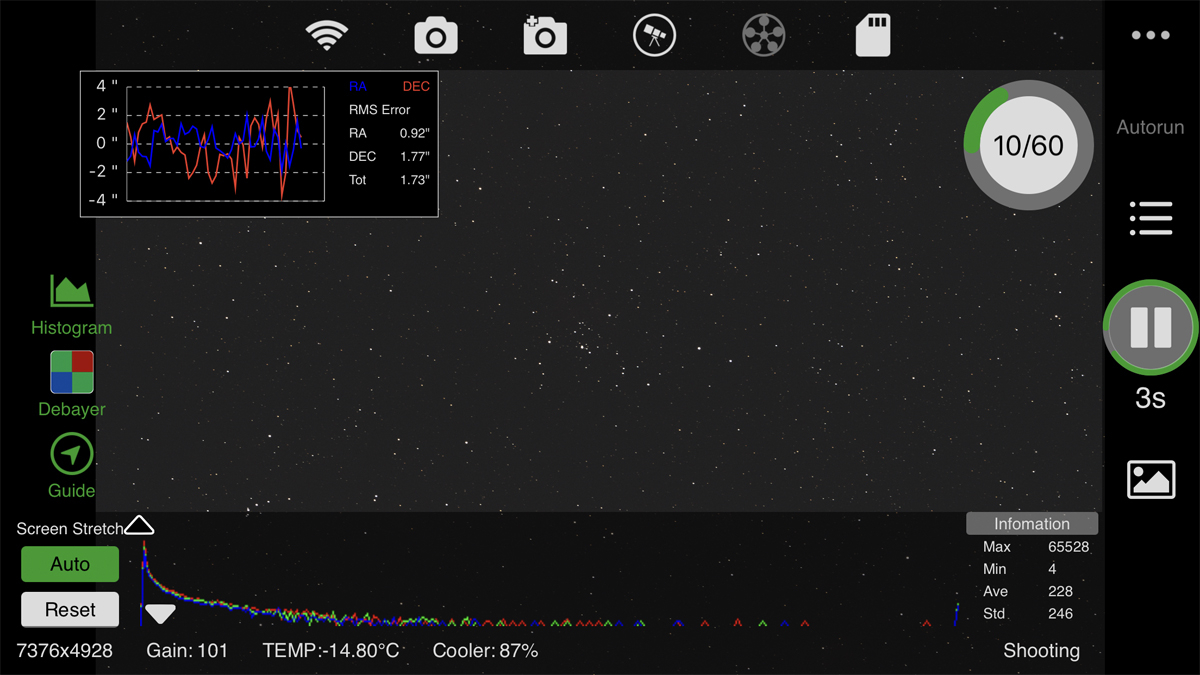
Full Action ASIair App Screen Shot
UPDATE - In keeping with the stellar reputation of ZWO's software development team, the most recent ASIair update appears to have resolved all of the connectivity issues I had previously been having. This update also included some new firmware for the ASIair, plus it has an EQMod option for connection without the hand controller as well as the standard SynScan option. I have always found EQMod to be an incredibly stable platform and would recommend any Sky-Watcher or Orion owners go this route, but if you would rather use the factory-included serial/rs-232 cables then you have this option as well. I used the serial to USB adapter included from ZWO and this worked great as well, but for those looking to get the EQ Direct cable and skip the clutter of a hand controller then you would want the "USB2EQ5" cable at ShoeString Astronomy. In addition to the Sky-Watcher AZEQ6, the fact that the EQMod driver works means that any Orion mount should be fine as well. I was also able to confirm that the ASIair works with the Losmandy Gemini 2, and we've had reports of iOptron mounts connecting as well. We will update the website with any mounts that have been confirmed to work or not work so check back often if you're wondering, or try reaching out to us directly at 1-800-266-9590 or at [email protected].
Click the arrow above to see MLA, APA, and Chicago Manual of Style citations.
MLA:
High Point Scientific Team. "ASIAIR Software Reveiw," AstronomyHub, High Point Scientific, 31 Jul. 2023, https://www.highpointscientific.com/astronomy-hub/post/asiair-software-review.
APA:
High Point Scientific Team. (2023, July 31). Asiair software review. High Point Scientific. https://www.highpointscientific.com/astronomy-hub/post/asiair-software-review
Chicago Manual of Style:
Bibliography:
High Point Scientific Team. "ASIAIR Software Reveiw," AstronomyHub (blog), High Point Scientific, July 31, 2023. https://www.highpointscientific.com/astronomy-hub/post/asiair-software-review.
Footnote:
High Point Scientific Team, "ASIAIR Software Reveiw," AstronomyHub, High Point Scientific, July 31, 2023, https://www.highpointscientific.com/astronomy-hub/post/asiair-software-review.
This Article was Last Updated on 07/31/2023