


Have you dreamed of capturing a lunar Kodak moment but felt underwhelmed by what you can accomplish with your smartphone's camera? Do you find yourself overcome with frustration when trying to balance the various settings of a DSLR or mirrorless camera? If you’ve had these questions, or you simply wish to learn more about lunar photography, this guide is for you.
There are countless ways to capture an image of our closest cosmic companion, ranging from incredibly layered mosaics to straightforward candid photos. To help you embark on your astrophotography journey, this step-by-step beginner’s guide covers three tried and true imaging methods, from planning to post-processing. So, whether you’re just starting out or looking to expand your astrophotography skillset, follow along to learn the basics of photographing the Moon!
Planning Your Shot
While capturing the Moon on a whim can be a great way to jump into lunar photography, a little bit of planning can make all the difference. The first thing you’ll want to do is get acquainted with the lunar cycle; check this article to learn How to Predict the Phases of the Moon.
Once you’ve familiarized yourself with the lunar cycle, you want to decide the type of image you intend to capture. You don’t need to know exactly what the final product should look like but having a rough idea will save you time and effort. Review the list of the common lunar images below and decide which piques your interest the most.
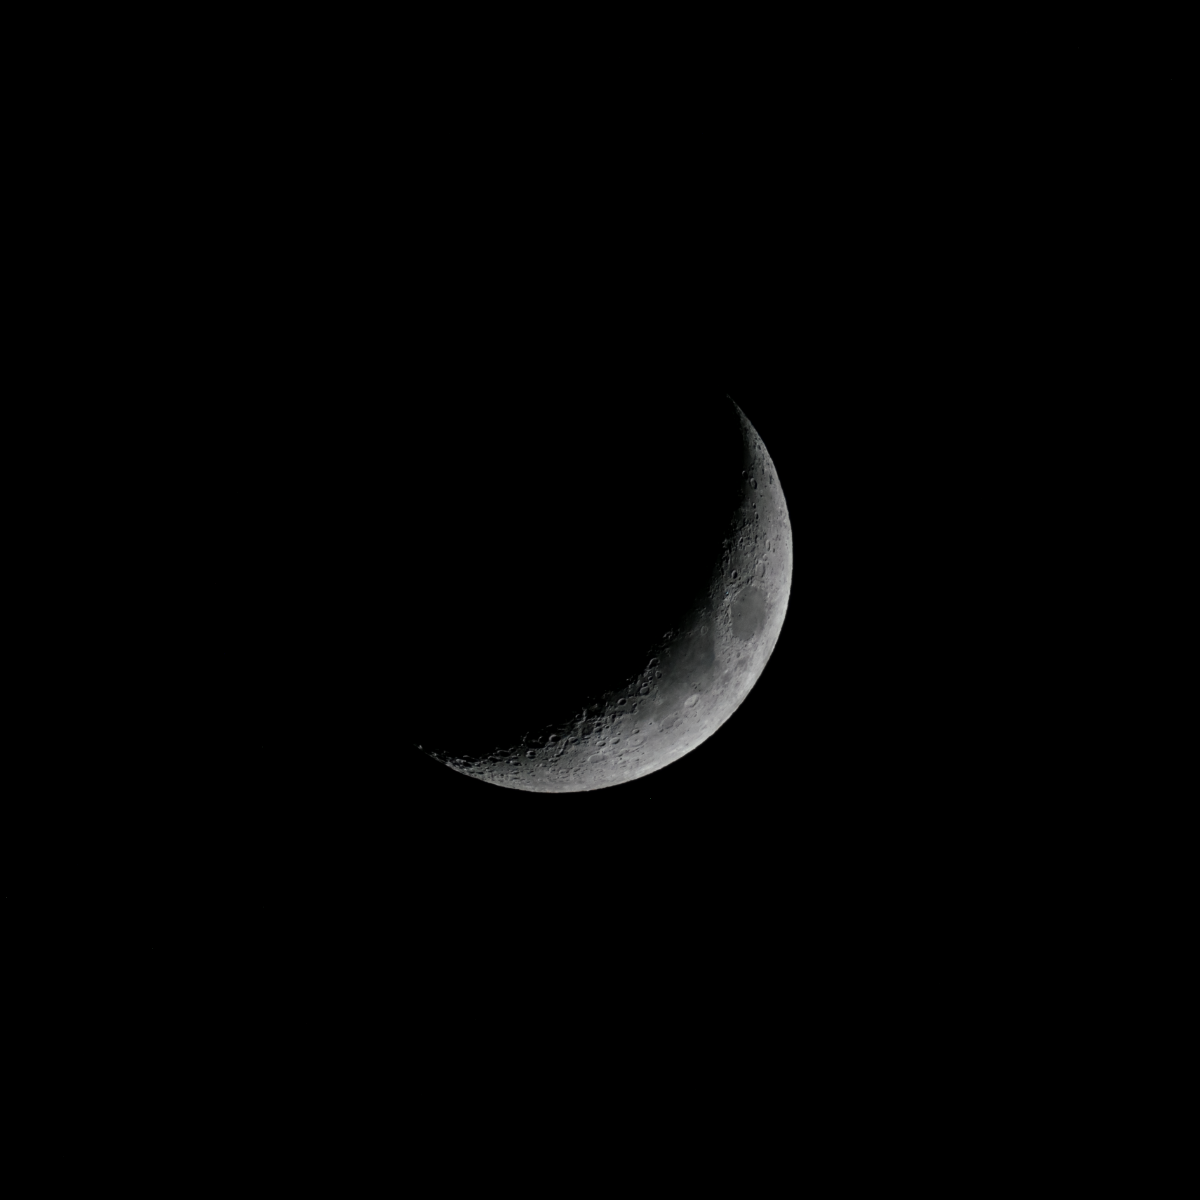
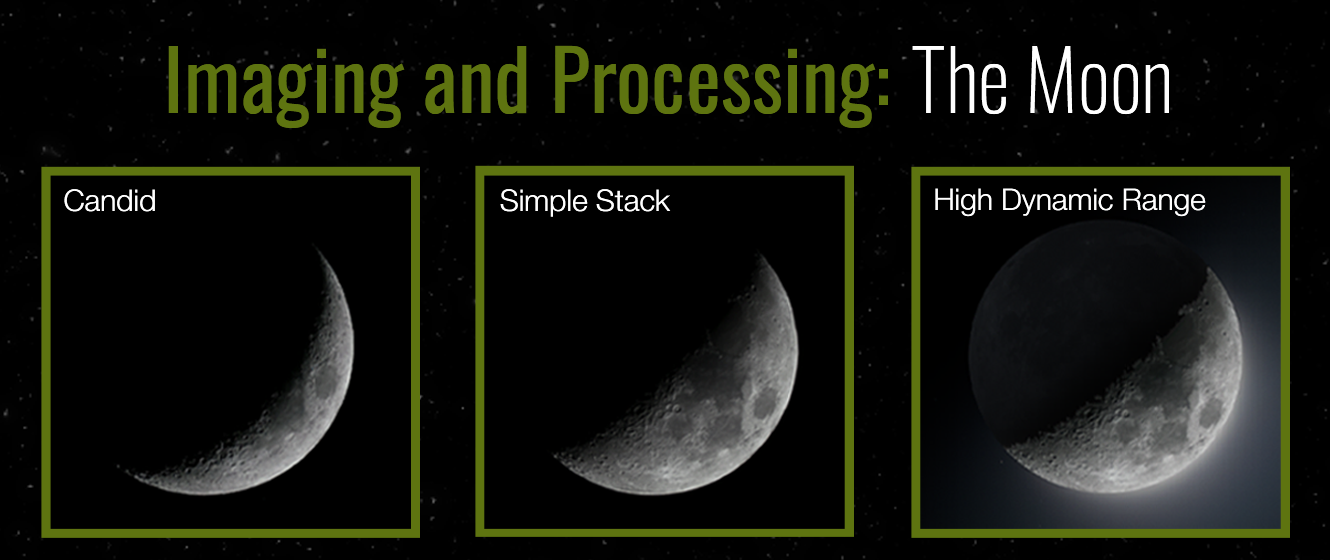
A candid lunar photo is a single image with the Moon taking up as much of the frame as possible. Taking this image is relatively straightforward, but don’t let the simplicity fool you, these photos often look great!
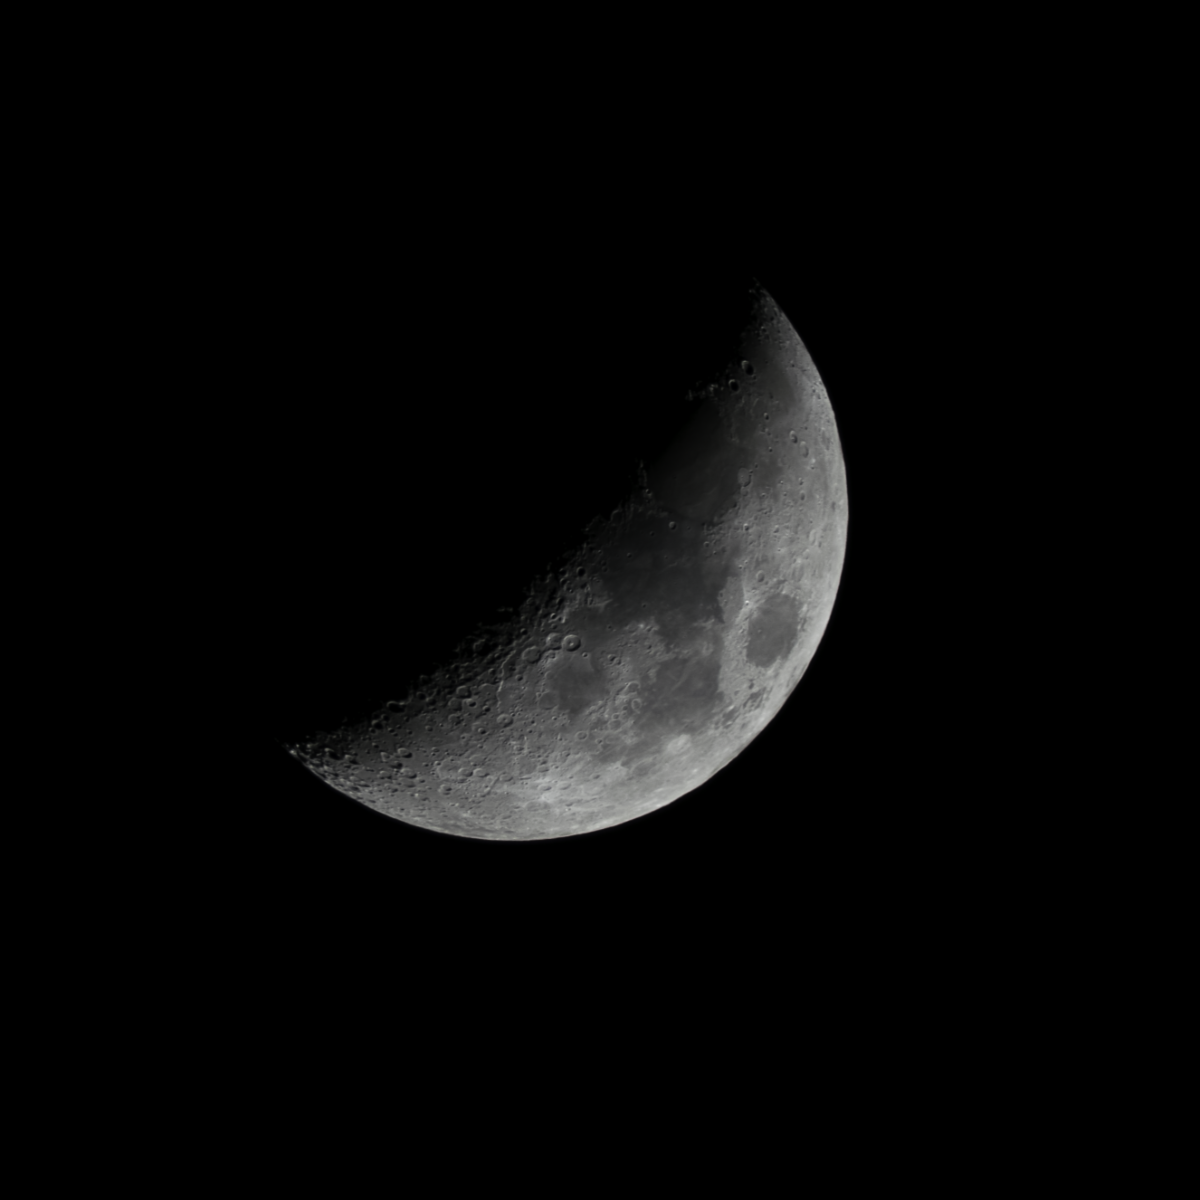
By editing and stacking 25-50 images of the Moon, you can create a lunar photo with more depth, structure, and less noise. Learning how to stack images can seem intimidating. However, it's a great way to learn the ins and outs of processing images.
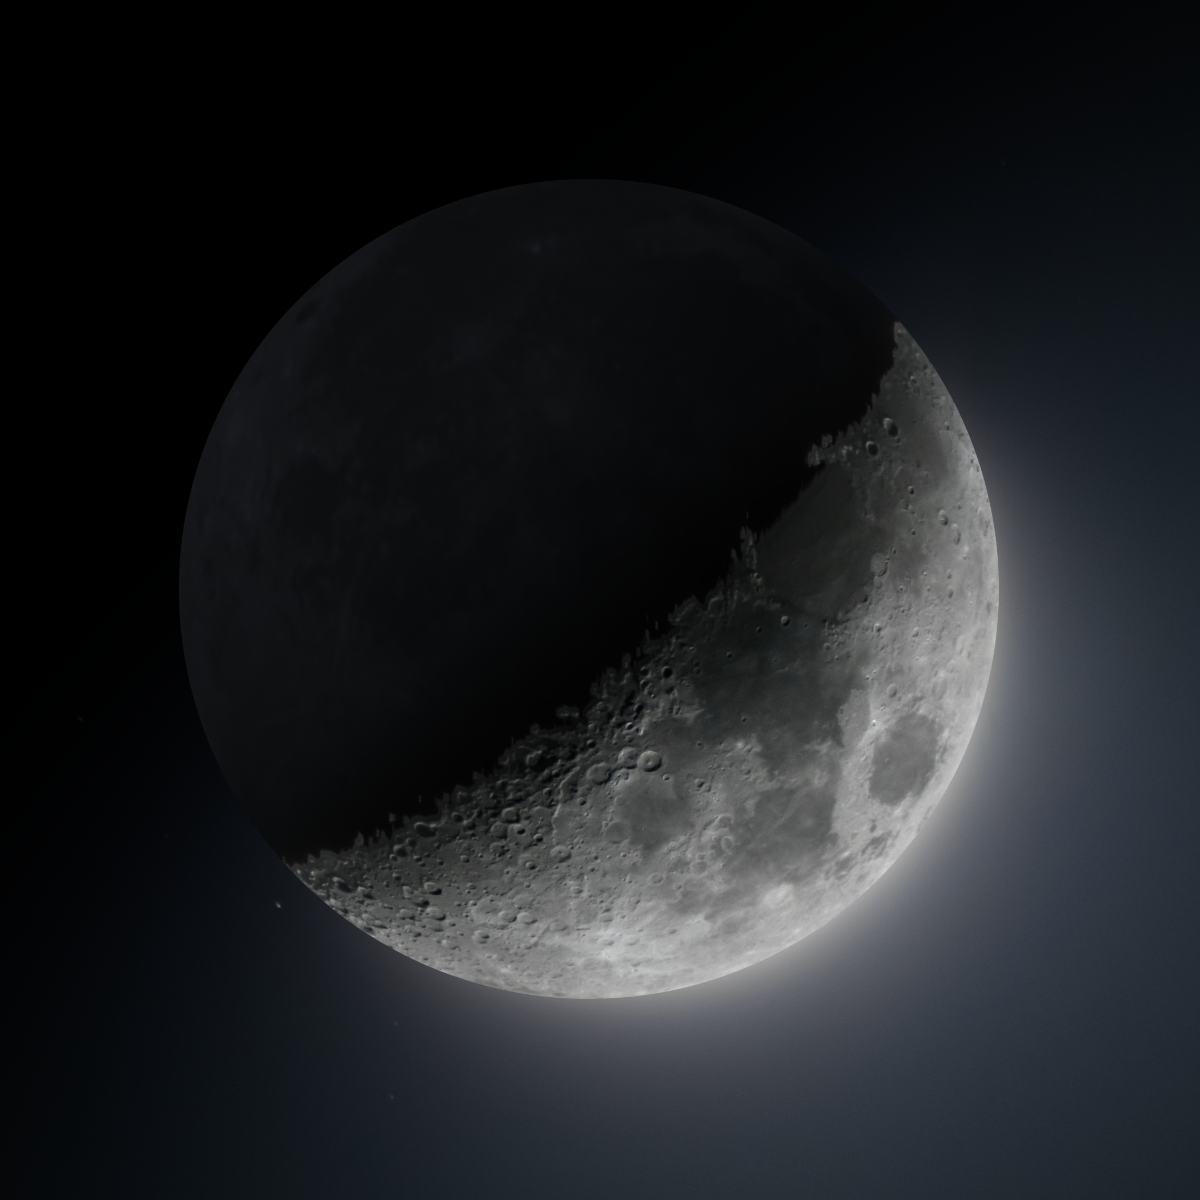
High dynamic range is a type of processing that is useful when dealing with scenes with both bright and dark areas. When imaging with a DSLR or mirrorless camera, the settings needed to capture bright objects differ from those needed for darker objects. The solution is to take elements from multiple photos and bring them together to produce a composite image closer to what we perceive with our eyes.
Equipment
For lunar photography, you don’t need much. A DSLR or mirrorless camera with at least a 200 mm lens and a basic tripod is all you need to take stunning images of the Moon. However, there are a few pieces of equipment that can make things even easier. While not strictly necessary, it's highly recommended to use a remote shutter release, as it will help keep your camera stable when shooting. If you don’t have a remote shutter release, you can try connecting your camera to your smartphone or use the camera's shutter timer.
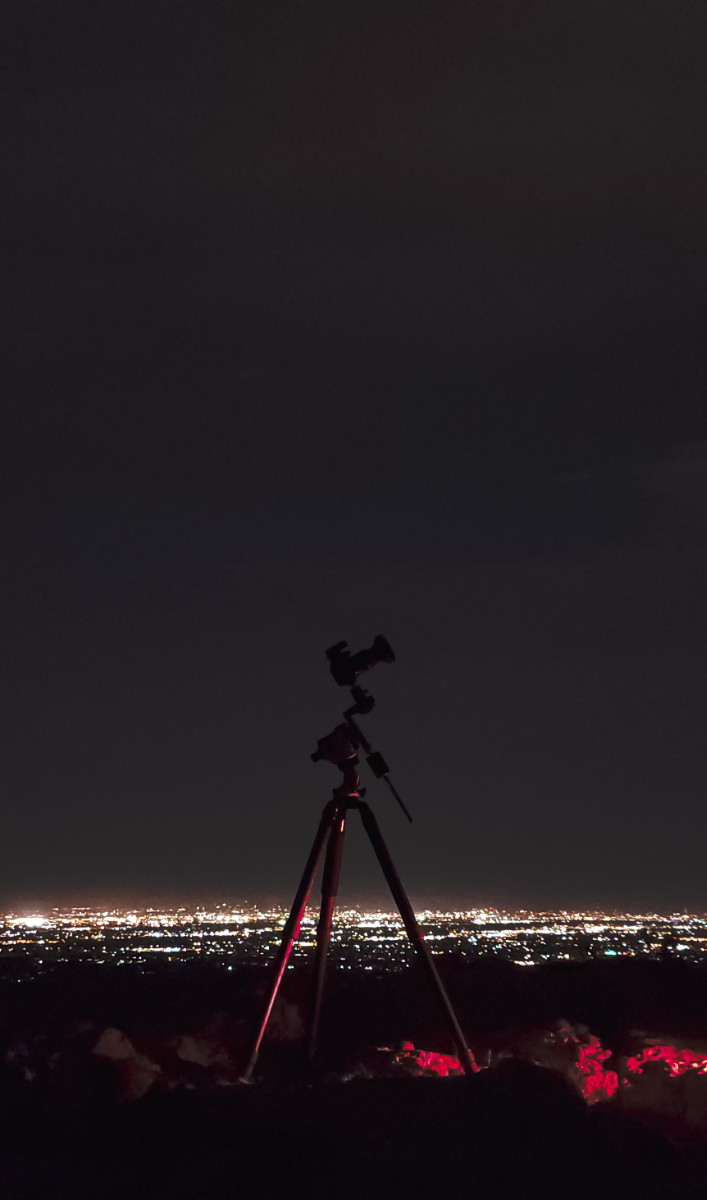
Another piece of equipment that will save you time is a tracking mount. Most tracking mounts feature a lunar tracking mode that will keep the Moon centered in your frame. Again, while not strictly necessary, a good tracking mount can save you a lot of time and effort, freeing you to focus on the image instead of constantly readjusting your setup.
Are you looking to purchase a portable mount that will help you learn the fundamentals of tracking based imaging? Our team of astrophotography experts recommend the Sky-Watcher Star Adventurer 2i or the iOptron SkyGuider Pro. These mounts are both great additions to your astrophotography rig. However, if you are looking to expand into deep sky astro-imaging, you’ll appreciate the more developed capabilities of the Sky-Watcher GTi. This lightweight mount features a “Go-To” function, which takes the hassle out of locating faint or non-visible deep sky objects, and with the 11 lbs. payload capacity, you’ll be able to attach small OTAs to further expand your imaging capabilities!
All you need for a great lunar shot is a long focal length lens, but with a telescope, you can bring your astro-images to the next level! If you're looking for more reach, more light gathering power, and a system that grows with you as you get deeper into astrophotography, then look no further than a 60mm refractor. The Apertura 60 EDR package pairs perfectly with a photo tripod, or a star tracker. Simply attach a camera specific T-ring, and you’re all set! With a 360mm focal length, you’ll be up close and personal with our nearest celestial neighbor!
If you prefer innovative optics that transcend tradition, check out the Askar SQA55 Quintuplet Refractor. This innovative refractor features an interchangeable lens/scope design, a dual-speed helical focuser, and an aperture adjustment wheel, all within a 4 lb. compact body, making it an excellent choice for both astrophotography and terrestrial photography!
If you already have a telescope and want to learn how to attach your DSLR, mirrorless, or astrophotography camera, review our article covering the various ways to Connect a Camera to a Telescope!
Tips
Conditions
When planning an imaging session, it's always important to check your local weather conditions. There are many weather tracking apps and websites out there, but an app like Windy offers an in-depth overview of humidity levels, atmospheric water content, dust levels, and more.
Image Composition
After choosing the type of lunar image you want to capture, you’ll want to further consider the composition of the image. Having an understanding of framing (what's in the frame), flow (the orientation, patterning, and weight of various elements in the frame), and the subject placement (rule of thirds, etc) can make all the difference. However, don't get too caught up in the details. It’s best to try your hand at capturing the Moon a few times before diving into the weeds. Once you have a photo you like, try comparing it to other images that incorporate different creative choices. This will help you learn about the principles of image composition.
Processing Foresight
Knowing how you intend to edit your images can save you time. While it's ultimately unavoidable, it can be frustrating to spend a whole evening imaging only to discover a fatal error in post. Nevertheless, you should always try to work with what you have, as it will help you learn the rhythm of processing. Once you zero in on a workflow that feels comfortable, start considering how you can adjust your imaging session to speed up the final edits.
Overview of Settings

ISO
The ISO setting controls the sensitivity of your camera sensor to incoming light. High values are more sensitive, creating bright images, and low values are less sensitive, creating darker images with less noise.
Shutter Speed
The shutter speed setting controls how fast the aperture closes when you take an image. Faster speeds let less light reach your sensor, which can help when imaging bright scenes or fast-moving objects.
Aperture
The aperture setting, which is often referred to as f-stop, controls the size of the lens aperture, which further controls the amount of light that reaches the sensor. Increasing or decreasing the aperture changes the depth of field. A wide aperture results in a narrow depth of field, making the foreground or background appear out of focus. A small aperture results in a wider depth of field, making more of the image appear in focus.

File Type
DSLR and mirrorless cameras allow a lot of control over the way your image is encoded on the memory card. Some file types (jpeg) compress the data received by the sensor, while others (RAW) preserve all the information. When imaging with the intention to edit the photos, you’ll want as much of that information as possible, so it’s generally best to set the file type to RAW.
Tips
It is important to note the inverse relation between shutter speed and aperture. Since both of these settings control the amount of light reaching the sensor, you need to make adjustments to both values if you want to maintain the same level of brightness across your images. By using the shutter priority mode when imaging, your camera will automatically adjust the aperture as you adjust the shutter speed. However, when shooting in full manual, you will need to make these adjustments yourself.
Capturing the Moon
Setting Up
Once you locate the spot you intend to do your imaging, secure the camera on your tripod or tracking mount, polar align, if necessary, find the moon, and move on to the next step. Make sure you check lenses for smudges or dust, as these can be hard to notice until you pull up your frames on a larger screen. We suggest keeping an cleaning kit, like the Apertura Optics & Sensor Cleaning Kit, handy.
Framing and Testing
Once you have located the Moon, start snapping some test shots. If planning to capture the foreground, you may need to bump up the ISO so you can get a sense of your surroundings. Once you’ve found the right position, start adjusting the settings to your liking. It's generally best to keep the ISO low (100-400) to avoid unnecessary noise. The f-stop should be high, around f/9-f/20. This keeps the image from being washed out by the brightness of the Moon. To keep the image clear of movement, keep the shutter speed as fast as possible (somewhere between 250-125 should work). Keep in mind that depending on the phase of the Moon, time of day/night, and the camera you are using, the best settings will vary.
Capture Methods
Candid
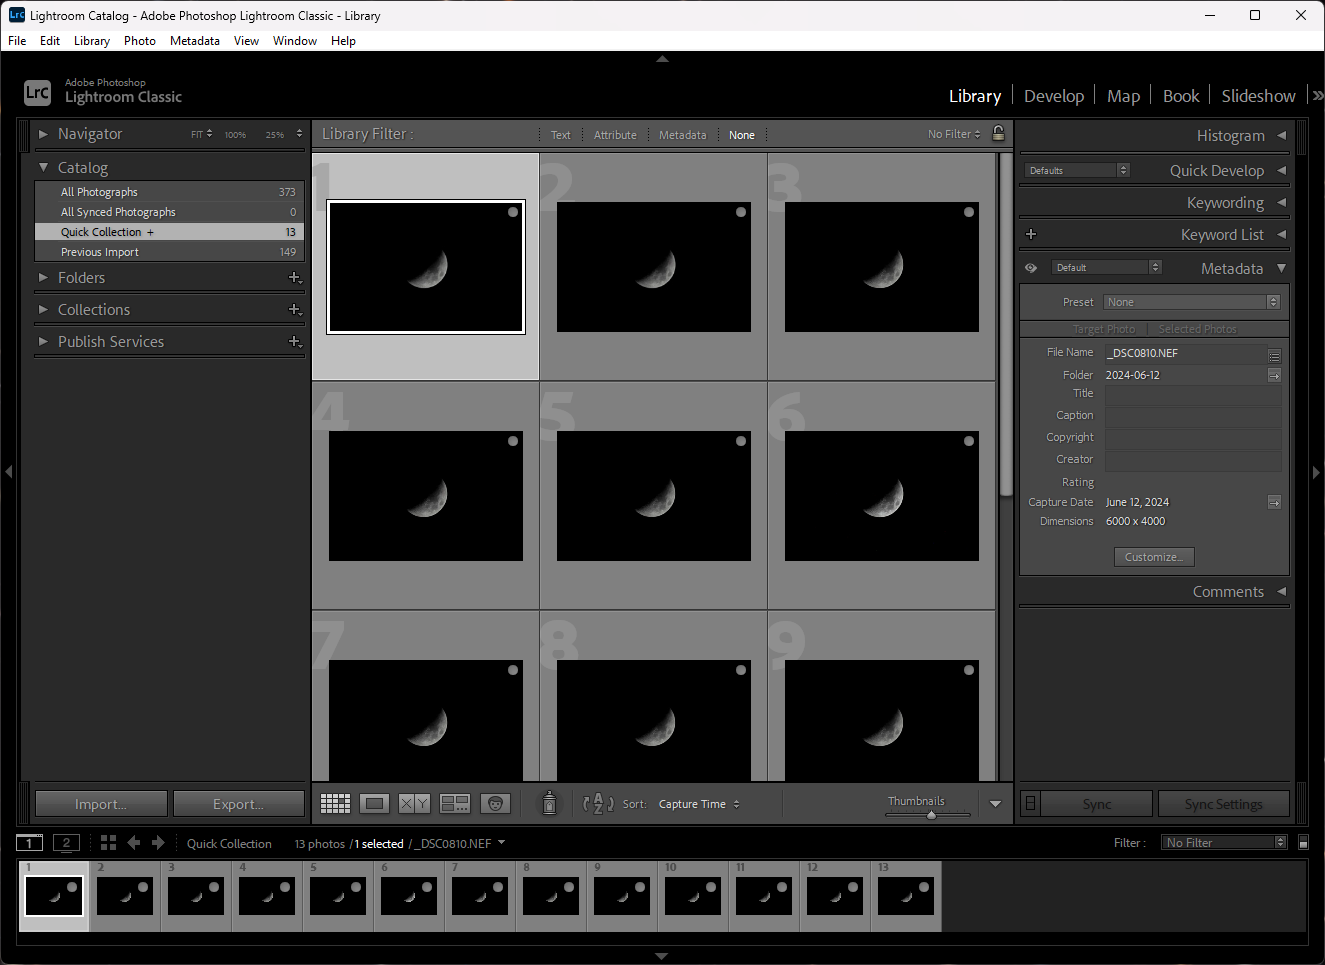
To capture a candid shot of the Moon, you’ll want to use the longest focal length lens you have available. Ideally, a lens with a focal length longer than 200 mm. Once you have your camera and tripod set up, zoom in on the Moon and manually adjust the focus until you can clearly see the craters and other features. Using a remote shutter release, or shutter timer, take at least 10-20 images of the Moon. If you are happy with the results, you can move on to the post processing step. If not, try adjusting the ISO and shutter speed and repeating the previous steps. If you are using a traditional tripod, make sure you reposition the camera so the Moon is near the center of the frame.
Simple Stack
To capture the frames needed to create a simple stack, you’ll want to follow the same steps mentioned above, creating 4-5 batches of frames each with different ISO and shutter speeds. To create a batch, you’ll want to take 25-50 images in quick succession. Since the atmosphere is constantly changing, some of these frames will turn out blurry, but don’t worry, you only need a handful of clear images to create a simple stack. Once you’ve captured enough batches, move on to the post-processing steps.
High Dynamic Range
When imaging the Moon, you’ll notice that capturing the details of the surface often comes at the expense of brightness. While it is possible to find a nice balance between these settings, you don’t necessarily have to compromise. The HDR method allows you to combine the brightness and glow of one image, with the clarity and contrast of another image.
Capturing the images needed for an HDR image is simple, as most of the heavy lifting is done in the post processing stage. You’ll need at least two images of the moon, but I recommend capturing more, as it will give you more options to choose from when processing. You’ll need one image that looks overexposed (higher ISO and slower shutter speed) and one that is relatively detailed (you can use the same steps as candid or simple stack). Once you have some images you are happy with, move on to the post-processing step.
Tips
Too much isn’t always a bad thing. Over capturing can give you more to work with and save you from the defeat of a wasted imaging session. You can always delete photos you don’t need.
Processing
Once you've captured enough images, its time to start editing. The first thing you need to do is download a software that can handle the RAW file type. There are a lot of software options on the market, and some of them are even free. Review the list below and find a software that works best for your needs.
Free Software
Gimp, Darktable, DxO Photolab, Mac Photo Editor (free for mac users)
Paid Software
Lightroom, Photoshop
Tips
Depending on the manufacturer, your DSLR or mirrorless camera may include a download for a free editing software. Check the information included in the camera's box, or check the manufacturers website.
Candid
First, transfer the files from your camera to your PC or laptop. Review the images and select the clearest image.
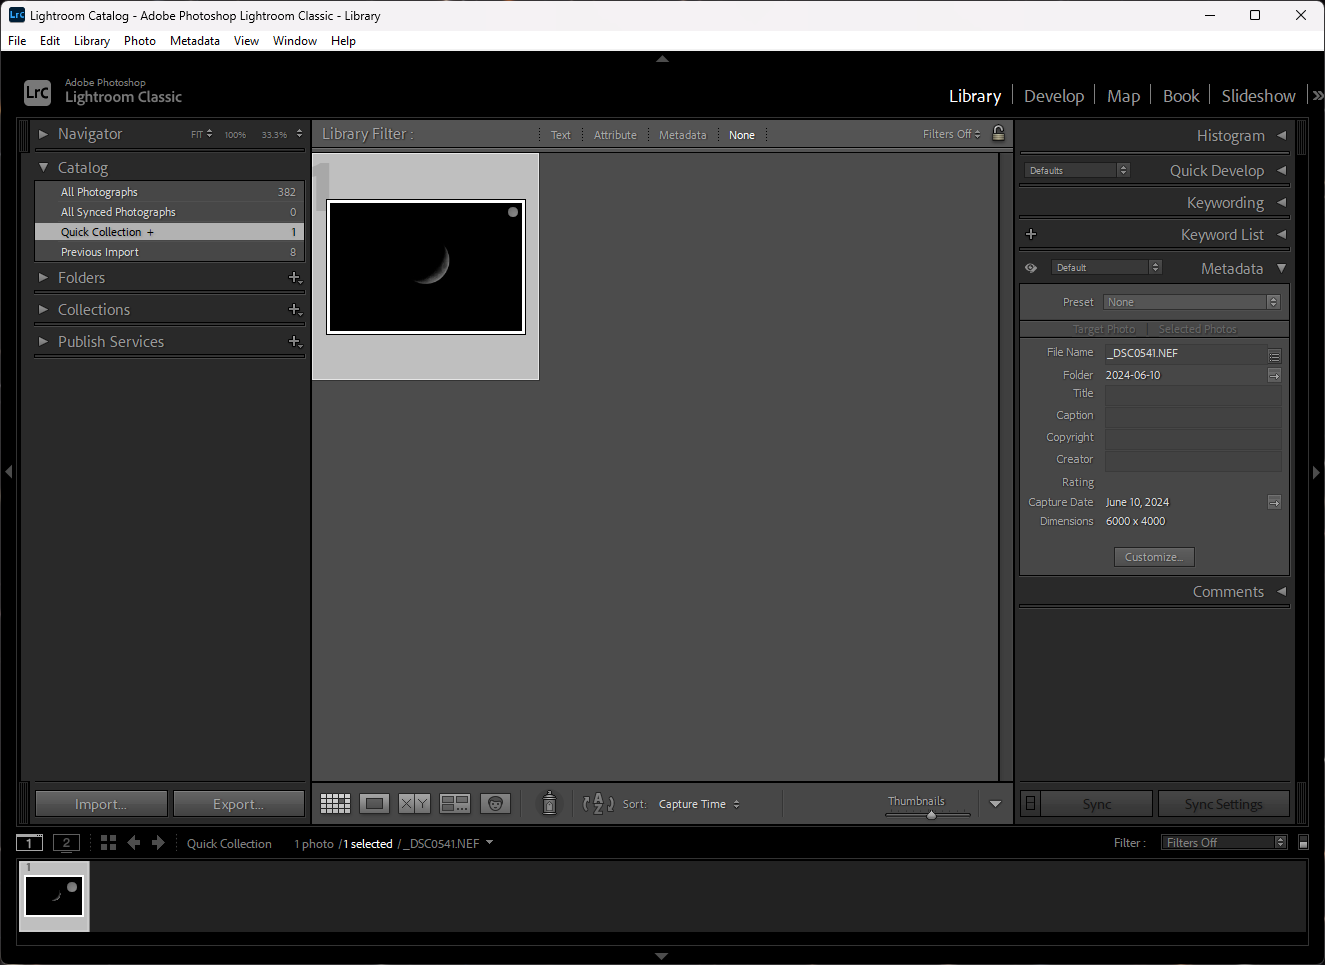
Step 1
Open the file in whichever editing software you are using. For this guide, we are using Lightroom Classic and Photoshop, but similar results can be achieved with free software.
Step 2
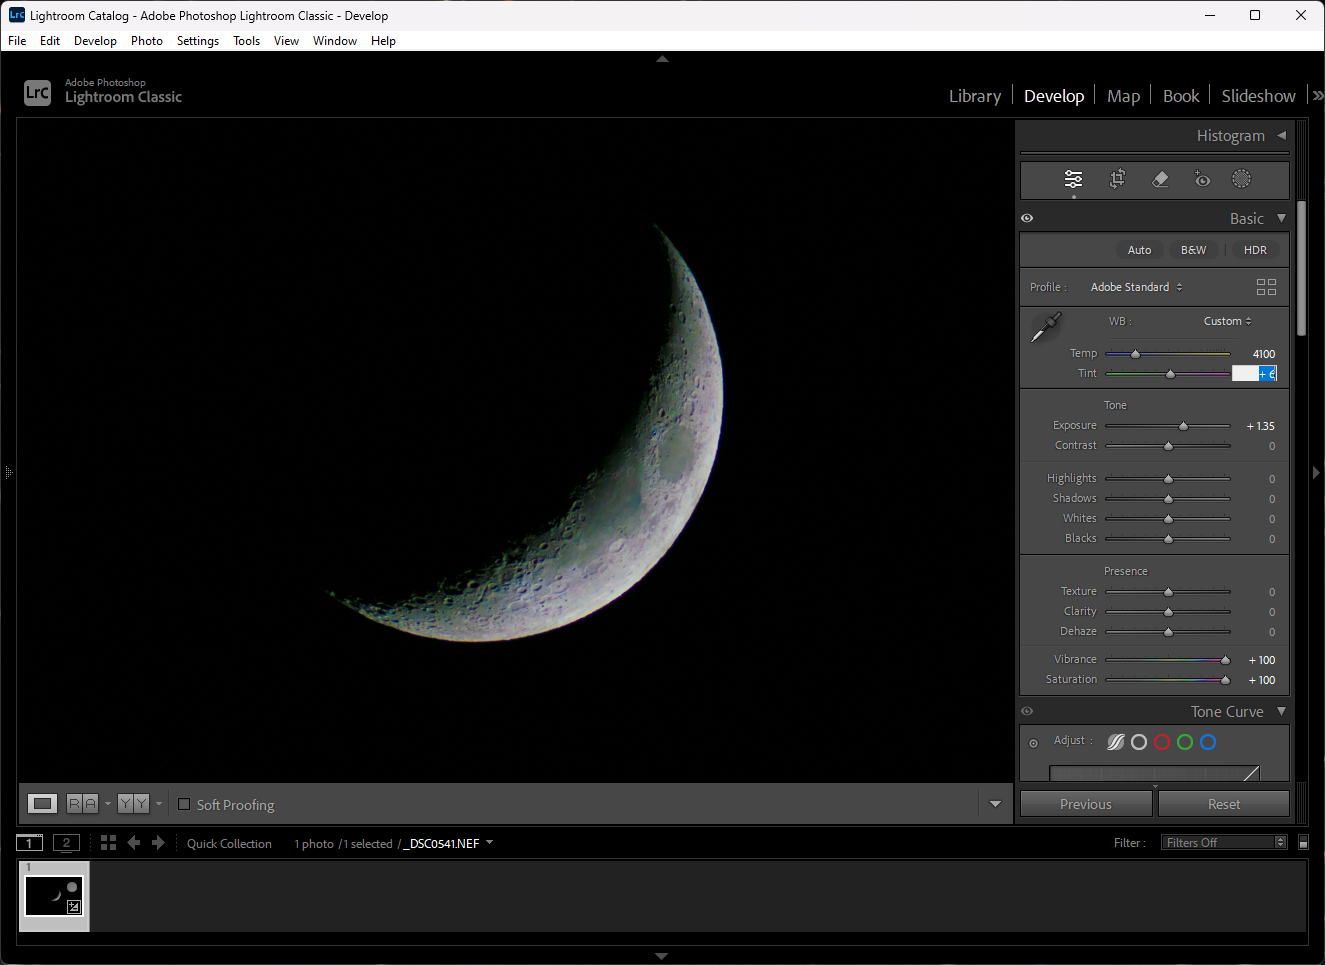
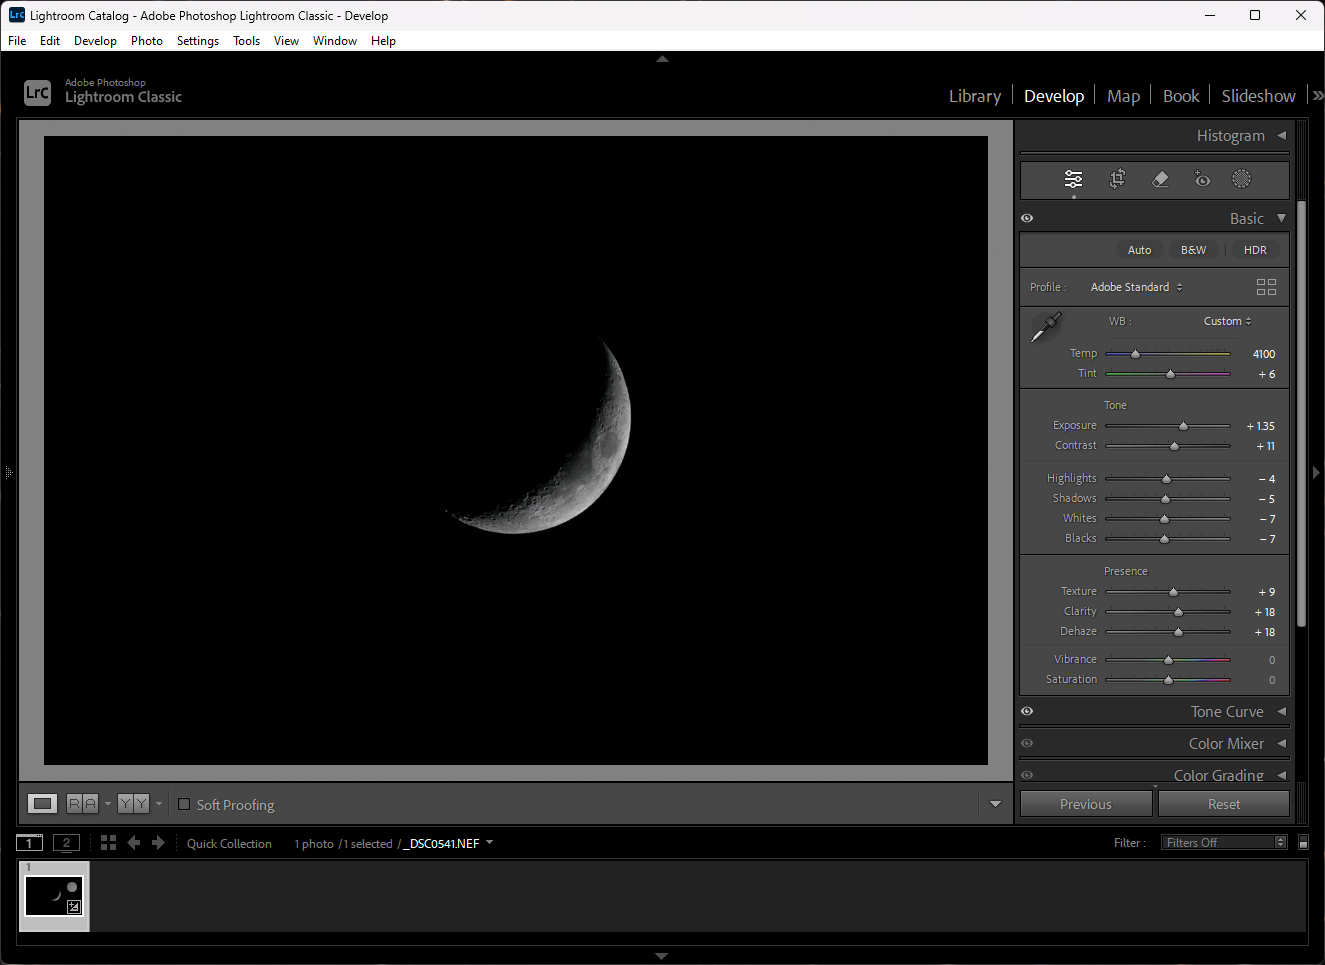
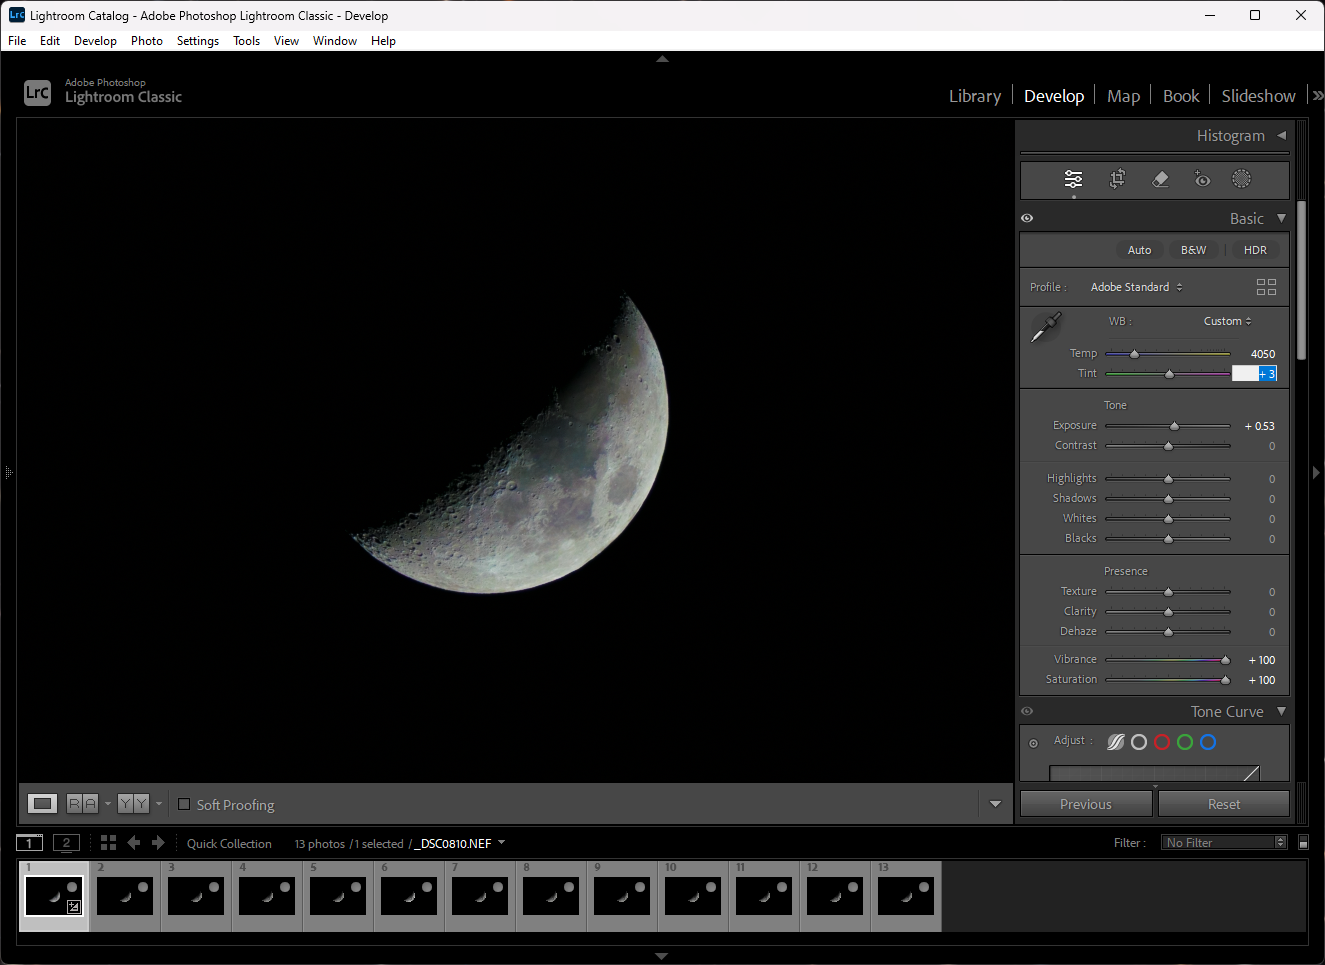
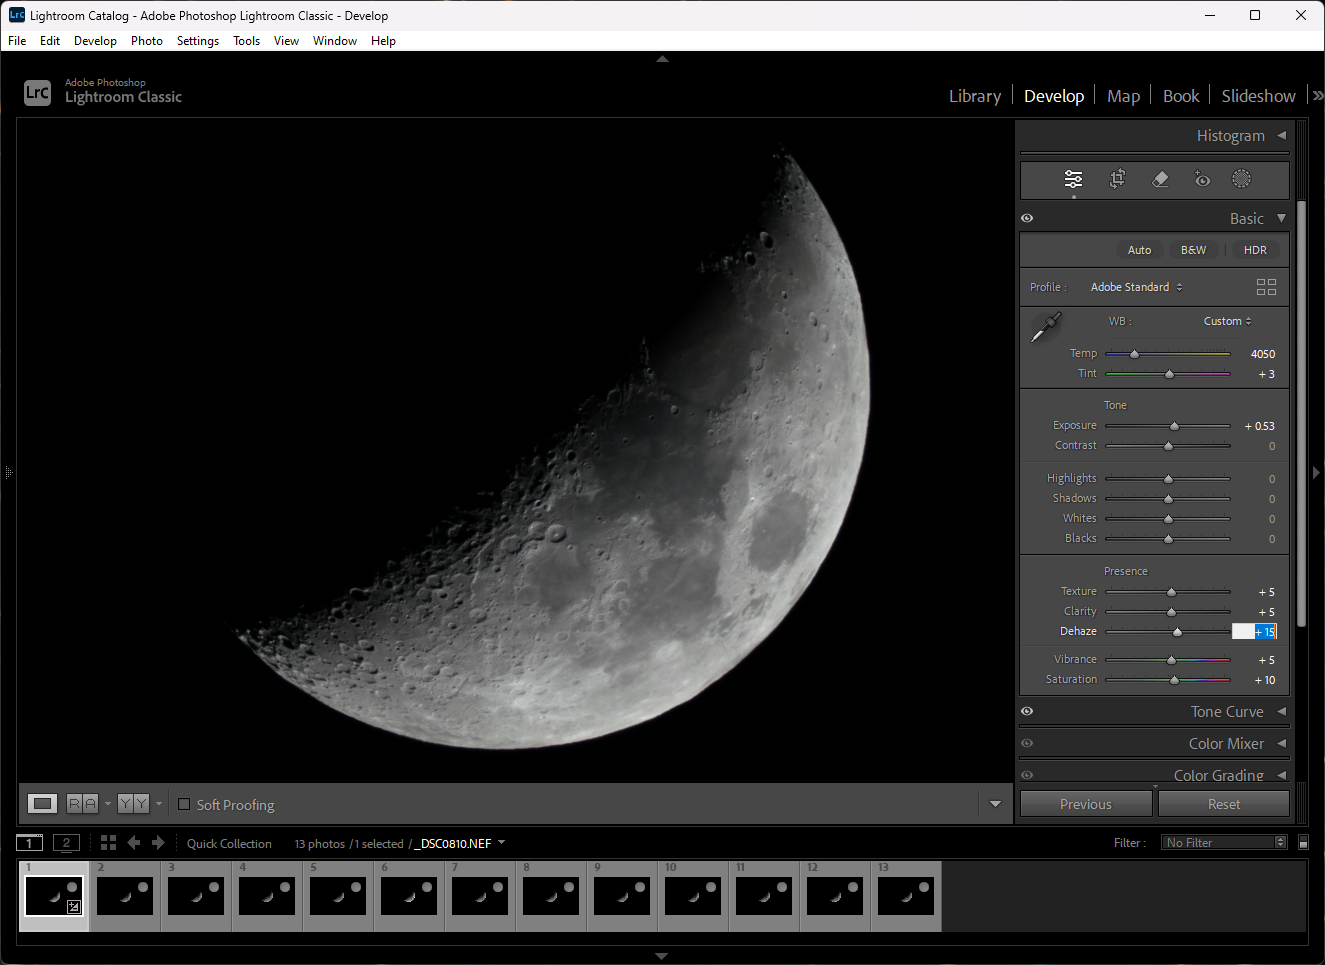
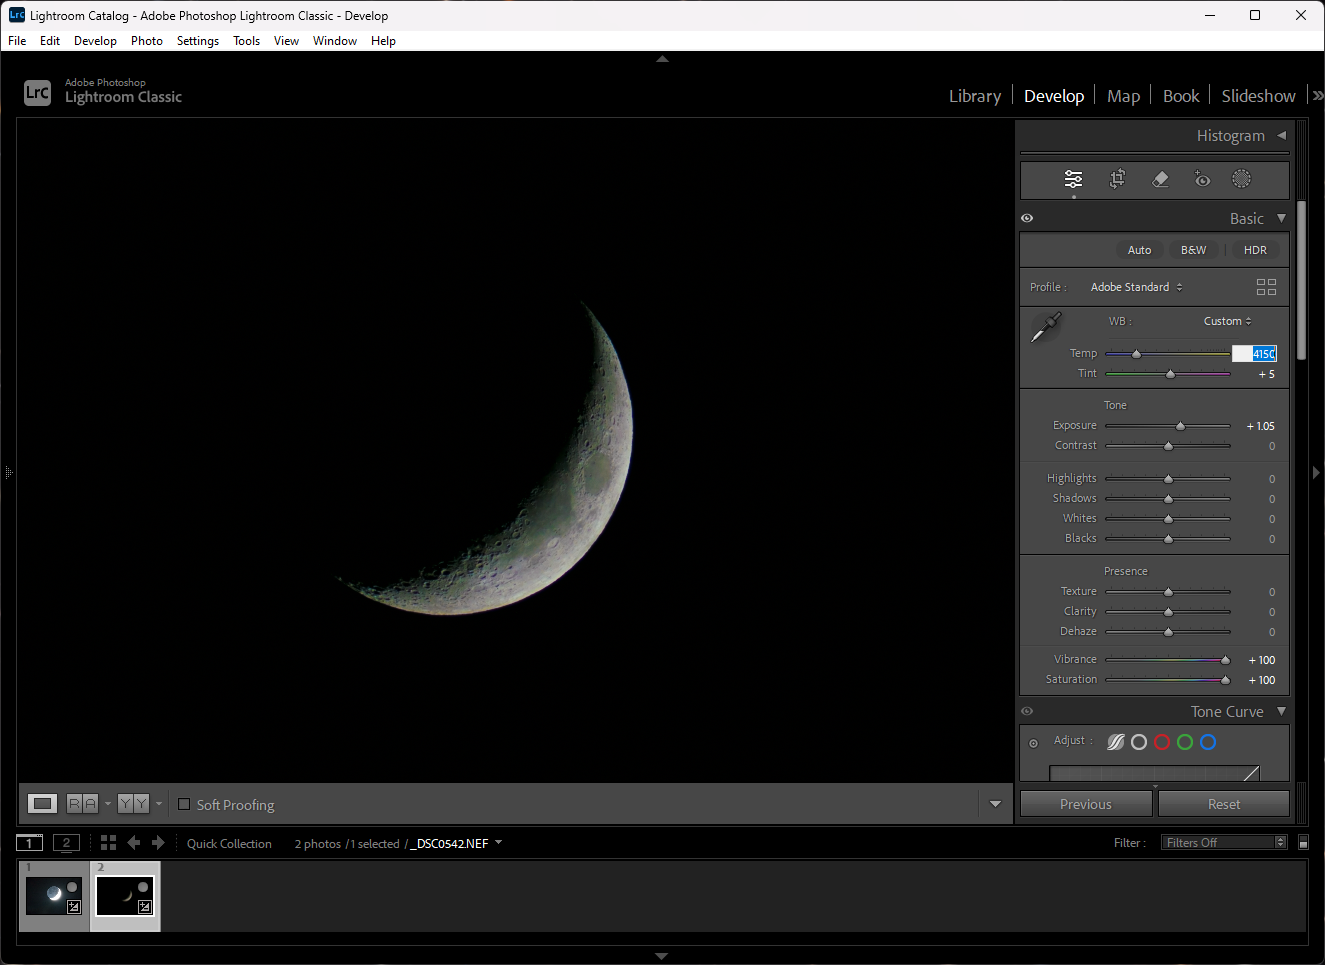
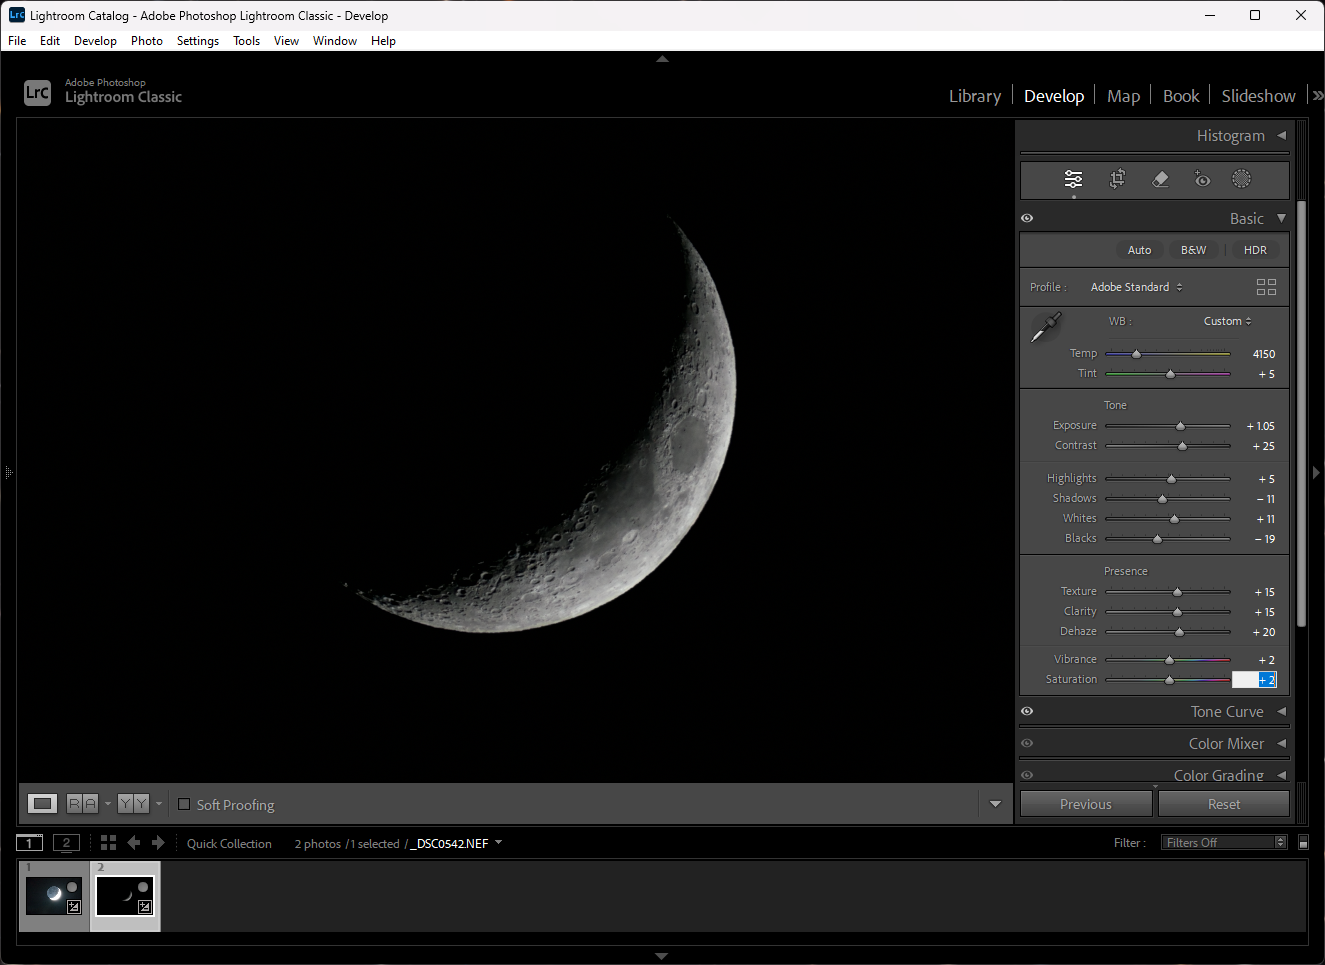
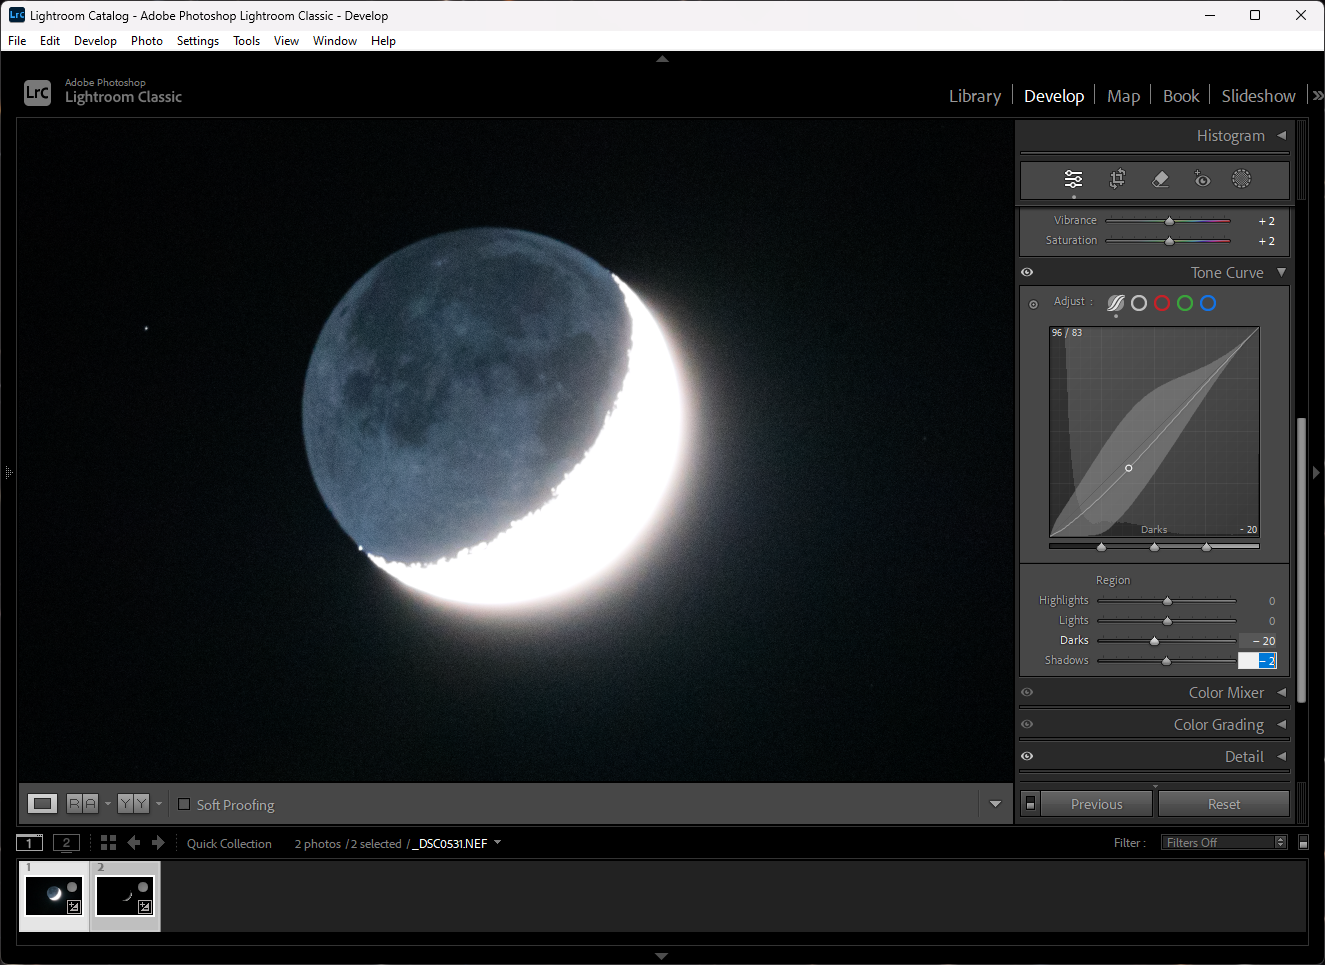
Begin by increasing the saturation and vibrance to 100. This will allow you to see the color details when adjusting the white balance. Then, adjust the temperature and tint until there is a good balance of color. Generally, you’ll want to bring the temperature slightly lower and tint slightly higher.
Step 3
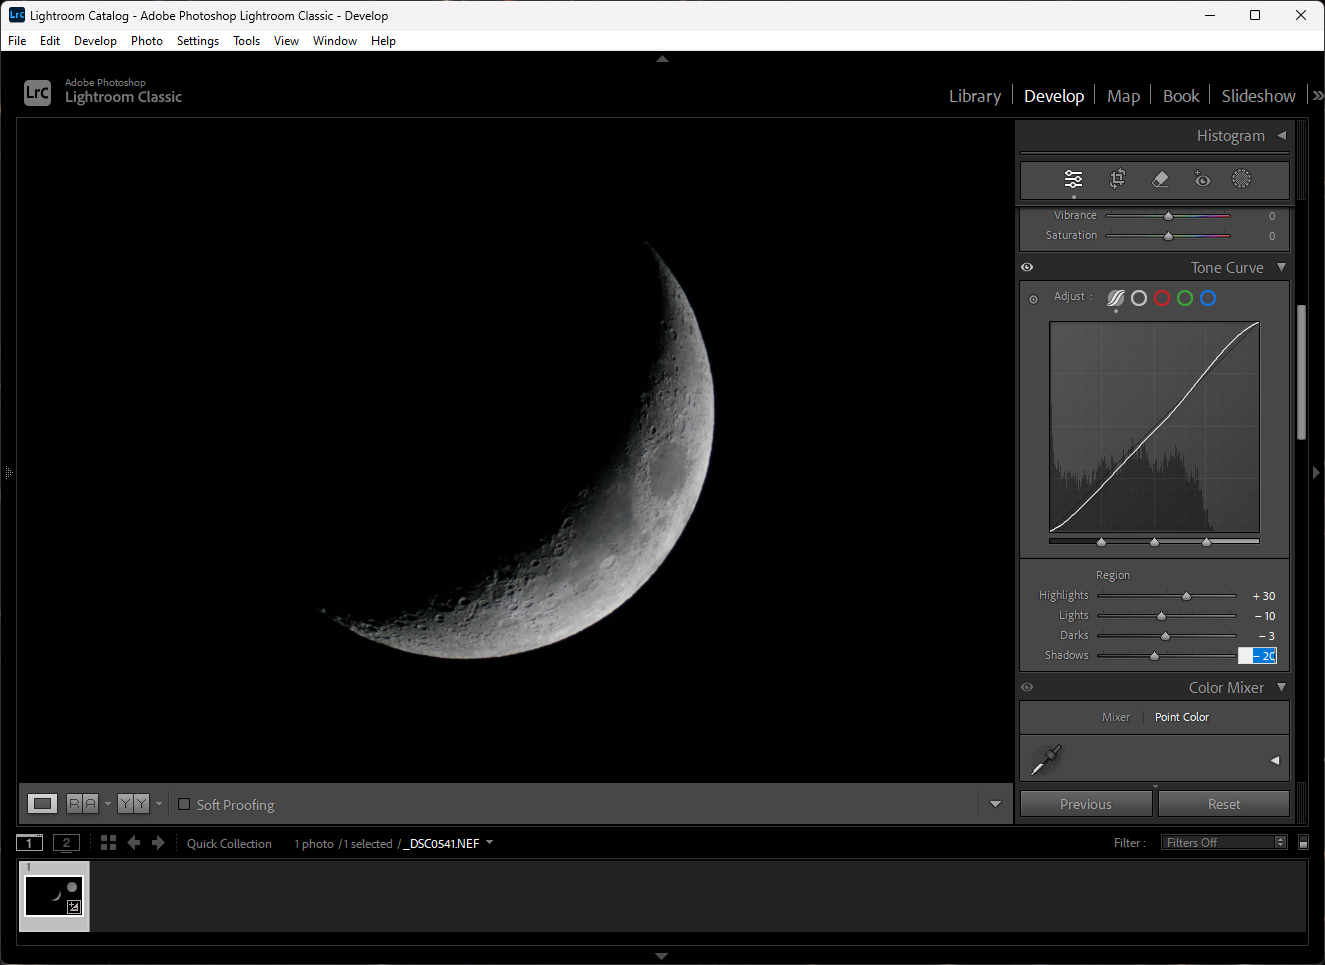
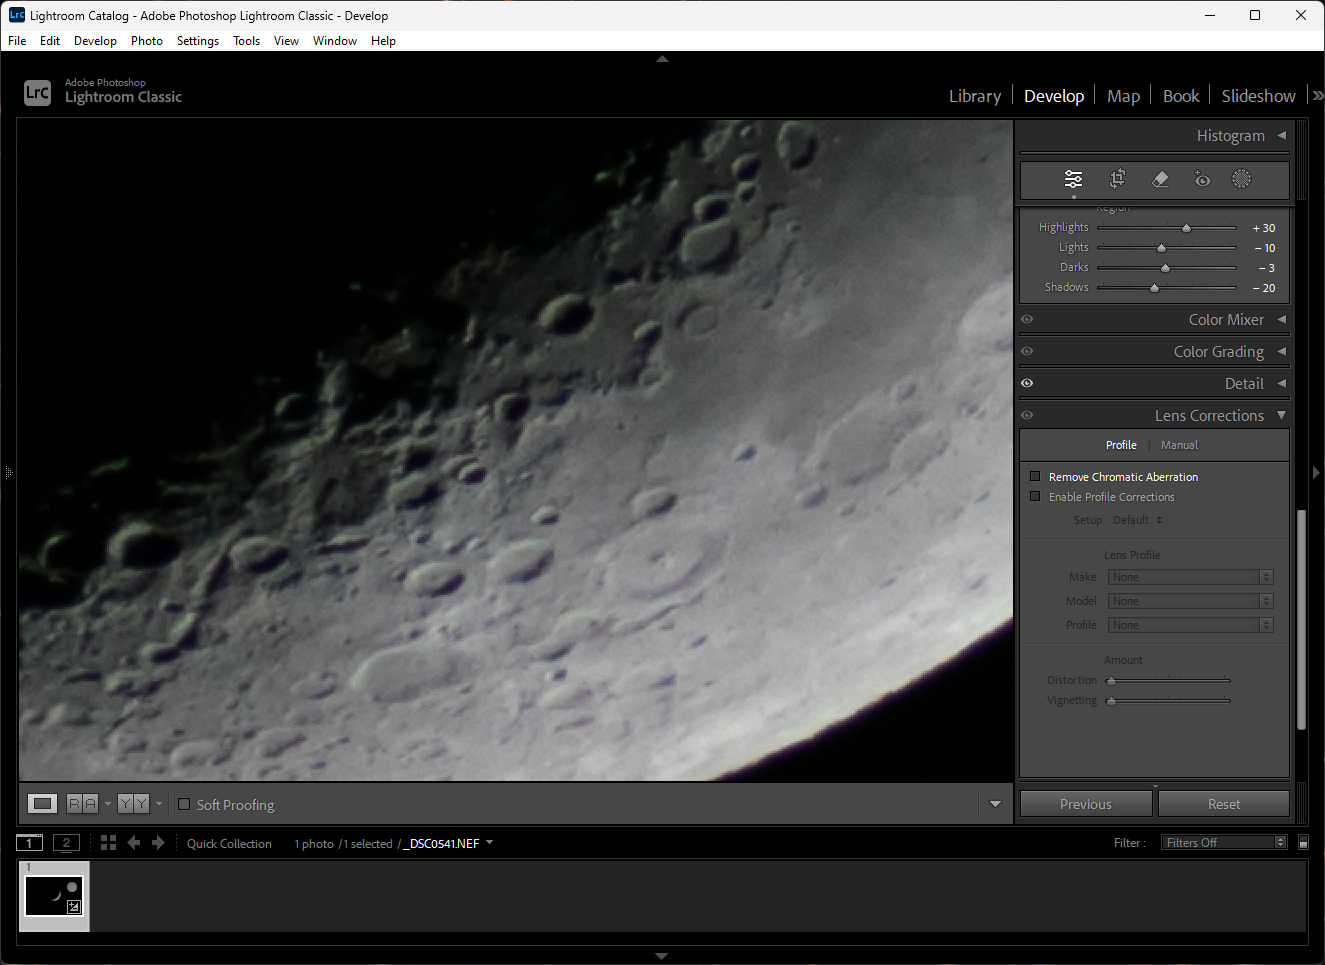
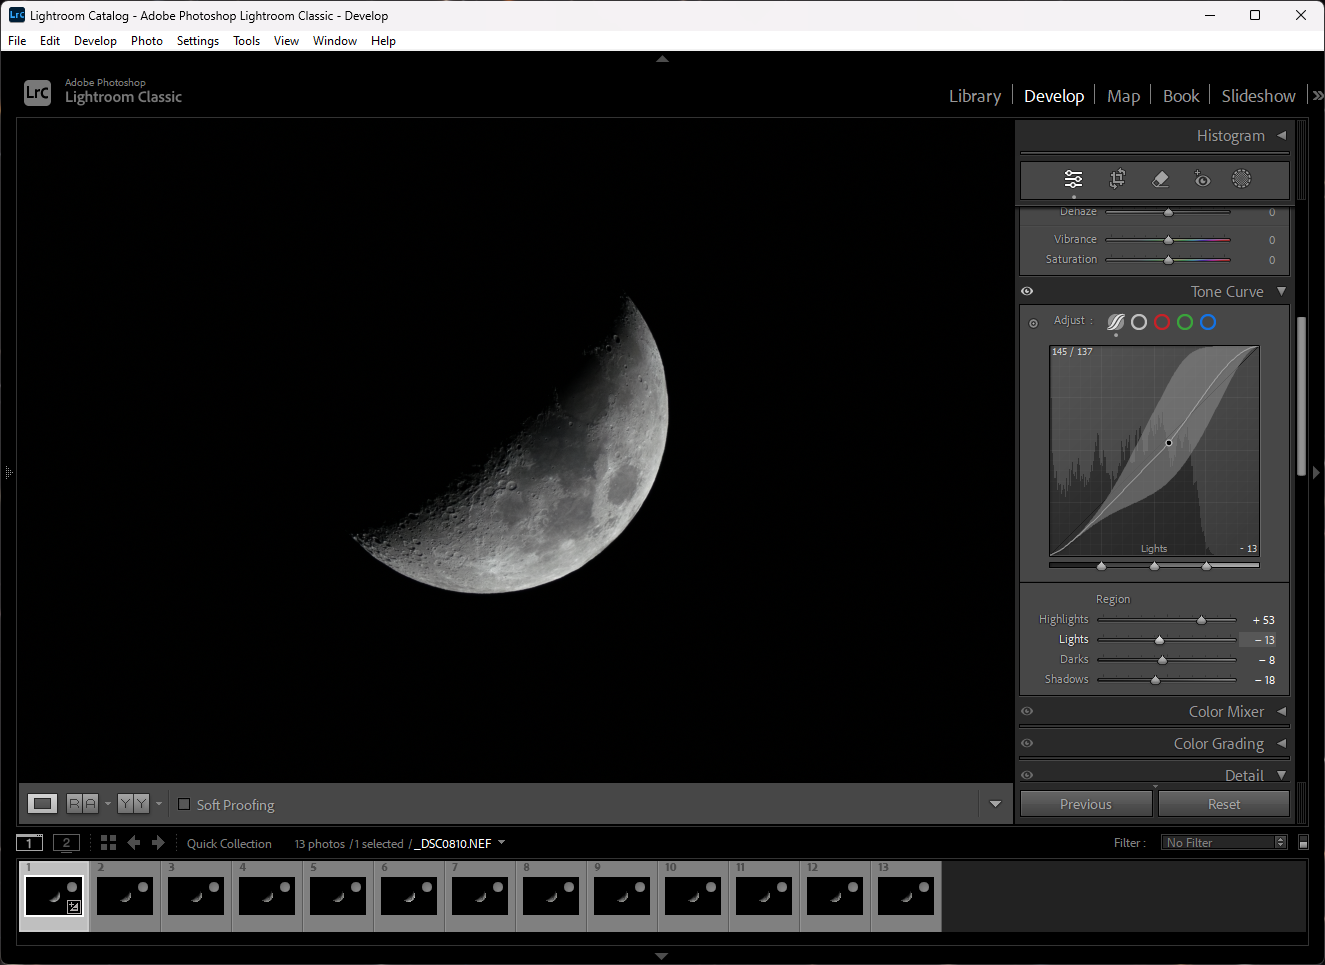
Now, adjust the tone curve. Generally, you’ll want to bring the highlights up a bit, while bringing the darks and shadows down. Remember, don’t over edit. The goal is to bring out the features of the Moon without harming the image.
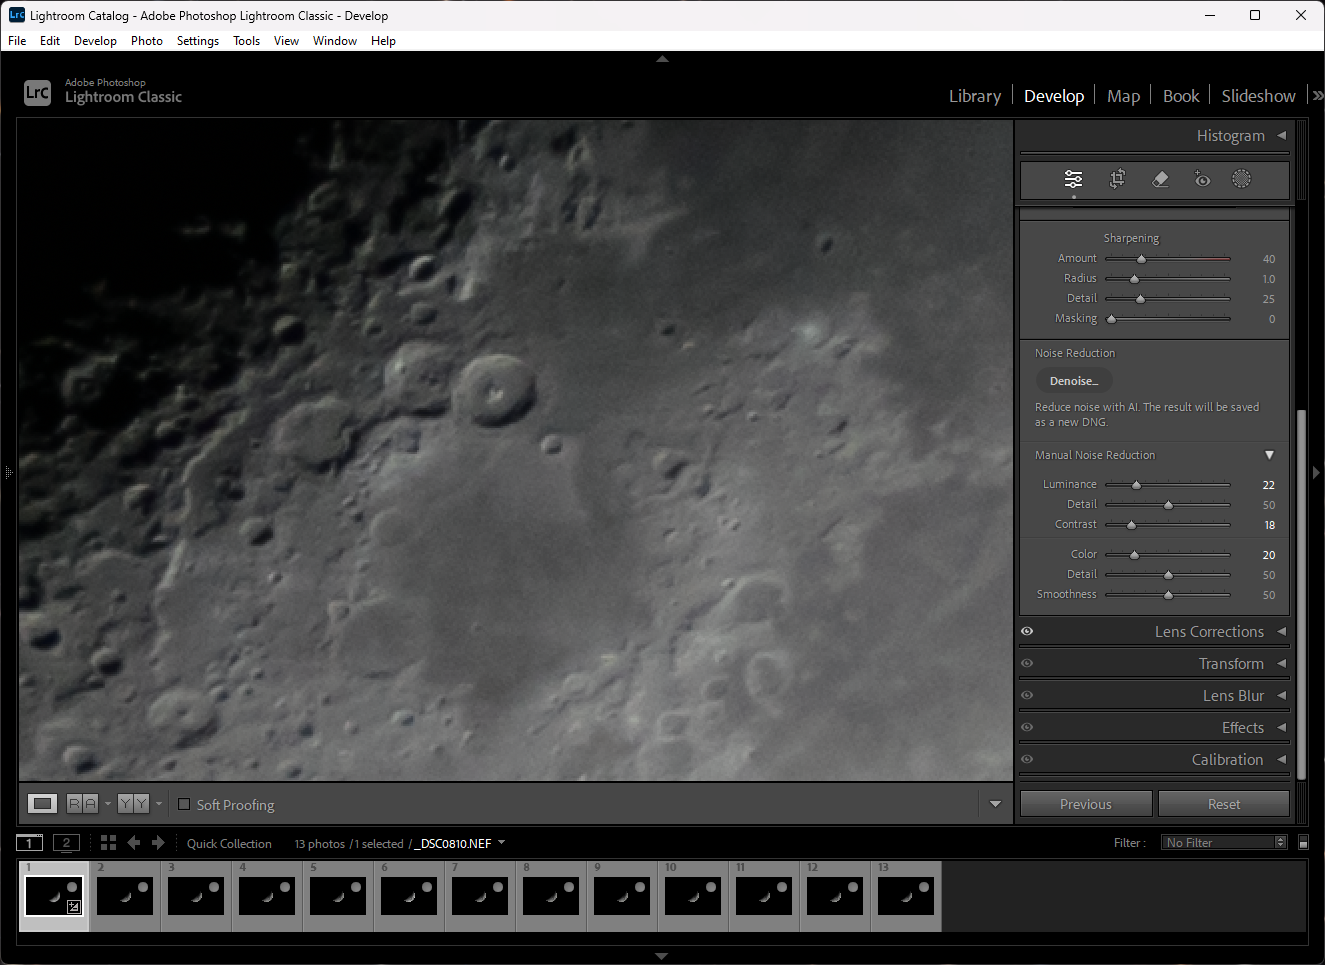
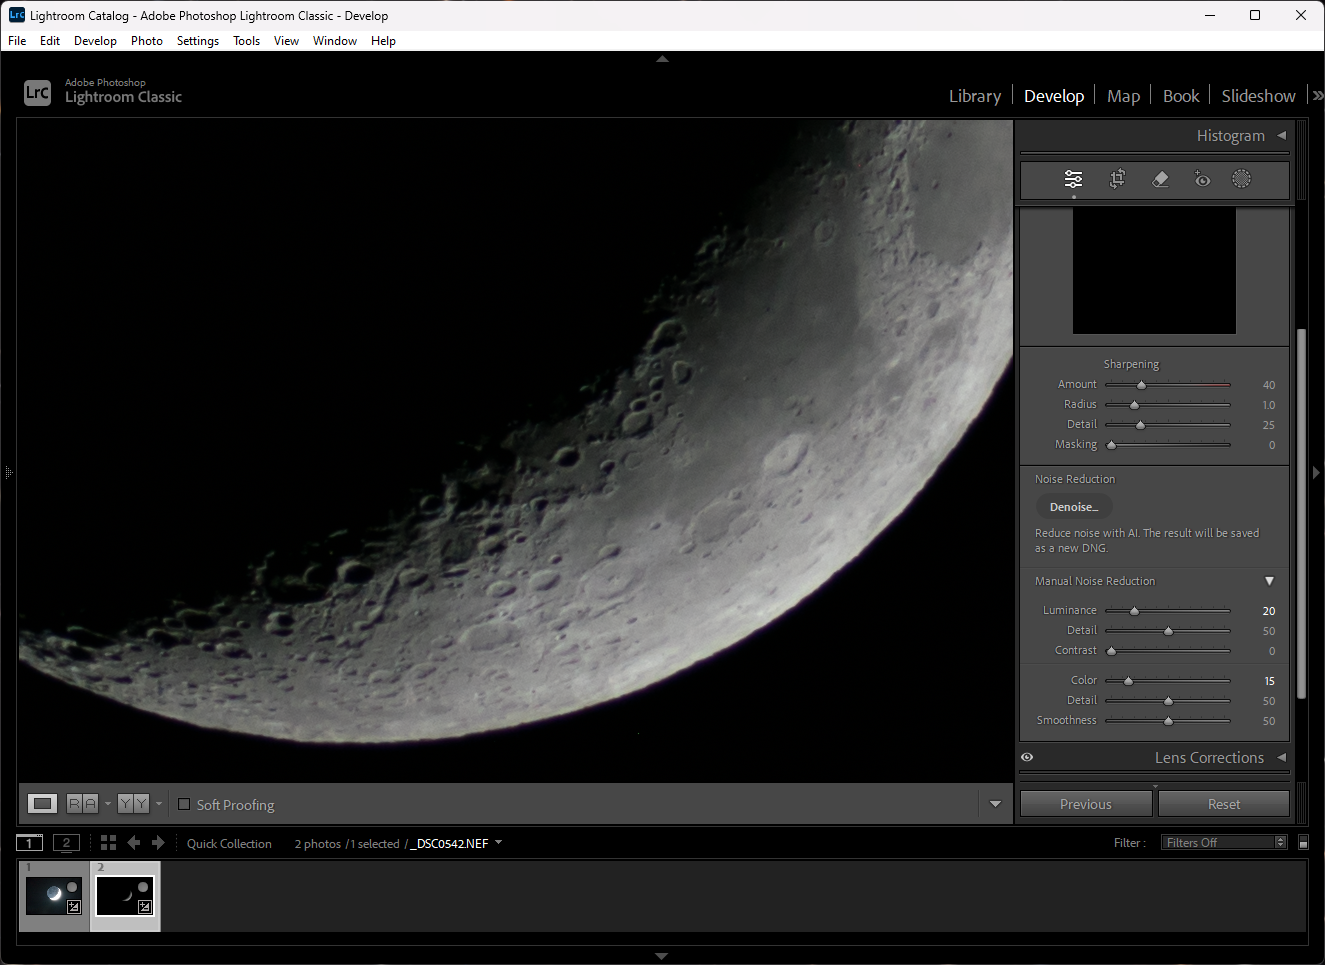
Step 4
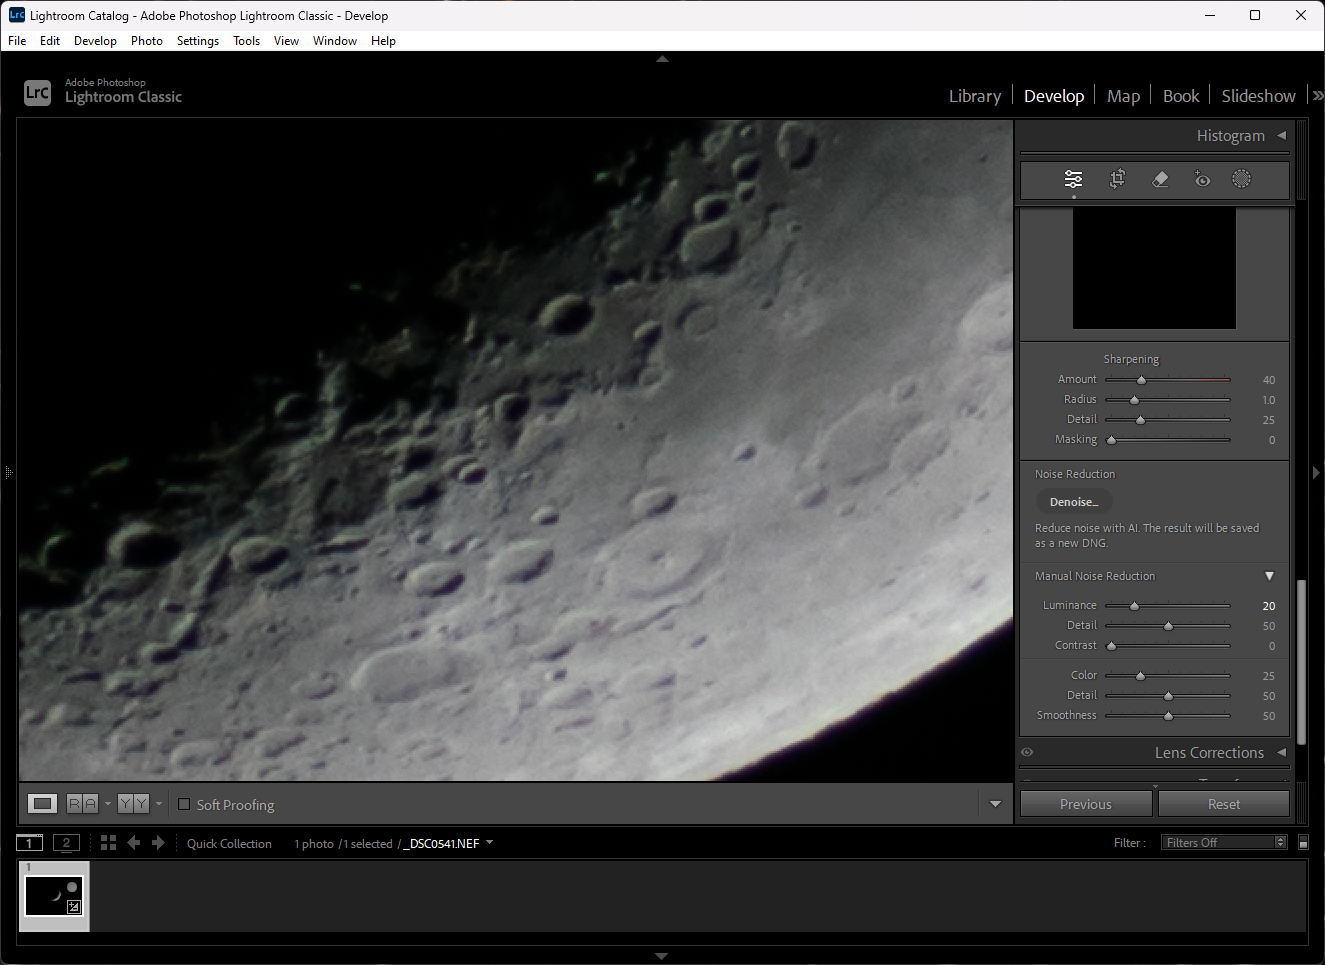
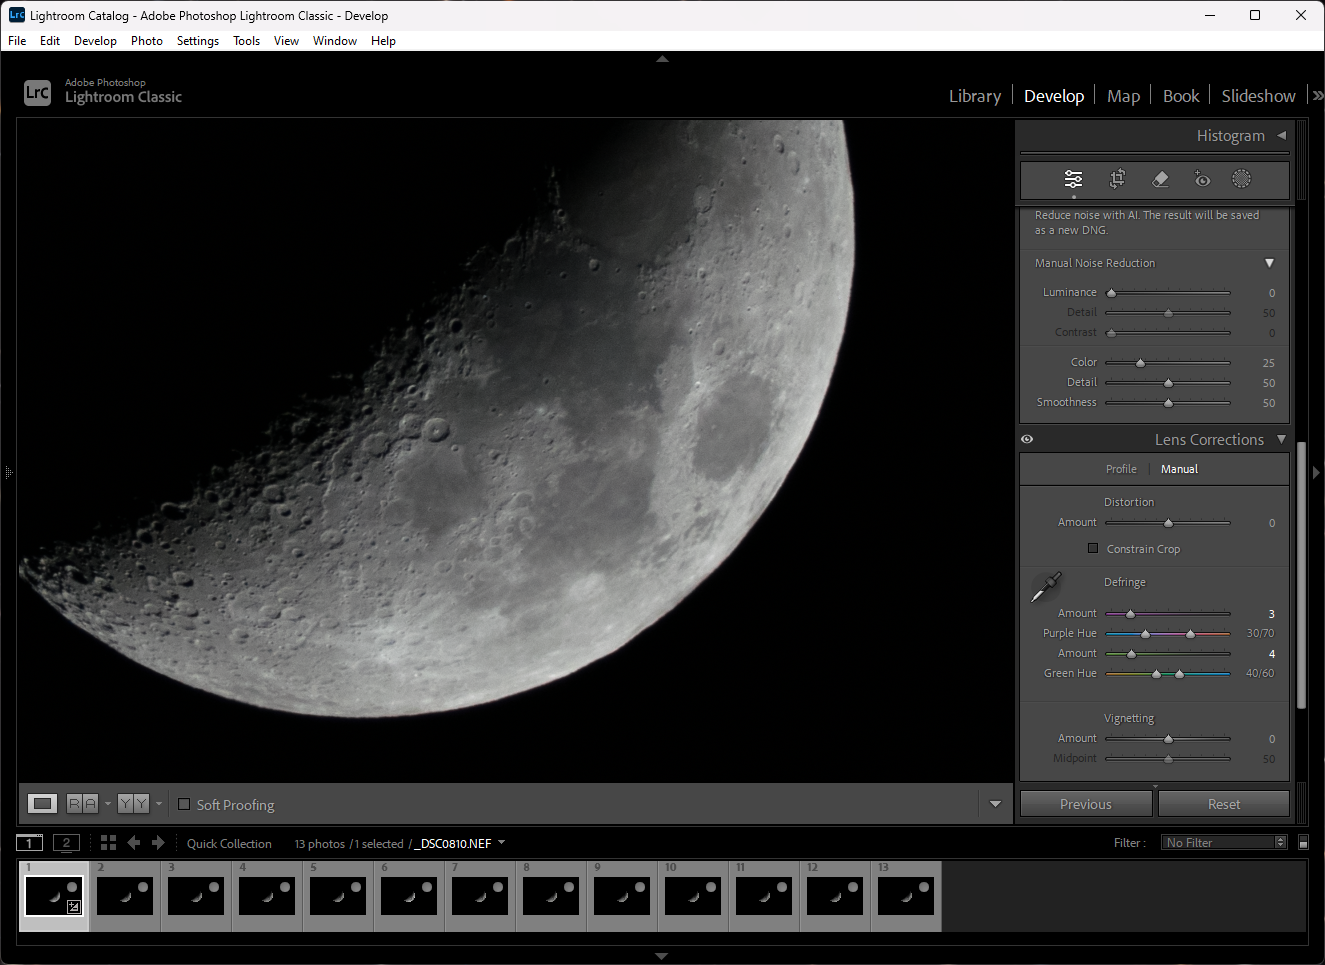
The next step is to denoise the image. First, zoom in until you can see the fine details of the image. Then, slowly bring the luminance slider up until the noise becomes difficult to see. Now zoom out. If the image looks blurry, adjust the detail and contrast sliders until the features of the Moon look clear.
Step 5
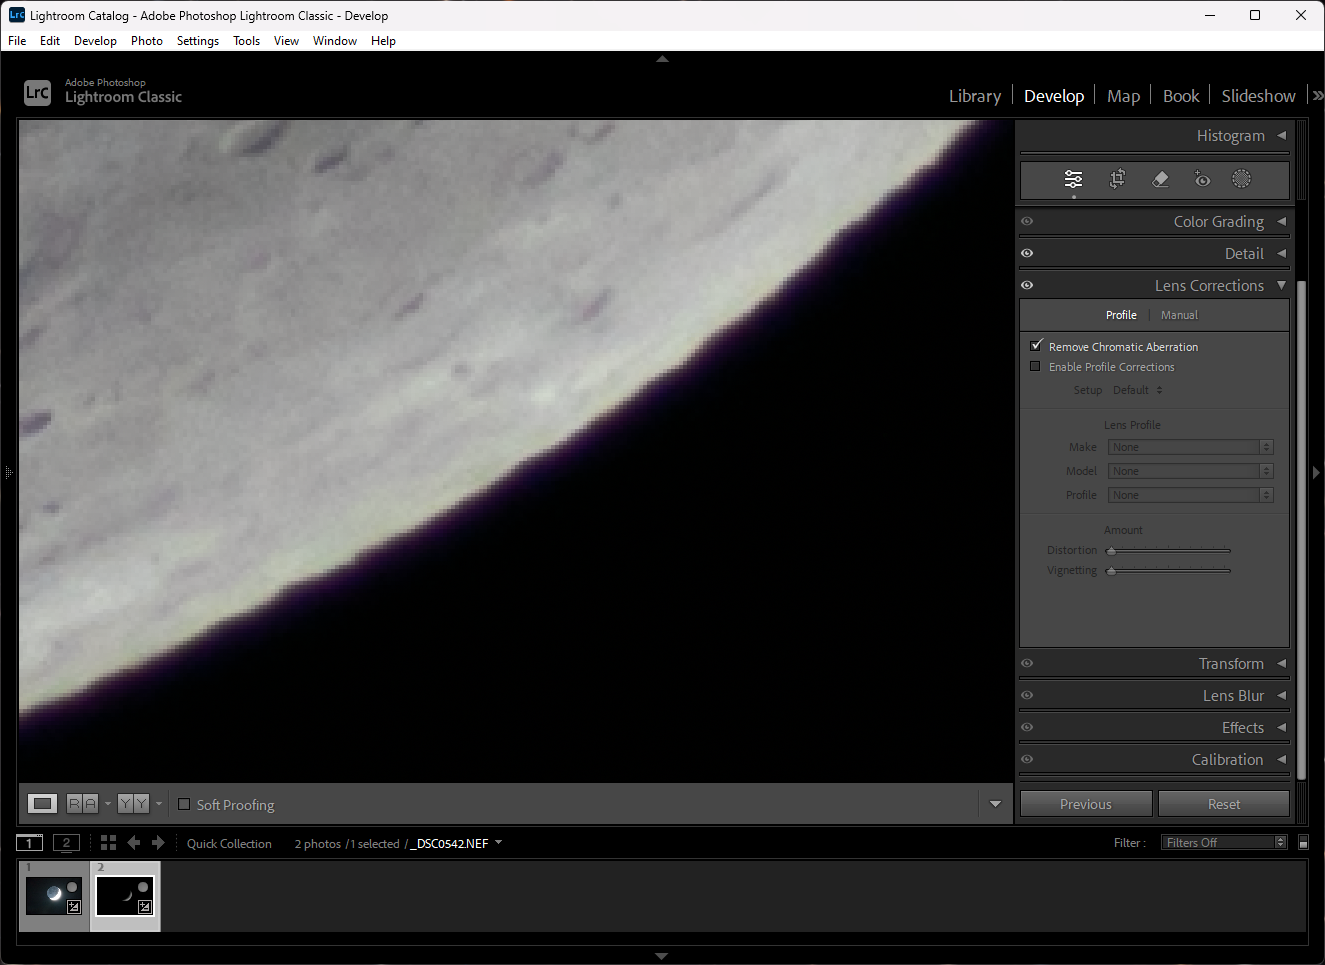
Next, check the "remove chromatic aberration box".

Step 6
If you still notice unwanted color fringing, manually adjust the purple and green defringe sliders.
Step 7
Now, return to the basic panel and make any final adjustments to the lighting. You can also adjust the texture, clarity, and dehaze sliders up further to enhance the features of the Moon.
Step 8
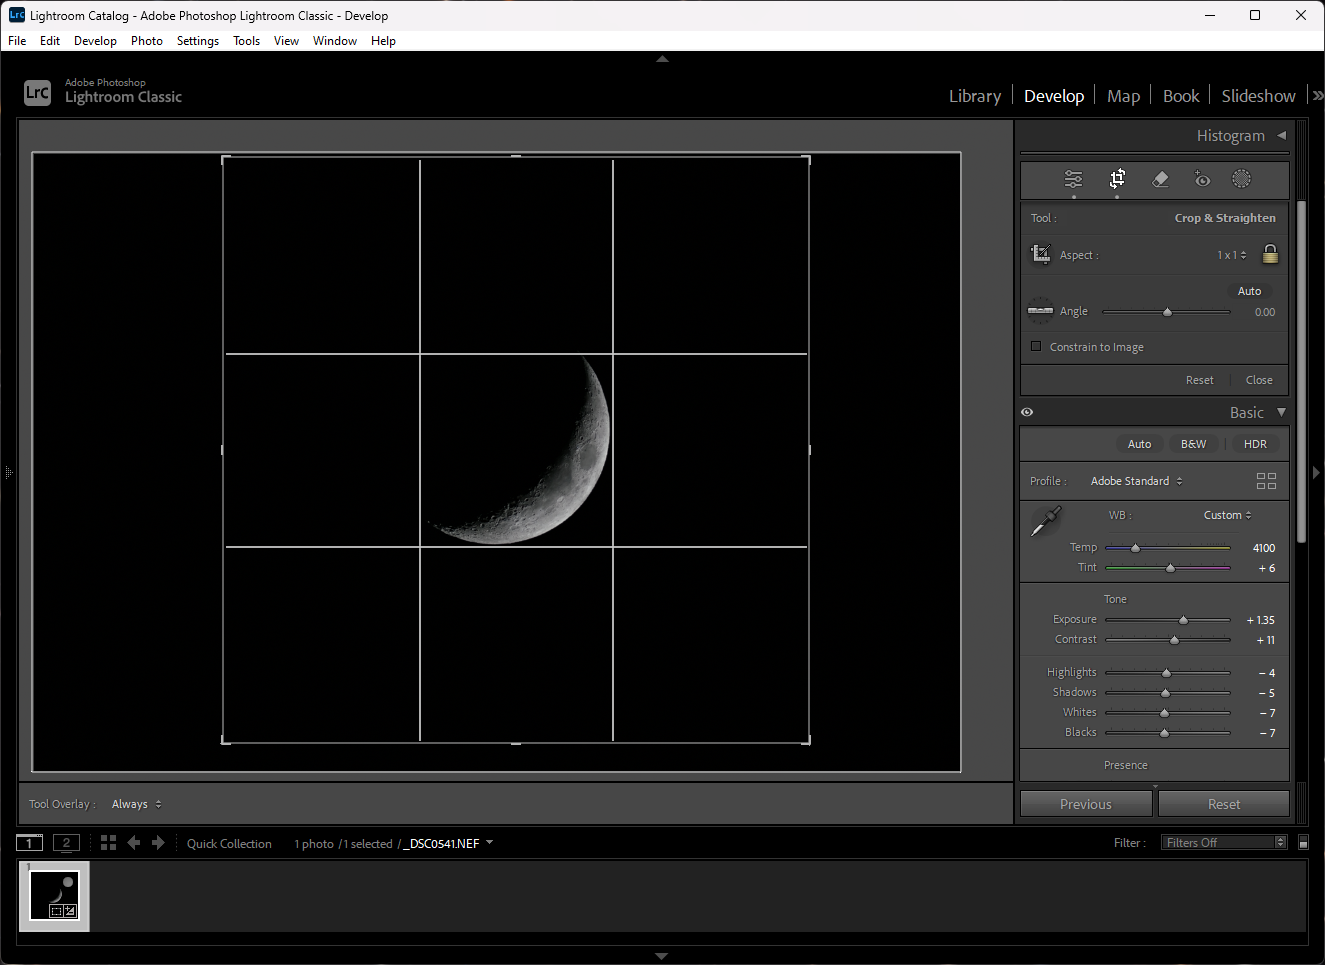
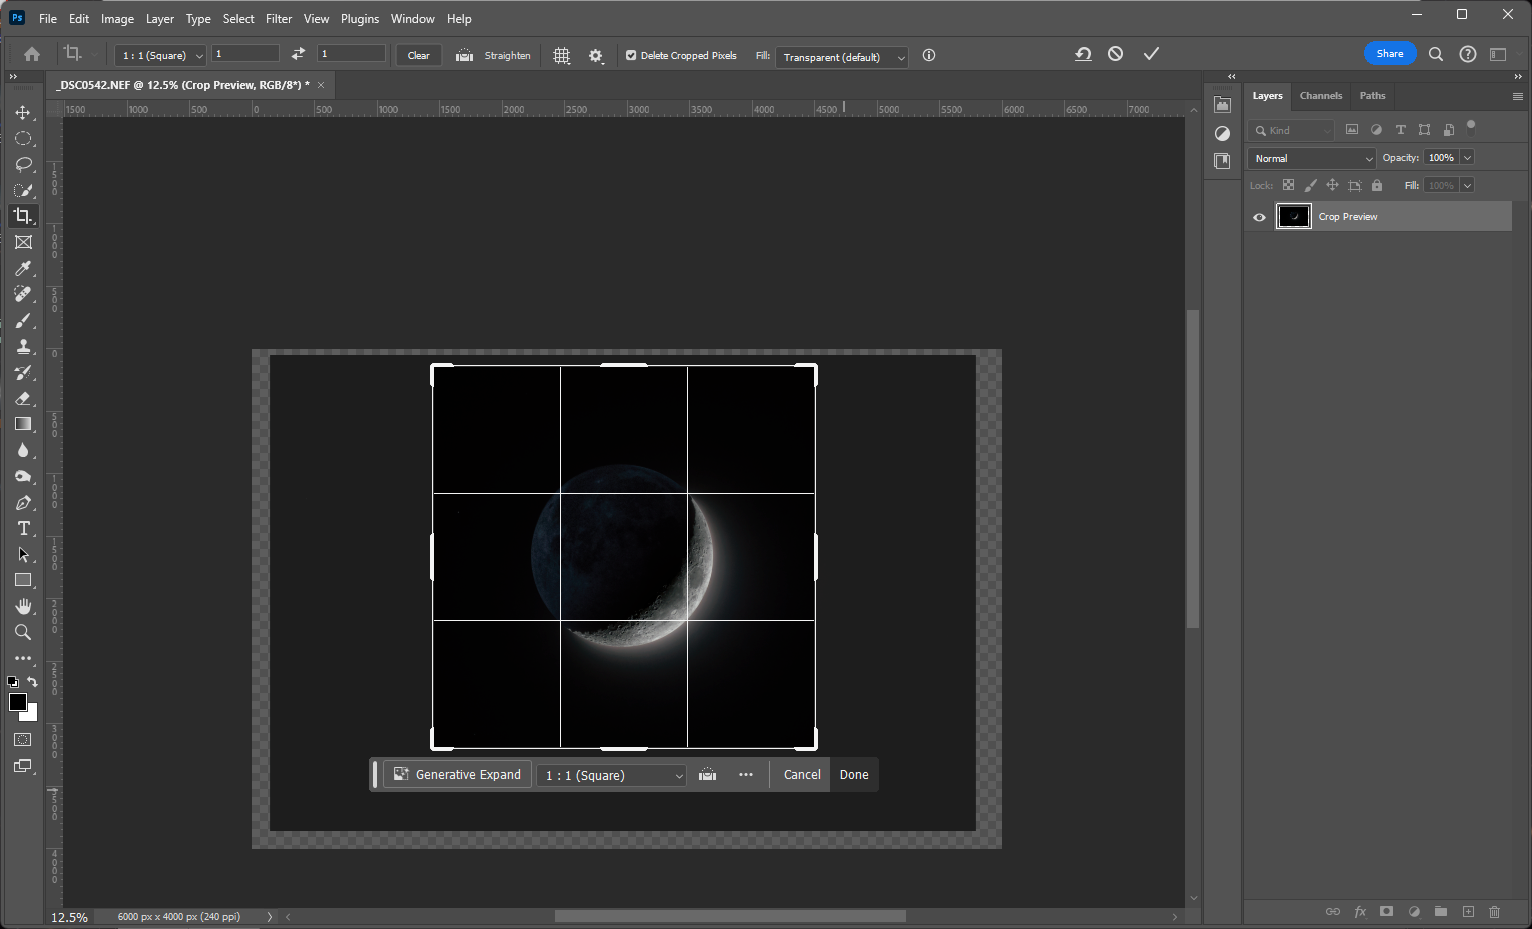
Finally, crop the image so the Moon is centered in the frame.

Step 9
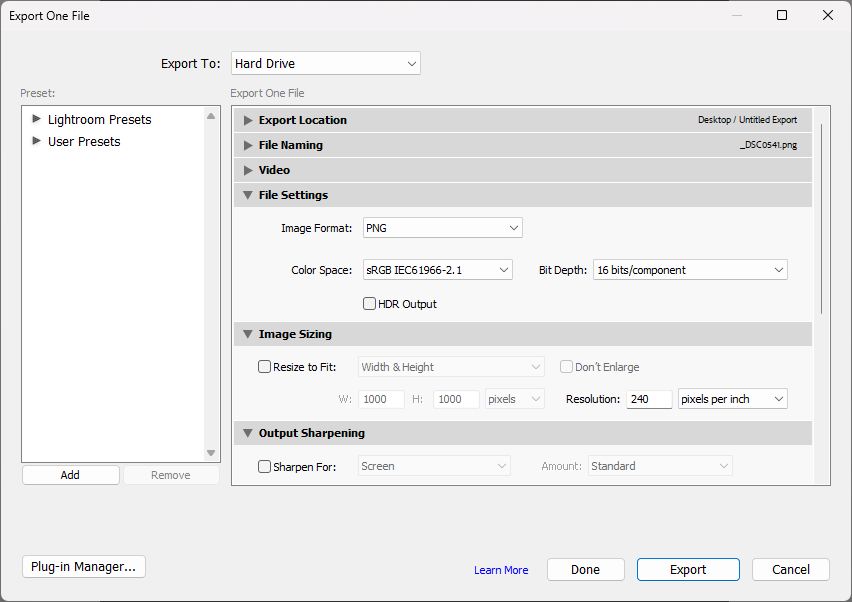
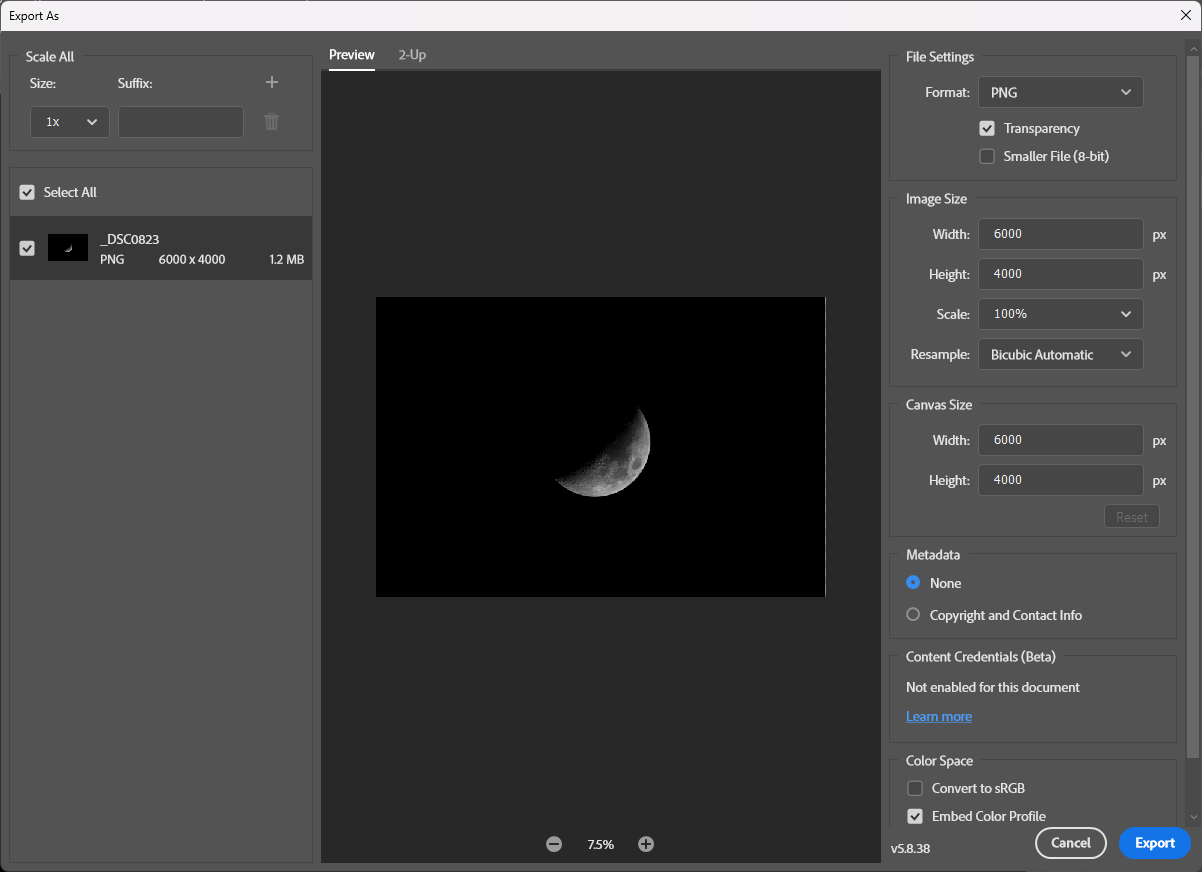
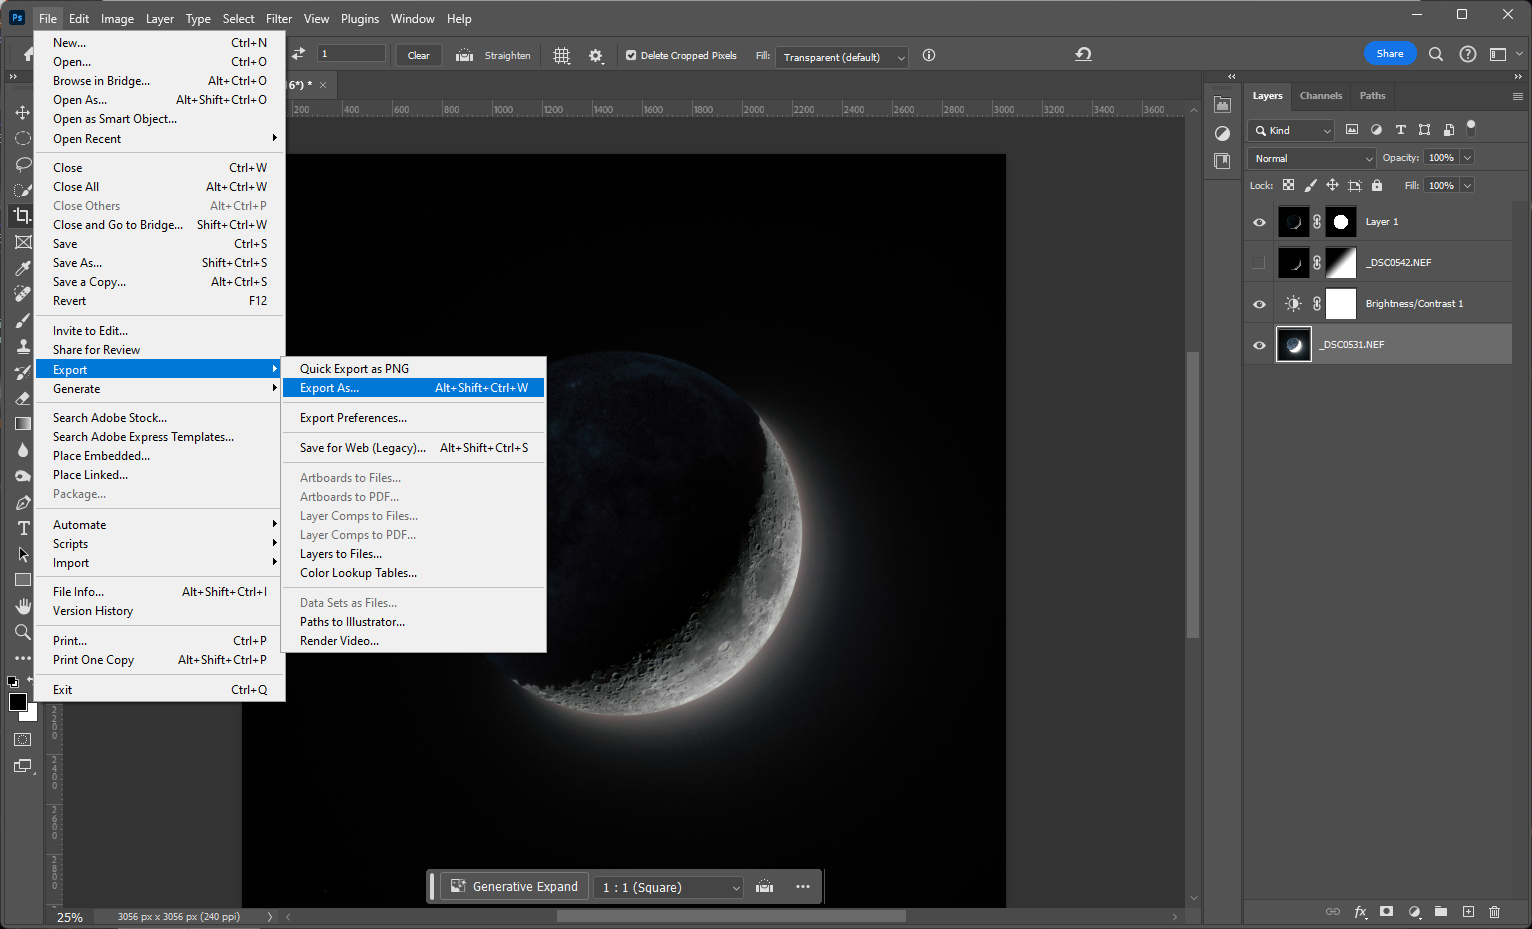
Once you are happy with the image, export it by clicking File > Export.
Step 10
In the export window, you can change the file name, size, and type. If you want to preserve the details of the image, export it as a "png" file with the highest bit component available.
...And there you have it!
Simple Stack
First, transfer the files from your camera to your PC or laptop. Review the images and remove any blurry images.
Step 1
Once you have the files you want to edit, open them in whichever editing software you are using. For this guide, we are using Lightroom Classic and Photoshop, but similar results can be achieved with free software like Gimp or Dark table.
Step 2
Select one of the images from the batch, and begin editing. Start by adjusting the exposure, then increase the saturation and vibrance until you can clearly see all of the color. With the color visible, adjust the temperature and tint until you have a nice balance of color.
Step 3
Next, reset the vibrance and saturation setting and make adjustments to the tone curve.
Step 4
Next, remove chromatic aberration and manually defringe the image.
Step 5
Now, reduce the overall noise. Since stacking the images will significantly improve the signal to noise ratio, you can be extremely modest with the noise reduction at this stage.
Step 6
Finalize the edits by making some global adjustments to the saturation, vibrance, texture, and clarity. If you feel the need to, you can also adjust the lighting sliders in the basic panel.

Step 7
Once you’ve finished editing the image, go back to your library and select all the files from the batch. Once you have them selected, sync the edits between all the images.
Step 8
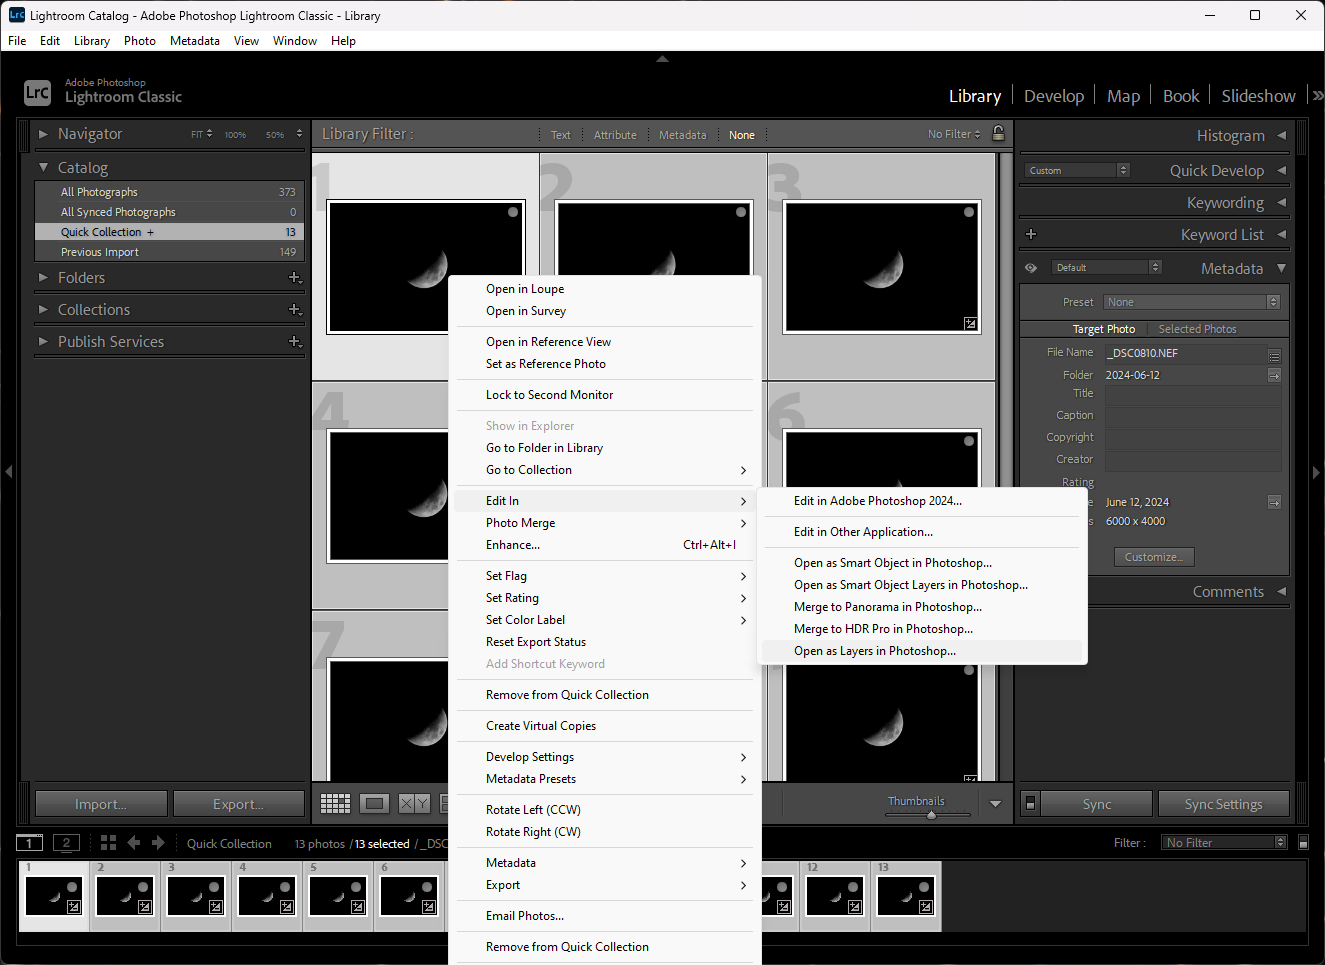
Now, you’ll need to select the files and find the option to open them as layers in Photoshop.
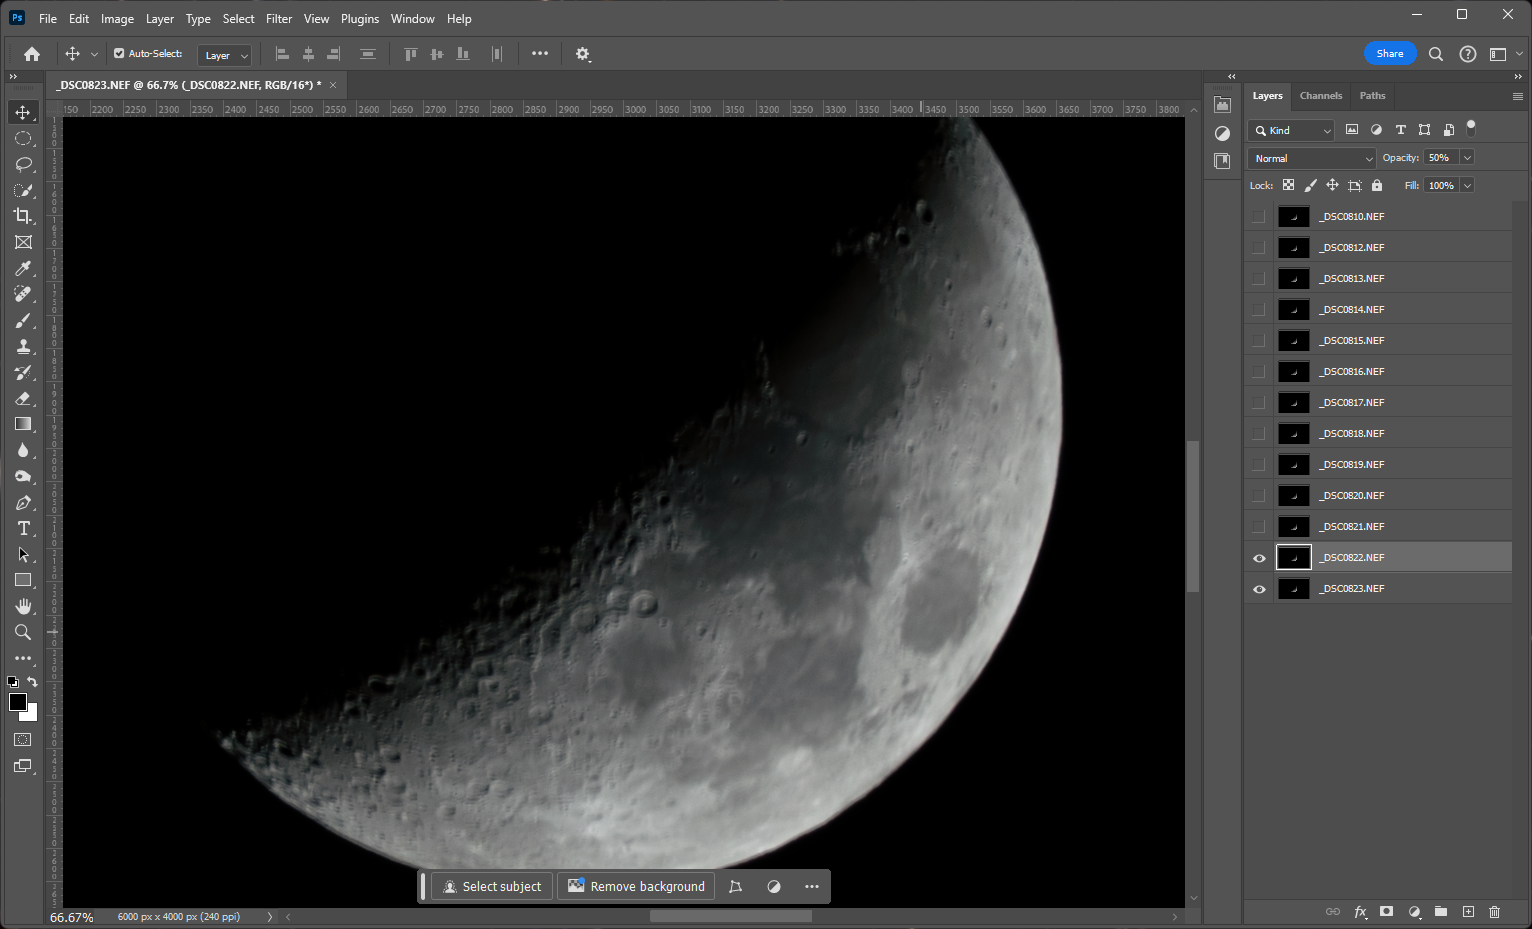
Step 9
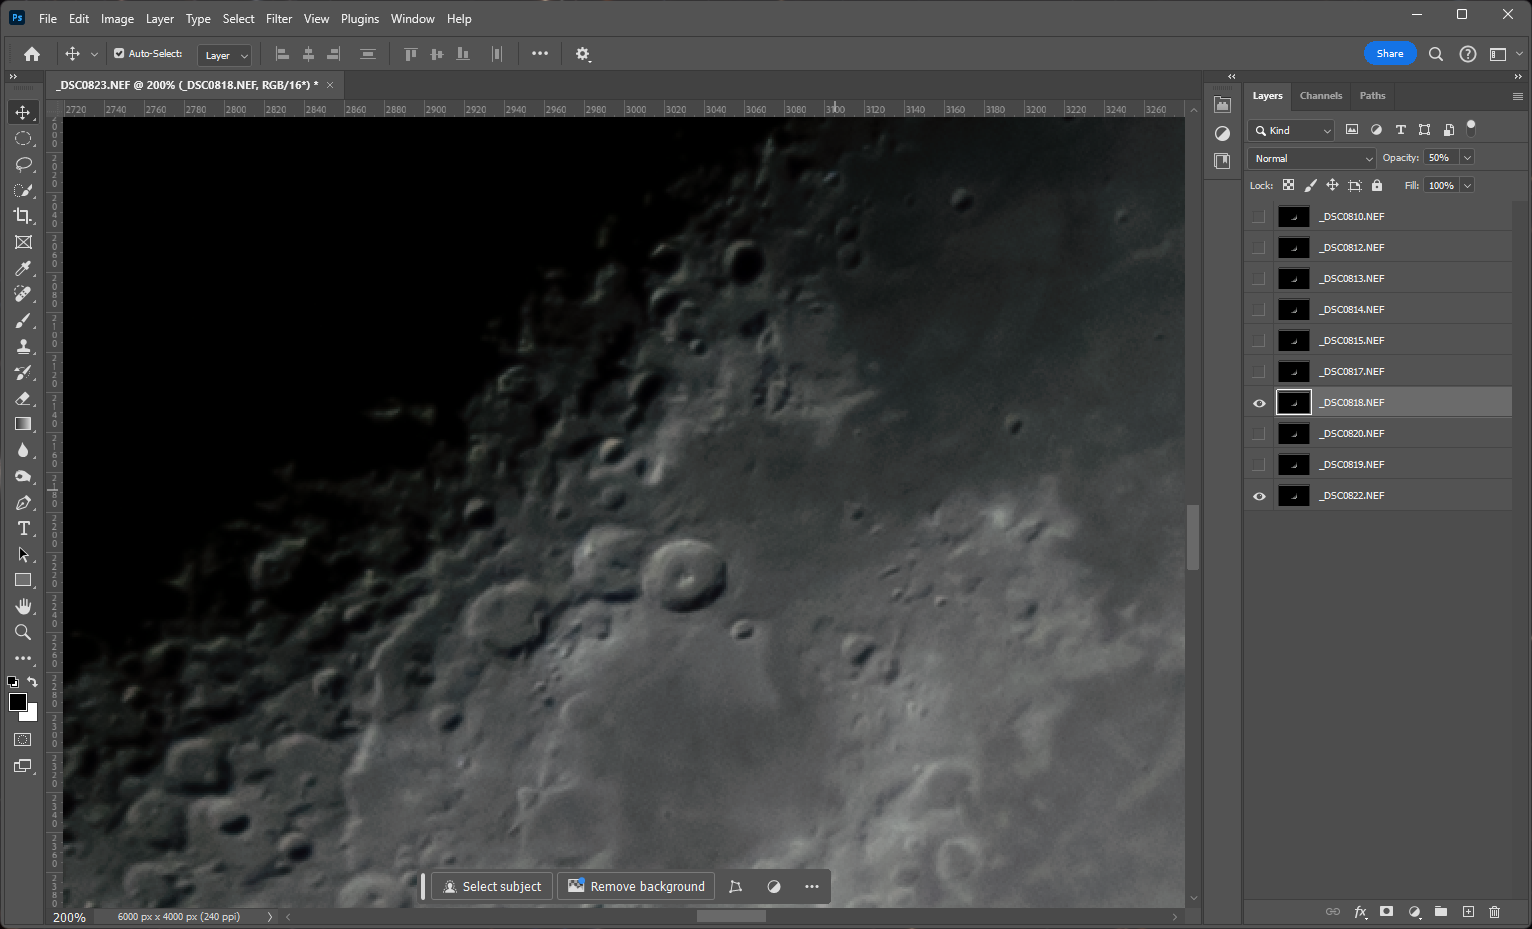
Once the images are loaded as layers in Photoshop, begin manually aligning the images. To do this, place the clearest image at the bottom of the stack and reduce the opacity of the layer directly above. You’ll need to hide the other layers. Then select the move tool and use the arrow keys to align the layers. If the image looks focused, you’ll know it's properly aligned.
Step 10
Repeat these steps for each layer, removing any layer that doesn’t easily align.
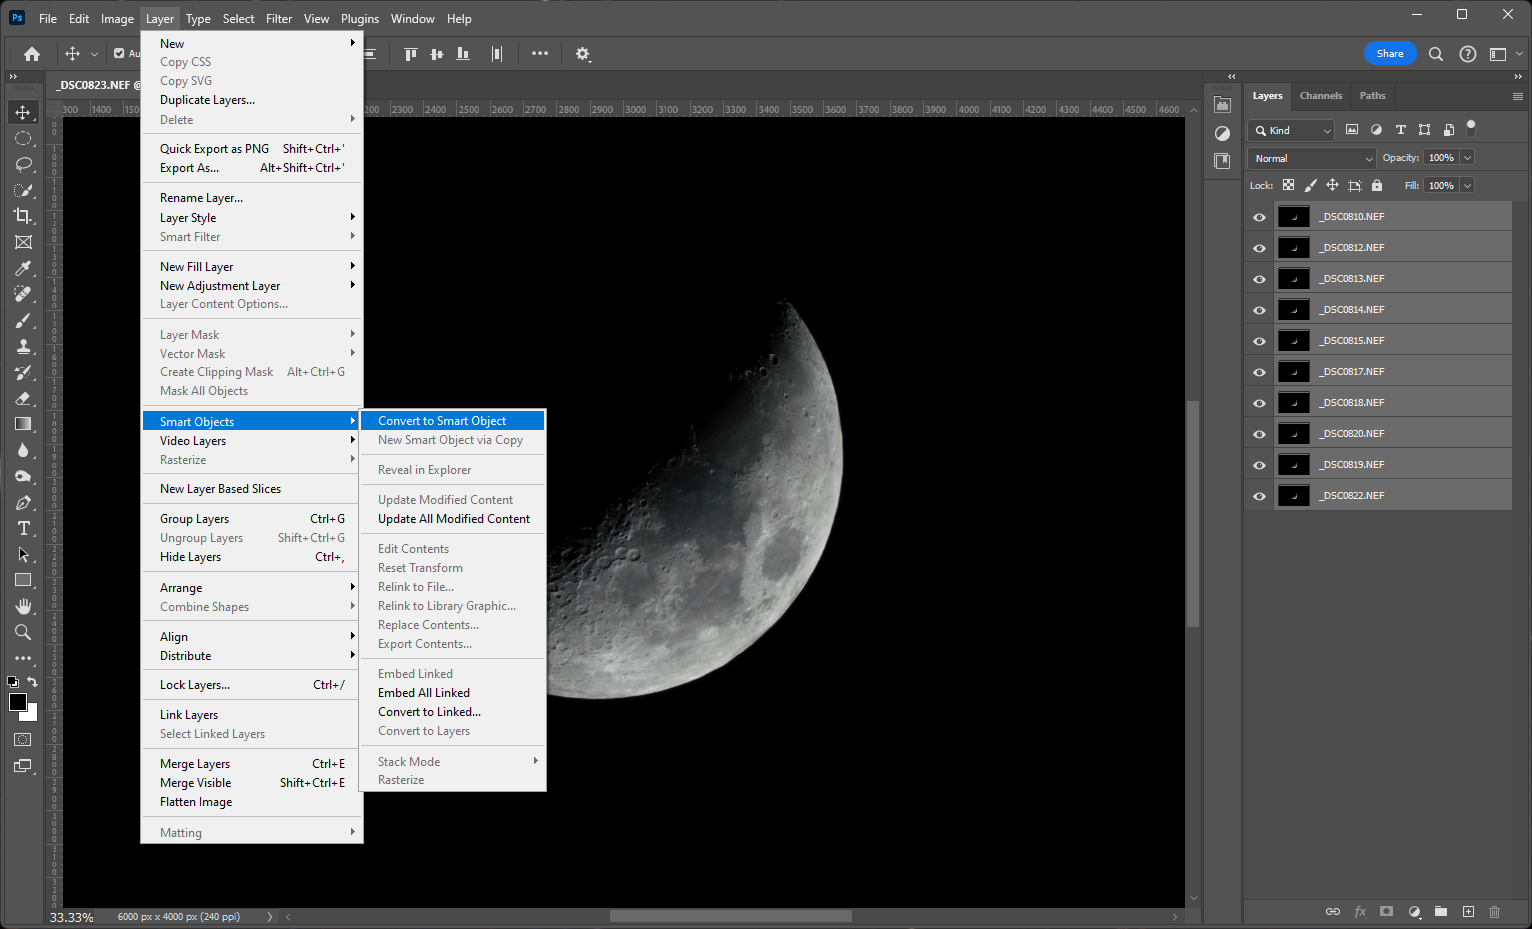
Step 11
Once the layers are all aligned, select all of the layers, reset the opacity and visibility, then convert the batch to a smart object.
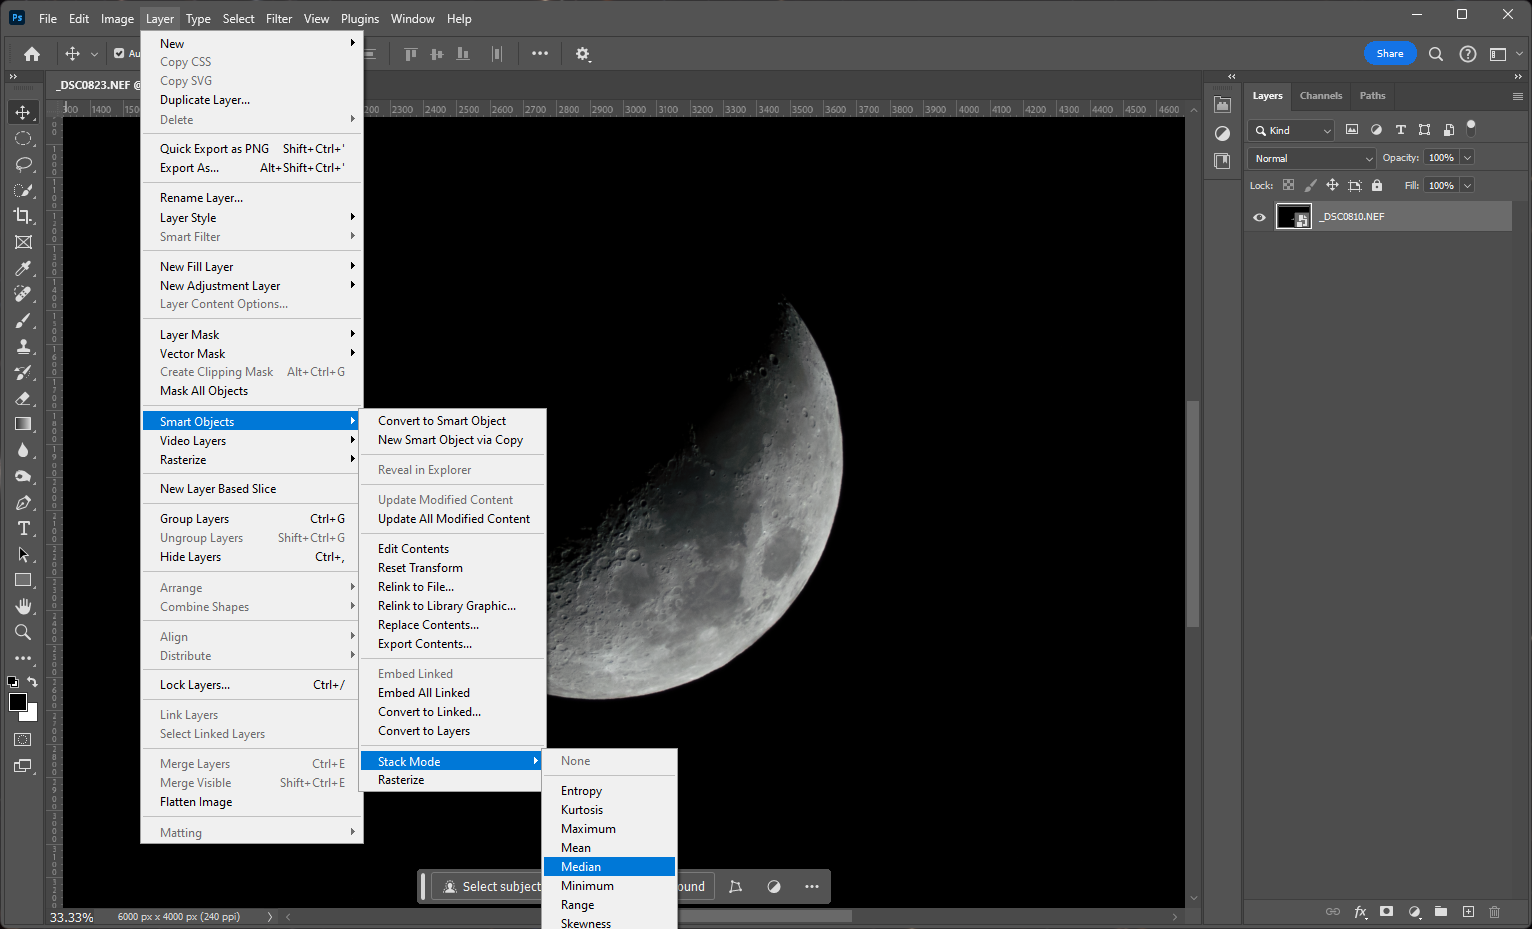
Step 12
Next, select the smart object layer and stack the layers using the median stacking option. This will improve image quality. Some loss of detail is to be expected. However, if the image becomes noticeably blurry, undo the stacking and review the frames.
Step 13
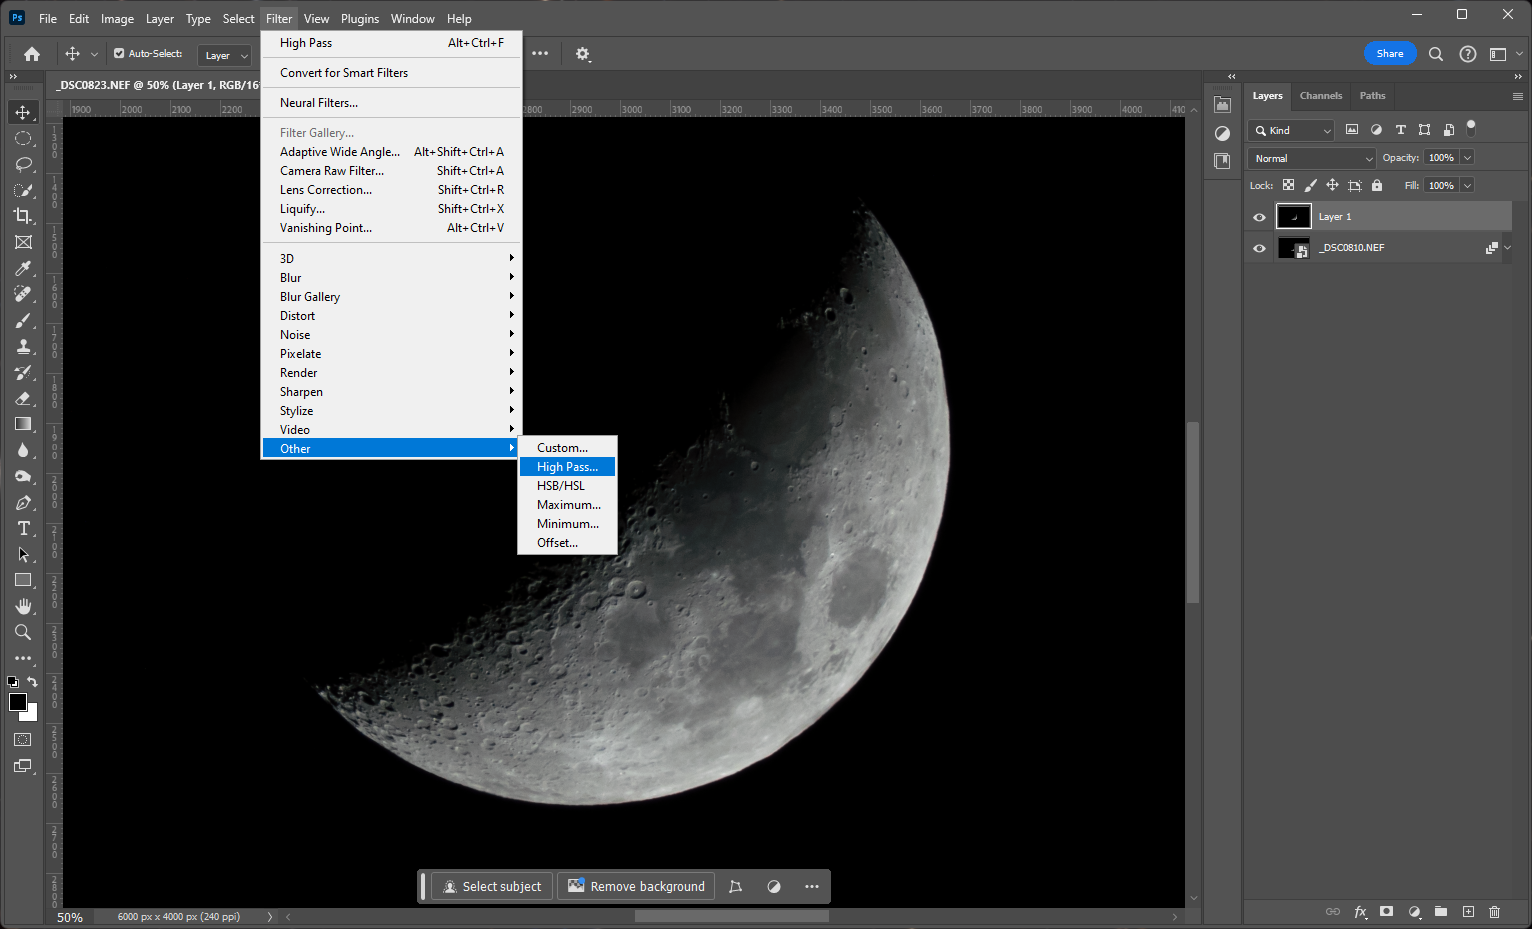
The next step requires going back and finding the clearest image in the batch. Select that image, and open it as a layer. Once it’s open, align it to the stacked layer. Then, select the layer and apply a high pass filter.
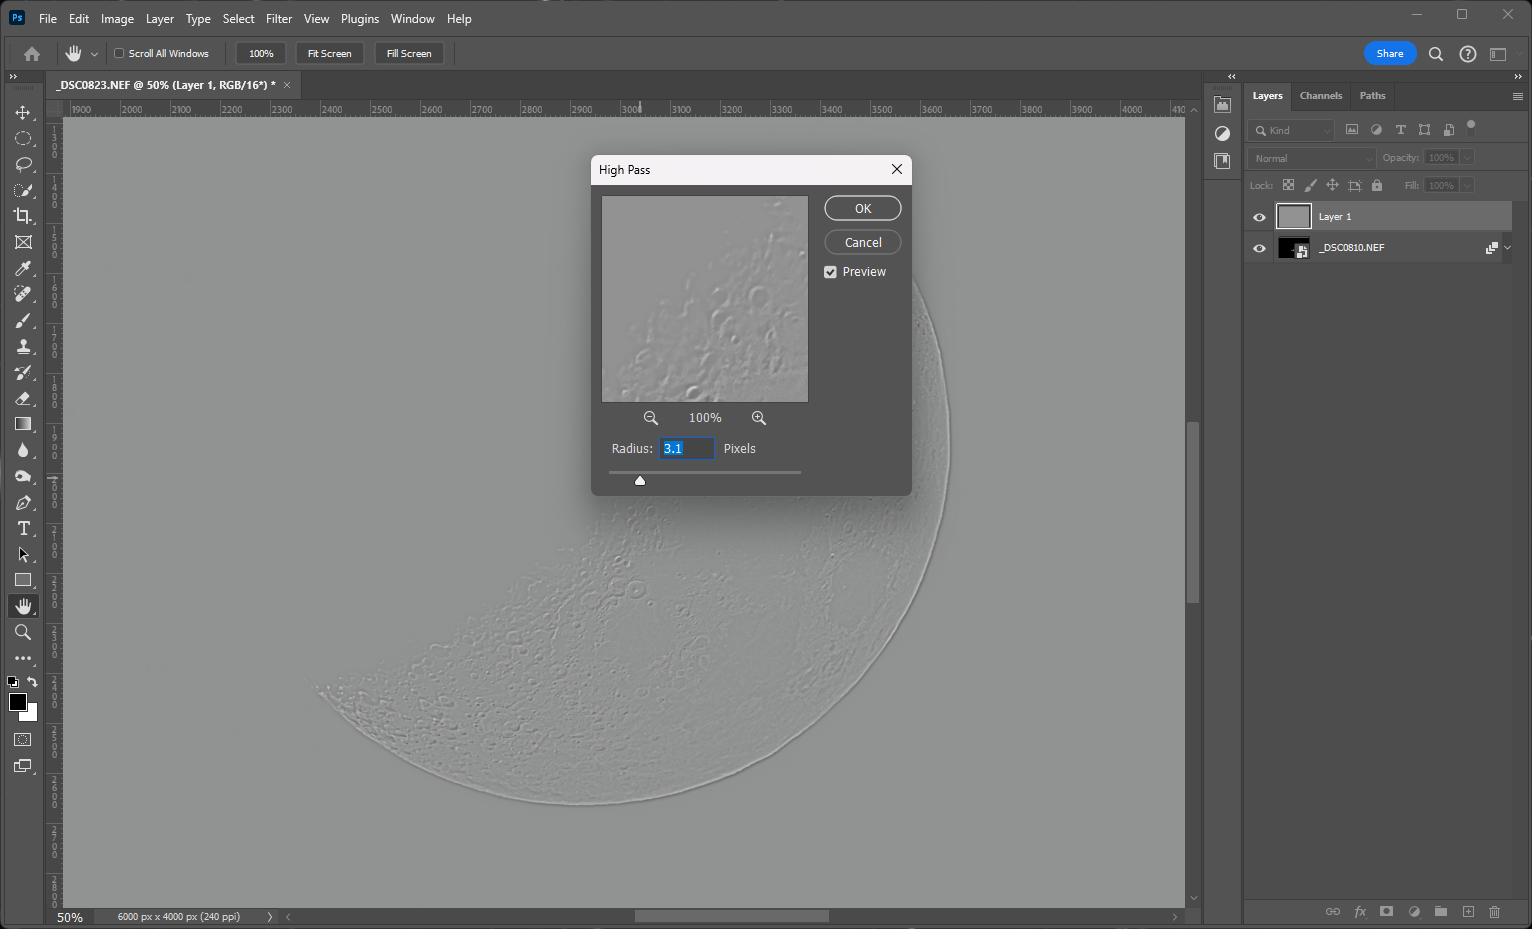
Step 14
Adjust the filter to bring out the subtle details of the image.
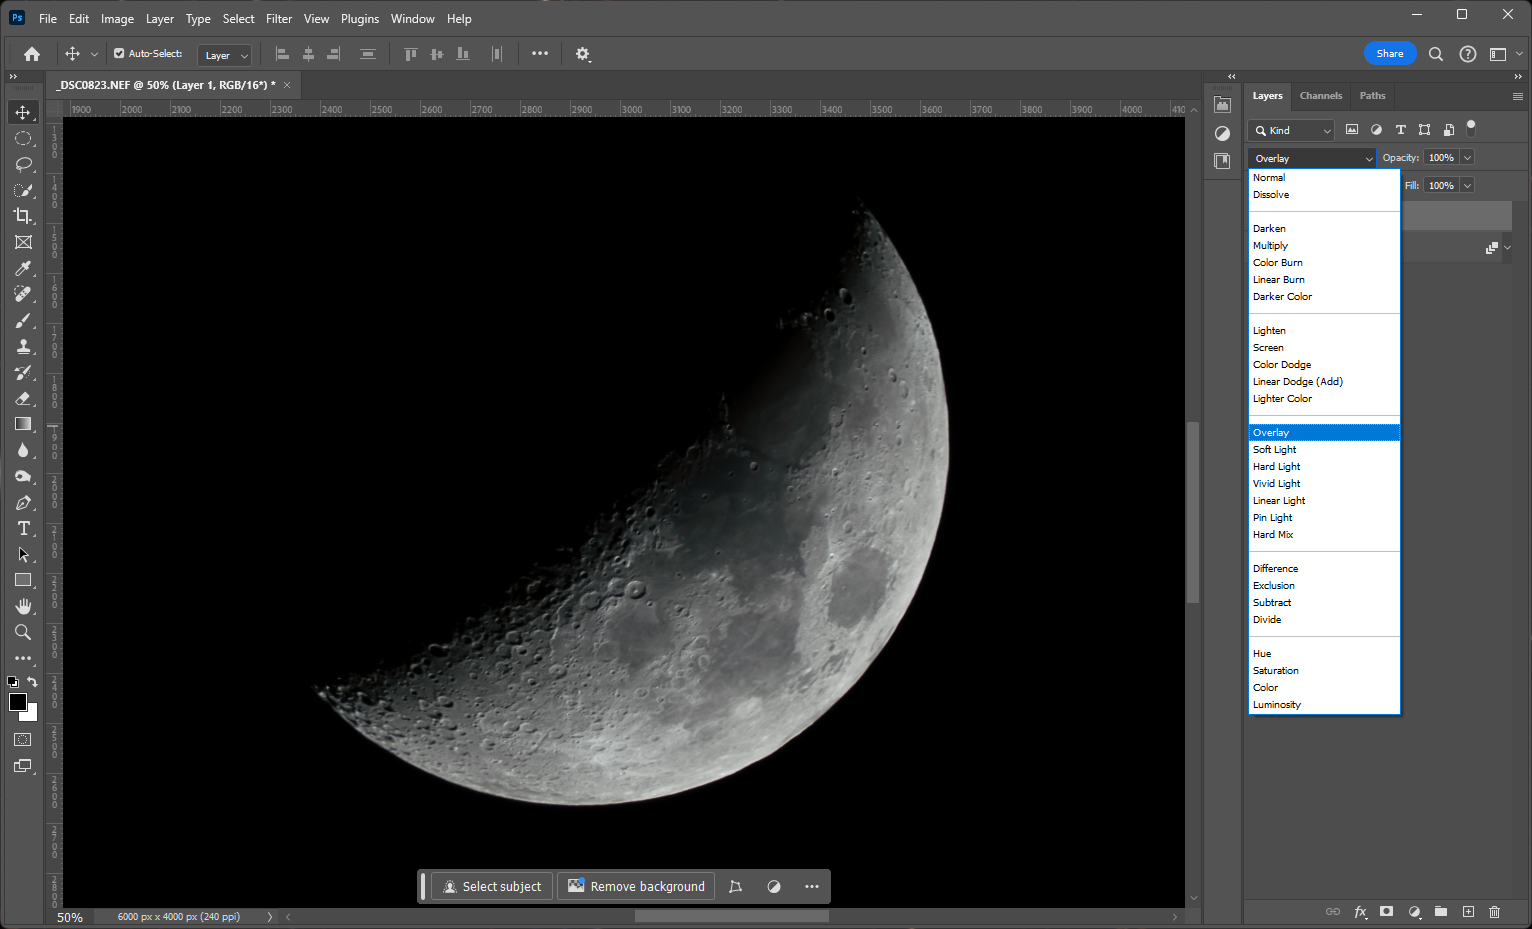
Step 15
With the high pass layer above the stacked layer, change the blending mode to overlay. The image should now appear much sharper.
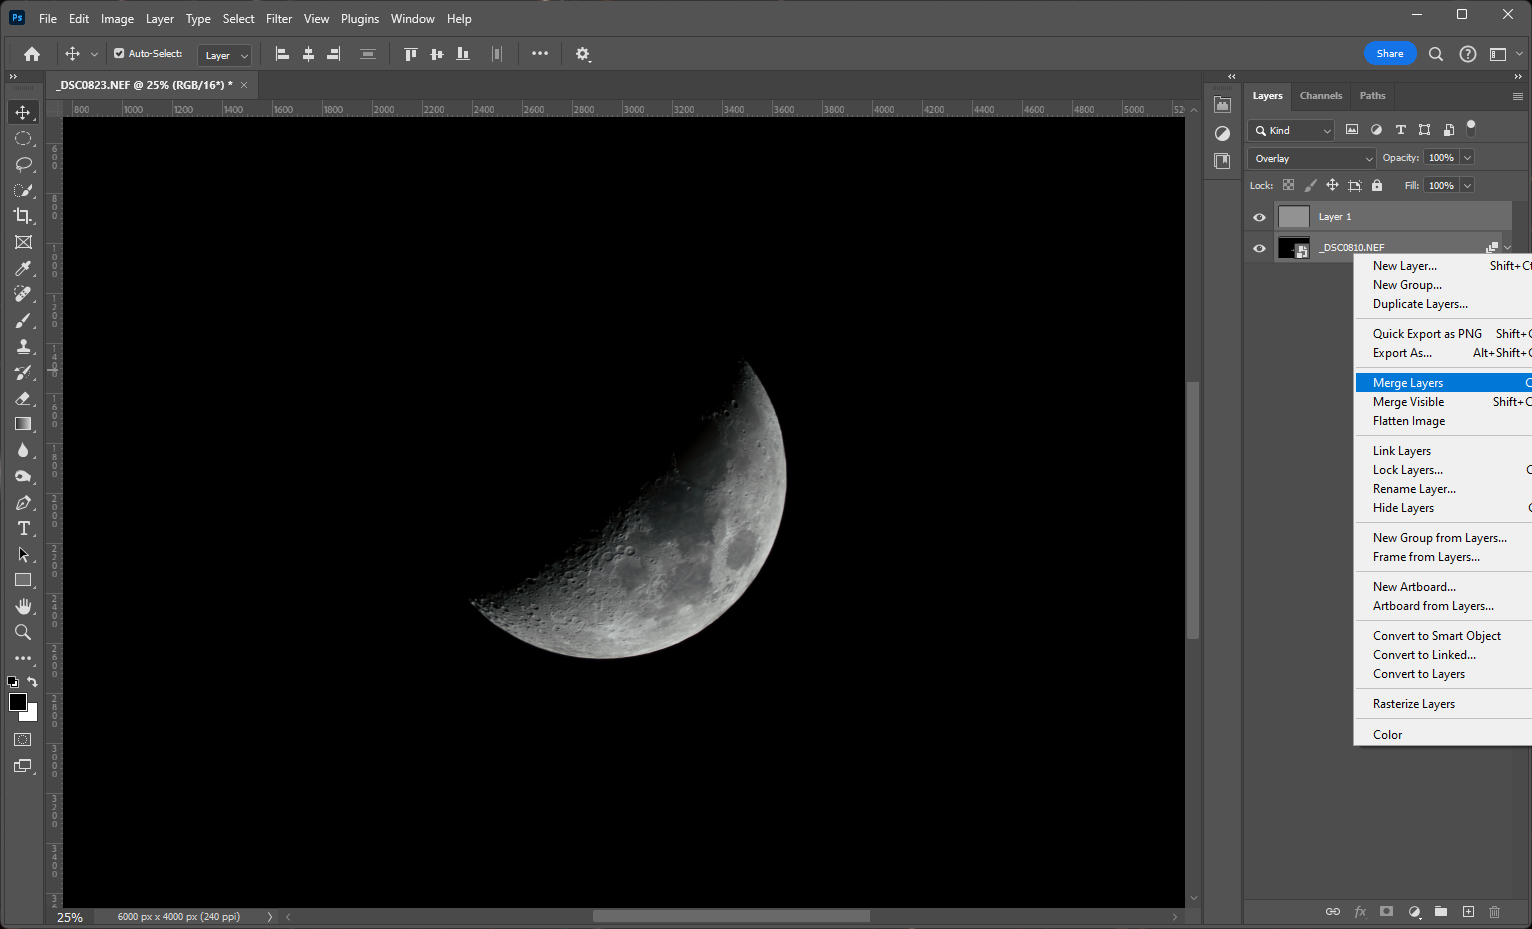
Step 16
Next, merge the high pass and stacked layers.
Step 17
Finally, export the image.
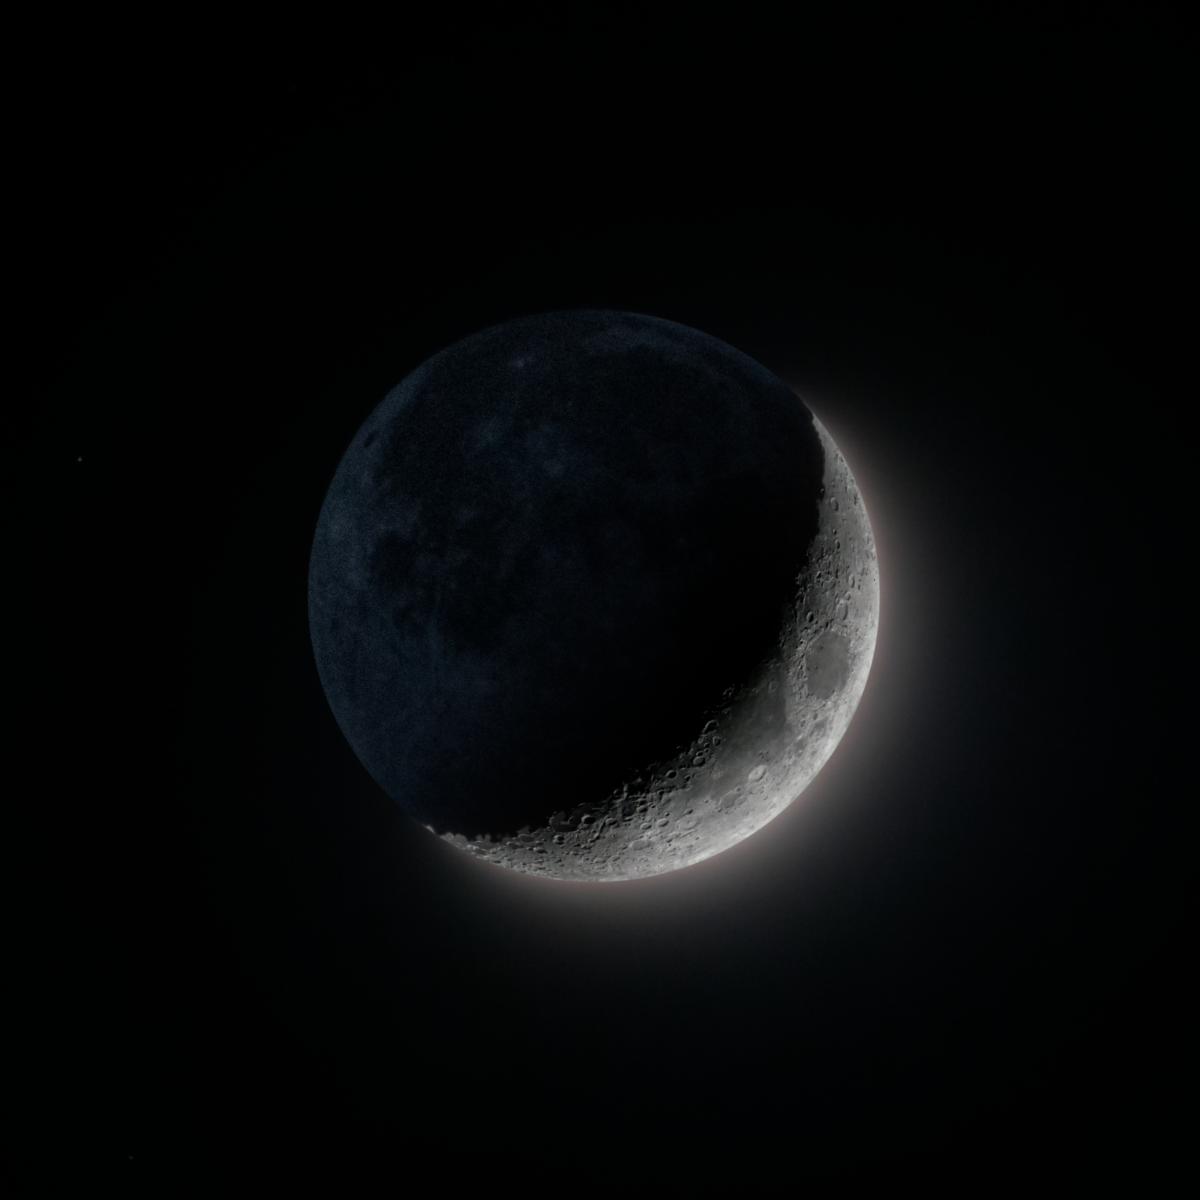
And there you have it! The final product should look something like this:
HDR
Begin by transferring the image files from your camera to your PC or laptop. Review the images and select the clearest images with the least amount of noise. For this processing technique, you need at least two images of the Moon, one that shows the details of the illuminated side of the Moon, and one that is over exposed, showing the glow of the moon and the unilluminated side. You only need two, but you can also stack multiple images of each category to increase the signal to noise ratio.

Step 1
Open the files in your editing software. For this guide, we are using Lightroom Classic and Photoshop, but similar results can be achieved with free software like Gimp or Dark table.
Step 2
Select the detailed frame and edit the image. Begin by increasing both the saturation and vibrance to reveal the color, then adjust the white balance and exposure. Once you have a nice balance of color, reset the vibrance and saturation to zero.

Step 3
Next, make adjustments to the basic lighting and tone curve.
Step 4
Now, begin to denoise the image. Be modest with the noise reduction to avoid unnecessary loss of details.
Step 5
Check the “remove chromatic aberration” box, then move on to the manual defringing.
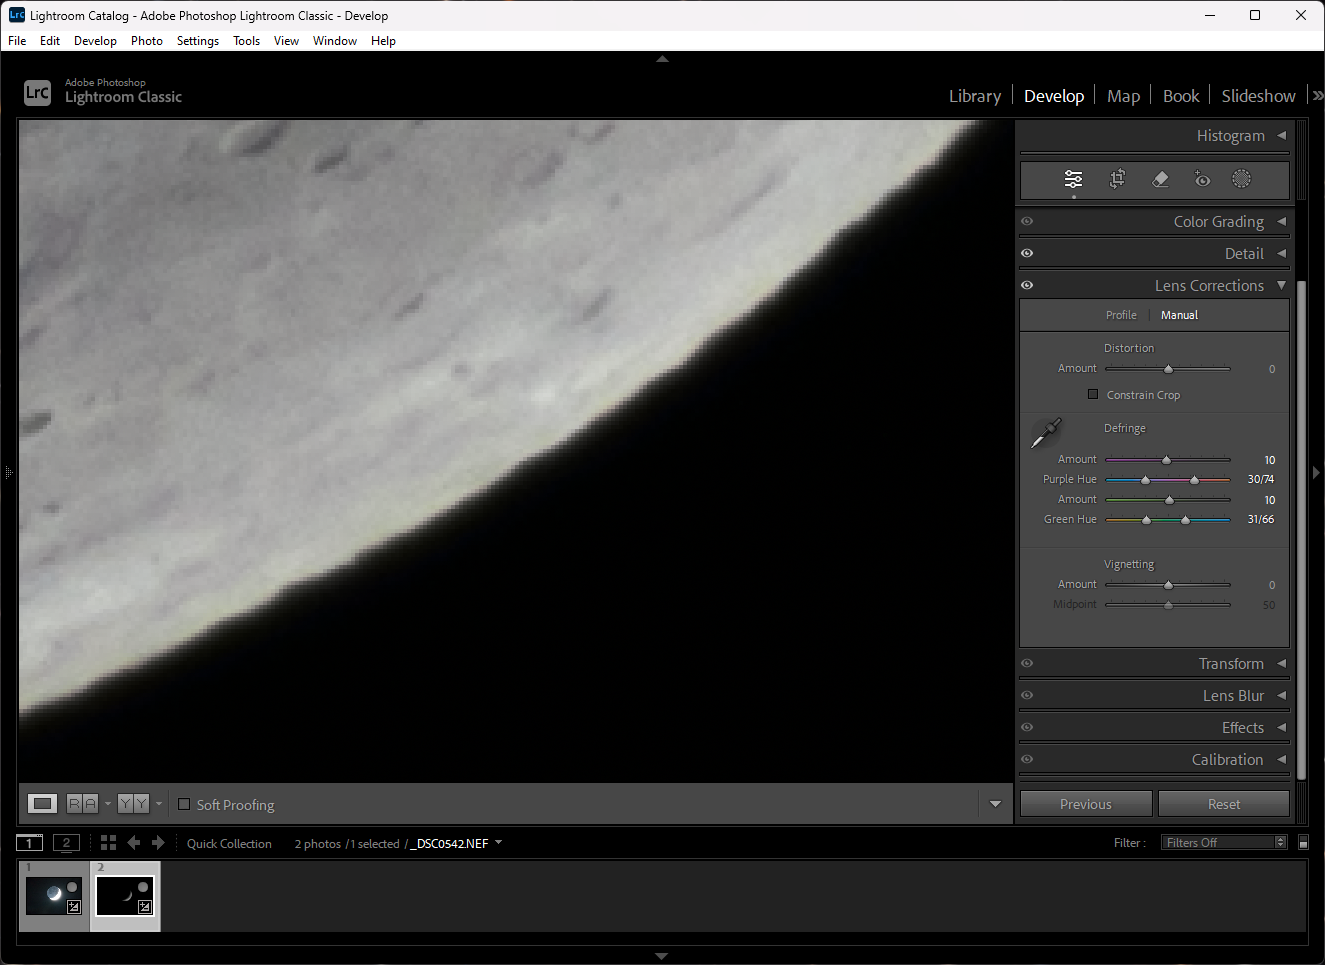
Step 6
Now, manually adjust the defringing sliders to remove the purple and green color fringing. This will make the edges of the moon appear more defined.
Step 7
Finish up the detailed frame with any global adjustments. You can increase the contrast, texture, and clarity to enhance the image.

Step 8
Return to your image library and sync the settings between the detailed frame and glow frame.
Step 9
Now, you’ll only need to make a few adjustments to the glow frame. Start by reducing the exposure and adjusting the tone curve.

Step 10
Now, this image will likely have more noise, as the ISO settings were higher. You’ll want to aggressively reduce the noise. To do this, you can globally reduce the luminance noise or use the masking feature to independently reduce the noise of subject and background.

Step 11
If you are happy with the image after the global noise reduction, move on to step 13. To adjust the noise of the sky and Moon independently, select the masking tab, then select the background mask and brush out any parts of the Moon caught by the automask.
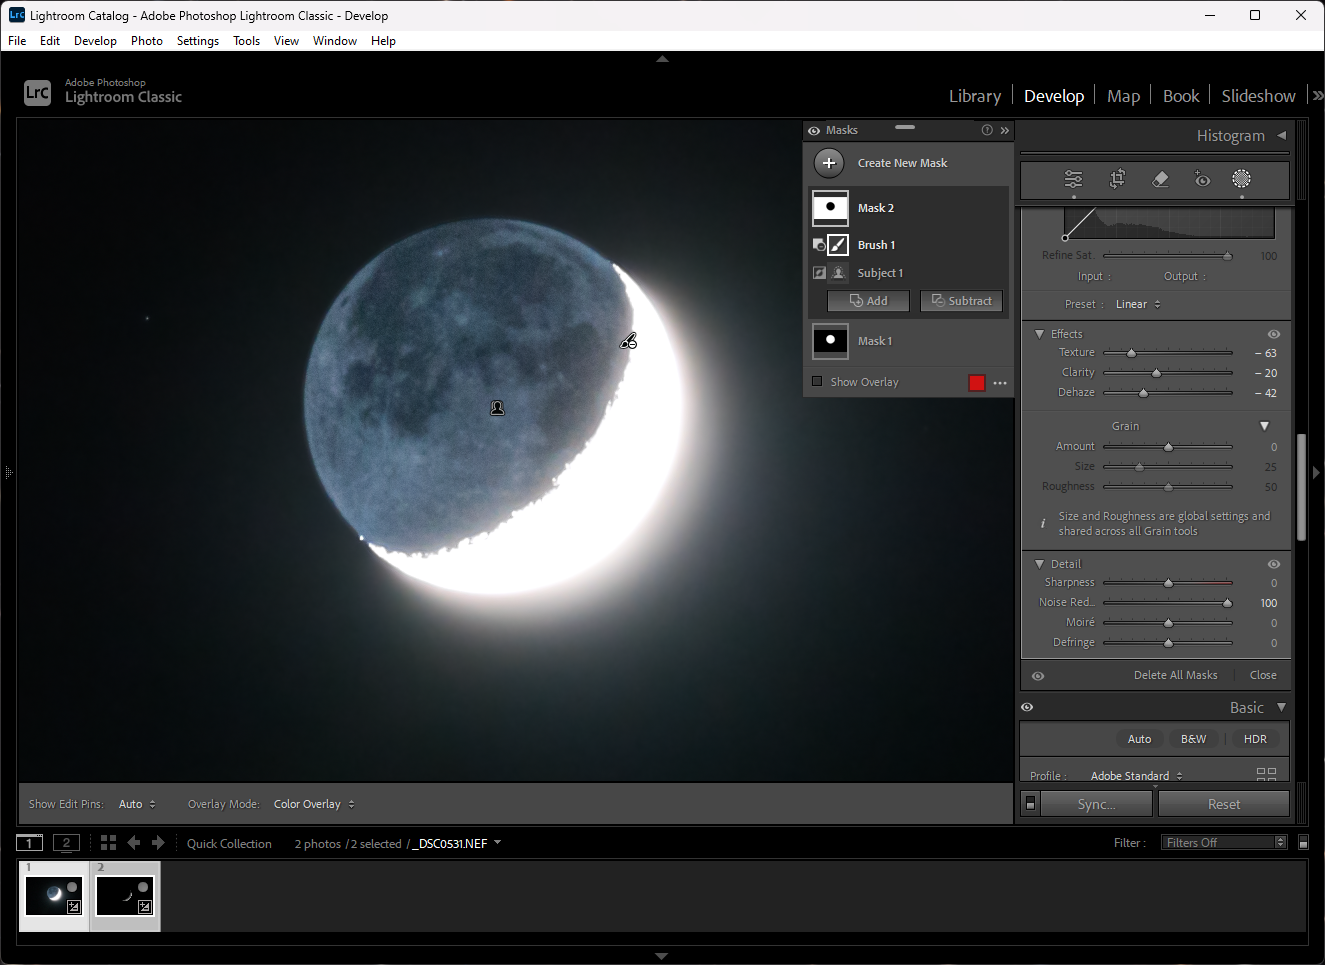
Step 12
Now, significantly reduce the texture and use the dehaze slider to increase the overall glow. You can also significantly reduce the noise.
Step 13
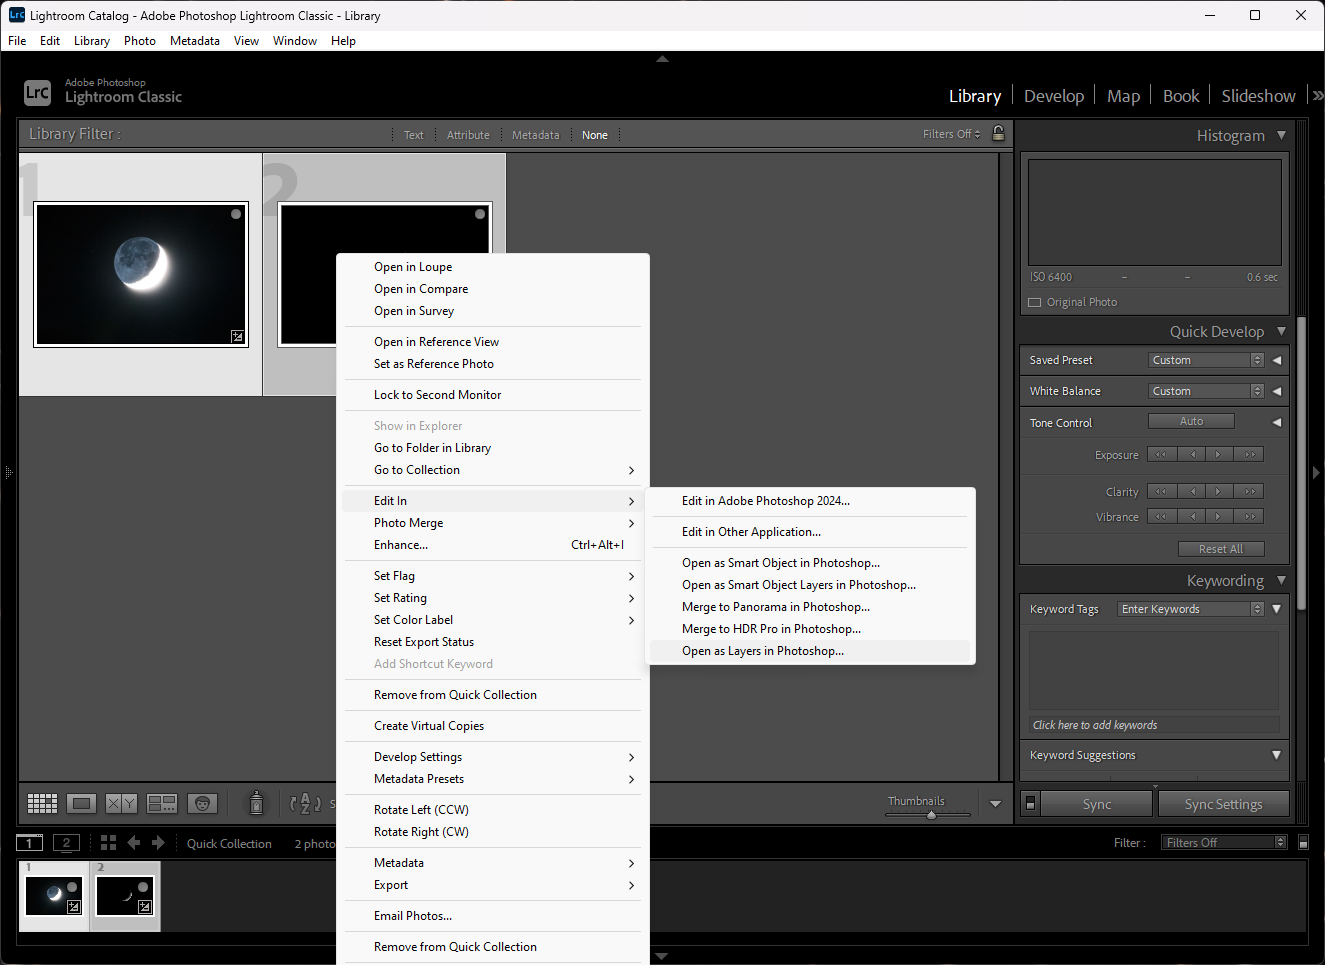
Once you are happy with the edits, go back to the image library and select both frames. Right click on the selection and find the open as layers.
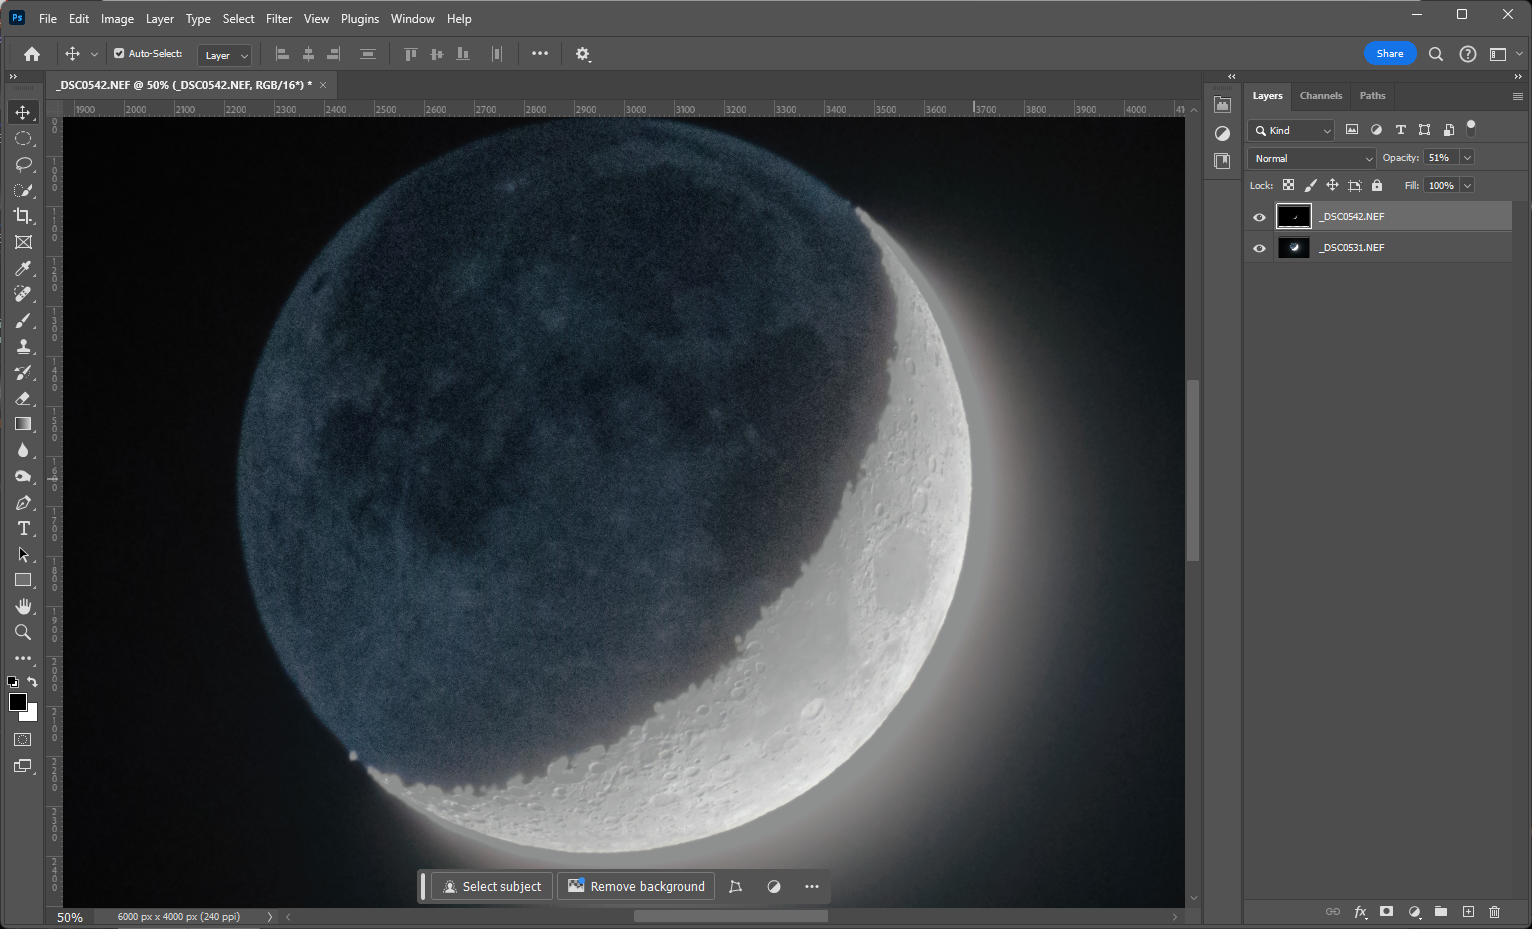
Step 14
Once the images are loaded, begin by aligning the frames. With the detailed frame atop the glow frame, reduce the opacity of the detail frame and align the two images.
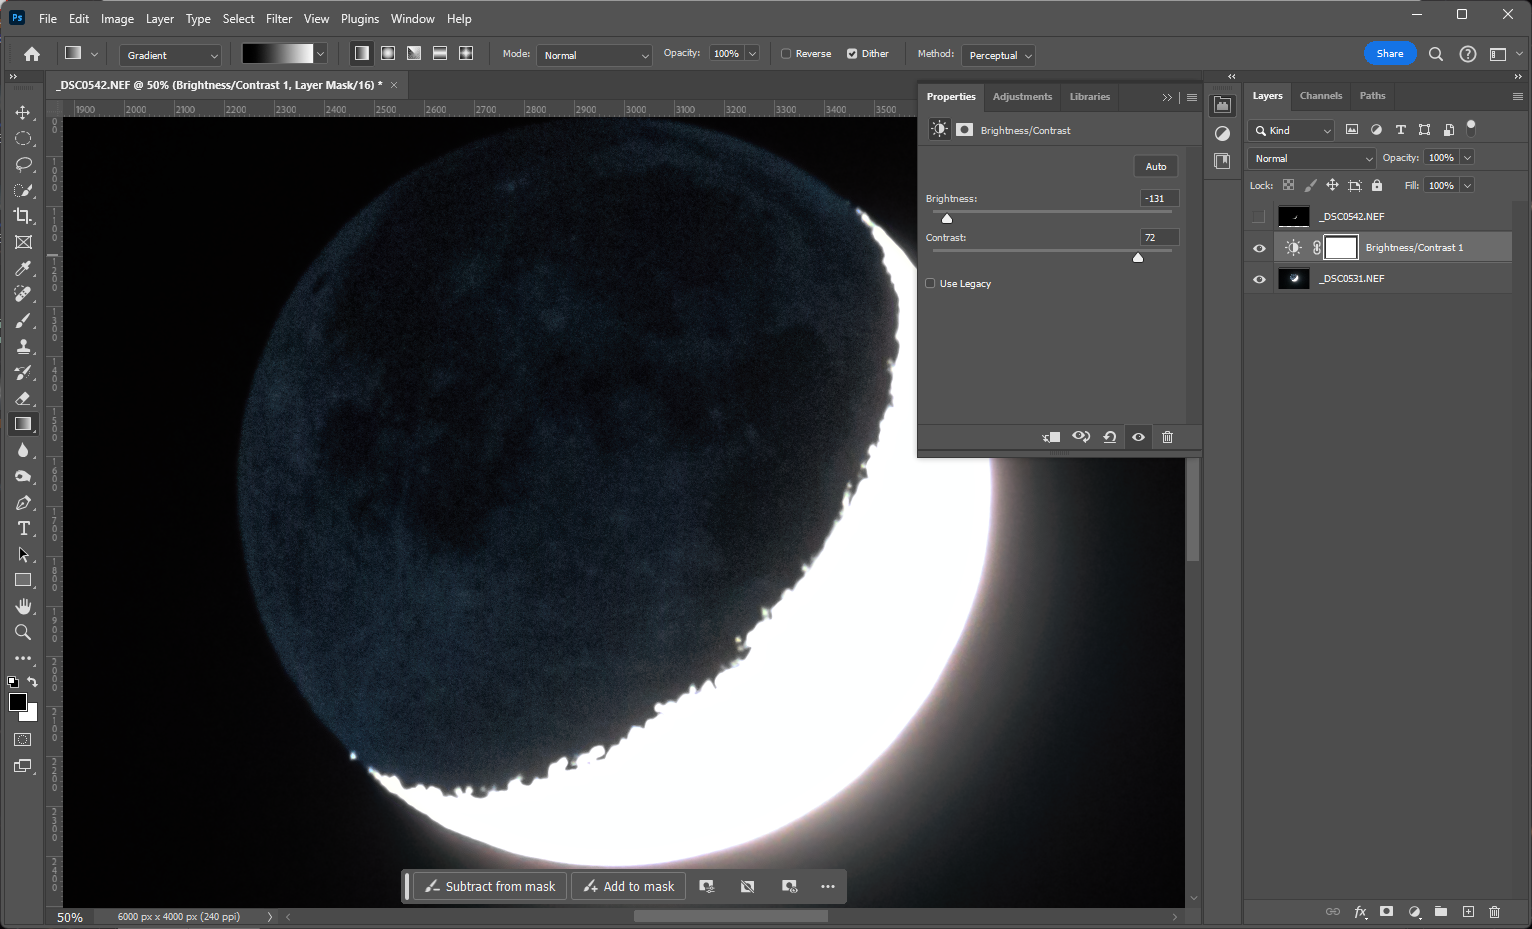
Step 15
Once you have a nice balance between the two frames, you want to make some adjustments to the brightness and contrast. Image adjustment layers will affect all of the layers below.
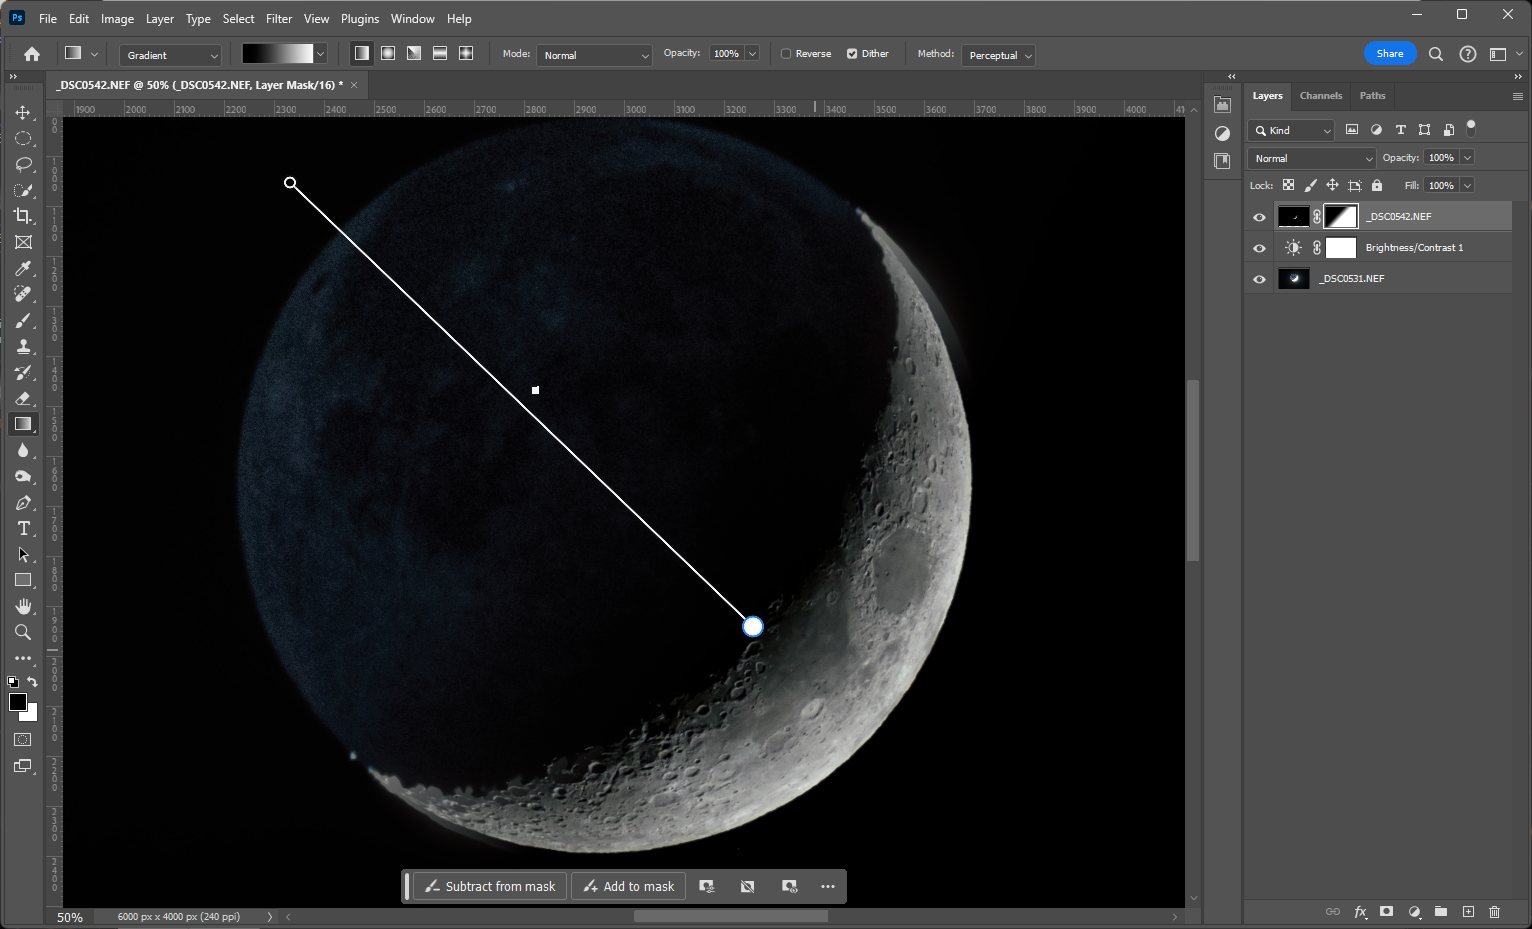
Step 16
With the layer mask selected, use the gradient tool to reveal the glow frame.
Step 17
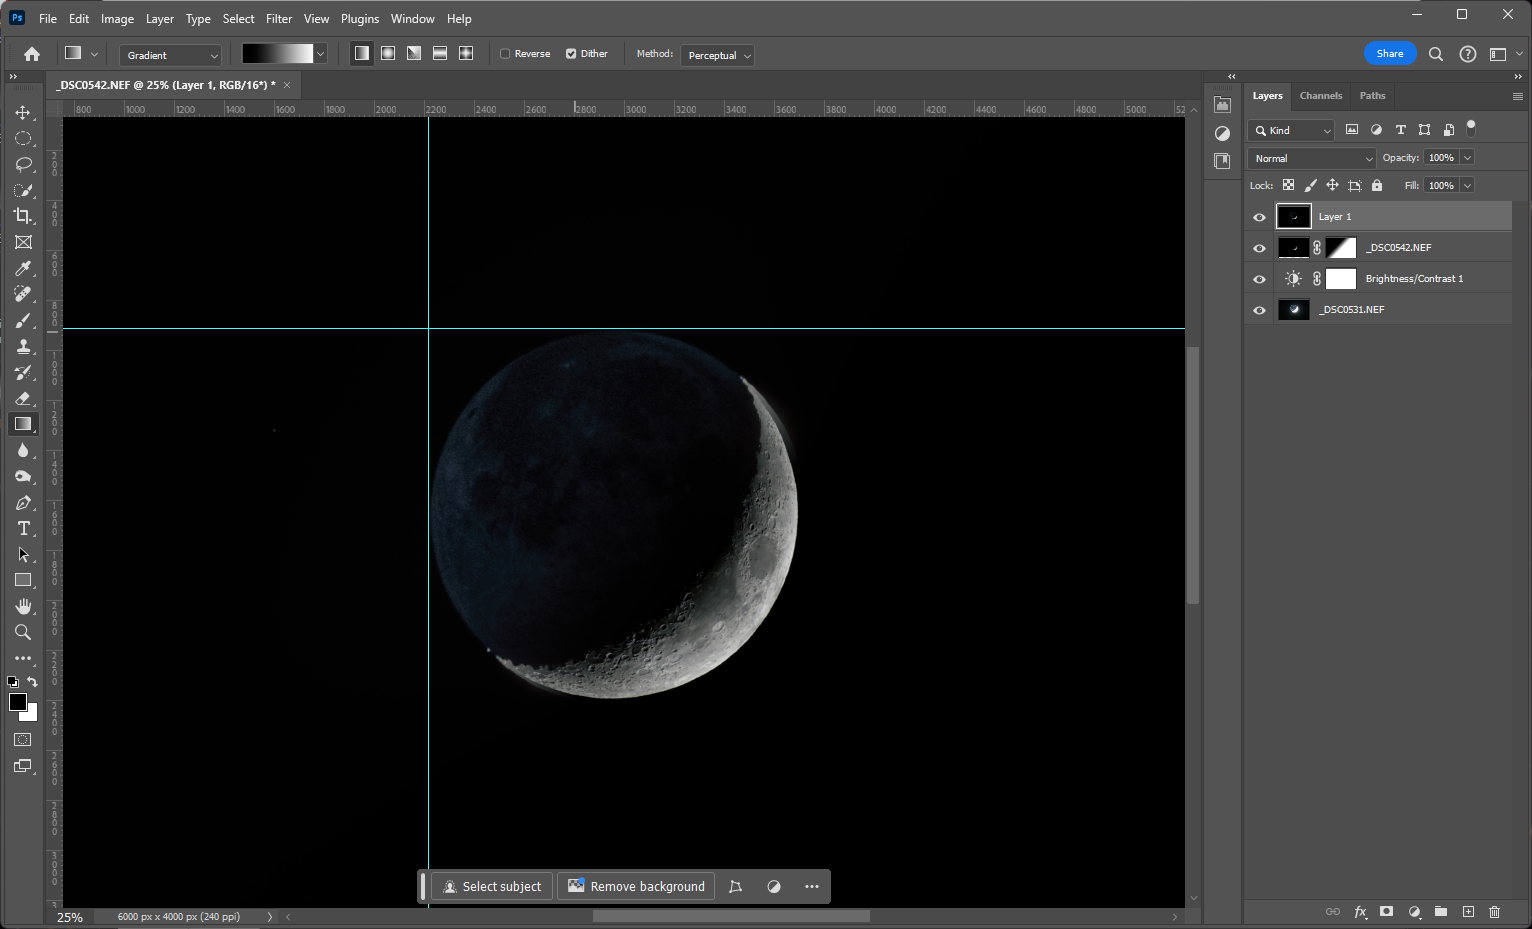
Next, you need to separate the composite of the Moon onto its own layer. To do this, make a new layer from the visible layers.
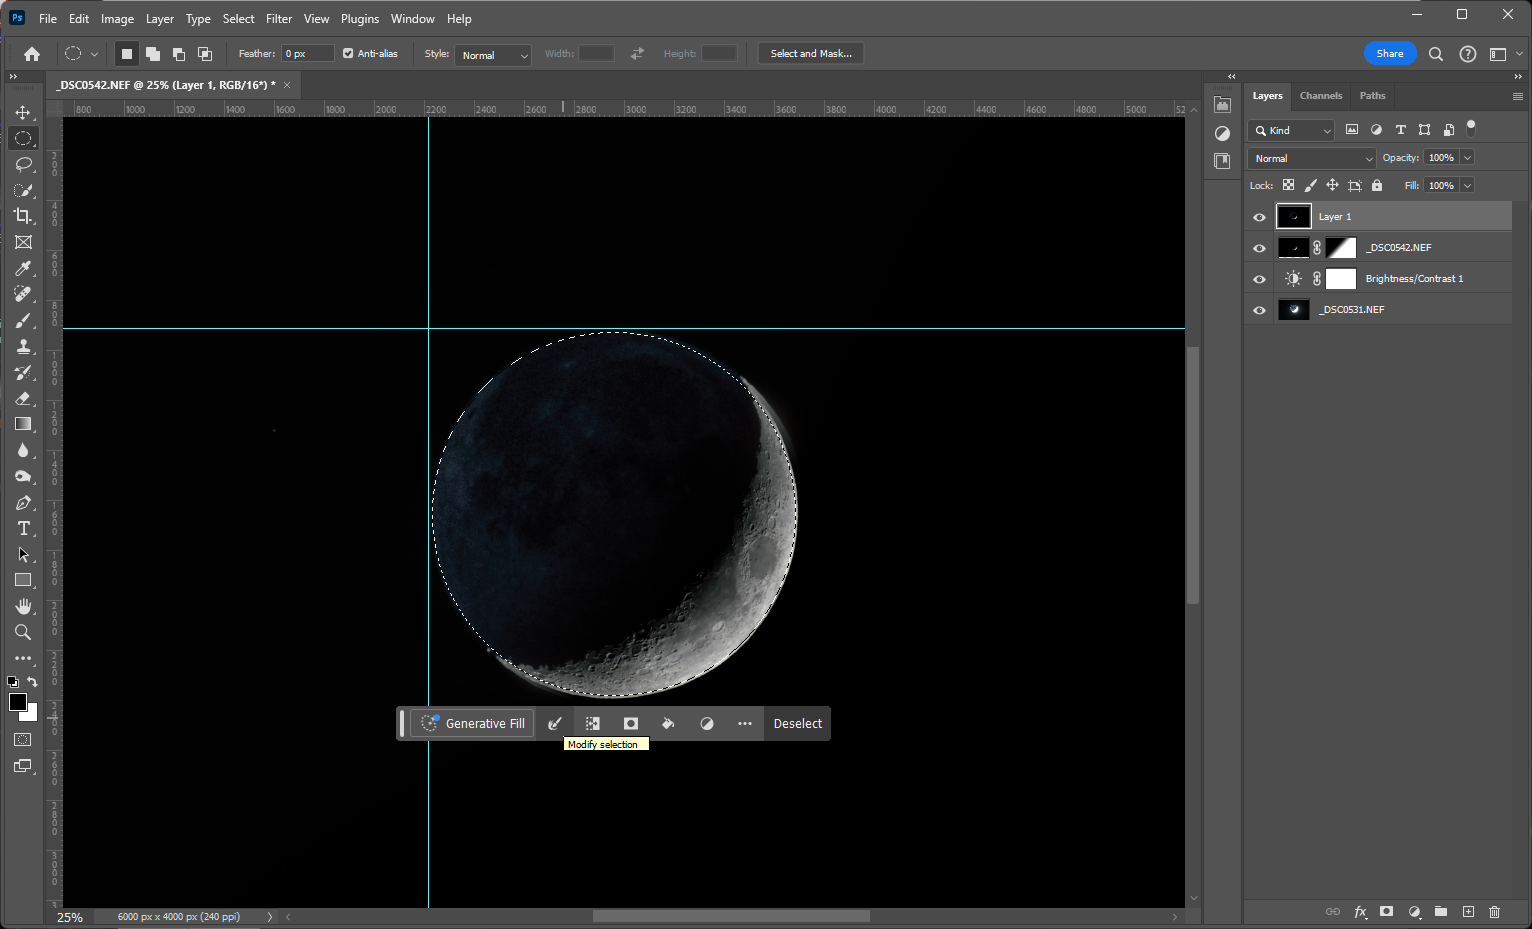
Step 18
Once you have the visible elements on to their own layer, use the marquee selection tool and some guides to create a layer mask. This will isolate the composite of the Moon.
Step 19
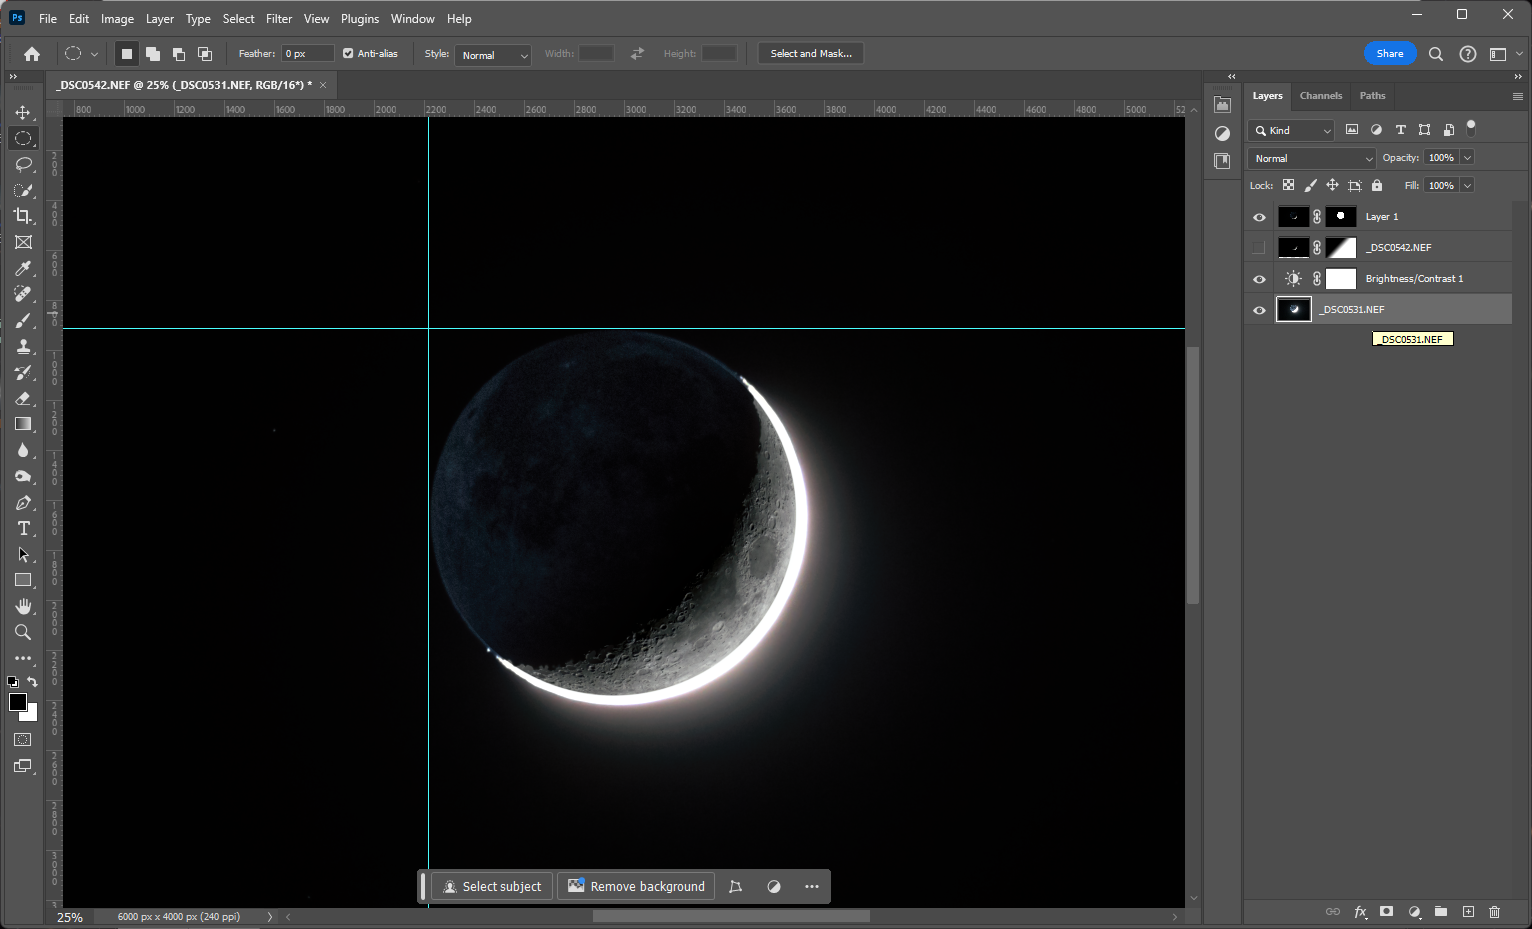
With the composite isolated, hide the detail frame and select the glow frame. Then, use the free transform tool to push the Moon glow behind the composite.
Step 20
Next, crop the image so the Moon is centered.
Step 21
Finally, save the file and export the image as a png or jpeg.
Here’s the final product:
If you notice that your image is grainy or has more noise than you would like, you can use the stacking method to stack glow and detail frames. This will significantly reduce the image noise.
Here’s an example of an image using stacked glow and detail frames:
Contributing Writers
 Edward
 Cierra
 Moryah
 Vincent
Glossary
Camera Aperture
The camera aperture is an adjustable opening within a camera lens that controls the amount and direction of light that reaches the imaging sensor or film. Wider apertures have a narrow depth of field, making the background or foreground appear blurry. Narrow apertures have a wider depth of field, bringing more of the image into focus.
Chromatic Aberration
Chromatic Aberration occurs when various wavelengths of light become unaligned or unfocused as they pass through an optical lens. This is usually an unwanted distortion that results in color fringing along the edges of the
Composite Image
A composite Image is a processing technique that combines elements from multiple images into a single image. While composite techniques vary, they all work to broaden the creative capabilities of photography.
DSLR
DSLR stands for digital single lens reflex and it is a type of digital camera designed to integrate the mechanics of analogue SLR cameras with a digital imaging sensor. These cameras feature interchangeable lenses, a reflex mirror that allows a user to see through the camera lens via the viewfinder, and a digital imaging sensor that converts light into a digital file that can be stored on a memory card.
High Dynamic Range
High Dynamic Range, or HDR, is an image processing technique that captures a wider range of luminosity between bright and dark areas of an image. This technique requires combining multiple images with varying exposures to produce an image with more life-like contrast.
ISO
ISO is an acronym for the International Organization for Standardization. This organization works to create standards for various technologies, practices, and methodologies. In the case of imaging sensors, ISO is a numerical value assigned to the sensor's light gathering sensitivity. Higher ISO values collect more light and a faster speed, while lower ISO values collect less light and a slower speed.
Lunar Cycle
A lunar cycle refers to the 29.5 day orbital period of the Moon around our planet, in which the Moon transitions through all 8 of its main phases.
Lunar Photography
Lunar photography is a subclass of astrophotography that focuses on capturing images of the Moon. By incorporating various techniques and methodologies
Mirrorless Camera
A mirrorless camera is a type of digital camera designed to maintain the functionality of DSLRs with less mechanical parts. Like DSLRs, they feature interchangeable lenses, however, they do not use an optical viewfinder or reflex mirror. The parsimonious design of mirrorless cameras makes them lighter, slimmer, and quieter than DSLRs and allow for more versatile imaging features.
Post Processing
Post processing refers to the editing techniques used to enhance images after they have been captured digitally or on film. For digital cameras, this process requires software that can read raw image data and convert it into a format more suitable for file sharing. For analog cameras, this process includes the development of the film, and the scanning, enlarging, and editing of the film negatives.
Remote Shutter Release
A remote shutter release is an accessory that allows a user to take images without touching the camera body. They can be wired directly to the camera or wirelessly connected, and they prevent unnecessary movements that distort objects when using longer exposure times.
Saturation
Saturation refers to the amount of color or light absorbed by the film or imaging sensor of a camera. Usually, it is represented as a percentage, ranging between fully absorbed, and not absorbed at all.
Shutter Speed
Shutter speed refers to the speed it takes the mechanical or electrical shutter of a camera to open and close. By adjusting the shutter speed of a camera, a photographer can control the exposure of an image.
Signal-Noise Ratio
Signal to Noise ratio refers to balance between signal (the information a user intends to capture) and the background noise (the undesired information present in the environment). For photography, this ratio expresses the degree to which an image includes the desire features of a object or scene
Tracking
As the Earth is continuously spinning and in motion, the location of a celestial object in the sky moves over the course of a night. This becomes apparent during observation as a target moves out of view, and particularly observable in images as stars and objects quickly become a blur as exposure time and focal length increases. To compensate for this, computerized mounts and smart telescopes employ tracking techniques to keep the target centered in the optics. Depending on the motion style of the mount, the resulting image can vary. Alt-Az motion, popular in smart telescopes, keeps the object centered but can not compensate for its “spin” without what is known as a wedge. Accordingly these images lose information on the edges of the frame as they rotate out of view, leading to ever smaller, circular, images as time spent imaging increases.
Star Walk
Star Walk celestial simulator that you can download on your smartphone. This software works with your phone’s GPS to give you real-time positioning of objects in the sky, night or day. It also allows you to see past or future positioning by changing the date and time. It is free with ads, or you can purchase a subscription for full access.
Stellarium
Stellarium celestial simulator that you can download on your smartphone. This software works with your phone’s GPS to give you real-time positioning of objects in the sky, night or day. It also allows you to see past or future positioning by changing the date and time. It is free with ads, or you can purchase a subscription for full access.
T-Ring
A T-Ring is an accessory that is used to connect a DSLR/ mirrorless camera to threaded connections. These have a camera lens mount on one side, and a female/ internally threaded connection on the other in either M48 or M42. Most (but not all) T-Rings will set the camera at 55 mm of backspacing, making connections easy.
Moon
A moon is a naturally occurring object that orbits a planet or other celestial bodies (excluding stars). These are also called natural satellites. The Moon, capitalized, is the Earth's only natural satellite and is the brightest object in the night sky. The Moon stabilizes the tilt of Earth's orbit, causing the seasons, and tides.


