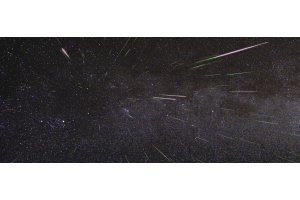
Looking to purchase a telescope mount but don’t know where to start? To help classify the plethora of telescope mounts available on the market today, and give you insight into selecting one of them, our team of gear experts have field tested these mounts and created four categories to help you in your selection. Portable Grab & Go, Backyard Observing, Remote Observatory Grade, and New Wave Harmonic. This guide lays out a few simple steps that are aimed to give you insight in selecting the best astrophotography mount for you based on your needs; and by categorizing telescope mounts by their astrophotography capabilities on the road, at home, or within a distant observatory, you’ll be better equipped in making the right choice for you!
Before jumping into the world of astrophotography mounts, let's gather some background information on what makes a telescope mount great for astrophotography in the first place.
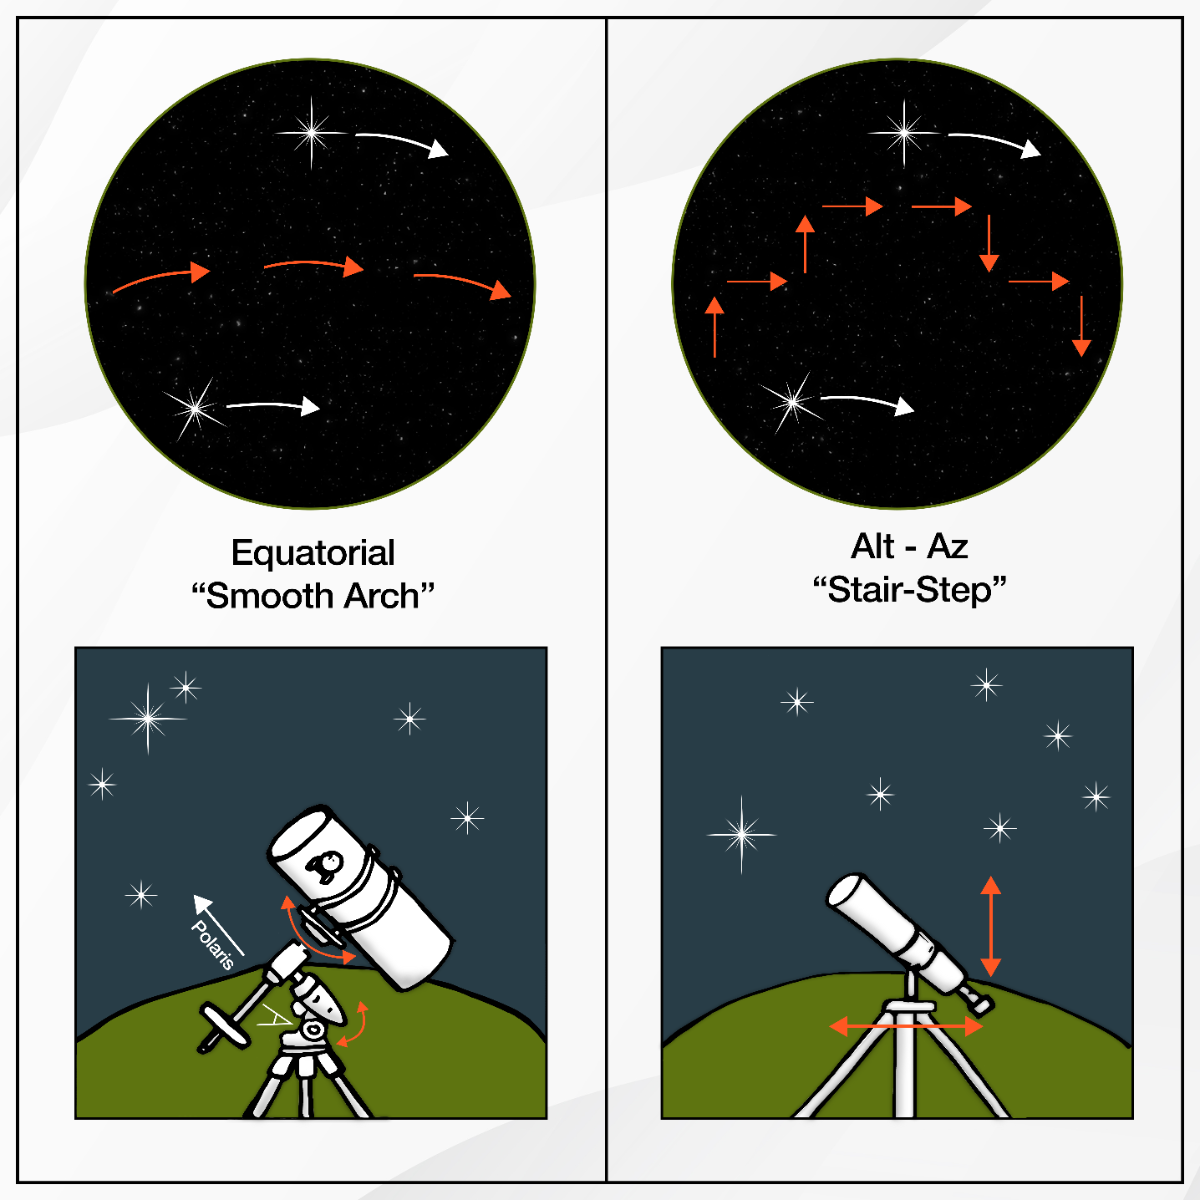
As there are two main types of mounts: alt-azimuth and equatorial, you may be wondering then, well, what’s the difference? Can astrophotography be done with an alt-azimuth mount? Or do I need an equatorial mount for astrophotography? While alt-azimuth mounts do track the night sky, the use of these types of mounts for astrophotography applications present the issue of field rotation within the captured images. Their movement in two directions without consideration of Earth’s polar axis displays objects in a concentric patterning around the edges of the frame. When using an equatorial mount for astrophotography, this issue is completely eliminated. Equatorial mounts feature an additional polar axis that aligns with Earth’s north or south celestial pole – perfectly counteracting Earth’s rotation. This keeps everything within your images sharp and clear! As such, equatorial mounts are the prime option for astrophotography, and all of the telescope mounts featured within this guide are of the equatorial type.
Another inclusion that is highly beneficial to astrophotography is the addition of GoTo capabilities within the equatorial mount. This function allows the telescope mount to slew to an object in space, and can be engaged using the hand controller or mount-specific software. It is a game changer for astrophotography applications, as it makes it incredibly easy to lock onto your target! Not all equatorial mounts come standard with this functionality, though every mount we have listed here does include this advantageous GoTo technology.
Choosing the Best Astrophotography Mount for Your Setup
Now that we have some background on the type of mount needed, we can move forward in selecting the best GoTo equatorial mount. There are a few steps that ensue:
- Determine the type of astrophotography you plan to conduct and the equipment required for this
- Calculate the required payload capacity based on the weight of your gear
- Determine where you plan to image
- Consider the mount’s weight and size based on where you plan to image
- Consider supplementary features offered that’ll assist you in your astrophotography journey
1. Determining what you plan to image, and the gear needed to achieve this is the first step in choosing the right mount. Are you fascinated by distant galaxies and want to take a deep look into space to capture images of them? Or maybe you’d like to photograph large clouds of nebulae that fill the frame! The wide range of telescopes, cameras, and additional accessories available on the market today determine what you can image. For instance, a heavy, high focal length Schmidt-Cassegrain is great for imaging galaxies, while a small refractor is perfect for widefield nebulae shots. Having a clear idea of the type of astrophotography you want to pursue is important in selecting the best equipment for the job.
2. Now that you have chosen the type of astrophotography you want to conduct, and have an idea on the telescope, camera, and accessories needed for success, the next step is finding a mount that will support the combined weight of your gear. The payload capacity of a telescope mount is the maximum weight it can carry. It's crucial to respect this rated payload and not overload the telescope mount as to avoid damage to your equipment.
3. After figuring out the payload capacity required for your equipment, it’s time to consider where you are going to be imaging. Many of us are surrounded by intrusive light pollution that hinders our views of the night sky. If this is the case, you may be planning to travel to darker skies to conduct astrophotography. Or, you may just be looking for a convenient, at-home setup. Determining just where you are going to be imaging is incredibly important in finding the right mount for you!
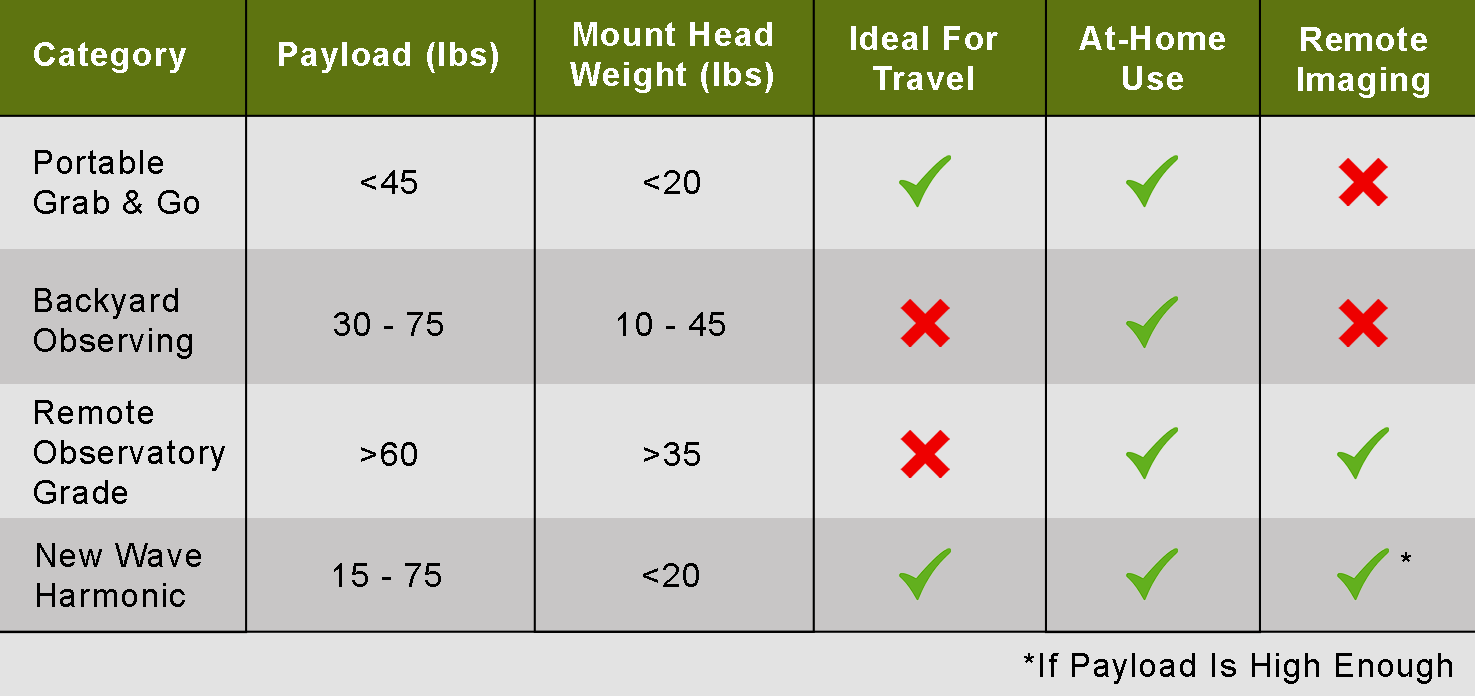
4. The next aspect to consider is the size and weight of the telescope mount. These factors are crucial to account for when it comes to deciding where you're going to be conducting astrophotography. If you intend on traveling to dark sky sites, having a mount that is small and lightweight is hugely beneficial. In contrast, if you aim to set up a remote observatory, finding the largest, heaviest mount is necessary for the utmost stability. It’s important to note that “large”, “small”, “light”, and “heavy” are relative terms that are immensely based on personal opinion, though when classifying these mounts, these terms are used to give you insight into what each mount can offer. A “small” mount is great for traveling, a “medium” mount is ideal for backyard observing, and a “large” mount is perfect for remote observatories. In figuring out where you want to image, you can then make an informed decision on the mount you’d like to purchase based on its size and weight.
5. Once you have an idea of the types of telescopes and equipment you want to use and where you plan to use them, the next step is ironing out the wrinkles of what else is important within your setup! For instance, an ergonomic design for effortless transport and setup, tripod or pier compatibility, or built-in safety mechanisms for remote observing. To instill confidence in you with making your decision, let’s take a deep look into our High Point Scientific astrophotography mount categories:
Portable Grab & Go


The mounts in this category all feature a lightweight design in a small, compact body. As such, these mounts have mount heads that weigh less than 20 lbs, making them easy to carry from place to place. Also, their small size takes up minimal space and can be packed away effortlessly for heightened portability. These two aspects also make set up and take down much easier, something very important when having to build your rig over and over again. Expanding upon this portable design, these telescope mounts are typically paired with lightweight, yet sturdy tripods. The payload capacity of up to 45 lbs makes the mounts within this category ideal for multiple types of astrophotography, while additionally giving you the freedom to image under dark, remote skies. When it comes to supplementary features, these mounts typically come equipped with ergonomics such as built-in handles for heightened portability and Wi-Fi capabilities that allow control with just your smartphone or tablet. A hand controller may also be included with these mounts, offering a simplistic, yet effective mode of operation!
Backyard Observing

While it is true that all equatorial mounts are suitable for backyard observing, it’s important to understand the fact that some mounts aren’t ideal for travel, nor are tailor-made for remote observatories. The mounts that are too heavy to be considered portable, yet do not obtain a substantial enough weight or payload capacity for remote observing fall here in the Backyard Observing category! These middle-ground mounts are more robust than the portable mounts listed above, featuring a mount head weight of 10-45 lbs and bearing a payload capacity of 30-75 lbs. This increase in weight provides more support for your imaging equipment, and the higher payload means a wider range of telescopes can be supported. While these mounts are more sizable than portable mounts, they are much more manageable and easier to set up than remote observatory-grade mounts – making them perfect for the backyard. The tripods that these catch-all mounts pair well with are generally heavier than the ones featured with portable mounts, and with a more substantial base, the more stable your telescope rig will be. For the utmost stability, these Backyard Observing mounts can also be used with a telescope pier. Piers act like an anchor for your equipment, keeping everything fixed to the ground. While typical of remote observatories, the use of piers is growing in popularity amongst amateur astrophotographers imaging from their backyard. The sturdy nature of these mounts also makes them ideal for backyard observatories, another advancement that is gaining traction within the astrophotographers community!
Remote Observatory Grade
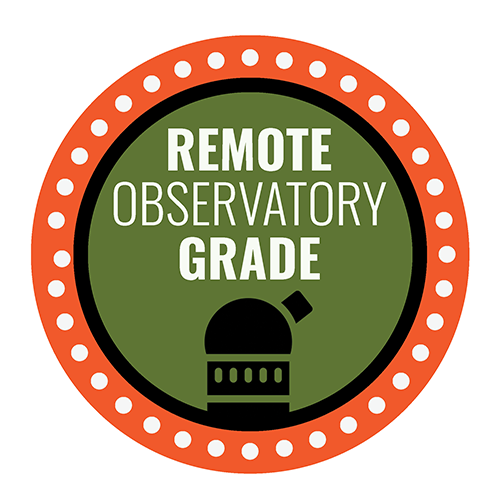

When it comes to constructing a remote observatory, having an equatorial mount that provides maximum stability, has a high payload capacity, and comes equipped with built-in safety mechanics is crucial in maximizing the potential of your gear and the dark skies these observatories are often established under. The mounts featured within this Remote Observatory Grade classification help push the limits of astrophotography through their mount head weight of over 35 lbs and exceptionally large >60 lb payload designed to haul high-end, premier OTAs. If not mounted on a pier, these equatorial mounts are paired with considerable tripods, typically made of thick stainless steel or solid metal. Also, as remote observatories are designed to be operated from far away, it’s important to have mechanisms in place that 1) help keep your equipment safe, and 2) make control effortless. These high-caliber mounts will often come equipped with physical hard stops to help prevent your equipment from accidental tripod/pier collisions, internal cabling to reduce the chances of cable snags, and threaded ports that keep your wires securely connected. Reliable internal mechanics with extensive software compatibility is another key aspect of these mounts; ensuring smooth operation night after night. Also, with the prestigious nature of these mounts, inner workings such as belt systems, spring-loaded worm wheels, or other high-precision gearings deliver remarkable tracking performances for images of the highest quality. This next-level imaging opens the doors for astroimagers looking to take their astrophotography to the next level or even for those wanting to engage in cosmic discoveries.
New Wave Harmonic

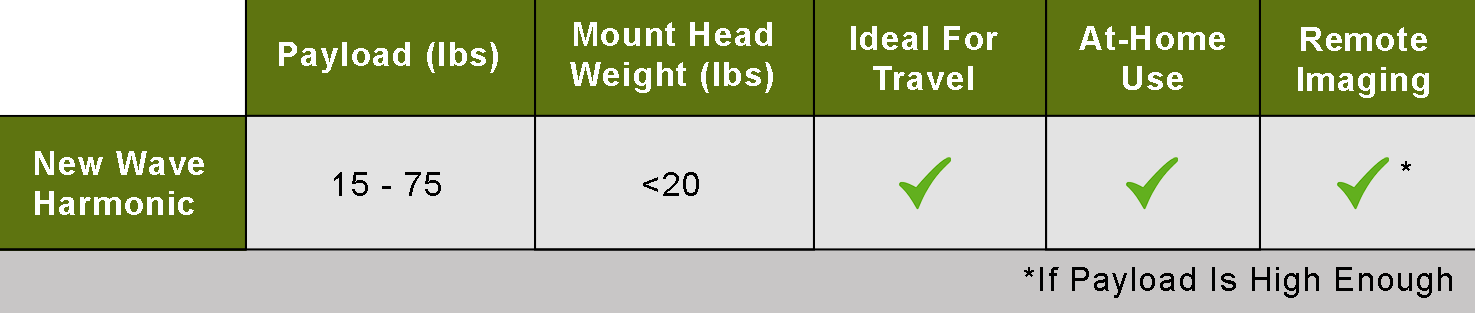
As the astroimaging community grows, so comes a new wave of improved technology: harmonic equatorial mounts. These state-of-the-art mounts are making their debut amongst amateur astrophotography rigs; delivering a unique experience by offering a remarkably high payload capacity within a small, easily transportable package. As such, this type of equatorial mount “breaks the rules'' of the previous categories we have laid out above given their unprecedented weight-to-payload ratios. They are perfect for traveling, ideal for backyard observing, and, if their payload is high enough, make amazing remote observatory mounts as well! The internal strain wave gearing systems operate with exceptionally high torque, making the use of counterweights optional. Eliminating the need to lug around these additional accessories makes traveling with harmonic EQ mounts that much easier, plus, setting up is a breeze as there is no need to bother with balancing your equipment. If you do choose to use counterweights with a harmonic equatorial mount, you will be awarded an even higher payload capacity! This new technology helps simplify astroimaging by broadening the horizons of the types of astrophotography that can be achieved with a singular mount.
- ZWO AM3 Harmonic Drive Equatorial Mount
- ZWO AM5N Harmonic Drive Equatorial Mount
- Sky-Watcher Wave Strainwave Mount Series
- iOptron HEM15 Hybrid Equatorial Mount Series
- iOptron HEM27 Hybrid Equatorial Mount Series
- iOptron HEM44 Hybrid Equatorial Mount Series
- Pegasus Astro NYX Harmonic Geared Mount Series
Classifying these mounts based on their payload capacity and weight brings great insight into what each mount within these categories can help you achieve. To summarize the points above, we have compiled this comprehensive chart to assist you in choosing the right equatorial mount for your astrophotography journey!
Now that you're ready to make an informed decision, it's time to order your new mount and prepare to explore the cosmos! If you still have any questions about the choosing right mount for you, click here to contact our team. Our experienced gear experts are happy to help!
Astrophotography is an art and we can't wait to see what you capture. Let's get social! Share your images with us on Facebook or Instagram.
Contributing Writers
 Edward
 Daniel
 Moryah
 Vincent
Glossary
All-Star Polar alignment
All-Star polar alignment is an innovation from Celestron that allows you to polar align your mount with the Celestron NexStar hand controller. As opposed to other polar alignment methods, this approach does not require a clear view of the north or south celestial pole, allowing you to set up almost anywhere even in the presence of large obstructions. The process is simple: once you have successfully star aligned your mount, slew to a bright star from the hand controller’s database. Next, press the Align button on the hand controller, then “Polar Align”, then “Align Mount”. Your mount will then re-slew to this star, and prompt you to center it within the eyepiece or camera. Next, the mount will position this star in the exact location it should be if your mount was properly polar aligned. Finally, adjust the altitude and azimuth knobs in your mount to re-center this star, and press enter. Your telescope mount is now accurately aligned with Earth’s axis of rotation!
Astrophotography
This refers to photography of astronomical bodies and phenomena. Astrophotography is not new, for example the popular T threading still used today harkens from Tamron’s T-mount developed for their 35 mm cameras - however it has seen a notable increase in popularity with improvements in cameras, mounts, filters, and software making astrophotography much more accessible. This is not limited to celestial bodies such as nebulae, planets, or galaxies either, as solar imaging is now more within the reach of the average consumer than ever before.
Autoguiding
Autoguiding is a process which utilizes a smaller telescope, referred to as a guide scope, and an additional camera sensor, known as a guide camera, to assist your mount in its tracking precision. Alternatively, this can be achieved using an Off-Axis Guider (OAG), which is fitted within your primary imaging train. An OAG uses the light captured by your telescope and sends it to your guide camera via an internal prism. So, how does autoguiding actually work? Your guide camera will take a constant series of short exposures (typically 1-3 seconds each) that will then be analyzed by software. After the software selects the best guide star(s) to guide upon, the goal is to keep these stars as steady as possible from frame to frame. If there is a discrepancy in the positioning of the stars, the guiding software will communicate with the mount to make small adjustments to fix these tracking errors. While it may not be necessary for short exposure astrophotography such as planetary, lunar, or solar, autoguiding is highly beneficial for long exposure astrophotography.
Equatorial Mount
An equatorial mount is an astronomy instrument that features two axes of rotation: right ascension (RA) and declination (DEC). These two axes of rotation are also found on alt-azimuth mounts, though equatorial mounts feature an additional axis, called the polar axis, that the RA and DEC axes rotate about. This polar axis is to be lined up with Earth’s celestial pole to accurately counteract Earth’s rotation. These mounts are ideal for astrophotography applications, as the addition of a polar axis eliminates the issue of field rotation within captured images.
German Equatorial Mount
A German equatorial mount is a specific type of equatorial mount created by Joseph von Fraunhofer in 1824. These mounts feature a design that places the telescope on one side of the declination axis, which is offset by counterweight(s) on the opposite end. The declination and right ascension axes meet each other within a T-joint. This T-joint is aimed at the north or south celestial pole, parallel to Earth’s axis of rotation, and rotates about this polar axis. With these three axes, these mounts are popular within the astrophotography community due to their ability to counteract Earth’s rotation without presenting field rotation within the captured images.
GoTo (Go-To) Technology
In simple terms, Go-To technology is a telescope mount’s ability to slew to an object in space. This process requires alignment with the night sky, and is achieved through correlation with the optics of the telescope and software. Alignment can be achieved a number of ways and is necessary in order to determine the pointing position of the telescope. The user can either calibrate their telescope with 1-3 well-known bright stars or planets, or can utilize plate solving if their software offers it. In plate solving, the field of view is compared to a database, and the software can then determine the exact positioning of the telescope. Plate solving is considered more accurate than star alignment, and is widely featured within the smart telescopes on the market today for accurate Go-To functionality.
Harmonic EQ
Harmonic equatorial mounts, often times referred to as strainwave mounts, are a type of equatorial mount with unique internal gearing. How these mounts work is as follows: A motor within this mount attaches to an internal wave generator, which is fixed inside of a flexible spline gear. While the motor rotates this wave generator, the flexible spline gear then pushes against the ring gear it’s housed inside of. The coupling of the flexible spline gear and ring gear is what drives the mount. One key advantage of this internal gearing system is that it can work with unbalanced loads, making the use of counterweights optional in most cases. Also, these mounts deliver high torque values, and have impressive weight-to-payload ratios. As such, these mounts are much smaller and more compact than other equatorial mounts, making them ideal for traveling.
Meridian Flip
While tracking the night sky, there may be a time when your target reaches the meridian, the imaginary line directly overhead that can be traced from the north celestial pole to the south celestial pole. While your telescope is pointed this high in the sky, it’s necessary to “flip” your equipment to the east side of the tripod or pier, so you can continue to track your target and avoid a tripod collision.
Polaris
Polaris is the pole star for the northern hemisphere, and is often referred to as the North Star. It resides >1 degree away from true celestial north, therefore appears to be fixed in one position night after night. It has a magnitude of 1.98, making it easily detectable to the naked eye in the night sky. Due to its brightness and stationary disposition, it has been used for centuries for navigation, helping sailors and other travelers on their voyages. This star is the brightest star within the Ursa Minor constellation, and is the last star within the “handle” of the Little Dipper asterism.
Polar Alignment
Polar alignment is the process of aligning a telescope mount’s polar axis with the Earth’s axis of rotation. By having these two axes parallel to one another, precise counteraction of the Earth’s rotation can then be achieved. While a typical process of equatorial mounts that have a polar axis, a similar effect can also be achieved by utilizing an equatorial wedge with alt-azimuth mounts.
Polar Scope
Polar scopes are small telescopes that assist with aligning a mount’s polar axis with the Earth’s axis of rotation. They are found within your mount, and are fitted with an internal reticle that shows Polaris’s position in reference to the true celestial North Pole, and Sigma Octantis’s position in reference to the true celestial South Pole. Through alignment of these pole stars within the polar scope, the mount will then be accurately polar aligned.
Tracking
As the Earth is continuously spinning and in motion, the location of a celestial object in the sky moves over the course of a night. This becomes apparent during observation as a target moves out of view, and particularly observable in images as stars and objects quickly become a blur as exposure time and focal length increases. To compensate for this, computerized mounts and smart telescopes employ tracking techniques to keep the target centered in the optics. Depending on the motion style of the mount, the resulting image can vary. Alt-Az motion, popular in smart telescopes, keeps the object centered but can not compensate for its “spin” without what is known as a wedge. Accordingly these images lose information on the edges of the frame as they rotate out of view, leading to ever smaller, circular, images as time spent imaging increases.
Tracking Modes
As opposed to the tracking rate that determines the speed in which the mount will track the sky, the tracking mode of a telescope mount determines the way in which the mount will counteract the Earth’s rotation. This can be selected from either the hand controller or software. Typically, you will find the modes of: EQ North, EQ South, Off, and Alt-Azimuth. For instance, if you are polar aligned with the north celestial pole, choosing EQ North will be the appropriate tracking mode to select, while EQ South is reserved for those polar aligned with the south celestial pole. Equatorial tracking modes are optimal for astrophotography applications, while the alt-azimuth mode is ideal for those who are conducting visual astronomy.
Tracking Rates
Unlike the tracking mode which denotes the way in which the mount will track the sky, tracking rates determine the speed at which the mount will track the sky. This can be selected from the mount’s hand controller or through computer software, and should be selected based on the target that is being tracked. Typically, there are three tracking rates: Sidereal, Lunar, and Solar. The sidereal tracking rate moves the mount at a speed that is equivalent in magnitude, yet opposite in direction as the speed of Earth’s rotation. This is ideal for all targets within the night sky save the Moon and the Sun, in which the lunar and solar tracking rates are appropriate for.
Worm Gear
A worm gear is a component within a worm drive gearing system that includes spiral threads. Driven by a motor, this worm gear’s threads mesh with the worm wheel to then rotate the right ascension or declination axis of a mount.

Learn More
Interested in learning more about telescope mounts and astrophotography? Not sure where to begin? Check out our Astronomy Hub!
Click the arrow above to see MLA, APA, and Chicago Manual of Style citations.
MLA:
Armijo, Cierra. "Astrophotography Mount Buying Guide," AstronomyHub, High Point Scientific, 13 May. 2024, https://www.highpointscientific.com/astronomy-hub/post/telescope-mount-buying-guide.
APA:
Armijo, C. (2024, May 13). Astrophotography mount buying guide. High Point Scientific. https://www.highpointscientific.com/astronomy-hub/post/telescope-mount-buying-guide
Chicago Manual of Style:
Bibliography:
Cierra Armijo. "Astrophotography Mount Buying Guide," AstronomyHub (blog), High Point Scientific, May 13, 2024. https://www.highpointscientific.com/astronomy-hub/post/telescope-mount-buying-guide.
Footnote:
Cierra Armijo, "Astrophotography Mount Buying Guide," AstronomyHub, High Point Scientific, May 13, 2024, https://www.highpointscientific.com/astronomy-hub/post/telescope-mount-buying-guide.
This Article was Originally Posted on May 13, 2024