Maybe you’ve seen a stunning image of Jupiter and thought, "Wow, I’d love to capture something like that!" Maybe you’ve given planetary imaging a try and didn’t feel great about the results. Well, I’m here to tell you that with some basic equipment and a little bit of practice, it’s EASY to capture an image of Jupiter, Saturn, and Mars!
In this guide, I’ll take you through each step of my planetary imaging journey and show you how to plan, capture, and process your own image of Jupiter! Before we dive in, take a moment to consider your goals. Mastering this skillset will take time, but with dedication and patience, you’ll achieve truly outstanding results!
Before learning how to image the planets, take a moment to build your cosmic perspective! Below, you'll find some mind-blowing facts about our solar system and our planetary kin! But don't worry, you won't find any pop quizzes at the end of this article!
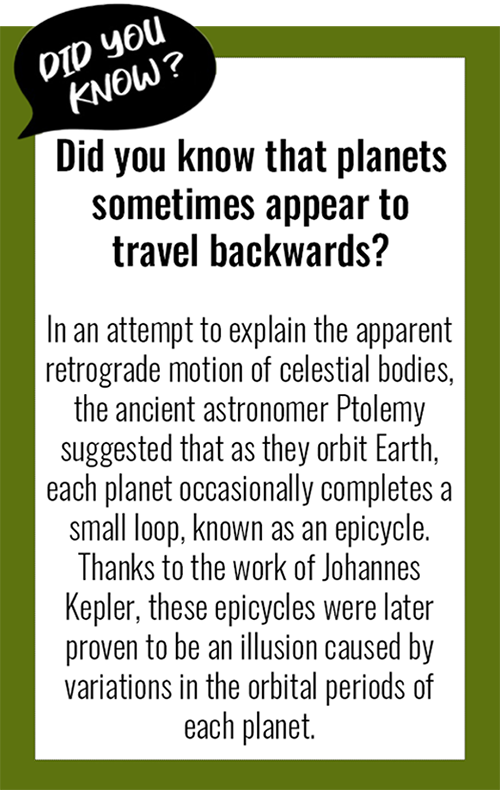
- About 4.6 billion years ago, our solar system was nothing but clouds of dust, ice, and gas. As these stellar ingredients condensed due to the conservation of their momentum, the combined mass created intense pressure and heat, strong enough to fuse isotopes of hydrogen into heavier helium molecules. This process gave birth to our Sun.
- The intense heat produced by our young star pushed the remaining gas and ice to the outer regions of the solar system, leaving behind only solid rocky materials. Now, moving faster due to increased gravitational pull, these leftover materials began bumping into one another. Eventually, these collisions formed the inner planets: Mercury, Venus, Earth, and Mars. Meanwhile, in the cooler outer regions of the solar system, gas and ice condensed and form the gas giants: Jupiter, Saturn, Uranus, and Neptune.
- All of the planets orbit on the relatively flat plane, called the ecliptic. This was first described by the Greek astronomer and mathematician Hipparchus, who observed all wandering celestial bodies follow the same path through our sky. Had he been able to observe the planets past Saturn, he likely would have been surprised by the eccentric orbit of Pluto. Unlike the other celestial bodies in our solar system, Pluto's orbital path is tilted by about 17°, making it the largest object to deviate from the ecliptic plane.
- The motion of the planets is caused by the gravitational pull of the Sun, and the effect of gravity decreases as the distance between objects increases (inverse proportionality). This is why planets further away from the Sun take longer to complete their orbit!
- The planets don't follow a perfect circular path around the sun. That's, in part, because the planets don't actually orbit the Sun, but instead, the Sun and the planets orbit a shared focal point (just like a binary star system)! This shared focal is called a barycenter, and since the Sun and the planets are constantly moving around, our solar system's barycenter moves somewhere between the Sun's inner core and just outside it's corona!
- Since the planets follow an ellipse instead of a circle, there are occasionally brief windows of time where the planets make a close approach to one another. Sometimes called an opposition, or conjunction, these celestial reunions can provide ideal conditions for imaging the planets!
Tip: Learning the ins and outs of astrophotography often feels like climbing an endless canyon. Just as you think you've reached the peak, another summit appears that was previously out of site. If you want to avoid burning out, try not to rush to the top! And remember, if you always have your sights set on the finish line, you might miss out on the incredible views along the way. Slow down and enjoy the journey!
Planning Your Planetary Photoshoot
Careful planning goes a long way when it comes to any form of astrophotography. Since the planets aren't always visible, and the seeing conditions of our atmosphere are constantly changing, you'll need to learn a bit about tracking both the planets and local weather conditions. Below, I broke down the three basic steps I followed to plan my planetary imaging session, but don't get caught up waiting for the perfect viewing window. While great conditions certainly make a difference, you'll likely a bit of practice before you can make the most of a "perfect viewing window."
Step 1: I started planning by tracking my target planet. This is incredibly simple if you have access to a celestial simulator, such as Star Walk 2 or Stellarium. These apps provide live views of numerous celestial objects including each of the planets, but if you don't have a compatible smartphone, you can also find nightly viewing windows at for each planet at TimeAndDate.com!
Step 2: Once I knew when I could view my target, I then checked the local weather conditions. This step can be as complicated as you want it to be, but it ultimately comes down to ensuring the skies are clear. If you want to get really technical, or only image during the best possible conditions, check out ClearDarkSky.com, where you'll find nuanced weather forecasts, light pollution maps, and so much more! This is a really neat site, and I highly suggest checking out, but be warned, it can be a little intimidating until you get the hang of how they layout the information.
Step 2: Finally, I found a nearby imaging location using a light pollution map. This isn't as necessary for planetary imaging as it is for other forms of astrophotography, though I find it relaxing to imaging under dark skies. With that said, you can certainly image the planets from the comfort of your backyard, even in heavily light polluted areas!
Tip: Keep in mind, you'll want to start your session before the planet reaches it's highest point in the sky, as this is when it will be clearest. Also, make sure you give yourself enough time step up and let your scope settle in to the outside temperatures!
Equipment
What makes planetary imaging so exciting is how the different components work together to capture the planetary data. Understanding these connections can save you a lot of time, especially during setup and post-processing, but it’s important to remember that having the right equipment doesn’t always mean having the most expensive or advanced gear. So long as you have the basic components, there’s a lot you'll be able to achieve. So, enjoy the process, and don't get too caught up on perfecting your step up!
With that said, you will need some basic equipment, such as a telescope with a mount, a planetary camera, a Barlow lens, and, depending on the camera, a device to control the camera. Below, we’ll explore each of these in a bit more detail!
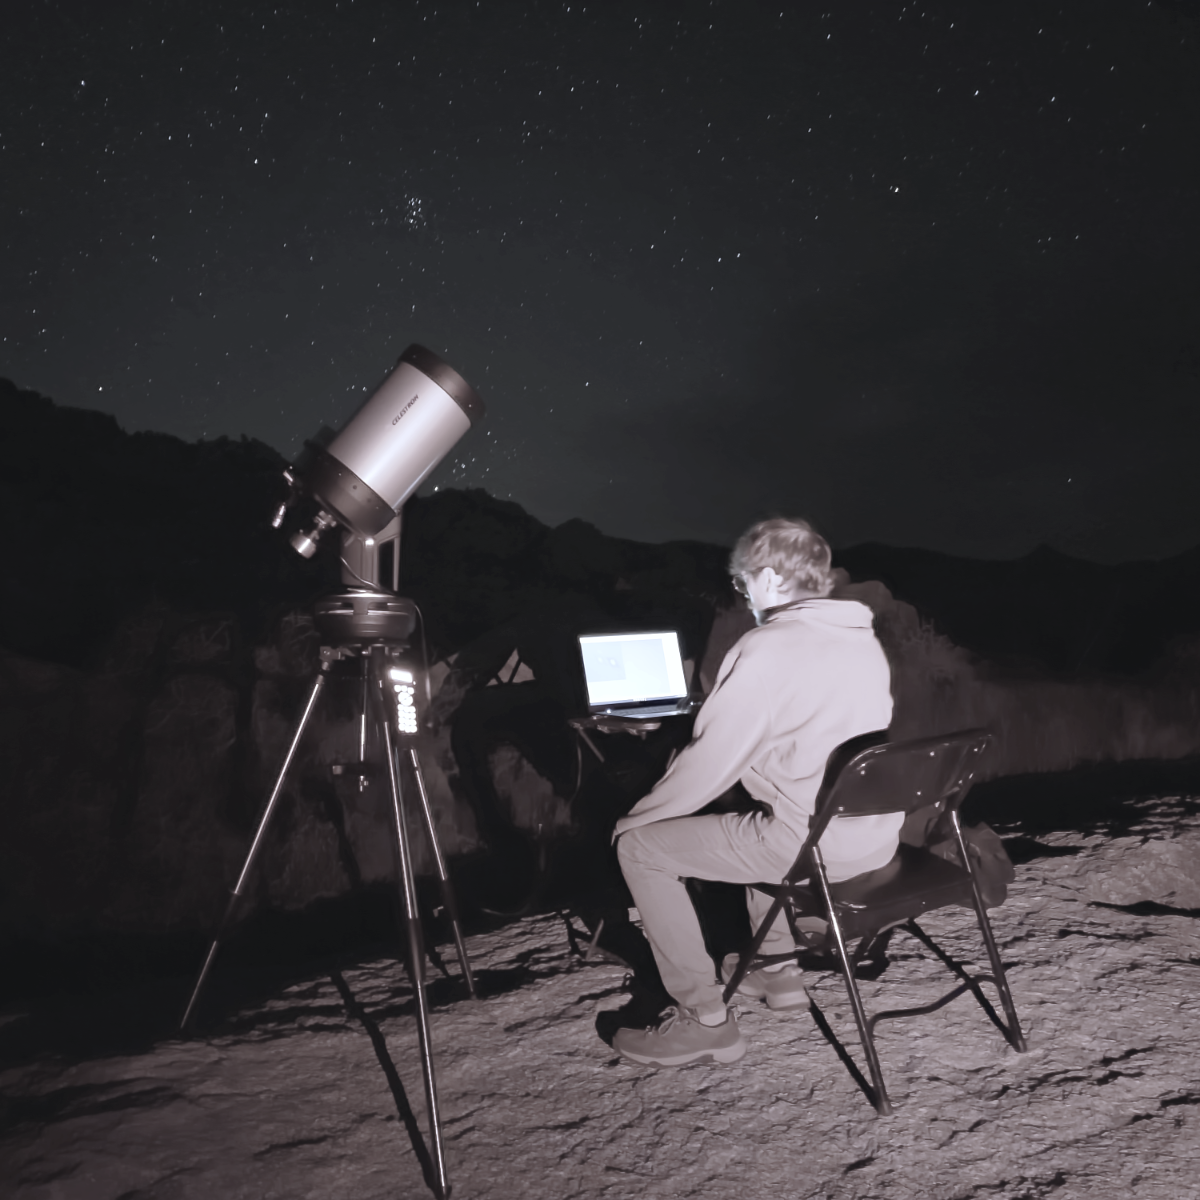
Telescope
As a beginner to planetary imaging, I set my sights on Jupiter as my first target, and I used a Celestron 8" NexStar Evolution. This beautiful scope packs a lot of punch, and on my first few nights imaging, I got carried away exploring the numerous objects in the Celestron database.
I used the 8” EVO because it’s a great scope for beginners, but it also has a large 8" aperture and a focal length over 2000 mm, both of which are important for getting up close to Jupiter. If you’re looking to purchase a new scope, our astrophotography gear experts highly recommend the Celstron NexStar 8SE. This tried and true SCT is remarkably user-friendly and comes equipped with a fully motorized "GoTo" mount, which will make it easy to capture a stunning image of Jupiter!
Mount
The 8" EVO comes equipped with a motorized Celestron alt-azimuth mount, which is easily be maneuvered with the included hand controller. Alt-az style mounts work great for planetary imaging, but you can also use an EQ mount or manually track the planet with a Dobsonian rocker-box mount. With that said, manually tracking introduces a lot of unnecessary movement, which can reduce the overall quality of your frames.
Motorized alt-az mounts will need to be aligned, which can be a bit intimidating at first, but, once you get the hang of the alignment procedure, setting up will be a breeze. If you are using a Celestron mount, I recommend going with the auto two star alignment, then syncing the mount to the planet you plan to image. Syncing to the planet will help keep it centered in your FOV (field of view), but keep in mind that, depending on the mount you are using, you still might need to adjust the targeting ever so often.
Camera
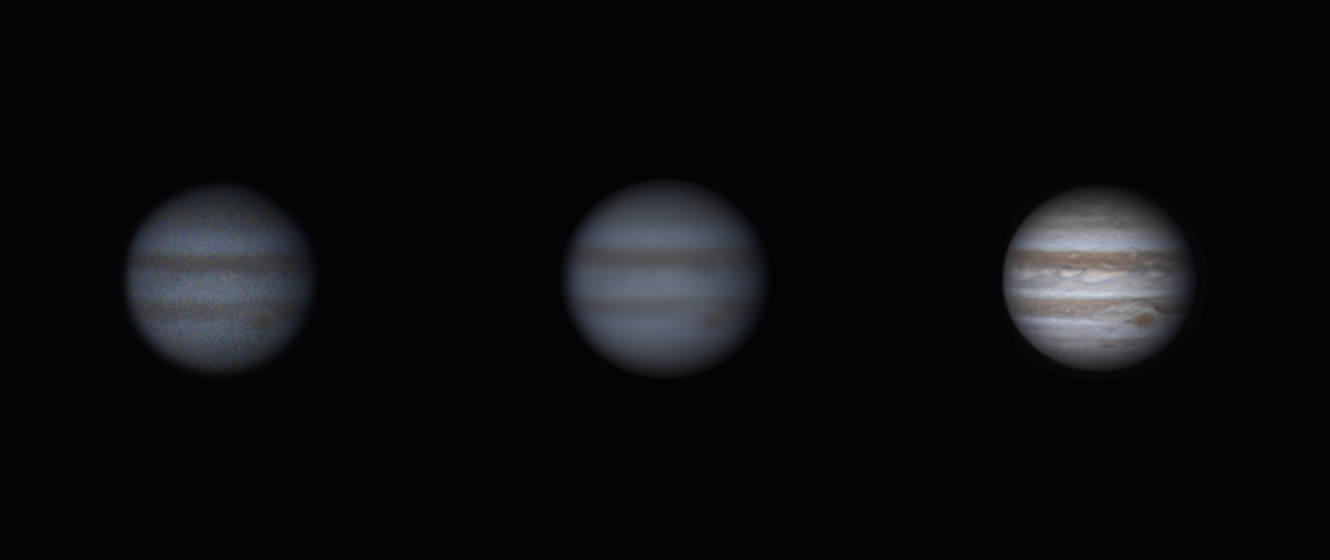
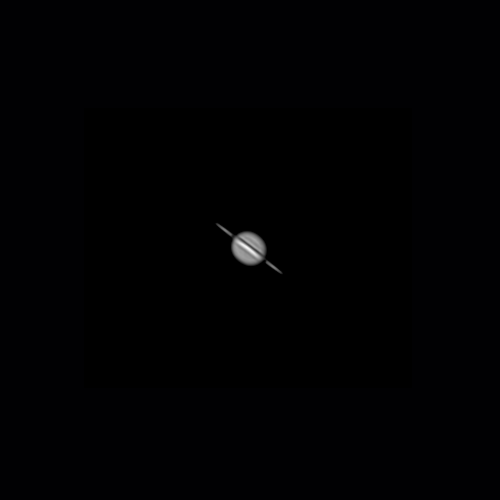
The camera I used was a ZWO ASI678 MC. I went with this camera because the pixel size was a good match for my optics, and it is incredibly simple to use! If you don’t have a planetary camera, you might be able to capture an image with DSLR or mirrorless camera, but don't go out of your way to purchase one for this purpose. Check out the image on the right if you want to see what you can capture with a DSLR!
If you’re using a dedicated planetary camera, you’ll need a device that can control the camera. I used my laptop and a software called SharpCap, which is free software that can easily connect (after installing the correct drivers) to the ASI camera I used. It can look a little intimidating at first, but once you learn which settings you need to focus on, you can ignore most of the other features. I recommend plugging your camera in and recording during daylight hours to learn more about the settings.
Barlow
In most cases, you’ll want to use a Barlow lens. This small but powerful component works to increase the focal length of your scope, which will enlarge objects in your field of view. When I imaged Jupiter, I used a 2x Barlow, which brought my focal ratio above the optimal sampling size. In other words, the 2x Barlow increased the power (magnification) of my optics, which made Jupiter appear larger; however, at this magnification, the individual pixels on the sensor of the camera I used were too large to capture the fine details on Jupiter's surface. This is known as "oversampling", and if I wanted to improve the image quality, I would need to use less powerful Barlow or a camera with a smaller pixel size. With that said, I was still able to capture a good image, but you should still aim to pair your optics with the right Barlow.
If you want to learn more about pairing your optics and camera with the right Barlow, check out our article on planetary cameras and Barlow lenses.
Setting Up
Once you have all the equipment needed to begin imaging the planets, you'll want to spend some time practicing your set up procedure. I recommend practicing in a well lit area or during daylight hours. You can also use this time to ensure the finder scope is properly aligned and practice connecting you camera.
Below, you'll find a video that shows you how to set up a NexStar 8SE, which I found to be incredibly helpful. If you're just starting out, I highly recommend giving it a watch!
Capturing Guide
The most exciting part of planetary imaging is capturing the video! Yes, you read that right, to capture an image of the planets, you'll need to first capture a video! Why is this? Well, unlike other forms of astrophotography, you cannot take long exposure images of the planets. This is, in part, because they are too bright, and a long exposure image will just be over exposed. The other reason is that our atmosphere isn't actually as clear as it first appears. When light passes through the layers of our atmosphere, it bends and warps, distorting objects. To combat this, planetary photographers use the lucky imaging method.
What is lucky Imaging? Lucky imaging is a capturing/processing method that uses a high frame rate video to capture thousands of images over a brief window of time. Then, using an editing software like Autostakkert, that video is broken down and sorted into its component frames. Once the frames are sorted, the best are collected and stacked into a highly detailed image.
Check out the video below to learn how to capture a video of Jupiter using SharpCap!
Processing Guide
AutoStakkert
Once you've captured the video, the next step is processing the data. To do this, we will be using AutoStakkert. This free program is extremely useful for planetary and deep sky photographers, as it can analyze, sort, and stack images or video frames into a highly detailed image. Once you've downloaded and installed the program, follow along below!
Step 1
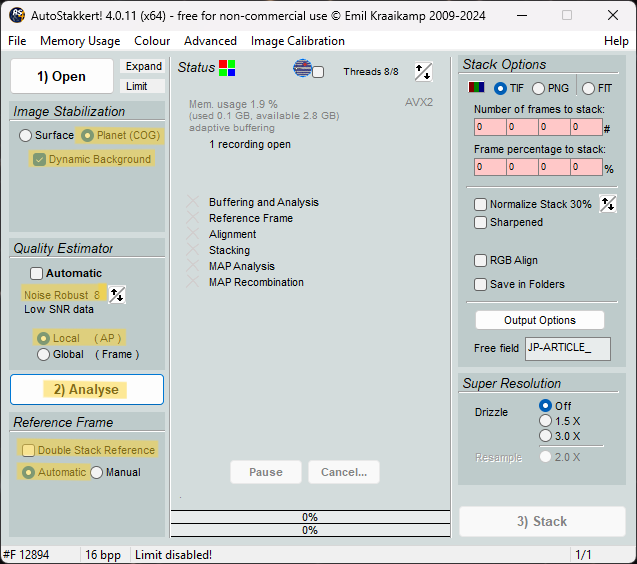
Begin by opening AutoStakkert. Two windows will appear: a "main menu" and a "preview window." Navigate to the main menu and select the "open" button in the top left hand corner. Then, locate the SER. file you captured with SharpCap (you can also drag and drop the video file into the preview window).
Step 2
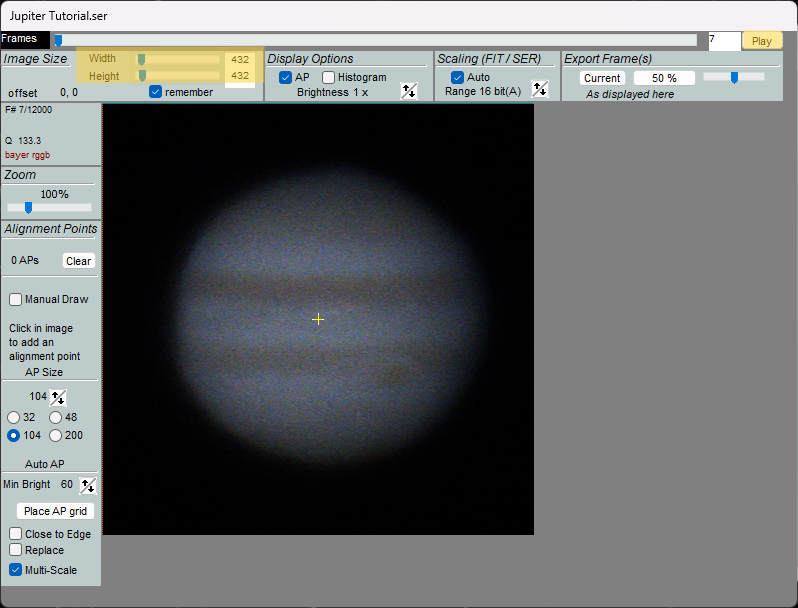
Once you've open the file, the first frame should appear in the "preview" window. From here, you can review the video by pressing play and crop the the image size (this will speed up the processing stage). Once you've reviewed and cropped the video to your liking, navigate back to the main menu.
Step 3
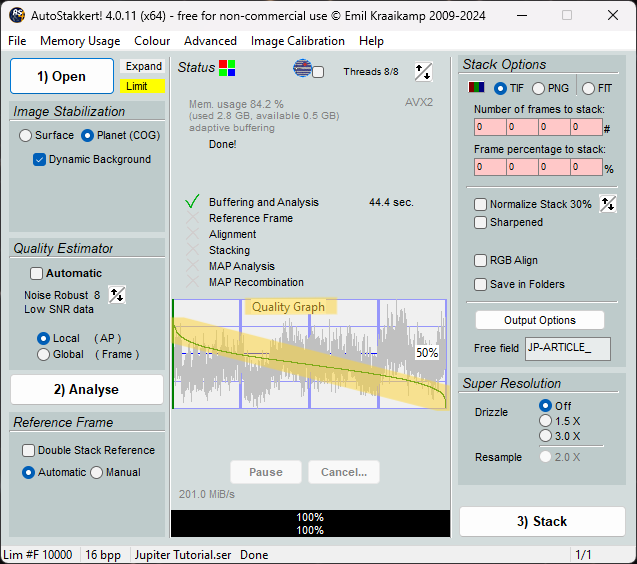
From here, you'll need to adjust a few settings. Start by selecting the "planet" and "dynamic background" option under image stabilization. This will help AutoStakkert properly process the frames. Then, under quality estimator, uncheck the automatic box and select Local (AP). Depending on the quality of your video, you may need to adjust the single to noise estimator. Once you've made these adjustments, head back to the preview window to set your alignment points.
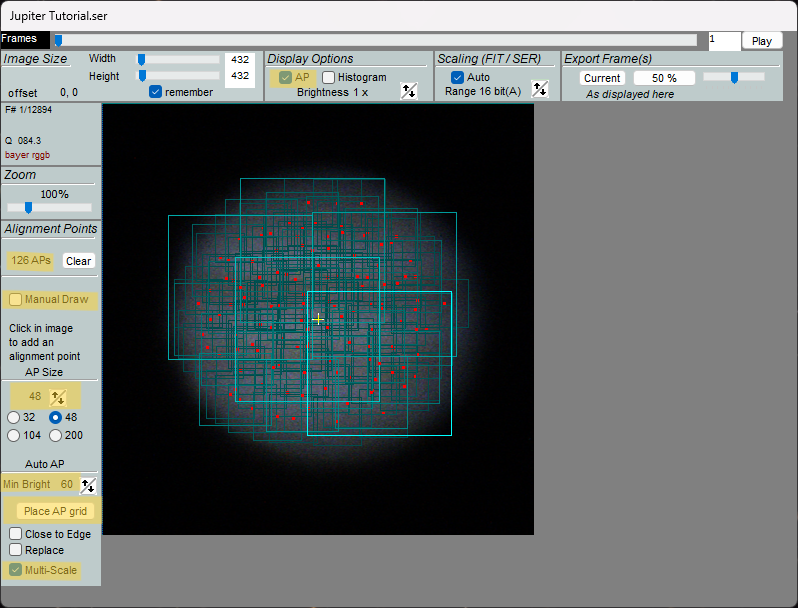
Step 4
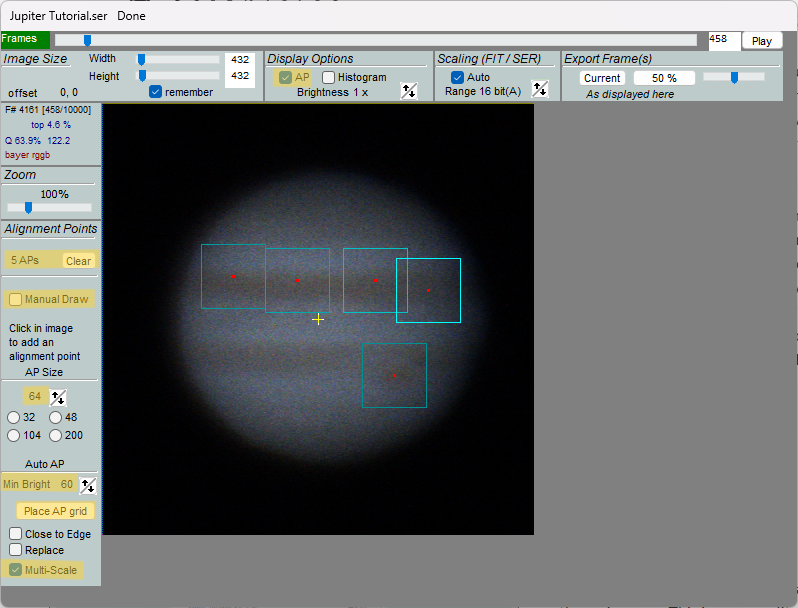
Before AutoStakkert can estimate the quality of the video, you will need to place alignment points. Alignment points (APs) are small "windows" that AutoStakkert uses to analyze, align, and eventually, stack the "best" frames into a single image. You'll have a few options when it comes to how you set APs. First, you can let AutoStakkert place the APs for you, however, you'll get better results if you place them manually. To do so, use either the "manual draw" feature to draw custom APs or use the preset options below to choose a pre-sized AP. Then use the cursor to place each AP.
Step 5
There is a lot of freedom here, and you may need experiment until you find a method that works best for you. However, there are a few things to consider when placing each AP. First, make sure there is a lot of overlap between each AP. This will ensure there are not stacking artifacts in the final image. Secondly, avoid setting APs near or beyond the edge of the planet, as this will decrease the quality of the final image. Lastly, try to map the APs on to the areas with high contrast (like the cloud bands). Also, it will help to use multiple sized of APs (which will require checking the "Multi-Scale" box in the bottom left hand corner). Once you have about 70-150 APs placed, navigate back to the main window and press "Analyze."
Step 6
Once the analysis is complete, a graph will appear in the middle of the main menu. This is your quality graph and it represents the quality of each frame. This graph is incredible useful, as it will tell which frames you should stack. It's divided into four columns and four rows. Each row corresponds to a "quality percentage," and each column represents 25% of the overall frames. The green line running through the middle is the "quality slope." This is a valuable piece of information tells you the exact amount of frame is at each level of quality. For example, if the green line passes the middle line before the end of the first column, you'll know that 25% of your frames have a quality rating above 50%. In other words, 25% of your frames are consider high quality, and the rest should be discarded.
Step 7
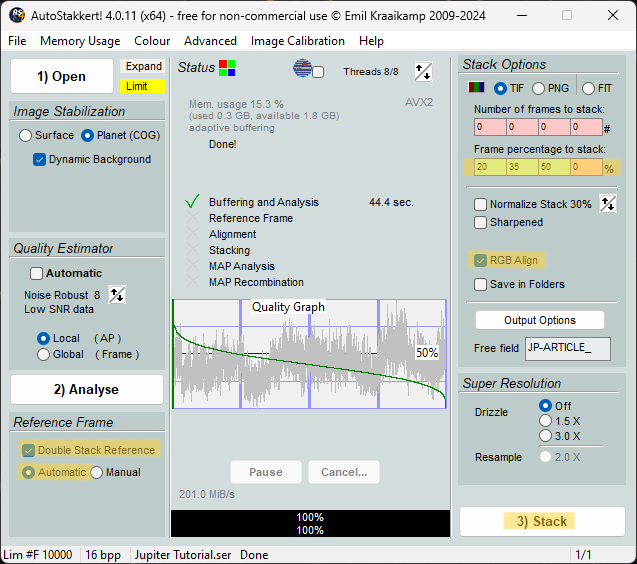
Once you've review the quality graph and decided how many frames you want to stack, navigate to "stack options" in the top right hand corner. Fill in the red boxes with either the exact number or percent of frames you want to stack. Usually, it is best create a more than one stack. Before hitting the "stack" button, ensure the double stack reference box is checked, as this will improve the quality of the output image. Then, check the RGB align box and name you output files. If you'd like, you can have AutoStakkert normalize the brightness of each frame. However, I find that doing so makes it difficult to sharpen the images. Finally, press stack!
Step 8
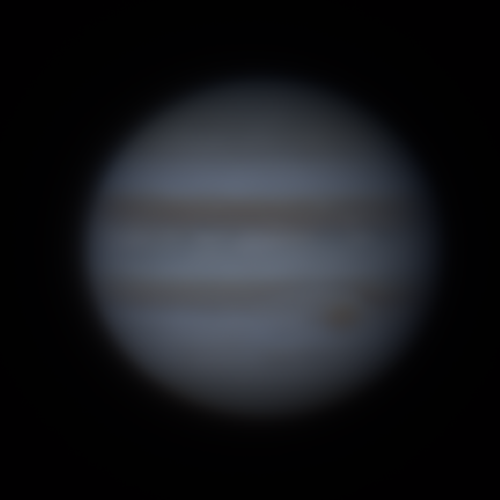
Once the stacking process is complete, you should be able to find the out image(s) in the same folder where the SER. file is saved. If you selected "save in folders" you'll find each image saved in a sub folder labeled with the percentage of frames stacked. Review the image(s) to ensure the stacking process was successful. Keep in mind, the output image(s) will look blurry or out of focus. In the next stage, I'll show you how to sharpen the image using Registax!
Registax
Now that you've successfully stacked the image, all that is left to do is sharpening! This can be easily done with Registax, which is available for free and can be quickly found online. Registax is a powerful program for planetary photographers, and we will use the unique "wavelet" sharpening tool bring out the details hidden in the stacked image of Jupiter. Once you've downloaded and installed the program, follow along below!
Step 1
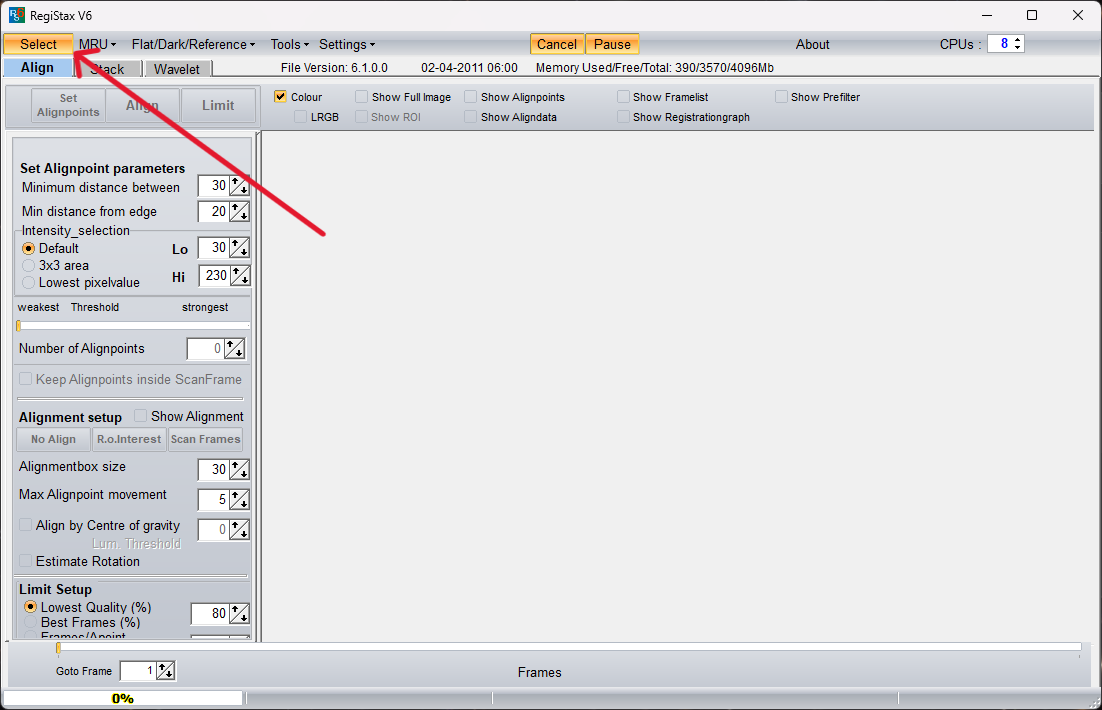
Begin by opening Registax and navigating to the "select" button in the top left hand corner. Once you press this button, a file explorer window will appear. Locate the output images you created with AutoStakkert, and select the one you would like to sharpen. I suggest starting with the file that contains the most frames.
Step 2
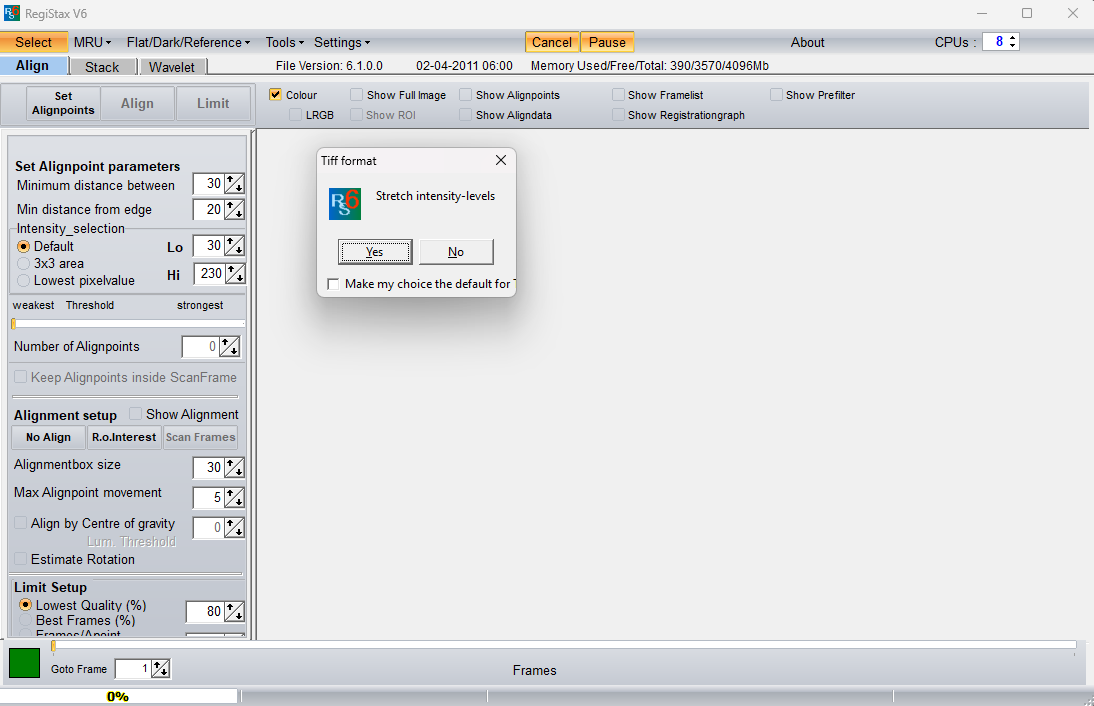
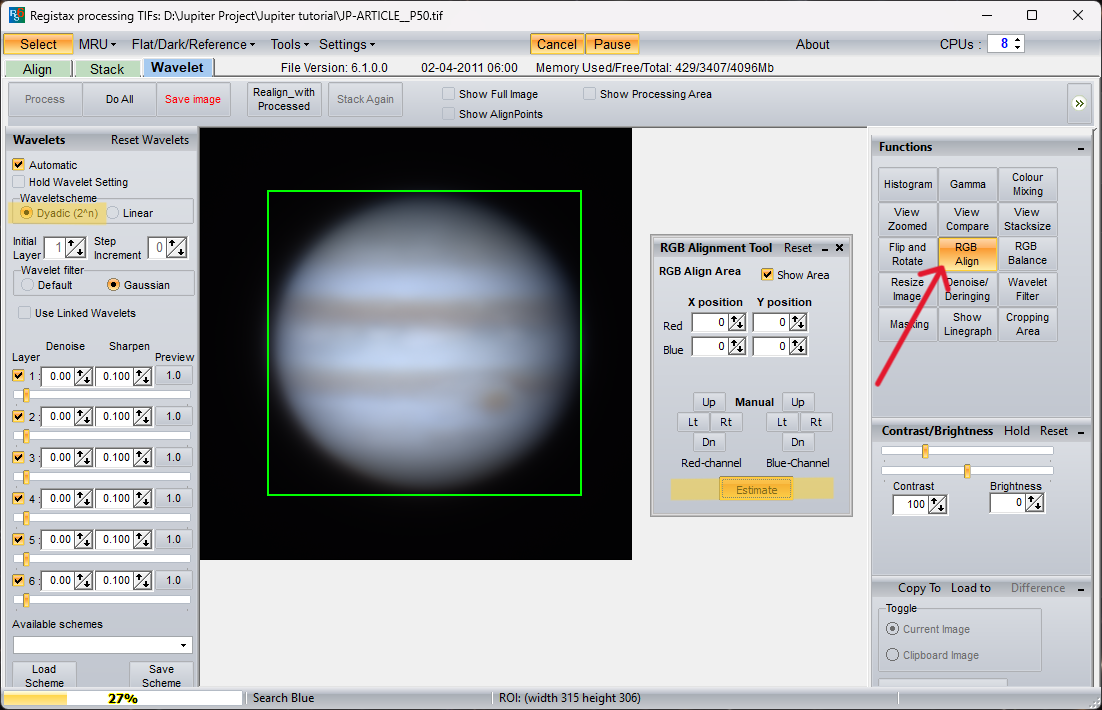
After you open the image, you'll be prompted with the option to "auto stretch intensity levels." I recommend clicking "no," as you will get better results if you stretch them manually. Once the image is loaded, take a moment to review the menu. On the left side, you'll see the wavelets panel. Wavelets are like hidden layers in the image with each level corresponding to a different area or component of the image. By adjusting each layer, you can enhance details and sharpen the overall image. On the right side, you'll find the brightness and contrast sliders below the functions panel, which contains various editing tools. In this tutorial, we will only use the Align RGB, RGB Balance, and Histogram functions.
Step 3
If you did not select this option in AutoStakkert, auto align the RGB channels. Next, navigate to the wavelet panel and set the "waveletscheme" to dyadic and the wavelet filter to Gaussian. Then, head back to the functions panel and select "histogram."
Step 4
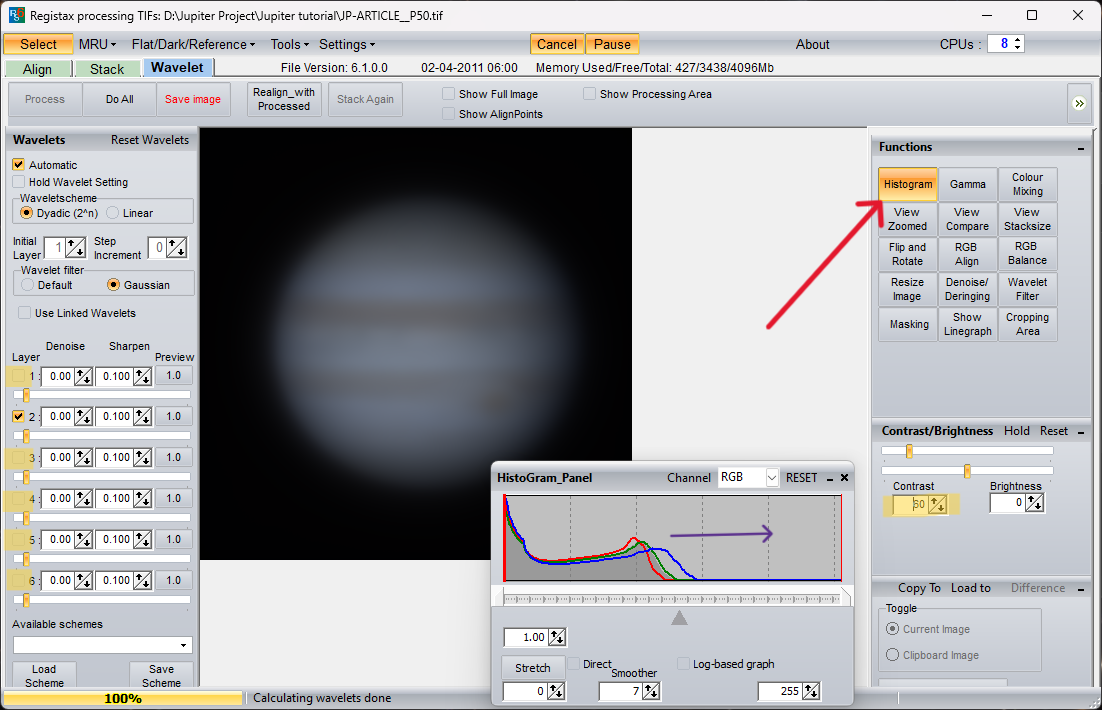
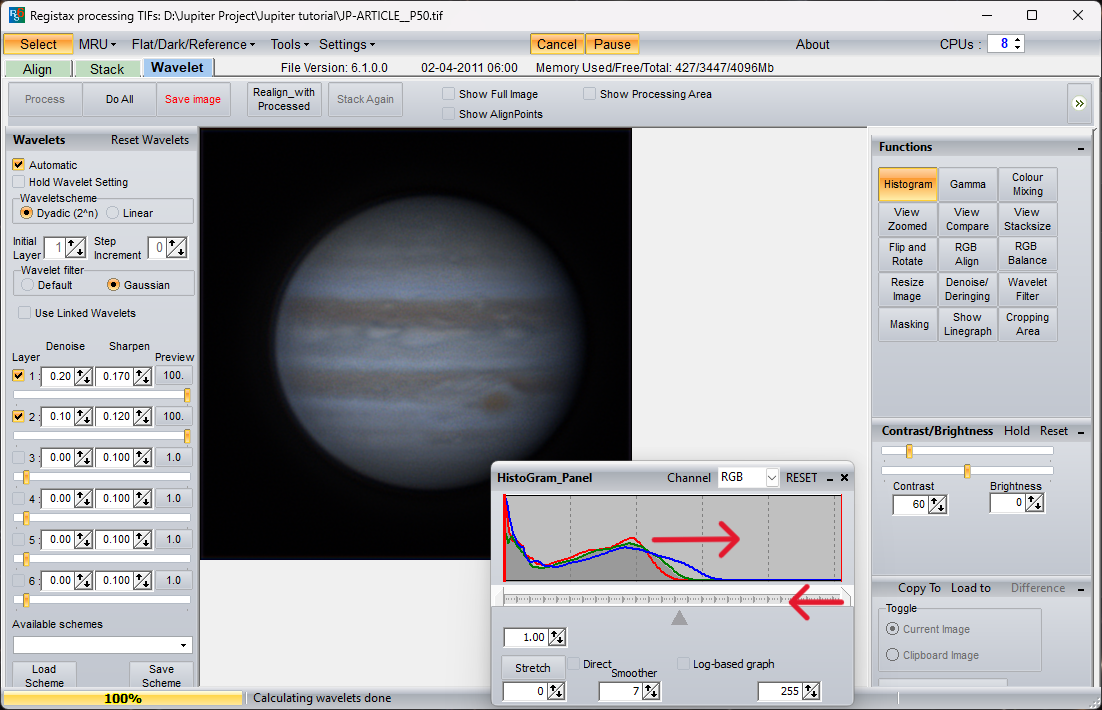
The histogram tool is very important. Without it, you won't be able to pull out enough detail to sharpen the image. With the histogram window open, try stretching the peak to the right. Loosely speaking, the goal is to bring the peak closer to the right hand side, but try to stretch in small increments and leave room to further adjustments. Remember, if you over stretch the levels, simply hit the reset button at the top of the window and begin again. Also, may need to lower the contrast slider to avoid over brightening the image. Once you've made the initial stretches, head back to the wavelet panel.
Step 5
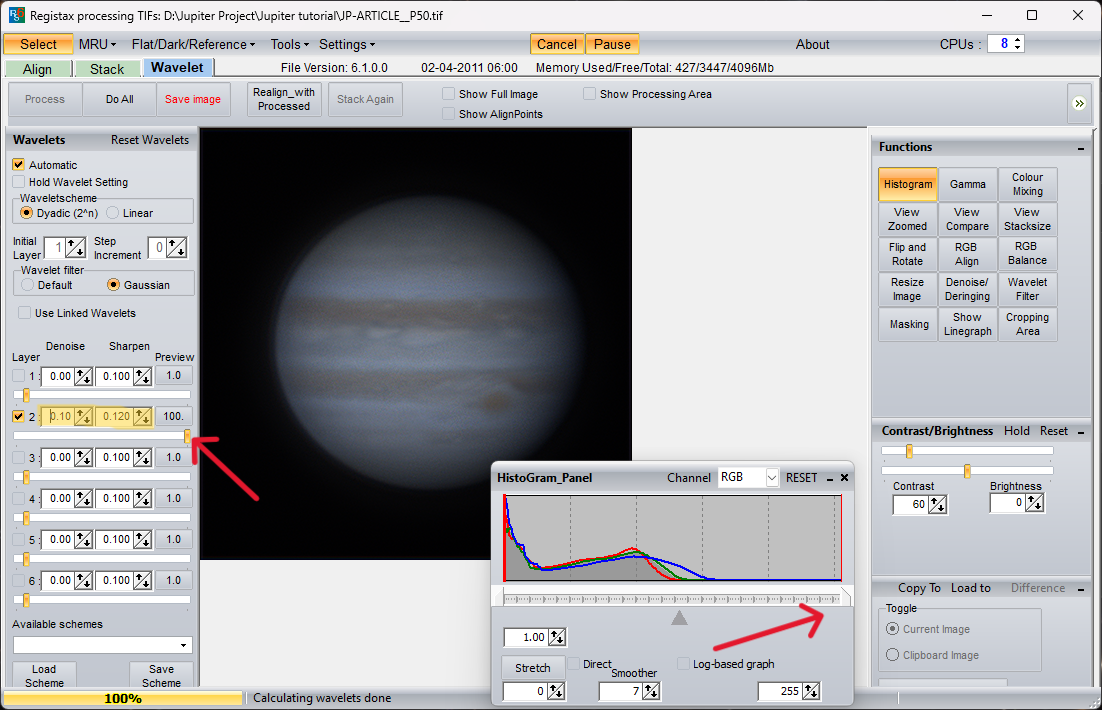
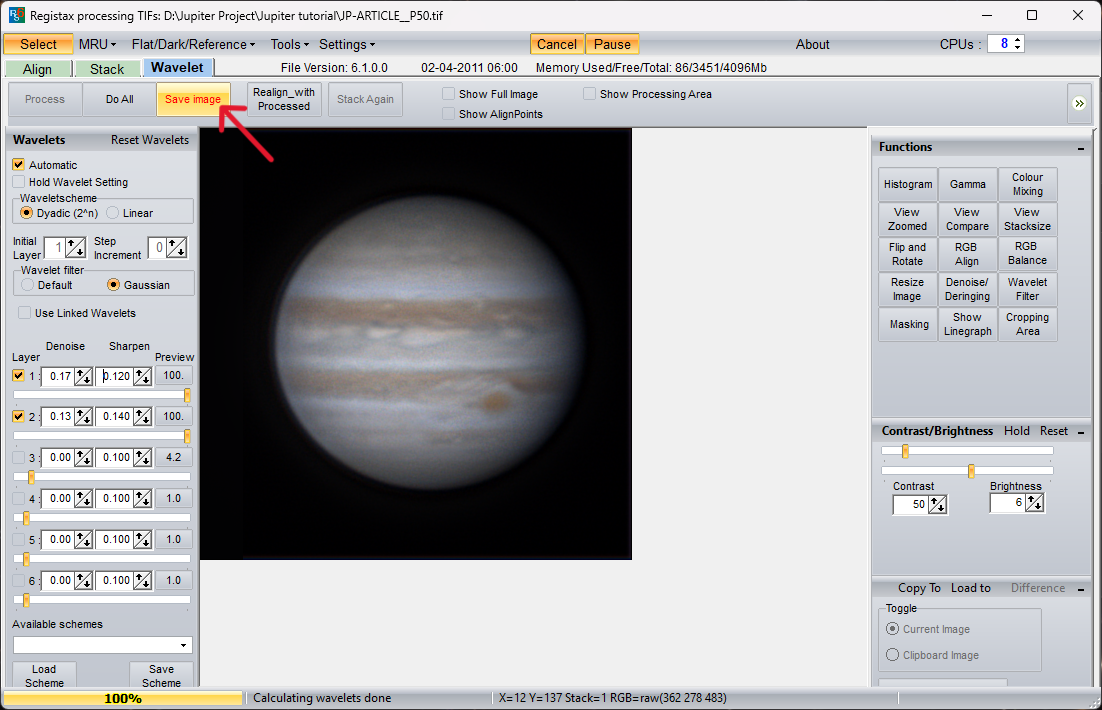
In the wavelet panel, uncheck every layer except for layer two. Then, bring the slider all the way to the right. This will start to bring out details, but it will also introduce noise. Increase the denoise value until the image looks a bit blurry. Then, repeat the same steps for the above layer.
Step 6
At this point, your image should appear significantly sharper, but you may want to try and pull more details out of the image. To do so, return to the histogram and contrast slider. Decrease the contrast so the image is slightly darker. Then, in the histogram window, pull the peak slightly closer to the right until the image has regained some brightness.
Step 7
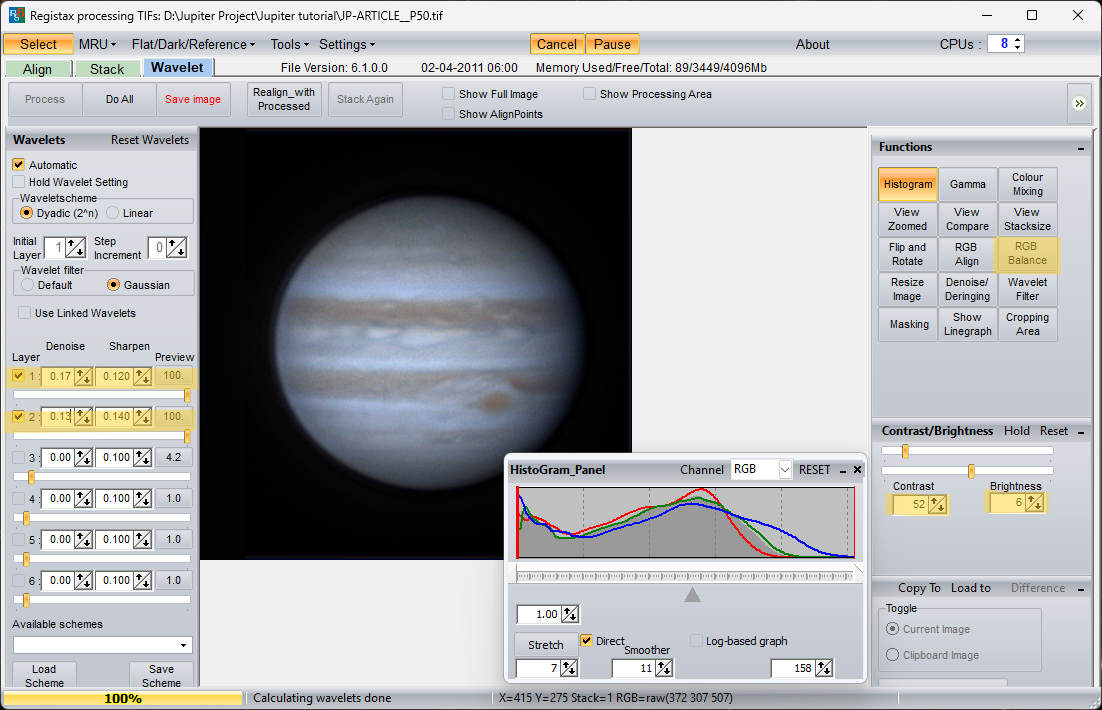
From here, you can further adjust the wavelet sliders. However, keep note of the settings that work, as you may want to return. Then, try enabling the third layer and slowly pulling the slider to the right. This will likely over saturate the image, so be sure to work in small increments. If the image looks fine without the third layer, feel free to keep it disabled. As for the subsequent layers, you might be able to enable them, but its unlikely to improve the overall image quality.
Step 8
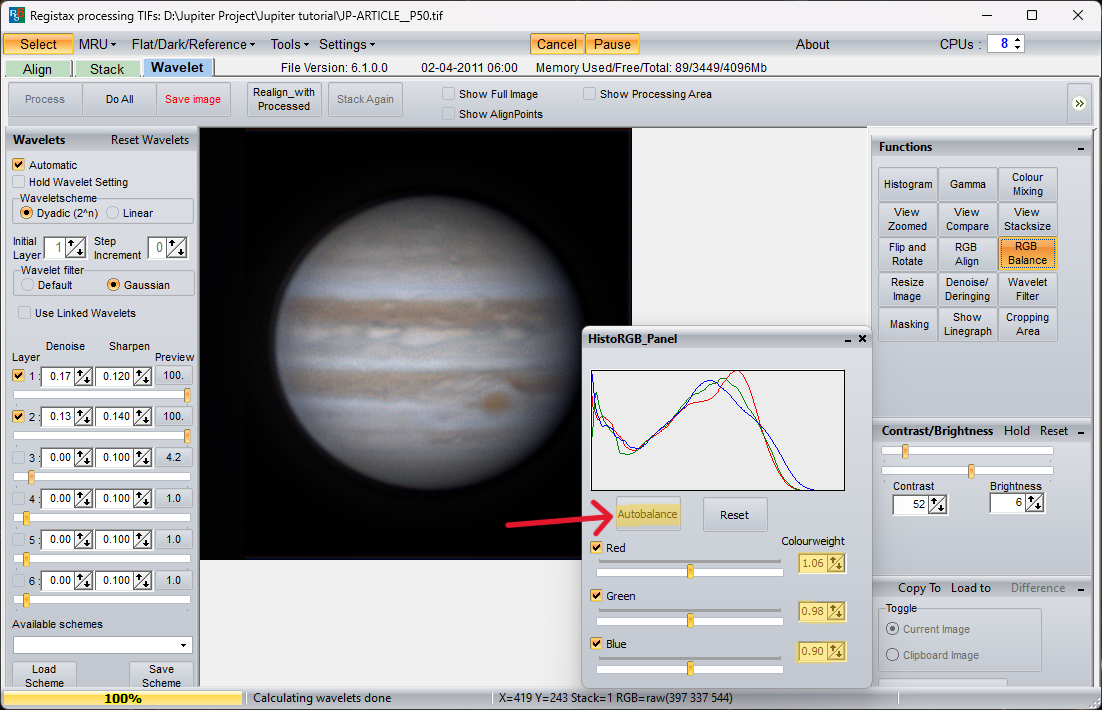
Once you've found a good balance between sharpness and noise, select the "balance RGB" tool from the functions panel and balance the channels.
Step 9
Finally, save the file and, if you'd like, export it to an editing software for further adjustments.
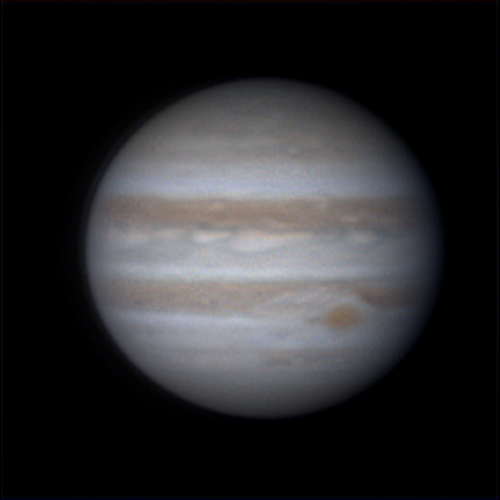
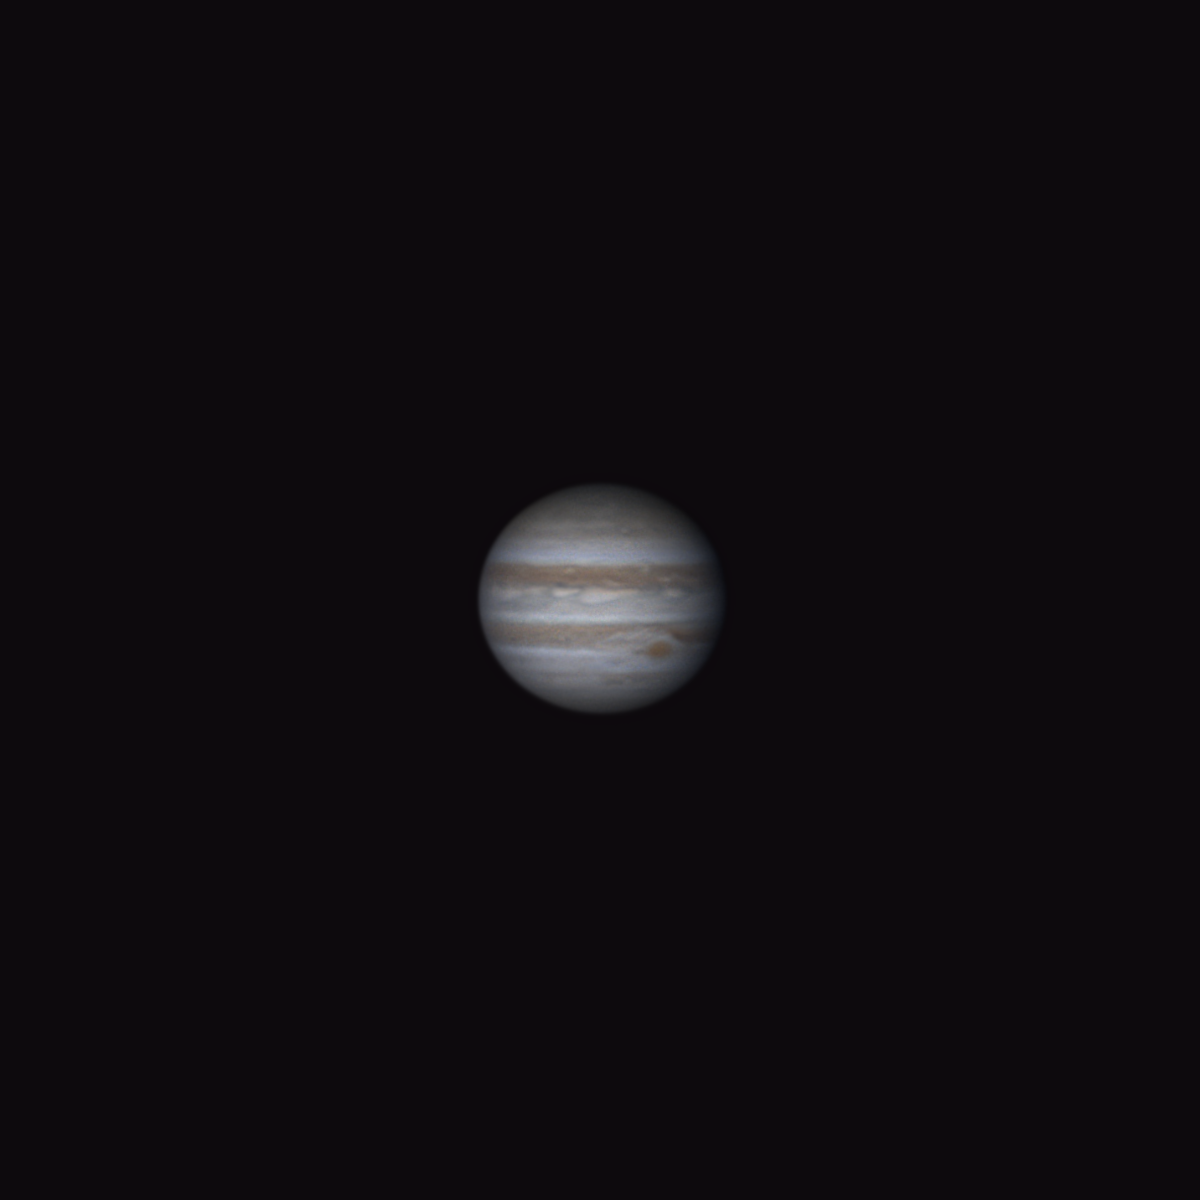
...And there you have it! If you followed the steps correctly, you should have a fully sharpen image of Jupiter! Check out the final images below. The image on the right has been further processed in Photoshop!
Now that you've learned how to plan, capture, and process an image of Jupiter, put your skills to the test and try capturing an image of Saturn or Mars! While these planets are smaller, the steps to capture an image of them are the same!
Learn More
Interested in learning more about telescopes, astronomy, and more? Not sure where to begin? Check out our Astronomy Hub!
Glossary
Aperture
Aperture is the diameter of a telescope's primary mirror or lens listed in millimeters or inches. The bigger the aperture of a telescope, the more light it will gather, allowing the observer to see more detail on celestial objects and ascertain finer details that a telescope of lesser aperture may not see.
Astrophotography
This refers to photography of astronomical bodies and phenomena. Astrophotography is not new, for example the popular T threading still used today harkens from Tamron’s T-mount developed for their 35 mm cameras - however it has seen a notable increase in popularity with improvements in cameras, mounts, filters, and software making astrophotography much more accessible. This is not limited to celestial bodies such as nebulae, planets, or galaxies either, as solar imaging is now more within the reach of the average consumer than ever before.
Bortle Scale
The Bortle scale measures how light polluted a particular area is, and classifies the level of brightness from 1 to 9, with 9 being the brightest. This scale is incredibly helpful for astronomers, as the darker the sky, the more celestial objects are able to be discerned.
Dedicated Astronomy Camera
These cameras don’t look like what one traditionally thinks of when imaging a camera; instead taking the form of cylinders or pucks, with no physical controls, displays, or viewfinders to speak of. These require a computer or WiFi control device to take images, with more advanced models additionally requiring external power. What they give in return for all of these concessions is granular control over the sensor settings, increased sensitivity to wavelengths that more traditional cameras filter out, options for deBayered sensors (true monochrome), designs that easily connect with astronomy equipment, and in some cases cooling for increased performance.
Earth
Also known as the Pale Blue Dot, Earth is the unique planet we are standing on right now. It's located between Venus and Mars in the goldilocks zone of our solar system, making it the third planet from the Sun. Our Earth is estimated to be around four billion years old, and is currently the only known planet to support the necessary conditions for life.
Ecliptic Plane
First described by the Greek astronomer and mathematician Hipparchus, the ecliptic plane is an imaginary two dimensional plane on which planets orbit their host star. Not all celestial objects are confined to the ecliptic plane. For example, Pluto's orbit is tilted by about 17° when compared to the other planets and dwarf planets, making it the largest object to deviate from the ecliptic plane.
EdgeHD Telescope
EdgeHD is Celestron's top of the line flat field aplanatic Schmidt-Cassegrain telescope series. You can buy a variety of apertures, from 8 to 14 inches, as an OTA or as part of a telescope/mount package. EdgeHD telescopes are great for visual use but they really shine for astrophotography. With a wide field of view that is three times flatter than a standard SCT, you will see beautiful, pinpoint stars across the entire field, even if you have a full frame (35 mm) CMOS or CCD camera sensor to satisfy.
Equatorial Mount
An equatorial mount is an astronomy instrument that features two axes of rotation: right ascension (RA) and declination (DEC). Equatorial mounts also feature an additional axis, called the polar axis, that these RA and DEC axes rotate about. This polar axis is to be lined up with Earth’s celestial pole to accurately counteract Earth’s rotation. These mounts are ideal for astrophotography applications, as the addition of a polar axis eliminates the issue of field rotation within captured images.
Focal Length
The focal length is the distance, usually measured in millimeters, between the primary mirror or lens and the point at which the image comes to focus. Generally, classic refractors have a longer focal length, Newtonian reflectors tend to have a focal length that is shorter, and Schmidt-Cassegrain fall somewhere in the middle.
Focal Ratio
The focal ratio is calculated by dividing the aperture (mm) of the primary mirror or lens into the focal length. Example: 2500 mm divided by 254 mm (10") equals an f/ratio of 9.84, which is usually rounded off, in this case to f/10. The focal ratio signifies how quickly a telescope gathers light and tells us something about the telescope's field of view, how long exposures will take during astrophotography sessions, and how much magnification the eyepiece will produce for that telescope.
GoTo (Go-To) Technology
In simple terms, Go-To technology is a telescope mount’s ability to slew to an object in space. This process requires alignment with the night sky, and is achieved through correlation with the optics of the telescope and software. Alignment can be achieved a number of ways and is necessary in order to determine the pointing position of the telescope. The user can either calibrate their telescope with 1-3 well-known bright stars or planets, or can utilize plate solving if their software offers it. In plate solving, the field of view is compared to a database, and the software can then determine the exact positioning of the telescope. Plate solving is considered more accurate than star alignment, and is widely featured within the smart telescopes on the market today for accurate Go-To functionality.
Image Capture Software
Astrophotography image capture software are specialized pieces of software designed to operate your astrophotography equipment. There are plenty of options available, though some of the most popular ones are N.I.N.A, Astro Photography Tool, Sequence Generator Pro, and SharpCap, just to name a few. These applications have been designed to provide seamless imaging sessions, allowing extensive opportunities such as target selection, target framing, plate solving, autoguiding, image acquisition, camera cooling, automation, and plenty more.
Latitude
Latitude is one of two coordinates used to find a position on a globe. Lower latitudes are closer to the equator, while higher latitudes are closer to the poles.
Light pollution
Light pollution is the brightening of the atmosphere due to lights from street lamps, other forms of artificial light, and even the Moon. As light enters the atmosphere, it washes out the night sky, making it very difficult to observe the stars, nebulae, and planets. In order to combat light pollution in astrophotography, special filters have been developed to cut through excess light and enhance images. These filters are known as City Light Suppression filters, commonly referred to as CLS filters.
Megapixels
A megapixel is one million pixels, and refers to the number of pixels a sensor contains. For example, if a sensor has 2,000,000 pixels, then this would be a 2-megapixel (2MP) sensor. These pixels capture light and color from the subject, and when combined, the signal collected results in an image. This measurement of the pixels available determines the resolution of a sensor and overall quality of the image produced. In general, the more pixels a sensor has, the higher resolution images that sensor will yield.
Moon
A moon is a naturally occurring object that orbits a planet or other celestial bodies (excluding stars). These are also called natural satellites. The Moon, capitalized is the Earth's only natural satellite and is the brightest object in the night sky. The Moon stabilizes the tilt Earth's orbit, causing the seasons, and tides.
Nadir
The nadir is geometrical term which describes an imaginary line running below and perpendicular to a two dimensional plane. In the context of visual astronomy, it refers to the point directly below you when standing upright. While less commonly used than its opposing term zenith, it can be useful when describing the location of objects that are below your celestial horizon.
Optics
In basic terms, this refers to the system that “collects” and focuses incoming light down to a smaller, brighter, magnified image that is then viewed through an eyepiece or captured by a camera. There are different ways to accomplish this, most commonly with glass elements (refractor) or with systems of mirrors (reflector). Each approach comes with its own set of tradeoffs, whether that be chromatic aberration, coma, etc. which can sometimes be mitigated with upgraded optical components (ED glass) or additional corrective components (like coma correctors). Numbers of standard optical designs have emerged as well, such as doublets, triplets, Petvals, Newtonians, SCTs, RCs, and more.
Orbit
An orbit is a predictable and periodic path an object follows as it moves through the space-time warped by a more massive celestial object. We have known about celestial orbits since early antiquity, however, it was not until Johannes Kepler formalized the three laws of planetary motion that we gained the ability to acutely predict the movements of our planetary neighbors.
Planet
A planet is a type of celestial body that is created as the proto-planetary disk of a young star system is pulled inwards towards the host star. As this disk contracts, its matter condenses into asteroids, comets, and ionized gas clouds. These celestial objects inevitably collide with one another to form protoplanets, dwarf planets, and eventually, planets like those easily viewed in our night sky.
Schmidt-Cassegrain Telescope (SCT)
The acronym SCT stands for Schmidt-Cassegrain Telescope, one of the most popular telescope designs in amateur astronomy today. A Schmidt-Cassegrain, which belongs more broadly to the Catadioptric telescope type, uses a folded optical design incorporating both mirrors and lenses to gather and bring the light to focus. The folded light path allows for a short tube assembly even with relatively large apertures of 8" or more. A shorter tube length makes the SCT far more portable than a classic Newtonian or refractor of the same aperture.
Seeing Conditions
This term refers to the overall clarity of the night sky at any given time and within any given location. This clarity fluctuates constantly, as it is based on numerous different atmospheric conditions, such as humidity, turbulence, high clouds, heat, and plenty more. To give an example, you may have witnessed stars in the night sky “twinkle.” This is due to our atmosphere distorting their incoming light, causing a twinkling effect. When it comes to astronomy, especially when observing the planets and the Moon, seeing conditions are very important to consider, as these distortions can cause the subjects to become blurred and unfocused. It’s best practice to observe celestial objects when the atmosphere is most stable.
Sensor
A camera sensor is the main component of a DSLR, deep sky camera, or smart telescope that turns incoming light into data that can then be displayed on digital devices like mobile phones or computers. Accordingly, these are just as important as the optics of a system for a quality image. There are a wide variety of specifications that are important for a sensor - physical size, pixel size, resolution, dynamic range, amounts of image “noise”, and other technologies such as back-side illumination. As a result there is also a wide variety of sensors available that attempt to balance these in differing ways for different applications and price points.
Sky Glow
As light interacts with the various component chemicals that make up our atmosphere, it occasionally changes direction and intensity. We perceive this interaction as a reduction in the transparency of our atmosphere, which can impact the visibility of objects in the night sky. Sky glow can be caused by terrestrial light pollution, sunlight, and even moonlight.
Solar Midnight
Unlike true midnight, solar midnight is the point where the Sun is closest to your nadir (the point directly below your feet). Solar midnight also delineates the half way mark between dusk and dawn.
Solar noon
Unlike true noon, solar noon is the point where the Sun is closest to your zenith (the point directly above your head when standing upright). Solar noon also delineates the half way mark between dawn and dusk.
Solar System
A solar system is any collection of celestial objects, and structures, found orbiting a star, or set of stars. Our solar system is home to many planets, dwarf planets, comets, and asteroids, but these are just some of the celestial objects that come together to form a solar system.
Sun
The Sun is the star in which our planet (others in our solar system) orbit around. Like other stars, the Sun is a luminous sphere of plasma held together by the collective gravitational attraction of hydrogen and helium atoms.
Tracking Rates
Unlike the tracking mode which denotes the way in which the mount will track the sky, tracking rates determine the speed at which the mount will track the sky. This can be selected from the mount’s hand controller or through computer software, and should be selected based on the target that is being tracked. Typically, there are three tracking rates: Sidereal, Lunar, and Solar. The sidereal tracking rate moves the mount at a speed that is equivalent in magnitude, yet opposite in direction as the speed of Earth’s rotation. This is ideal for all targets within the night sky save the Moon and the Sun, in which the lunar and solar tracking rates are appropriate for.
Visual Observation
Visual observation is the study of celestial objects using specialized visual equipment like telescopes and binoculars, or simply viewing the sky with your naked eye. Born from our species' first attempts to understand the many mysterious objects that fill our night sky, visual astronomy has blossomed into an expansive field of study, and inspired many to join in the pursuit of knowledge that beckoned our curious ancestors.
Zenith
The zenith is commonly used geometrical term which describes an imaginary line running above and perpendicular to a two dimensional plane. For visual astronomy, the zenith simply refers to the point directly above your head when standing upright, and can be a useful point of reference when describing the position of celestial objects in our night sky.


