


At some point, most amateurs will try their hand at imaging the moon and planets. Using modern techniques, these very bright targets can be captured in high resolution without the need for investing many thousands of dollars in gear. All that is needed is a quality telescope on a tracking mount, a Barlow lens, a laptop computer, and an inexpensive CMOS camera.
In the past, images of the solar system were acquired by capturing a single image through a simple eyepiece projection adapter (an accessory that allowed a medium to high power eyepiece to be placed between the telescope and camera body) attached to the focuser of a telescope. It has largely been replaced by a process that is known as "Lucky Imaging". This method allows for the capture of hundreds to thousands of individual frames taken with a high-speed video camera in a very short amount of time, generally about 2 minutes, and then stacking the best of those frames to form a final image that can be further enhanced with sharpening techniques. The latter method certainly yields far greater details and, although initially a bit more difficult to master, it is not overwhelmingly so, and good results can be had with just a bit of practice.
I will be the first to agree that there still is a place for single shots of the Moon and Sun using a DSLR and that one can capture stunning images without the need for a specialized high-speed video camera. The image below is a testament to that.
 Flight to Venus by Dave
Barrett
Flight to Venus by Dave
Barrett
However, the main advantage of these very sensitive high-speed video cameras is that they can, to a large degree, overcome the blurring effects of our ever-turbulent atmosphere due to their extremely short exposure times, thereby capturing sharp details during those rare moments of clarity. By capturing many of these high-quality frames and then stacking the sharpest of these, the backyard astronomer can produce an image that holds far more details than any single shot captured by itself and, in essence, can "beat the seeing".
Before I go any further, I want to make it clear that this very short tutorial is not meant to be a comprehensive step-by-step process. It is more of a guideline to show you how the process unfolds. Once you get out there and actually put that knowledge into practice, you will learn the in's and out's of the procedure and continue to improve over time.
Using a well-known formula to guarantee that you are sampling the data with enough magnification (but not too much!), simply use a Barlow lens that magnifies your telescope's focal ratio to a number that is roughly 6 times the pixel size of the CMOS camera that you intend to use. For example, say that your camera's sensor has a pixel size of 3.75 microns. Multiply this number by 6 and you'll get 22.5. You would do well to try to magnify the focal ratio of your telescope so that it comes close to this number. In this way, you are putting together a system that resolves to its very limits. Therefore, if you have a f/10 SCT then a 2x Barlow will bring you to f/20, which is very close to the 22.5 number that you are shooting for with this particular camera. An f/4 Newtonian will need a 5x Barlow to get close to this number, and so on.
Once you have worked out the magnification factor of the Barlow lens that you will need, choose a night where your target is reasonably high above the horizon. This way you can avoid the majority of the worst seeing conditions. I would also recommend that you take the time to make sure that your telescope has acclimated to the night-time temperature and that your optics are as perfectly collimated as you can make them. It would now be a good idea to test the seeing conditions by inserting your favorite high power eyepiece and view the image to verify that the atmosphere is stable enough to yield good results. Now, you can finally begin to collect data!
One thing that you will absolutely need to pay close attention to is focus...it needs to be as accurate as possible. I cannot emphasize this enough. If your focus is off by even a little bit the best capture and processing techniques will not recover that lost data.
I would recommend that you download and get acquainted with one of the following free capture programs: Firecapture or Sharpcap
You will need to use one of these programs to capture your initial video sequence. My target time for the video is generally 2 to 3 minutes using a 6" to 8" telescope. Much longer than that and the rotation of the planet itself can cause some blurring. There are techniques and programs that allow you to extend that time but we will not go into that here.
Once the video of the Sun, Moon, or planets is captured and the video file is saved to your computer, you will need to stack the individual frames. I would recommend that you use the following program to accurately stack your best frames and create the final stacked image: AutoStakkert2
Once you have stacked the appropriate number of frames (I generally shoot for the best 2500) for your current seeing conditions to form a final stacked image, take that stacked image into a program called Registax and utilize their great sharpening program.
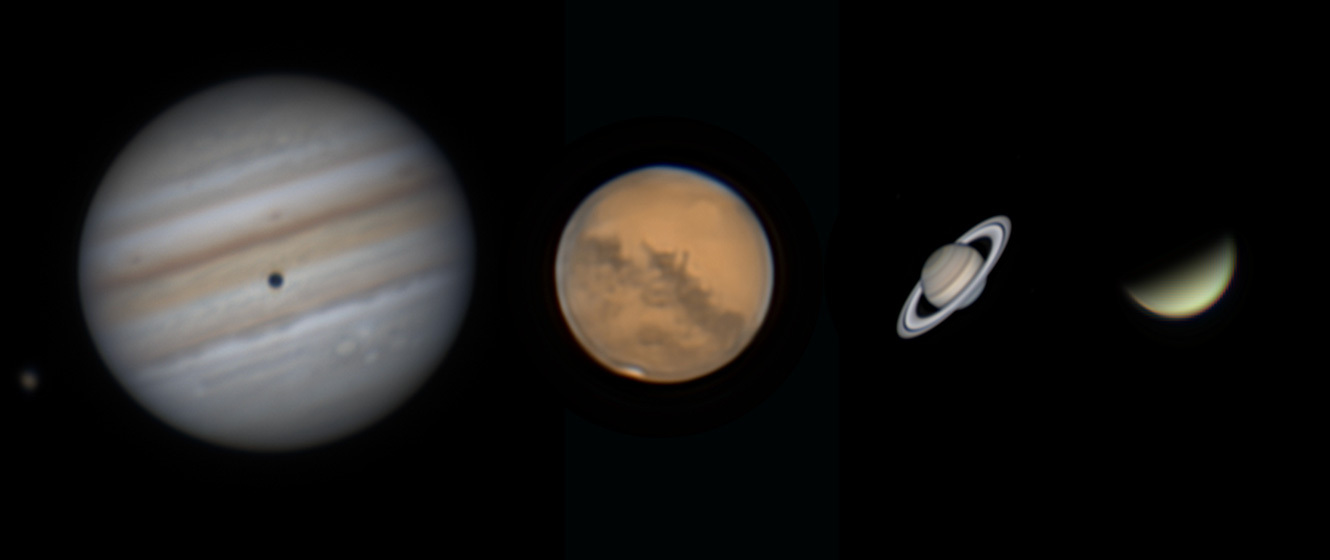
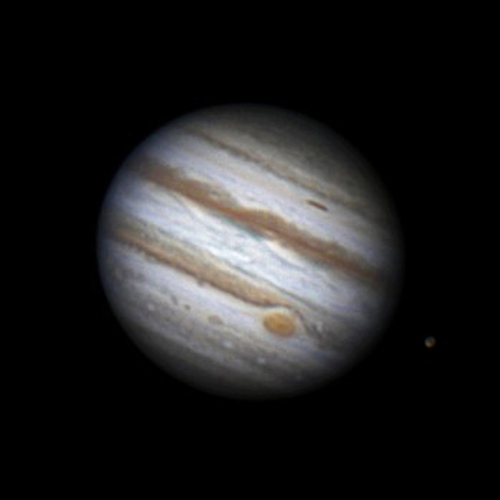
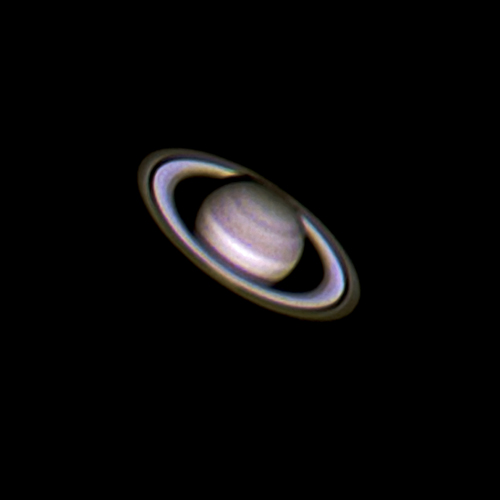
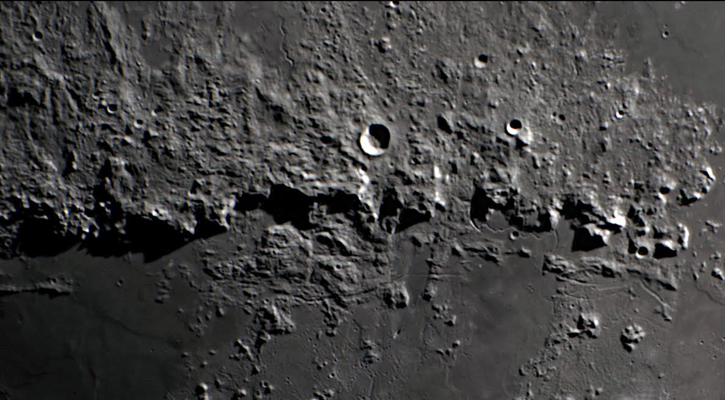
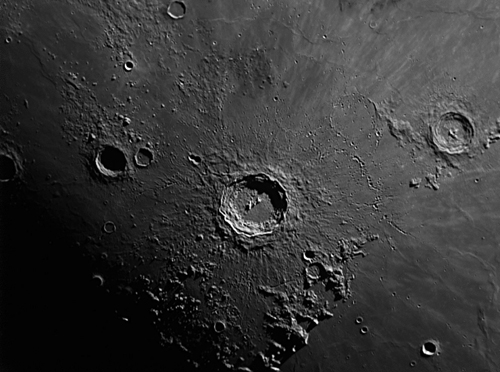
Below are some images of the moon and planets I was able to capture using either a 6" & 8" Newtonian telescope by following the guidelines listed above. I hope that this tutorial has inspired you to try your hand at imaging these fascinating targets. Please share your results with us!
Click the arrow above to see MLA, APA, and Chicago Manual of Style citations.
MLA:
Barrett, Dave. "Imaging the Planets," AstronomyHub, High Point Scientific, 20 July. 2023, https://www.highpointscientific.com/astronomy-hub/post/imaging-the-planets.
APA:
Barrett, D. (2023, July 20). Imaging the planets. High Point Scientific. https://www.highpointscientific.com/astronomy-hub/post/imaging-the-planets
Chicago Manual of Style:
Bibliography:
Dave Barrett. "Imaging the Planets," AstronomyHub (blog), High Point Scientific, July 20, 2023. https://www.highpointscientific.com/astronomy-hub/post/imaging-the-planets.
Footnote:
Dave Barrett, "Imaging the Planets," AstronomyHub, High Point Scientific, July 20, 2023, https://www.highpointscientific.com/astronomy-hub/post/imaging-the-planets.
This Article was Last Updated on 07/20/2023


