


Astrophotography revolves largely around resolution and sampling. A well sampled astrophotography setup is going to produce photos with details that are sharp and well resolved: they won’t be too pixelated or too soft. To achieve this, astrophotographers must properly match their focal length and pixel size with their seeing conditions. We will mention how to successfully achieve a well sampled scope-camera combination but first, a basic understanding of what oversampling and undersampling are will help you understand how these concepts are connected.
How Do I Determine My Resolution?
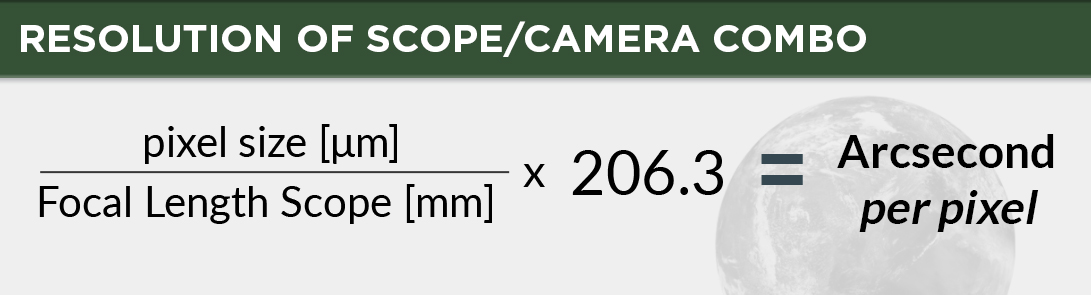
Astrophotographers typically compare their calculated resolution to their seeing conditions in order to determine if they are oversampled or undersampled. We will dive into these two terms here in a bit. Calculated resolution is displayed as arcseconds per pixel (“/pixel). It’s calculated by dividing your pixel size by your scope's focal length and then multiplying this by 206.3.
So what does this all mean? This means that you must pair your focal length, pixel size, and seeing conditions together to create a well sampled astro imaging setup. You want your calculated resolution to be about ½ the quality of your seeing conditions. Seeing conditions are measured in arcseconds ( “ ). Great seeing is typically labeled as 1.0” and poor seeing is labeled as 5.0”. Under average seeing conditions, a resolution of 1.5”/pixel to 3.0”/pixel is recommended. A resolution lower than 1.0”/pixel may result in an oversampled image and a resolution above 3.0”/pixel may result in an undersampled image. This is only a guideline. Please keep in mind that you may be sampled above or below, but if your seeing conditions support it, then you are considered well sampled!
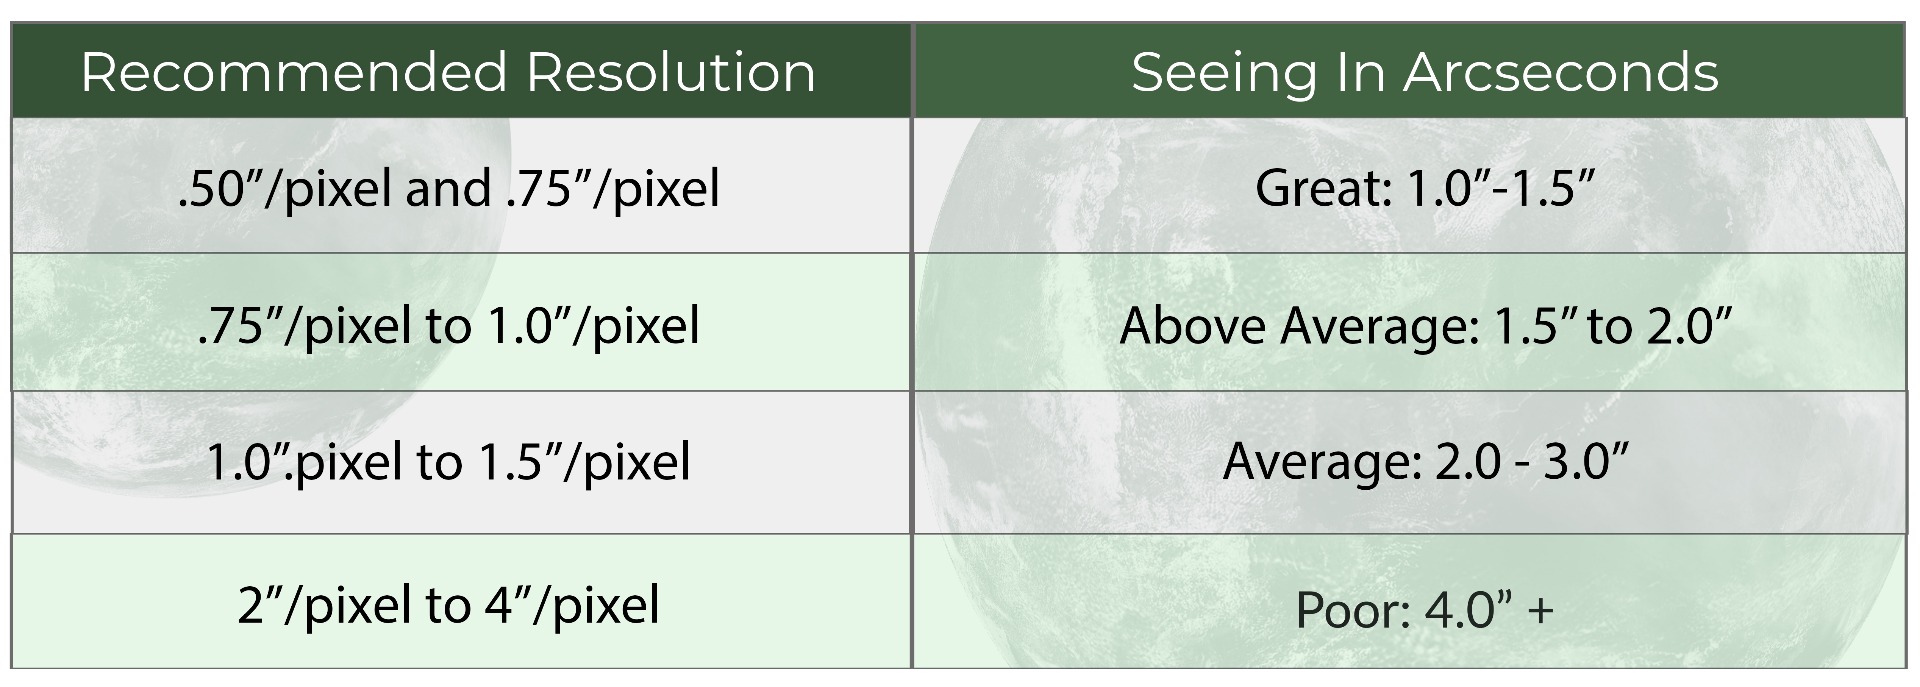
Here at High Point Scientific, we like to use this scale to determine the best resolution for you.
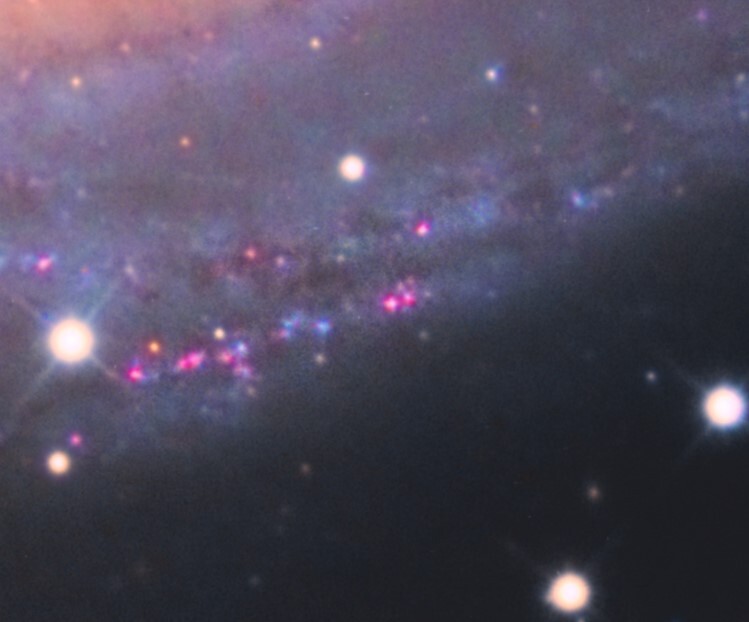
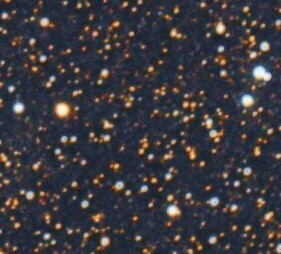
When astrophotographers incorrectly pair their focal length and pixel size with their seeing conditions it can result in either undersampling or oversampling. Undersampling occurs when the pixels on your camera sensor are too large for a given scope’s focal length. This creates blocky, pixelated stars. This indicates that there are not enough pixels within the star to create a round star shape. Oversampling, on the other hand, occurs when the camera’s pixels are too small for a given scope’s focal length. The incoming light is being spread over too many pixels resulting in a soft and bloated image. Generally, under average seeing conditions, a very short focal length scope paired with large pixels will produce undersampled results. A long focal length scope paired with small pixels will produce oversampled results. Here is an example of an oversampled image (left) and an undersampled (right).
If you would like more assistance in finding the best combination of scope and camera for you, take a look at our “Choosing the Best Deep Sky Camera” article here: The Best Deep Sky Camera. While this may help you pick a camera and scope well suited for your local seeing conditions, here are some often asked questions about oversampling and undersampling that are not answered in the article mentioned above.
Undersampling vs. Oversampling: Which is better?
We typically recommend oversampling as there are more corrective measures you can take to combat it. Actions such as deconvolution in PixInsight are meant to tighten and sharpen stars and detail in oversampled photos. When oversampling, you do need to increase your total exposure time to achieve a given signal to noise ratio but being oversampled allows you to take advantage of those nights with great atmospheric conditions.
Is sampling as important for planetary imaging as it is for deep sky imaging?
Planetary imaging is a different animal in terms of resolution. Due to lucky imaging techniques, we always recommend oversampling for planetary imaging setups. With a high frame rate planetary camera, you can typically capture thousands of frames in a few minutes. A small percentage of these frames are captured within very short pockets of stable atmospheric conditions. Out of the thousands of frames that one has captured during a planetary or lunar imaging session, they can choose to stack only the best 10% or 25% of frames for sharpest results! Planetary imaging setups are typically very oversampled at .15”/pixel to .30”/pixel.
How important is it, really?
Correctly sampling your pixel size and focal length is important to those who are rather experienced in their image capture abilities and post processing abilities. For those interested in widefield astro imaging with a basic imaging setup, aiming for a resolution of 1”/pixel to 3”/pixel will typically produce good results under average seeing conditions with average equipment! This is nothing you should lose sleep over: if you are a tad oversampled or undersampled, you will likely be unable to tell the difference as there are simply too many variables influencing your results.

Sampling and resolution can be an intimidating subject to understand, let alone to apply it correctly to your telescope and camera purchases! Our non-commissioned product advisors possess great knowledge surrounding these concepts and are happy to ensure that you are purchasing the best astrophotography gear for you. Please reach out to us with any questions!
Click the arrow above to see MLA, APA, and Chicago Manual of Style citations.
MLA:
High Point Scientific Team. "Undersampling & Oversampling in Astrophotography," AstronomyHub, High Point Scientific, 9 May 2023, https://www.highpointscientific.com/astronomy-hub/post/astro-photography-guides/undersampling-and-oversampling-in-astrophotography.
APA:
High Point Scientific Team. (2023, May 9). Undersampling & oversampling in astrophotography. High Point Scientific. https://www.highpointscientific.com/astronomy-hub/post/astro-photography-guides/undersampling-and-oversampling-in-astrophotography
Chicago Manual of Style:
Bibliography:
High Point Scientific Team. "Undersampling & Oversampling in Astrophotography," AstronomyHub (blog), High Point Scientific, May 9, 2023. https://www.highpointscientific.com/astronomy-hub/post/astro-photography-guides/undersampling-and-oversampling-in-astrophotography.
Footnote:
High Point Scientific Team, "Undersampling & Oversampling in Astrophotography," AstronomyHub, High Point Scientific, May 9, 2023. https://www.highpointscientific.com/astronomy-hub/post/astro-photography-guides/undersampling-and-oversampling-in-astrophotography.
This Article was Last Updated on 5/9/2023


