


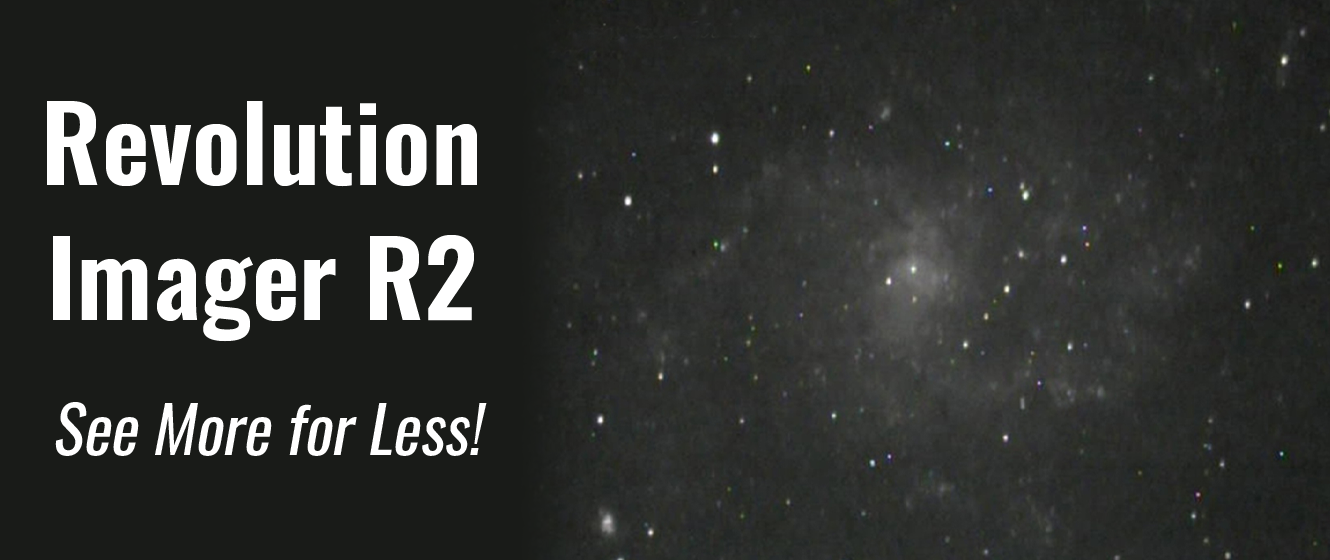
As my computerized mount slewed to Abell 2065, a galaxy cluster in the constellation of Corona Borealis, my eyes widened and a smile of satisfaction came to my face. This incredibly faint target had been on my observing list for many years, using my own 24” Dobsonian telescope, and I had never seen it with any level of certainty. Fast forward twenty years, and here I am using what I would have considered a tiny scope back in those days, a 6” f4 Newtonian, under far brighter skies, and that same target was seen with ease. On top of that, at the time of this observation, the galaxy cluster was only about 35 degrees above my western horizon, certainly not in the darkest part of my sky, far from it! The difference was that this time, instead of squinting through an eyepiece, I was using the incredible Revolution Imager!
A week later with the nearly full moon high in the sky, I find myself outside viewing several members of the Galaxy Cluster Abell 2256 in Ursa Minor, again using the Revolution Imager R2 with this same telescope. This incredibly distant cluster of galaxies lies roughly 900 million light-years from Earth. This sighting would not have been possible visually under those same conditions regardless of what telescope I would have used.
I have spoken with many folks over the years who desired to see more from their own light polluted backyards, and who were ready to spend a bundle of money in order to do so. Usually, this meant purchasing a very large and cumbersome telescope, hopefully not something that would start to collect dust in a closet or basement after only a few months of use. Twenty years ago I certainly would have agreed with them and told them to choose the largest telescope that they could easily transport, find the darkest location within an easy drive from their home, educate them on averted vision techniques, and let them know that they needed to keep their expectations down a bit when it came to the fainter targets. Now, I almost always mention EAA or “Electronic Assisted Astronomy”, the process of using a highly sensitive camera in place of a traditional eyepiece in order to see far deeper than what would have otherwise been possible. I have been pretty vocal about my opinions regarding this relatively new way of “seeing” the night sky, especially with folks who do not wish to own a giant telescope nor have a chance to regularly travel to dark skies. As a 30 year veteran of this wonderful hobby and a deep sky junkie from the very beginning, I know what large telescopes are capable of showing under different levels of light pollution. Visually when used under the same viewing conditions, no telescope that I have ever owned can reveal spiral structure in distant galaxies the way that the Revolution Imager R2 can, using my very portable 6” Newtonian.

Spiral structure seen in NGC 6946, the “Fireworks Galaxy”

Internal structure seen within M82, the “Cigar Galaxy”
The night sky images in this tutorial
Please note: All of the night sky images in this tutorial were screenshots captured with the "Revolution Imager LCD Digital Video Recorder (DVR)" accessory, sold separately. The actual images seen on the included 7” monitor definitely showed higher contrast with more vibrant colors than the images captured with this handy accessory so keep that in mind. With that said, I have not enhanced the images seen within this tutorial.
The purpose of this tutorial
Several years ago High Point Scientific sent me an R2 kit and asked me to try it out for a few weeks so that I could become acquainted with it, in order to help our customers with any questions that they might have. As excited as I was in putting this accessory to the test, I must tell you that the first few nights I was quite baffled and frustrated. My initial complaints were “There are so many wires!”, “What do all these menu options do?”, and “The screen is way too bright!”. I have heard these same complaints echoed from many of our customers regarding this accessory. Thankfully, I pushed through the learning curve and quickly grew to love this product. So much so that I have recently purchased one for my own use under the stars! In fact, this product has honestly reignited my passion for EAA! The reason for this, I believe, is that when using the supplied 7” monitor, this system simply comes closer to true visual astronomy than anything else that I have used. To a large degree, you feel more in tune with the night sky with less technology poking through and getting in the way.
Among other things, I will be addressing the above three complaints within this tutorial and will show you how you too can push this accessory to its limits. As long as you have access to a telescope with a solid and accurate tracking mount, I guarantee that when used properly, you will be able to “see” many faint deep space objects in far more detail than ever before using traditional observing techniques! If you do not yet have a telescope or are upgrading to something better suited for EAA, I will give you some tips on what to look for in a telescope. My goal is to minimize your own learning curve so that you can get set up quickly and start viewing the wonders of our incredibly vast universe right away! You will learn how to navigate through the camera’s menu options with confidence, thereby tuning the camera’s gain, exposure, and contrast settings in order to properly match your own telescope’s focal ratio to your sky conditions.
Before I continue with this tutorial, let me first set the record straight. In my humble opinion, this camera package is not meant to replace a high-quality eyepiece when viewing the moon, planets, or double stars, nor will it compete with the high-resolution CMOS cameras that are capturing incredibly detailed images of the night sky when using much longer total exposures. I use these cameras all the time and they are truly amazing performers. One should therefore not view the R2 as a camera that takes pretty pictures to hang on your wall, but instead, more like an “eyepiece on steroids”, able to, very quickly, reveal details in small to medium sized deep-sky objects that no eyepiece can. If this product is viewed in that light then I believe that folks will more fully appreciate its purpose within their collection of gear.

The delicate spiral structure of NGC 7479
It is my belief that the thrill one feels while viewing the moon and planets through the eyepiece of a fine telescope can never be recaptured when looking at an image of the same target. Also, the view of a tight or colorful double star seen through the eyepiece of a high-quality telescope, under good seeing conditions, can be absolutely breathtaking, and I have yet to see any image even come close to the beauty of what the eye can see when viewing these types of targets. I am therefore never going to sell off my collection of eyepieces or high-quality telescopes, nor will I ever condemn anyone who wants to see distant deep sky objects with their own eyes. I would be the biggest hypocrite should I do so! With that said, for the deep sky enthusiasts among you who wish to see as much as possible within that realm of objects, without the need of either a computer or a giant Newtonian, then this product is certainly worthy of your consideration!
Although you certainly can use a laptop with the R2, one glaring difference between this particular camera package and an astronomically dedicated CMOS camera is that with the latter, you absolutely need to use a computer to “see” what the camera sees. Although I do not have an issue with this personally, I have spoken to many folks who do not wish to lug their expensive laptops out in the cold. Also, when using these incredibly sophisticated stacking programs on your laptop, you simply can’t get away from the fact that there is a lot of technology between you and the universe. Call me a romantic or just old fashioned, but I like the simplicity of the R2, where if necessary, you can quickly and easily make changes to the number of stacks recorded, the contrast, color, or exposure time, and then simply exit out of the menu so that all you see on the screen is the beautiful night sky. I guess that the connection that I feel with the universe after looking through eyepieces for so many years has made this an important advantage.
Another thing to consider is that without a laptop, when the maximum exposure time tops out at 5.12 seconds and the maximum number of stacks that appreciably impact the image quality is 6 (although the program continues to stack, and you will continue to see small gains for a short time beyond that), you find yourself pushing your eyes, your scope, and the camera to their very limits to reveal the most deep sky detail. There is a challenge that you simply don’t feel when stacking on a laptop. This is because when using a laptop with programs such as Sharpcap, (should you have access to an accurately polar aligned equatorial mount or a fork mount on a wedge) you can simply keep stacking for as long as you wish. If you don’t see the details that you are looking for within a minute or so, you can simply sit staring at the screen for 20 minutes or longer and those details will usually come. With the stock Revolution Imager R2 package, I feel that every photon that strikes the sensor counts and you seem to appreciate the details that you can see a bit more because of the challenge, since there is now a time limit on how long you can keep stacking and building up details.
Keep in mind that the stacking procedure in itself does not make the target any brighter, it simply averages out the noisy background, allowing faint details originally lost in the noise to now be revealed. The CCD camera used with the R2 kit is extremely sensitive and seems to create an image that is less noisy than the CMOS cameras that I am used to using. It does not seem to require as many stacks to smooth out the background and therefore builds up those details within faint deep sky objects extremely fast.
Despite the time limit imposed on someone using the stock R2 kit without a computer, I am honestly surprised each and every clear night with what I can see! In fact, I find that I am searching the sky much like I did 20 years ago with the big Dobsonian, looking for interesting targets to scrutinize. I am almost never disappointed these days with EAA, and that is not something that I could have ever said before.
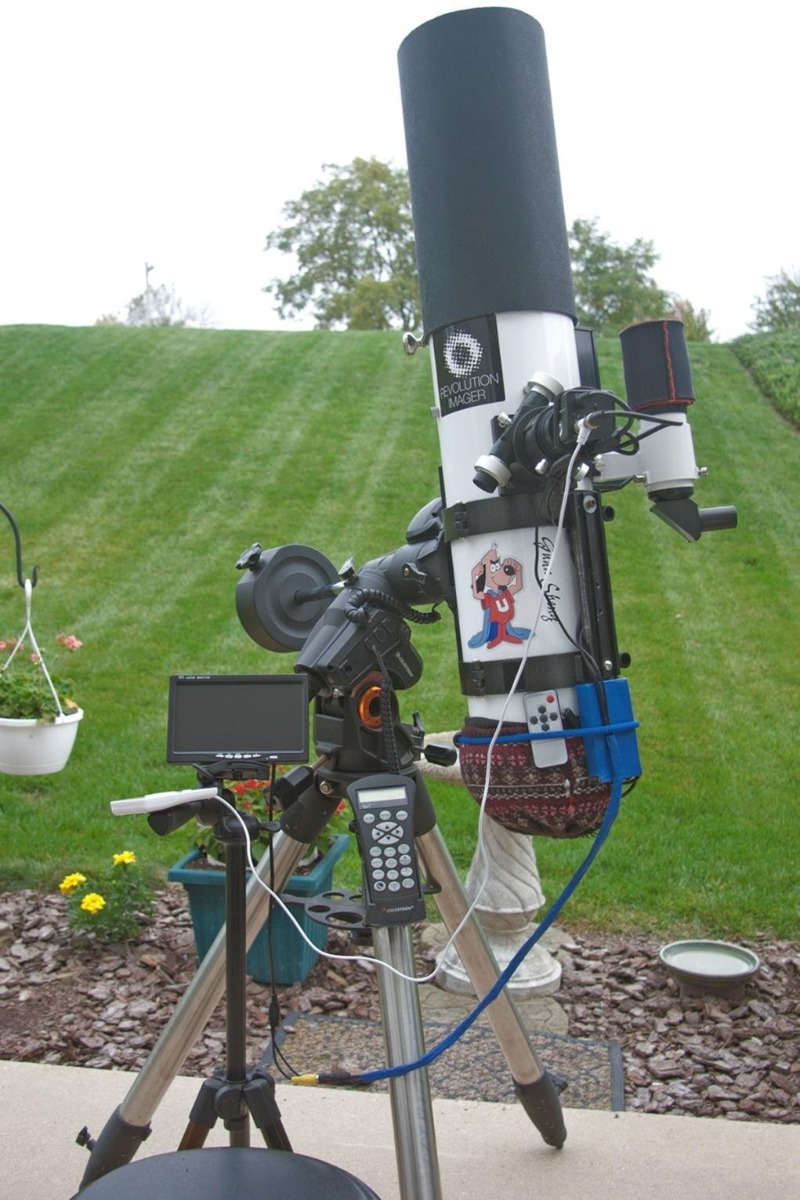
For a small fraction of what I paid many years ago for that huge and unwieldy 24” telescope, as well as the minivan needed to cart it around, I am currently using a much more portable setup. A setup that is able to reveal many objects with even greater detail! Below is an image of my own gear. A well-tuned 6”f4 Newtonian optical tube assembly, on a computerized equatorial mount, along with the Revolution R2 package. I have added my own lightweight tripod to carry the screen so that I can sit comfortably throughout the night while exploring the heavens without having to move from my chair! Compare that to having to climb atop a 6-foot ladder to peer into an eyepiece!

This is one sensitive camera! A single 5.12 second exposure of M15
Is there a “Perfect telescope” for the R2?
Unfortunately not… Life is full of compromises as we all know, and to choose the best telescope for any particular camera we need to first figure out which types of targets we most want to image, or in this case, view. A good way to do this would be to visit a field of view calculating website like astronomy.tools. Once there, we will want to add important information such as the camera’s pixel size (In this case, 5 x 6.25 micron) and resolution (976 x 582 pixels), as well as the focal length of our telescope. If we are using a focal reducer, we will need to add that information to the program as well. Once this data is accurately added to the program we can then choose a deep sky object that we wish to view and then click on the “Add to View” icon to see how the camera’s tiny sensor is going to frame that particular target.
Although a telescope of this focal length (610mm), combined with the Revolution Imager R2, will give me a relatively small field of view (less than the diameter of the full moon!), for the targets that I love observing the most, galaxies and galaxy clusters, it is a near-perfect setup. With this camera’s tiny sensor essentially zooming up on those small and faint targets, I am better able to see details like dust lanes and spiral arms. Because the sensor on the Revolution Imager R2 camera is roughly equal to the field of view that you would achieve when using a high power 6mm Plossl type eyepiece with the same telescope, a computerized mount makes a lot of sense and will allow you to view many more targets throughout the course of a night.
Another important consideration besides your telescope’s focal length is its focal ratio. Keep in mind that photographically at least, the brightness of extended targets like the moon, a galaxy, or a nebula, is dependent on the telescope’s focal ratio, not its aperture. Since the tiny field of view of this particular camera essentially magnifies small and faint objects to such a high degree, going with a larger, longer focal length telescope would only decrease its true field of view even more. With that said, there are most certainly increasing gains in the fine details seen within a small galaxy, globular cluster, or planetary nebula, by moving to a larger telescope with the same focal ratio, however, where you gain in one area, namely resolution, you lose in others.
Another problem with using a telescope that large and bulky is of course, portability. Using a 10” or 12” telescope of any type, as nice as that would be, would require a much heavier and therefore a more expensive and accurate mount. With that said, a fast focal ratio 4.5”, 6”, or 8” Newtonian, or a 5”, 6”, or 8” SCT coupled with a .5, .4, or .3.3 focal reducer, comes close, in my opinion, to the perfect telescope for this camera package, should one wish to view the smaller targets like most galaxies, globular clusters, and planetary nebula, while maintaining some level of portability! For achieving a wider field of view, for viewing larger nebula and star clusters, a fast 60 - 80mm refractor would be closer to ideal. To achieve an extremely large field of view, Revolution Imager even sells a 6-60 mm zoom lens that can be coupled to the R2, so you see there are plenty of options out there!
If you are confused by the terms “focal ratio” and “focal length” then I will try to educate you a bit (don’t worry, it won’t cost you a dime!). What do these terms mean, you ask, and why do they matter? Focal ratio is the ratio between the telescope’s aperture (the diameter of its main light-gathering optic, be it a mirror or lens) and its focal length. Focal length is the distance from the center of the main mirror or lens to the point where that particular optic focuses light. This of course is a simplified definition and does not work with a Cassegrain type telescope where the secondary mirror usually magnifies the focal length of the telescope by a factor of 5; however, for our purposes, it is accurate enough!
To clarify things a bit more, let’s say a good friend of yours gave you a really nice 4” lens and asked you to build a telescope out of it. If he told you that the focal length of this lens was exactly 40”, what he really means is that light, when passing through that lens, would come to focus at a point 40” away from the lens. By telling you the focal length, you would then be able to determine the length of the tube needed and exactly where to place the focuser, diagonal, and eyepiece within the light path of that telescope.

Dust lanes in M31, “The Andromeda Galaxy”
The focal ratio of this particular telescope would be f10, since the ratio between its 4” aperture and 40” focal length is 10. If the same 4” lens had a focal ratio of f5, the telescope’s focal length would be exactly half as long at 20”. Since both f10 and f5 telescopes are 4” in diameter, they are both gathering precisely the same amount of light. Now, as long as the exact same eyepiece or camera is used with each telescope, the shorter focal ratio f5 telescope would produce an image with exactly half the magnifying power, and exactly 4 times brighter vs. the f10 telescope. Why is this so? Since both telescopes are gathering the exact same amount of light? It is (and this is important!) because it takes 4 times the amount of light to maintain the same brightness at twice the power. This is just one of those pesky laws of physics and you don’t want to mess with the law!

Dynamic duo, NGC 7332 and NGC 7339 in Pegasus
With this knowledge, you can now see that the telescope’s focal ratio is going to make a huge difference in what is seen with this camera package. Therefore, a telescope’s focal length and focal ratio affect both the magnifying power as well as the brightness of the image. With respect to EAA, the “faster”, or shorter, the focal ratio, the brighter the image, with less exposure time needed for any object that you may wish to “view”.
The good news is that if you already own a longer focal ratio telescope on a reasonably accurate and solid tracking mount there may be no need to upgrade. The Revolution Imager R2 package comes with a thread on 1.25” .5 reducer. This accessory can be easily threaded onto the camera’s nosepiece, turning an f12 Maksutov Cassegrain telescope into an f6, an f10 Schmidt Cassegrain telescope into an f5, and an f6 Newtonian or Refractor into a whopping f3 light gulping machine! Any faster than that and it is my experience that when using the included focal reducer, the sharpness of your star images will really start to degrade towards the edge of your field.
How faint can you go with the stock R2 kit and no computer?

NGC 383 galaxy group, known as “The Pisces Chain”. UGC 679 is a whopping 16.6 magnitude!

Hickson 55 in Draco, known as “The Worm”. All five galaxies revealed (look closely!) in this unusual chain with magnitudes for individual galaxies ranging from 15.8 to 17.4!
Let's Get Started: Unboxing the R2 kit!
The day had finally arrived. After checking the tracking number for my shipment I asked my wife to be on the lookout for a package from High Point. After having worked for HPS for so many years this was nothing new for both my wife and the UPS driver. She gave her stock reply to the driver as he came to our door, “He just bought another toy!” The driver nodded to let her know that it was OK. Besides, this box was nice and light and posed no problem for him unlike some of the packages that I have received over the years.
Of course, the first thing that I did after work was to see what was inside! My wife said, “What about supper?” I gave her my stock reply, “That can wait!”


Very well packed as usual!

Our cat “Bones” could see that I was having a good time and
had to join in the fun!

Out of the box! Please note installation is via USB and an installation disc is no longer included.

This product has some good credentials!

The contents of the package revealed
Objects viewed on this screen will be MUCH further away
than they appear!
Getting connected
“There are so many wires!”
This was my initial complaint when using the first R2 that High Point had sent me many years ago. The good thing though is that the kind folks over at Revolution Imager have all the wires connected properly from the get-go so that you won’t need to scratch your head to try to figure it all out. On top of that, they now have a “How do I…” section on their website that spells out a lot of the initial questions that folks new to EAA might ask. Click here to take a look!
What you may need to figure out though, is where on your own scope you need to hang all of this stuff. Of course, if you take the final approach that I did even this will not be an issue for you as you shall see. If you feel that you would like to attach everything to the scope you will certainly want to make good use of Bungee cords and Velcro. I personally went through three different “Revolution Evolutionary Phases” on my own setup before finding the best arrangement for me. The first phase was to attach the viewing screen to the scope itself. This was done by first bolting an optional “Vixen” style universal dovetail plate to the top of the telescope’s tube rings. If you have an SCT type telescope, these plates are available for the vast majority of them through ADM or Losmandy. High Point Scientific sells all of these so you won’t have to look far if you go this route. You will also need what is called an ADM-VPA or “Vixen Plate Adapter” which is a clamp that can be firmly mounted on such a plate. You will also want to purchase a ball head so that the orientation of the screen can be easily adjusted for the best views, as the scope slews to different parts of the sky. The screen then bolts to the ball head which in turn bolts to the VPA which in turn clamps to the dovetail plate that is firmly attached to your OTA. Another very popular and less expensive option for Celestron SCT and Edge HD users would be to purchase a Celestron “Piggyback mount” and attach a ball head to it in order to mount the screen.
To the right you'll see an image of my scope with this initial option.
This all looks fine and dandy, however, for my equatorially mounted Newtonian all is not so rosy in practice. In actual use I found myself having to move my chair as the scope slewed to different portions of the sky. Also, the screen needed to be adjusted far more often than I liked. Although in saying this it may sound like I am “Mr. Lazy Bones”; the real issue was that, when making these adjustments to the screen, no matter how careful I was, the scope jiggled enough to mess up the image on the screen. Keep in mind that the stacking software is not selective and therefore includes even the distorted shaky images within its stacking parameters. For the image to be completely crisp, that single fuzzy stack takes time to “go away” while new cleaner images are stacked in its place. For this reason, I would find myself waiting for quite some time for a clean and sharp image to appear.
The other option is to go into the menu and simply change the DNR stacking (to be explained in detail below) so that it showed “0” images stacking. Very soon the messy looking screen would show just one razor sharp but noisy image since it was not trying to stack a shaky mess. Once I saw that the image was sharp, I would then immediately adjust the stacking parameters back to the maximum of 6 and then enjoy the detailed view that unfolded. If I returned to the program’s “Save” option so that the verbiage on the screen would disappear and could set down the hand controller without tugging on the scope, then all was good. While this approach might work well for an Alt-Azimuth mounted scope, such as a Celestron SE or Evolution mount, or other similar fork-mounted scopes, I felt that it was too much hassle with my equatorial mount and so I quickly evolved to this setup…


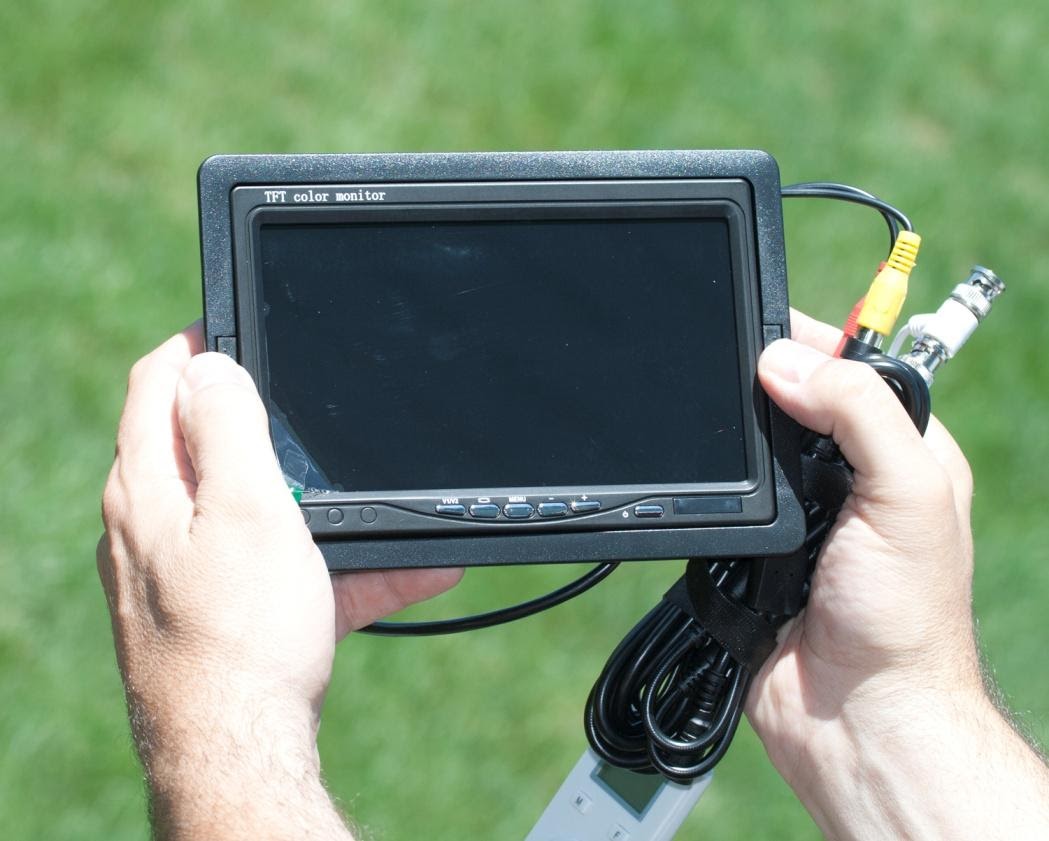
As you can see, I now have the screen mounted off the scope and onto a solid yet portable tripod. The obvious big advantage to this arrangement is that I can stay seated while the scope moves from target to target. The trick was to make sure that no matter where the scope was aiming that the screen would not get in the way. This was a fairly easy thing to overcome during the daytime as I could simply loosen up the clutches and mimic the scope slewing from one extreme to another. Once I found the perfect location for the screen I could then settle down for the night and watch the action.
After using the scope this way I did notice a glaring weakness in this setup and that was the wired hand controller. I wished that the cord was another 3 to 5 feet longer so that I could leave it attached to the handle of my tripod with Velcro. Even if it had been though, I could see that this, for me at least, would not work. One reason is that I like to make adjustments to the DNR (Digital Noise Reduction), bringing the number of stacked frames to 0 while the scope is slewing from target to target, and therefore could not simply leave the wired hand controller attached to the scope throughout the night. (I adjust the DNR in this way so that once the target is centered and the mount starts tracking the new object I can quickly adjust the stacking parameters back to 6 and then exit the program). As solid as the heavy-duty equatorial mounts that I use are with this particular telescope, I noticed that if I would pull on the focuser even slightly as I made these adjustments to the wired hand controller the scope would vibrate, revealing less than appealing star images. As critical as I am about image quality and wanting to see as much as possible, I knew that I had to come up with something different. What I really wanted to be able to do was to have the freedom to make adjustments to the wired hand controller that would in no way impact the image quality due to vibration issues. I also wanted to make sure that I did not have to worry about babysitting the hand controller cord as the scope slewed from one target to another. This I realized could be accomplished with the purchase of a very inexpensive 25-Foot Stand-Off Cable for the Revolution Imager.
With this one accessory I could remove the batteries (yes, I purchased another one for backup!) and the vast majority of cables from the scope and relocate them off the scope and onto a portable table or tripod. All that remains attached to the scope is the camera and a few feet of lightweight cabling, carefully positioned so that the scope is free to slew to any part of the sky without being fettered in any way. I now no longer need to worry about creating unwanted vibrations that disturb the image quality when making adjustments to the wired hand controller.
Once this change was made, I immediately noticed that the images coming off the screen were indeed sharper. For that reason, this accessory remains my favorite and it is one of the least expensive upgrades! Now finally, I can simply relax and enjoy the wonders of the night sky as they come into view. This is my kind of EAA!

NGC 2683, “The UFO Galaxy” in Lynx
“What do all these menu options do?”
Keep in mind the reason you have either purchased, or are contemplating purchasing, this product. The goal here is to enhance faint and distant deep-sky targets such as galaxies, nebula, and clusters, making those “impossible targets” that you have been longing to see such as spiral arms in galaxies, not only possible but in many cases, greatly detailed. This can be accomplished in three ways. Since our eyes, at best, can only “expose” for roughly 1/60th of a second, it is a wonder that we can see as much as we do. The Revolution Imager can expose for up to 5.12 seconds and on top of that, you have the ability to greatly enhance the sensitivity of the camera’s sensor. You can also stack up to 6 consecutive images and by doing so average out and cancel much of the noise that would be seen in a single image. My goal is to show you, the deep-sky enthusiast, how to use such a powerful system to reveal as much glorious deep sky detail as possible.
Although as mentioned earlier, this system can stack 6 consecutive images, should you choose to do so, the system will continue to stack exposures beyond this for as long as you care to look, and in my experience doing so continues to yield slightly better results even after the initial 6 images have been stacked. For this reason, don’t be too quick to move on to something else before you are certain that the camera is showing you as much as possible! At some point, however, the detail that you see will indeed level off. Should your mount not track accurately enough to handle this level of exposure time, you have plenty of exposure choices to choose from. The incredibly sensitive camera and viewing screen used in this system were developed for surveillance purposes and therefore have some quirks that need to be understood before one can feel comfortable using it. This may take some getting used to; however; it should all quickly become second nature to you as you push through the learning curve.
As you will see below, once you get above 1/50th of a second exposure time, the menu roughly doubles the exposure time as you go up, hence the x2, x4 x8 settings, etc.
Here is a list of your options. The lower exposures are geared more for lunar and planetary “viewing” and for fine focusing your telescope:
1/10000, 1/4000, 1/2000, 1/1000, 1/500, 1/250, 1/100, 1/50, x2 (0.04 seconds or 1/25 of a second), x4 (0.08 seconds or ~1/12), x8 (0.16 seconds or ~1/6), x16 (0.32 seconds or ~1/3), x32 (0.64 seconds or ~1/2), x64 (1.2 seconds), x128 (2.56 seconds), x256 (5.12 seconds)

The elusive “Horsehead Nebula” in Orion. No filters were used!
As mentioned earlier, you also have the ability to adjust the “gain” or sensitivity of the sensor using the “AGC” or “Automatic Gain Control” option. The higher the number you choose, the more sensitive the camera, but the noisier the image will be. This noise can of course be combated to a large degree with the internal stacking software, where more stacks, for example, 6, mean a smoother, more detailed image. These AGC numbers range from 6 AGC (least sensitive) to 44.8 AGC (most sensitive).
The trick here is to find out the best combination of exposure time and gain for the most detailed images without “blowing out” (overexposing) the background sky. Should you own a rock-solid mount with excellent tracking accuracy, my recommendation would be for you to choose the highest exposure times (5.12 seconds) along with the most stacks (6) and adjust your gain or ‘AGC’ and contrast settings to match the darkness of your skies. This will yield an image with the lowest noise levels while allowing you to maintain a natural-looking background that is not too bright. The flip side to this ideal situation would be lowering your exposure time and compensating for the dimmer image by choosing higher gain levels, something that you would need to do if your mount stability and tracking accuracy are less than stellar.
Shooting for the optimal camera settings
After much experimentation trying to achieve the best contrast and most accurate colors with my own setup, here are the settings that I have come up with. Your results may vary depending on your particular sky conditions and the telescope used, but I feel that this is a much better starting place to do your own experimentation vs. the factory default settings.
Adjusting the Monitor Settings
Please note: For the wireless LCD Remote to operate you will first need to remove the plastic strip extending from the bottom of the unit. This is in place to keep the internal battery from making contact during shipping.
By aiming the wireless LCD Remote* (above) at your 7” monitor (turned on of course!) and pressing the “Menu” key, I would recommend that you make the following changes shown below. To move to the next setting click the “Menu” key again once a setting is made and use the left or right arrows to change that particular setting:
(*This remote controls the brightness, contrast, and color of the monitor, not the camera.)
Set the “Brightness” to “0”
Set the “Contrast” to “100”
Set the “Color” to “100”

The aspect ratio can be set to stretch the image to fill the screen with sky (default 16:9 ratio) or to give you a more accurate view of the night sky leaving the edges of the screen dark (4:3 ratio). This is due to the fact that the camera’s sensor shape does not match the shape of the screen. Personally, I prefer the default 16:9 ratio setting when viewing deep-sky objects, however, since it does not affect the contrast of the image in any way I will leave that setting up to you. This particular setting can be quickly adjusted by pressing the “Mode Select” key on the bottom of the wireless remote without having to go through the menu setting to get there. The “Video Select” key at the top center of the wireless remote needs to be left at the AV1 setting otherwise you won’t see a signal from the camera. The red key at the very top right of the wireless LCD remote will turn the screen on or off should you need to step away from the action for a few minutes to get a snack. This will save on battery power until you are ready to resume viewing. You of course could simply flip the power switch on the battery off just as easily!
The next setting is the orientation of the image. If you desire to see the universe right side up and flipped left to right correct then you can make adjustments to the screen using this function to make it so regardless of how your particular telescope flips the image! Another tip is to make these adjustments, as well as altering the orientation of the camera within your focuser, visual back, or diagonal, so that when you press the “North” or “Up” key on the hand controller the image moves up on the viewing screen. When you press the “South” or “Down” key the image moves down, and so on. Doing so will save you lots of time later on. You will naturally know just which key to press on your HC when trying to center targets within your field of view! Once all of these adjustments are made you will not need to repeat them again as these changes are saved.
Adjusting the camera’s settings to your advantage
Now that the screen settings are adjusted you will want to turn your attention to the camera’s white balance setting using the wired remote. Doing so will help you to achieve more accurate colors whether viewing a faint galaxy cluster with almost no color, or a bright nebula with plenty of color!
If possible, I recommend that you get acquainted with the different menu options that I mention below during the daytime. This way you won’t feel pressured to rush this part of your education as we all would do on a rare clear moonless night!
Once the system is turned on, via the switch on the included battery, you can access the menu options by pressing the “OK” key in the center of the wired hand controller. Once done you will see something like the image to the right.

Since this system’s original purpose was for surveillance, as already mentioned, in my experience, many of the menu options are of little to no value for astronomy. This certainly makes things easier since we will need to only concentrate on a few of these settings. The first thing that you will notice is that the “Down” button is inoperable on the wired hand controller. I am really not sure why this is the case; however, you quickly grow to ignore it. The downside is that to access a certain option you may need to go the long way around the menu to get back to it. This only takes a few seconds though and in my mind is really a non-issue.
Another thing that you should know is that the menu options that have a down and left-pointing arrow to the right of the verbiage, can be more fully explored, should you wish to do so, by first adjusting the “Up” button on the wired hand controller until that particular option is highlighted and then by pressing the center “OK” key. Doing so will open up that menu’s internal options so that more adjustments can be made.
Should a particular menu option have the word “OFF” to its right, you can turn it “ON” by pressing the left or right arrow key on your wired hand controller. Furthermore, should the “ON” icon now reveal a down and left-pointing arrow you can then explore this menu option even more by pressing the center “OK” key once more. At the bottom of each and every internal option within the menu, you will find a “Return” option that can be chosen once any changes are made.
My recommendation, once again, is to spend some time during the daytime hours to practice navigating these menu options so that once a clear moonless night comes your way you are ready and able to utilize the full potential of this excellent product.
Since you initially have to go “down” to go “up”, the first useful setting that you will come to is “EZOOM” or “Electronic Zoom”. To achieve the most accurate focus with my telescope I generally slew the mount to a bright star then decrease the exposure time to 1/250th of a second and adjust the AGC to 44.8 while using this feature. Decreasing the exposure time or “Shutter” and increasing the gain or “AGC”, will essentially give you a “live view”, eliminating any lag time when attempting to tweak the focus of your telescope.

Although you will lose resolution should you try to use this feature to “see” more detail within a smaller deep-sky target, I have done so in order to more fully appreciate such things as the nebulous projections that extend from the main disc of the “Saturn Nebula”.

When centered over this icon, simply press the left or right arrow key on the wired hand controller to turn the feature “ON”, and then press the “OK” button on your wireless remote to access this menu option.

The “MAG” icon controls the magnification or zoom of the target being viewed. The PAN and TILT icons allow you to move the target up and down “TILT”, or side to side “PAN” functions. You will need to experiment as usual to best center your target, just make sure that you turn off this option once your telescope is focused or you will find yourself with an extremely tiny field of view! To exit this screen, simply press the “RETURN” icon to return to the previous menu. Turning the EZOOM feature off is achieved by once again pressing the left or right keypad.

The next menu option that you will be returning to a lot is “PICT ADJUST”.
This is where you can adjust the all important “Brightness”, “Contrast”, “Sharpness”, “Hue”, and “Color Gain” icons. Take a look at the settings that I have chosen but keep in mind that the best settings for you will be determined by your level of light pollution as well as the focal ratio of your telescope.

To keep the background as dark and natural-looking as possible with just a bit of “noise” showing through, I prefer to reduce the “Brightness” function to 0. Once the best exposure time “Shutter”, and gain “AGC”, settings have been determined for your current sky conditions and telescope focal ratio, you can further fine-tune the background brightness, by adjusting the “Contrast” icon either higher or lower. Keep in mind that the higher the “Contrast” setting the brighter the target, as well as the background, will be. To clarify this very important fact further, in order to maintain the proper sensitivity of the camera for the level of light pollution in a certain part of the sky that you may be examining, you will find it desirable to fine-tune the “Contrast” settings in order to do so. If you are aiming your telescope straight overhead, where the sky is generally the darkest, you may need to increase this setting. When closer to the horizon the higher levels of light pollution may force you to adjust the “Contrast” level to a lower setting so that the background sky is not overly bright.

The fact that the camera can be so finely tuned with these settings makes this an extremely important function and a feature that you will return to again and again to help you to “see” the most with your telescope.
You can therefore think of the “Contrast” setting as a way to fine-tune the camera’s sensitivity to perfectly match the sky brightness of a certain target or targets within that section of sky. To clarify this further, on a good night in my own backyard when the moon is absent and I am aiming the telescope nearly overhead I will set my “Contrast” to roughy 40 - 50, the “Exposure Time” or “Shutter” to 256 or 5.12 seconds, and the AGC “Advanced Gain Control” to 30 (Your setting may be different depending on your scope and your skies). The exposure and gain settings are found within the “Scene Select – Custom” portion of the “Setup menu” (shown below). When the scope is aiming closer to the horizon I will, however, need to lower the AGC to either 24 or even less while keeping the “Shutter” at the maximum exposure setting. I will then bring up the “PICT ADJUST” menu setting and fine-tune the sky brightness using the “Contrast” setting once more. While all of this sounds complicated right now, please stick with it and I am certain that after a very short amount of time it will become second nature to you.

Spiral structure easily seen in NGC 3184, within the constellation of Ursa Major
I have found that you will achieve better results with less noise when setting the “Shutter” to the maximum of 5.12 second setting (Shutter 256) and lowering the AGC, if needed, to keep the background from “blowing out”. This is much preferred over setting the AGC higher and then lowering the exposure time. This of course is provided that you have a solid and accurate tracking mount which allows you to take advantage of these longer exposure times. As already mentioned, another great feature built within this program is the ability to stack up to 6 consecutive images which will greatly reduce much of the ‘noise’ in the image. I highly recommend that you take full advantage of this feature for bringing out the best details. These stacking details are handled by the “DNR” setting in the “Advanced Menu”, which is accessed through the “Scene Select” icon.
I highly recommend that you choose the “Custom” setting which will give you more control over the camera. This of course is accessed with the left or right arrow keys on the wired hand controller once you are on the “Scene Select” icon.

Once selected, press the center “OK” key to move from the “Setup Menu” to the “Advanced Menu”.

You will once more need to navigate through the different menu options using the “Up” arrow on your wired hand controller. As you can see below, I have chosen to enter within the “DNR” or ‘Digital Noise Reduction’ menu option by first choosing that icon and then pressing the “Center” key on my wired hand controller.

With the Digital Noise Reduction menu opened you can now adjust the number of stacks using the right and left keys on your wired hand controller. My recommendation is to bring the number of stacks back to 0 once the mount is slewing from target to target. Once the object of your desire is located and centered within your telescope’s field of view you will at that point want to set this as high as possible depending on the tracking accuracy of your mount. I have found that a setting of between 3 and 6 usually renders a nice smooth background with the higher numbers doing slightly better. You can then exit this portion of the program by choosing the “Return” icon and pressing the “OK” key on your wired hand controller.


For achieving the most accurate colors I prefer to utilize the “Manual” “White Balance” icon feature seen to the right.

When accessing this menu option you may wish to adjust the “White Balance” level to between 47 and roughly 52. Of course, your sky conditions will dictate the ideal setting so keep that in mind. Once again, choose the “Return” icon and press OK to exit this portion of the program once you are happy with the “White Balance” setting that you have chosen. Keep in mind that you will need to wait for at least one or more exposures to occur before you see any changes when making an adjustment. It may be best to keep the “DNR” setting at 0, at least while experimenting with the best “White Balance” setting for your skies. This way you won’t need to wait as long to see if the color setting that you have chosen is correct.

For maximum control of the camera’s exposure times (Shutter), and gain (AGC), I recommend that you choose the “FIX” option under the “SHUTTER/AGC” icon. Doing so will force the camera to comply with your wishes thus ‘fixing’, or making permanent (until they are changed by you), the settings that you have chosen. This, in my opinion, is superior to allowing the camera to make these adjustments, although there will be more fine-tuning on your part since you may need to alter the “AGC”, as mentioned above, due to increased light pollution near the horizon. Again, slight changes to the brightness of the background should be handled by adjusting the “Contrast” setting (found under the “PICT ADJUST” icon within the program’s “Setup Menu”), once the proper exposure times (Shutter), and gain (AGC) have been applied.

Once the “Fix” menu has been accessed you will be able to adjust the “Shutter” (Exposure), and “AGC” (Gain) icons that I have been discussing. In the screenshots below you will notice the camera’s minimum and maximum settings. You are blessed indeed if your skies are dark enough to employ the maximum settings below!


Once these adjustments are made you can exit the screen menu by once again choosing the “Return” icon and pressing the center “OK” button on your wired hand controller and then the “EXIT” icon within the “Setup Menu” as seen to the left.
Doing so will bring you to the “Exit Menu” where you can choose the “Save” icon to first save the adjustments that you have just made, and then to exit out of the on-screen menu. You can now enjoy the night sky with no distractions overlaid on the image!
I am confident that if you practice the steps that I have shared within this tutorial, you will soon be viewing the night sky in far more detail than you ever thought possible!

Gallery
Below are just a few of the many deep-sky wonders that I have “seen” using my own 6” f4 Newtonian, with the help of this awesome accessory.


in Leo

It is my hope that the information within this short tutorial has given you the confidence to push this product to its limits using your own telescope. Thanks to the power of EAA, these incredibly distant and exotic galaxies, nebula, and clusters, most of them far beyond the visual range of our own telescopes, can now be seen as objects of beauty and wonder just waiting to be explored!
Enjoy the journey!!


