What Is Collimation?
Collimation is alignment of the optics or process of aligning the optics inside a telescope. The more accurately the optics are aligned, the greater the chance that the telescope will function at its highest level of performance and provide a more uniform view.
The Newtonian telescope design uses a primary mirror and secondary mirror to focus and direct light into the eyepiece. The primary mirror is the larger focusing mirror at the bottom of the telescope tube. The secondary mirror is the smaller elliptical flat mirror that sits just behind the focuser at the top of the telescope tube. You will see four thin vanes that support this secondary mirror’s structure. In some telescopes, there are three vanes, but this is less common.
Each of these mirrors typically have three adjustment fasteners spaced equally at 120 degrees from each other. On the bottom of the telescope (the primary mirror side), you might notice six fasteners rather than three. Three of these will be locking knobs to help keep the mirror in place once it has been adjusted. It is important to know which knobs are the locking knobs and which are the adjustment knobs, and this will be covered in more detail later.
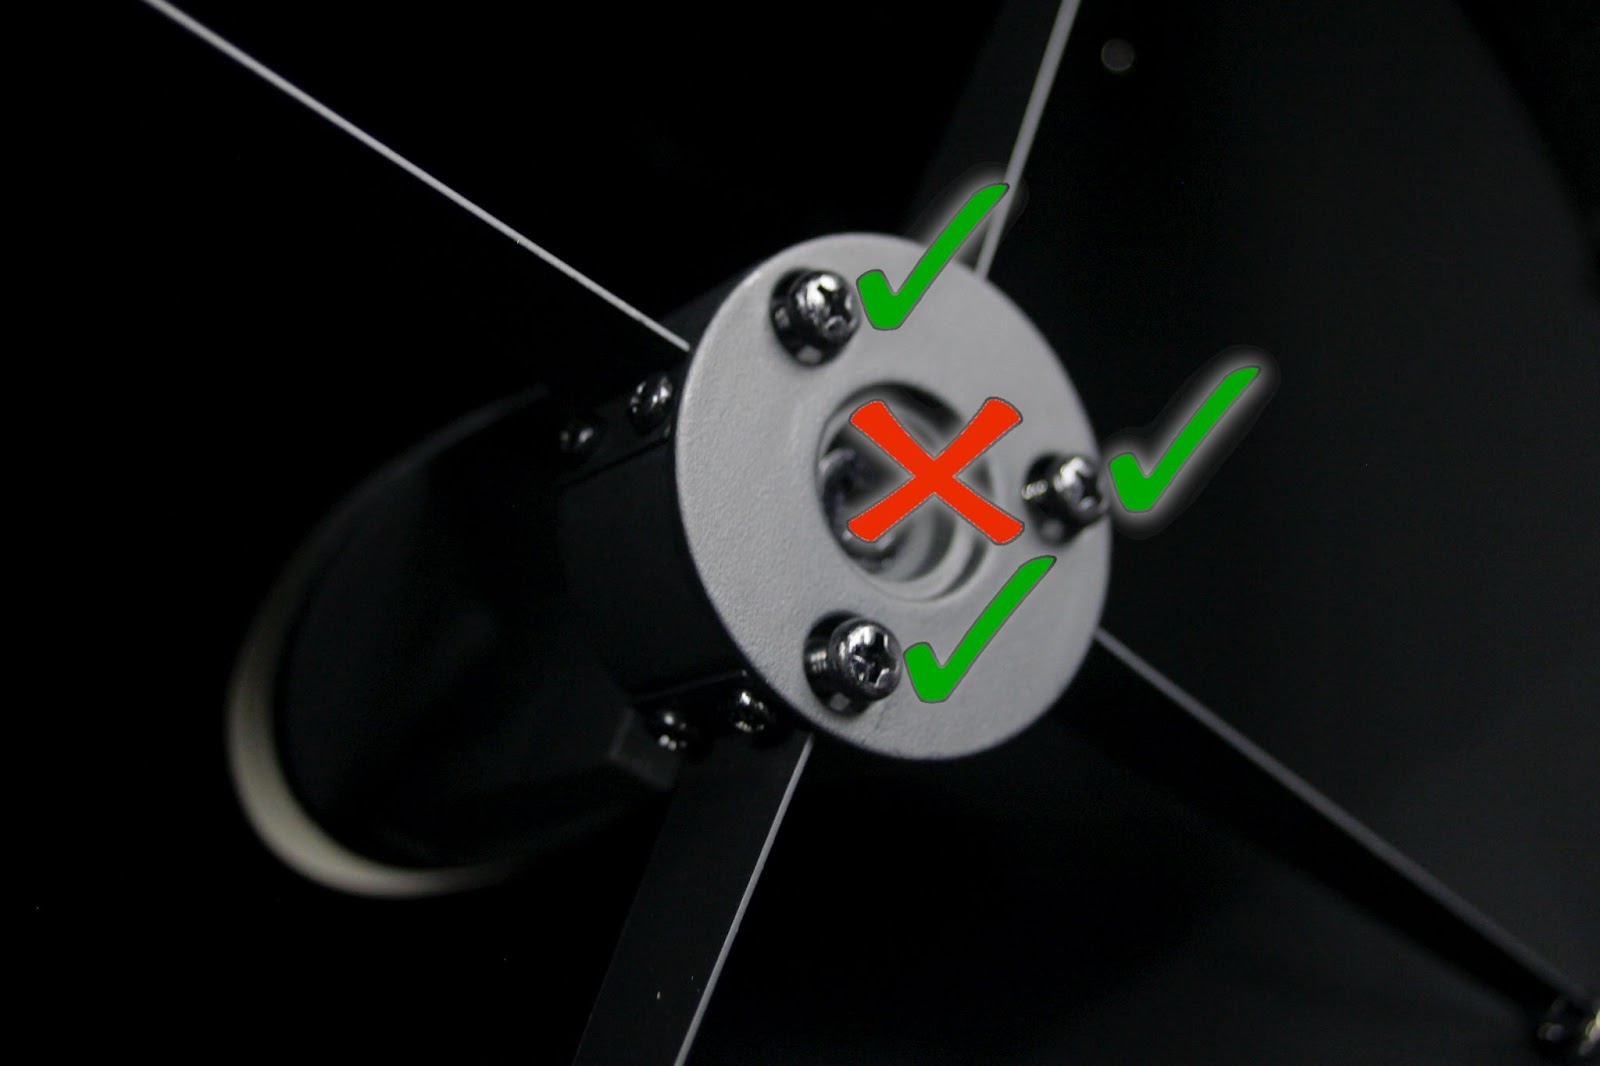
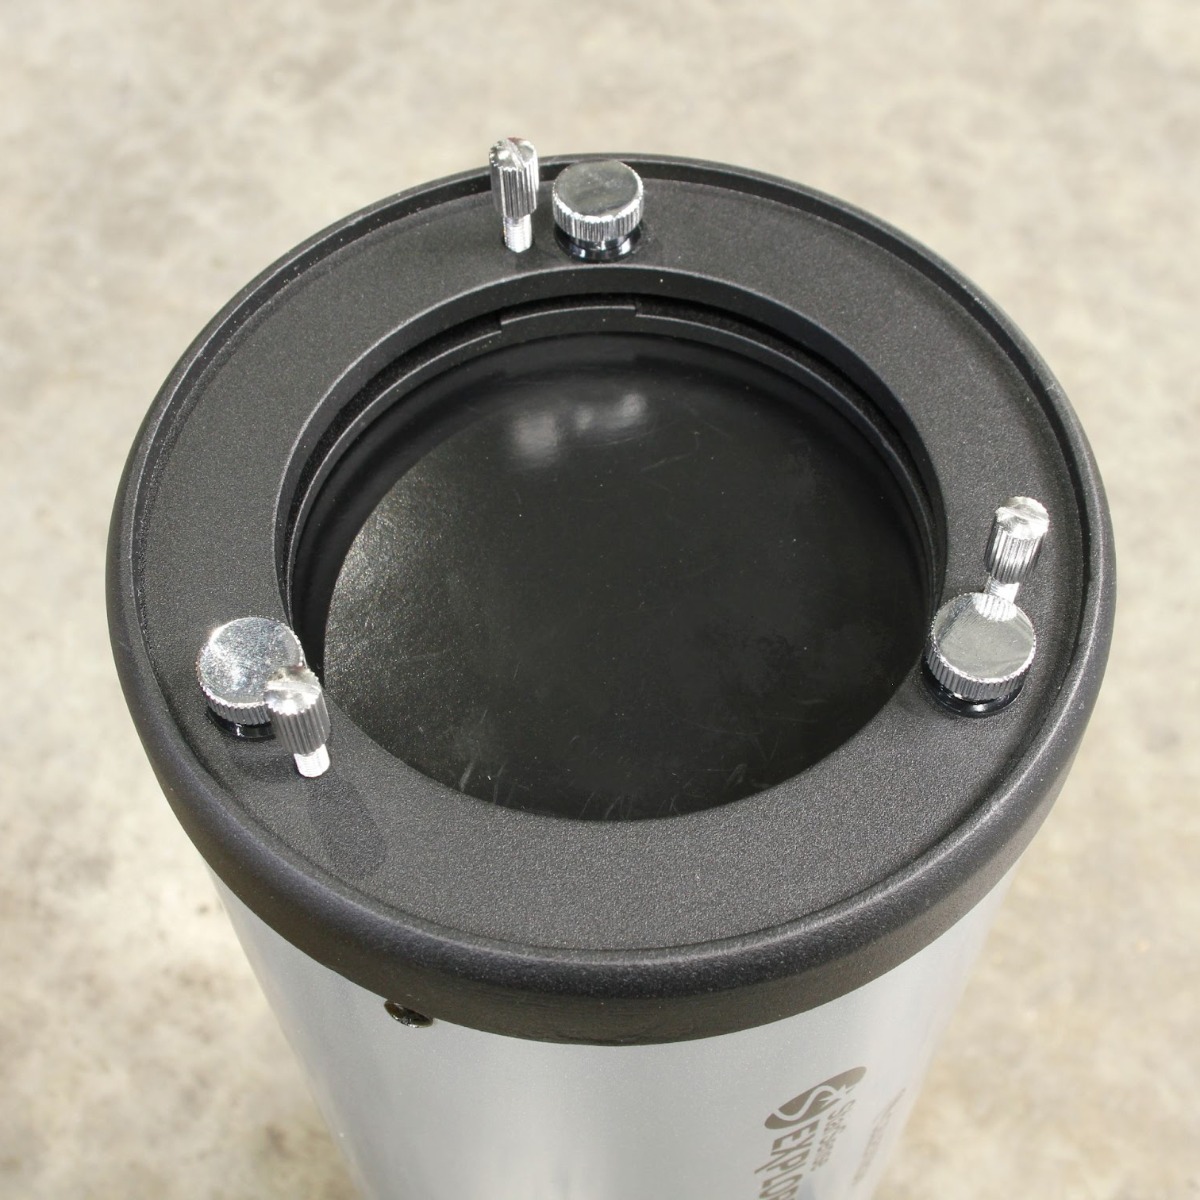
The secondary mirror will typically have three screws and these can be phillips head or hex head fasteners. In some applications, the fasteners are recessed into three holes in the central hub of the secondary holder. The central hub is the circular portion that the four thin vanes attach to.
While it might seem a bit intimidating at first, It’s important to remember that even a telescope that is collimated only marginally well can still allow us to see things in the night sky, and that the process of aligning the optics generally becomes easier and more familiar with time and practice. Do not be discouraged if the telescope is not perfectly aligned within your first few attempts at this process, especially if you are new to the hobby.
Before making any adjustments to your telescope, please take the time to observe and become familiar with the components of the telescope.
Using the Collimation Eyepiece
The Apertura Cheshire Collimating Eyepiece is a simple precision machined tool built to our exacting specifications. It consists of four major parts. The first is the beautifully machined aluminum housing which supports and centers the optical components. Starting from the back of the collimation tool, we have the viewing aperture. This is the portion that we look into when using the tool. This small aperture allows for a precision alignment. Next is the illuminator which is the polished silver-colored 45-degree surface. The job of this elliptical reflecting surface is to direct diffuse light down onto the final component of this tool - the crosshair wires. These wires give us a reference for centering the reflections within the telescope optics and make it much easier to get an accurate alignment of the system.
Begin the collimation process by setting up your telescope in a well-lit area. Having a bright wall or area to point the telescope at can help you to see the different parts inside the telescope. Be sure the telescope can not accidentally be pointed at the sun, and do not point it at a bright light when aligning the mirrors. Remove the front cover of the telescope, then insert the Apertura Collimating Eyepiece into the focuser of your telescope.
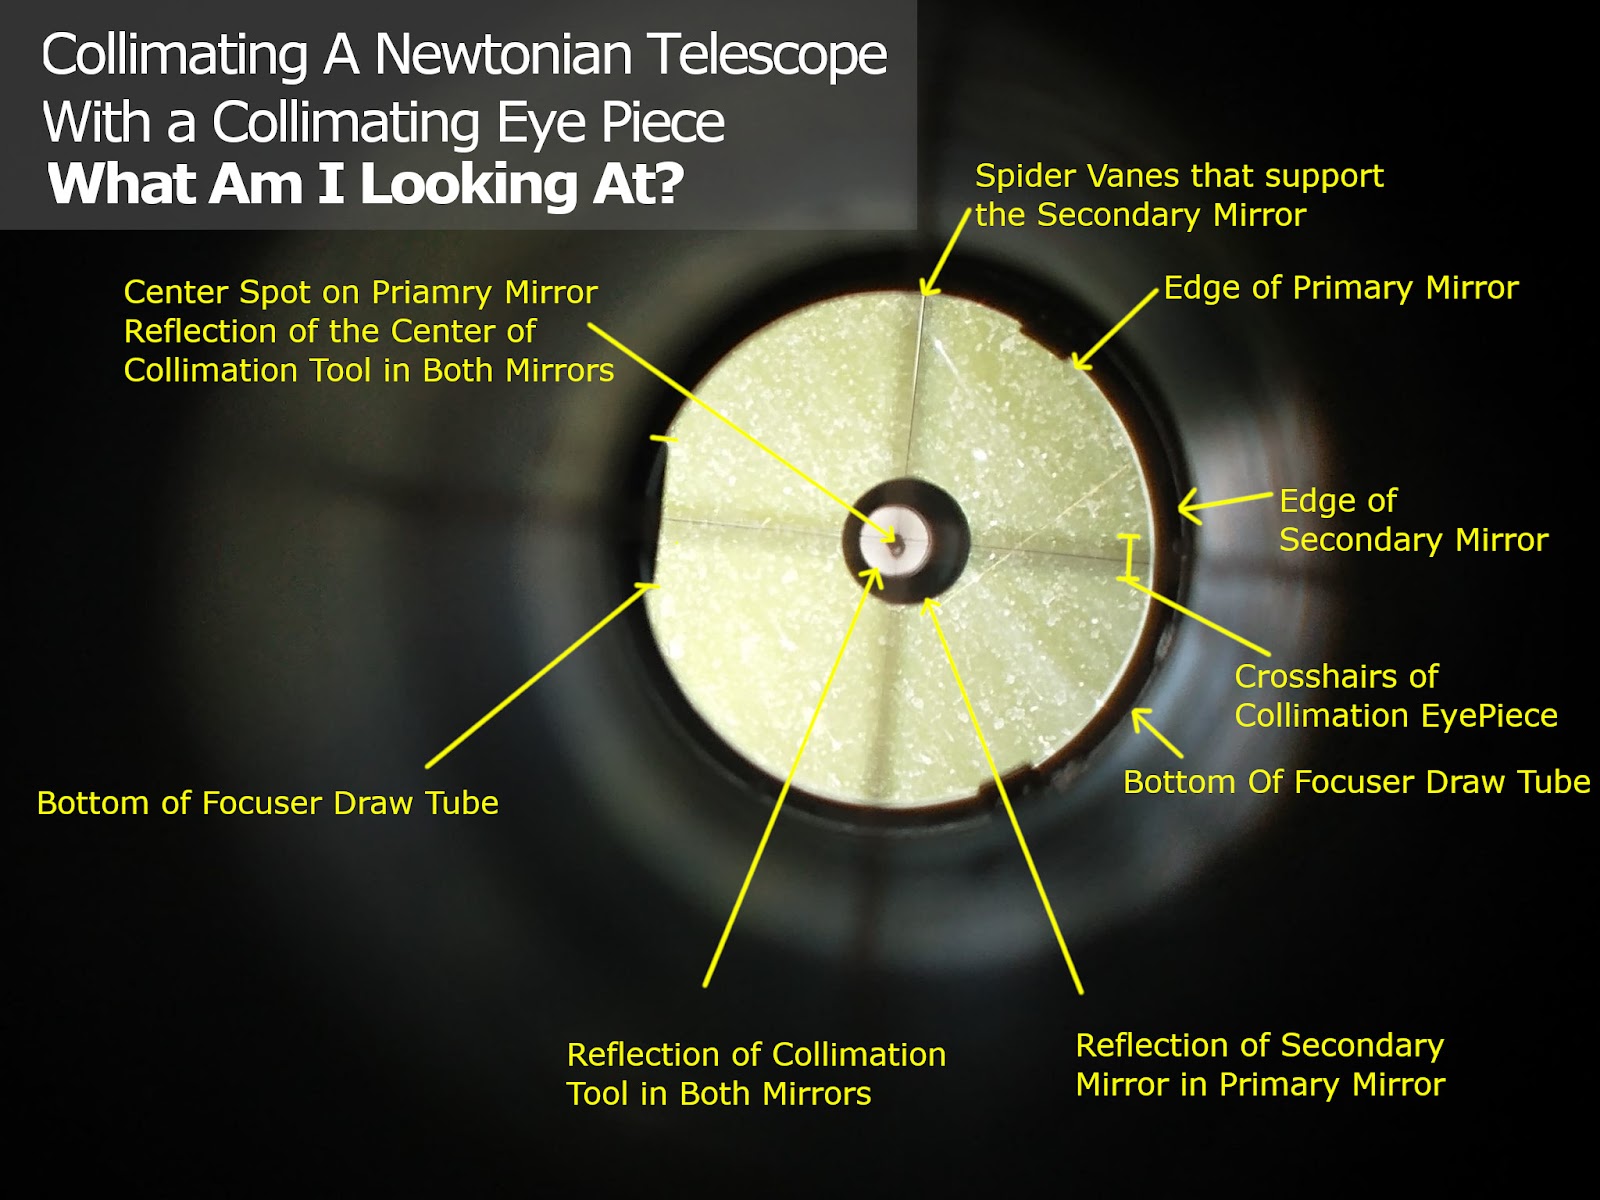
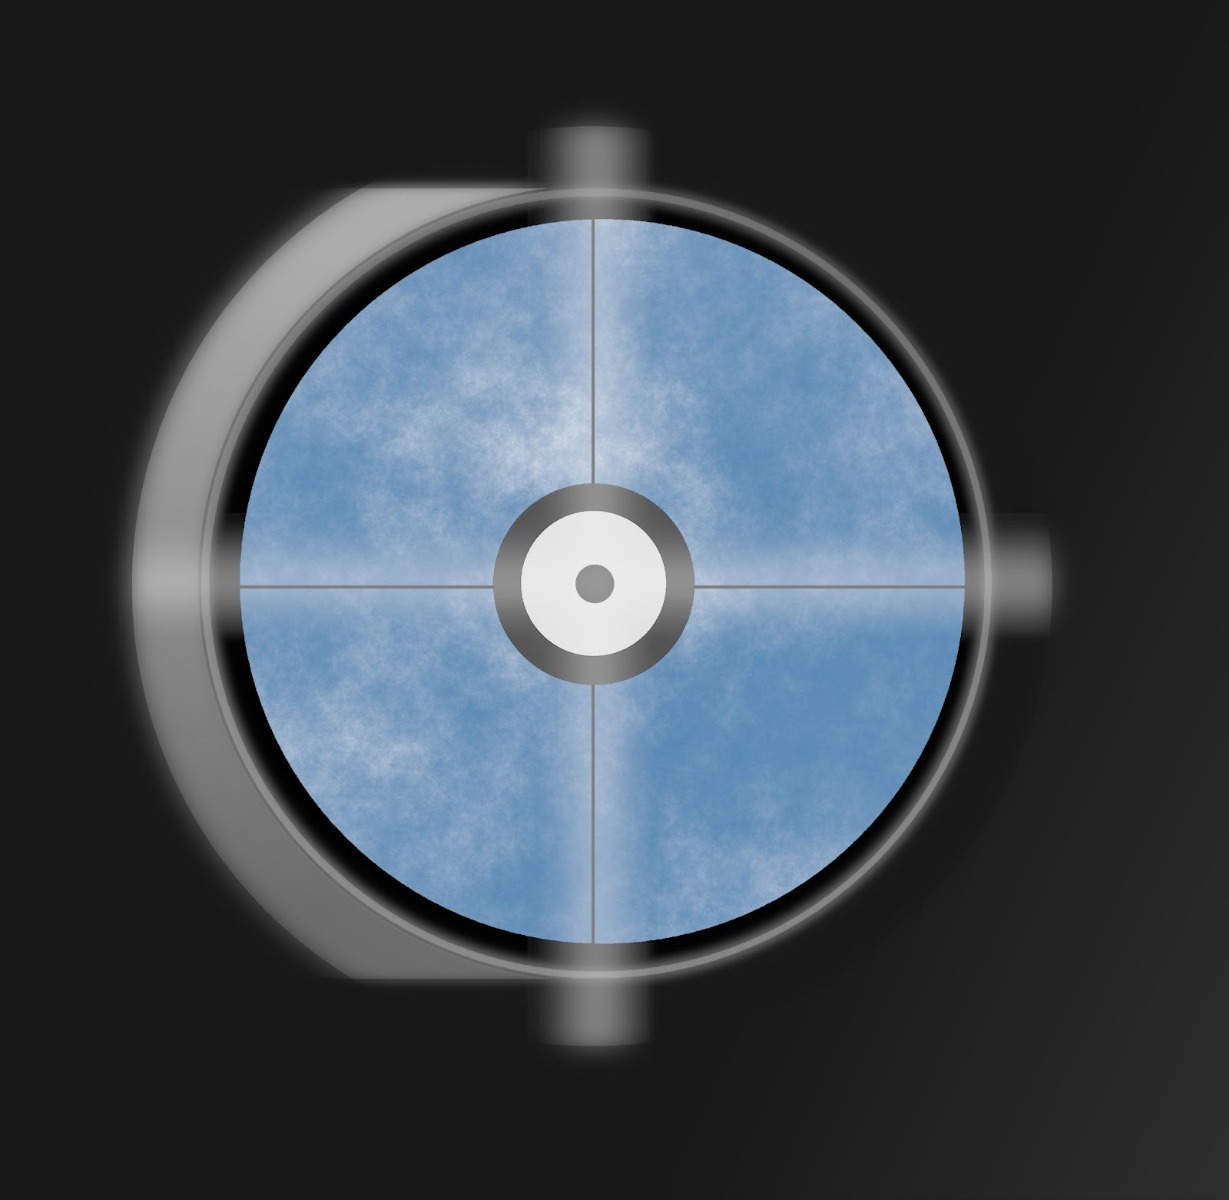
When looking into the collimating eyepiece, you’ll see many different parts of the telescope. This image shows an actual photo taken through the Apertura Cheshire Collimating Eyepiece and a Newtonian telescope. Take a minute to look at the different parts that can be seen from this position.
Checking and Adjusting the Secondary Mirror
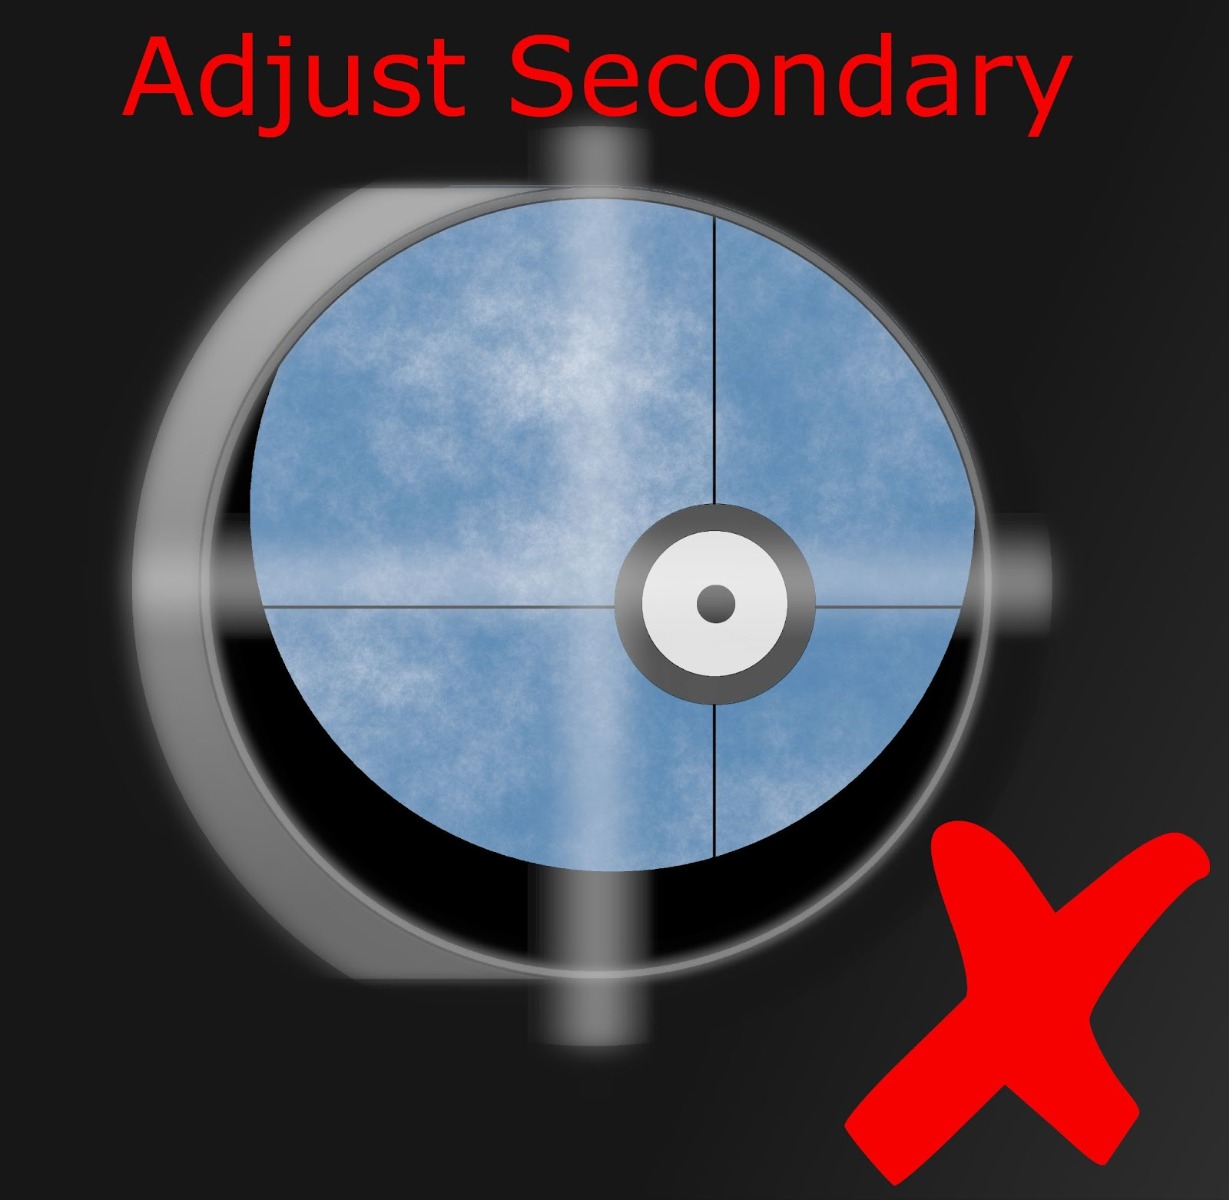
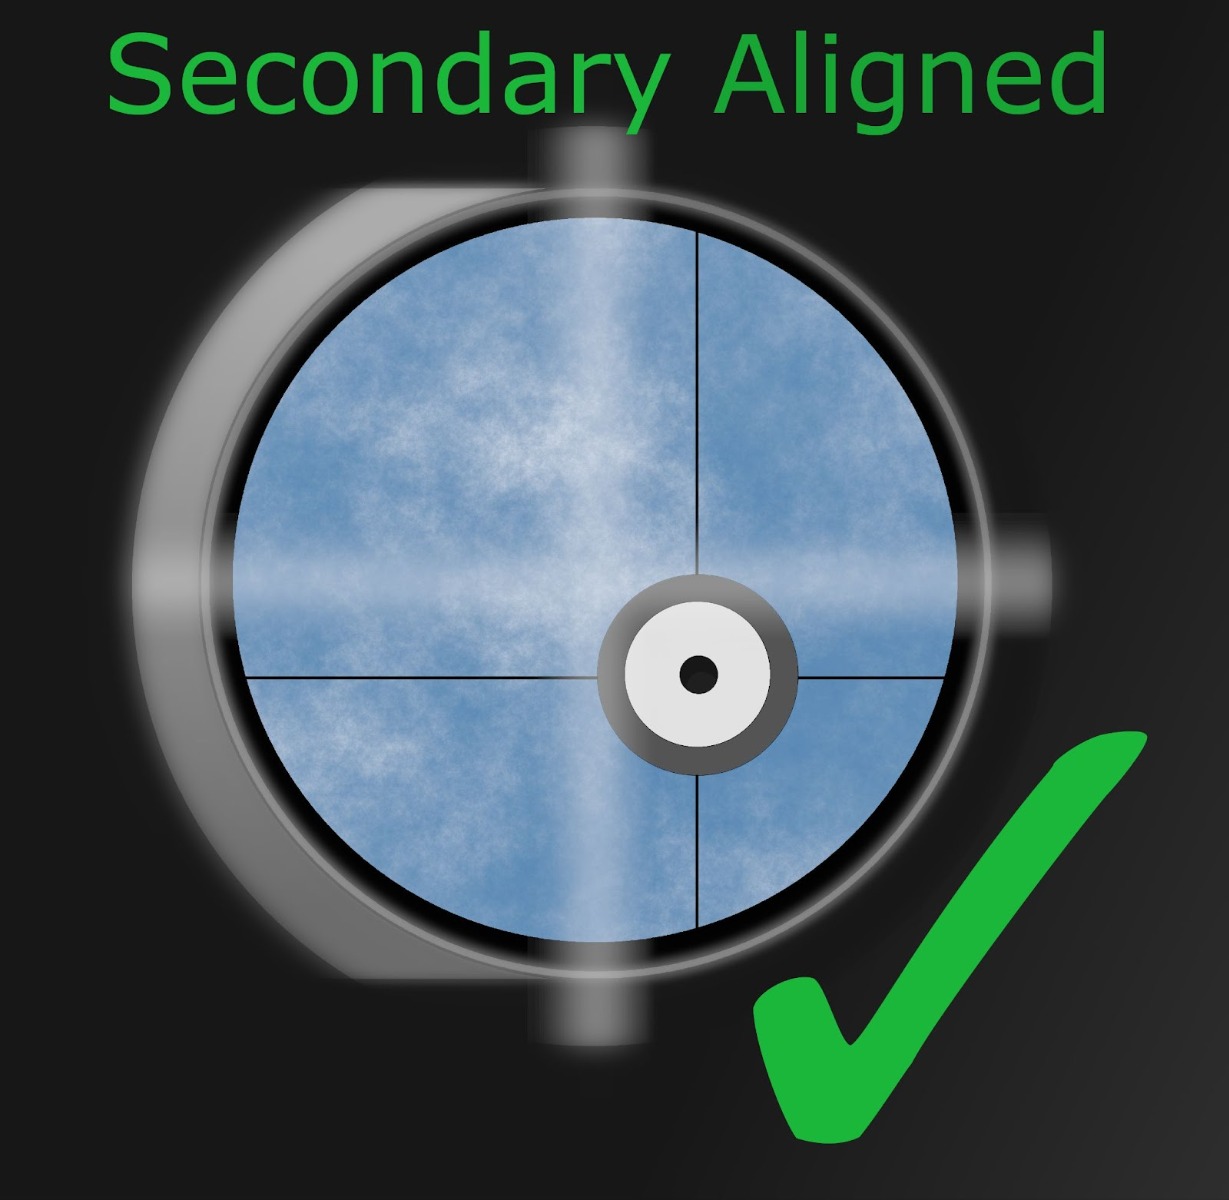
The first mirror that we want to check is the secondary mirror located near the telescope’s focuser. To begin, rack the focuser all the way in with the collimation eyepiece in the telescope. You will see an image like the one labeled above. You should be able to see the entire primary mirror reflected in the secondary mirror, and the view of the primary should be centered on the secondary mirror. If your primary mirror has a center spot marking, this mark should also be centered on the collimation tool’s crosshairs.
If the view of the primary mirror is not centered, adjust the three secondary mirror screws until it is fully visible. Your telescope might also have a screw in the center of the secondary mirror hub. Do not adjust this center screw.
If your telescope is equipped with Apertura Collimation Knobs, it is possible for some users to make adjustments to the secondary mirror while looking through the collimation eyepiece, due to the tool-free nature of the secondary adjustment.
You should notice the reflected image of the spider vanes and secondary mirror. It might not be centered, much like the image below. This is perfectly ok during the secondary mirror adjustment, and we will work to better center this reflected image in later steps, ignoring it for now. All that we are concerned with at this point is the large bright disc of the Primary Mirror being fully visible.
Checking and Adjusting the Primary Mirror
Now that the secondary has been adjusted so that the entire primary mirror can be seen, we will want to adjust the primary mirror. To do so, you will first need to release the locking screws on the back of your telescope. On a telescope like the Celestron Nexstar 130 SLT, the locking screws will be the thin cylindrical fasteners, and the collimation screws will be the short coin shaped fasteners.
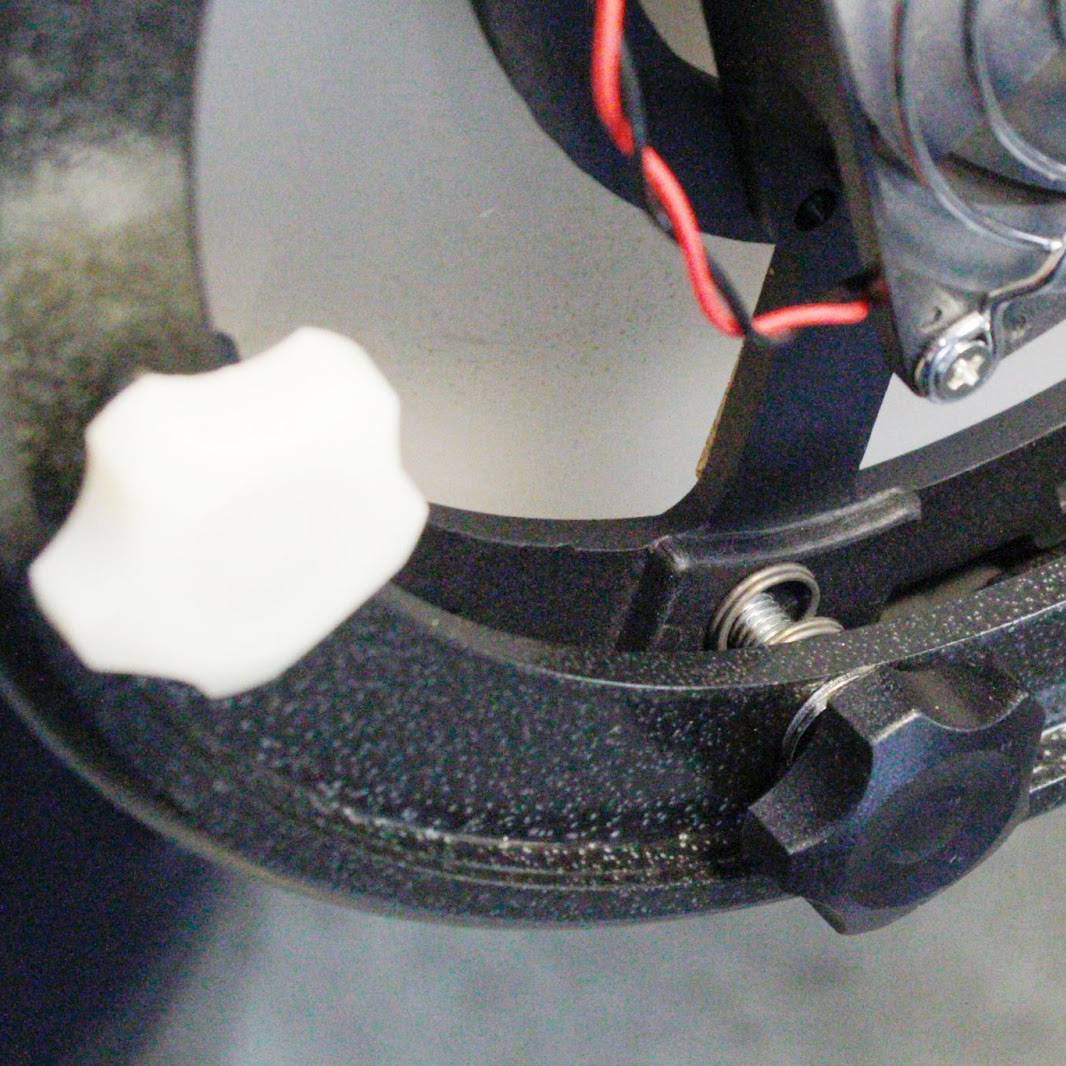
A telescope like the Apertura AD Dobsonian will have white and black knobs. The white knobs are the locking knobs, while the black knobs are the collimation knobs. Typically you can tell which knob is which by looking to see which one has a spring on it, looking closely in the back of the telescope. Because each telescope is a little different, it is best to check your specific telescope. Some examples of different systems can be seen in the following images.
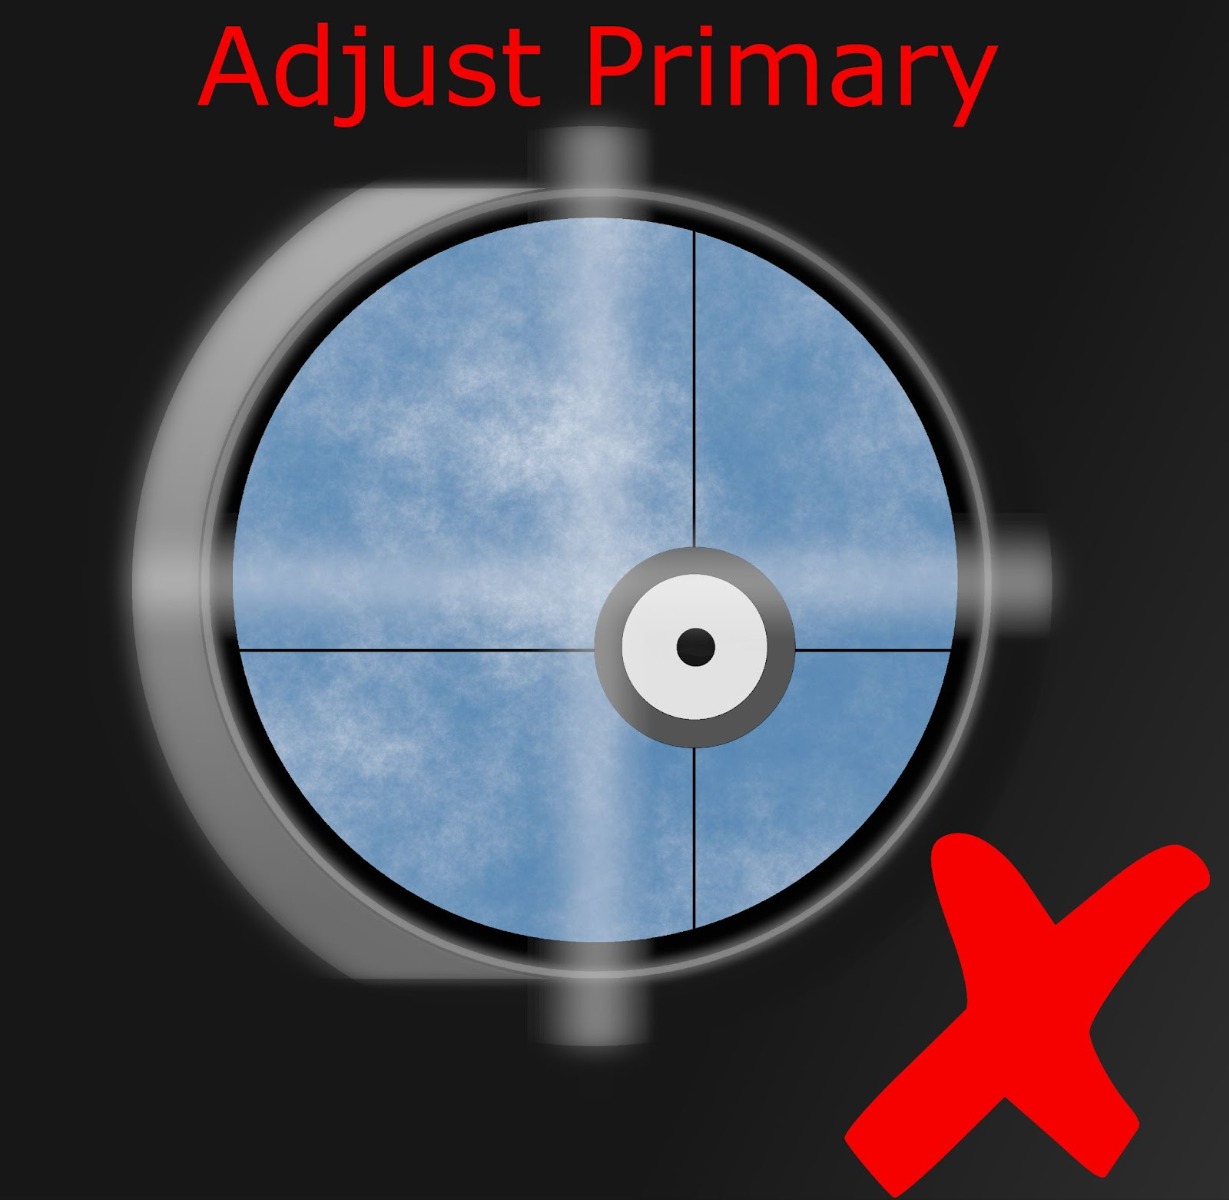
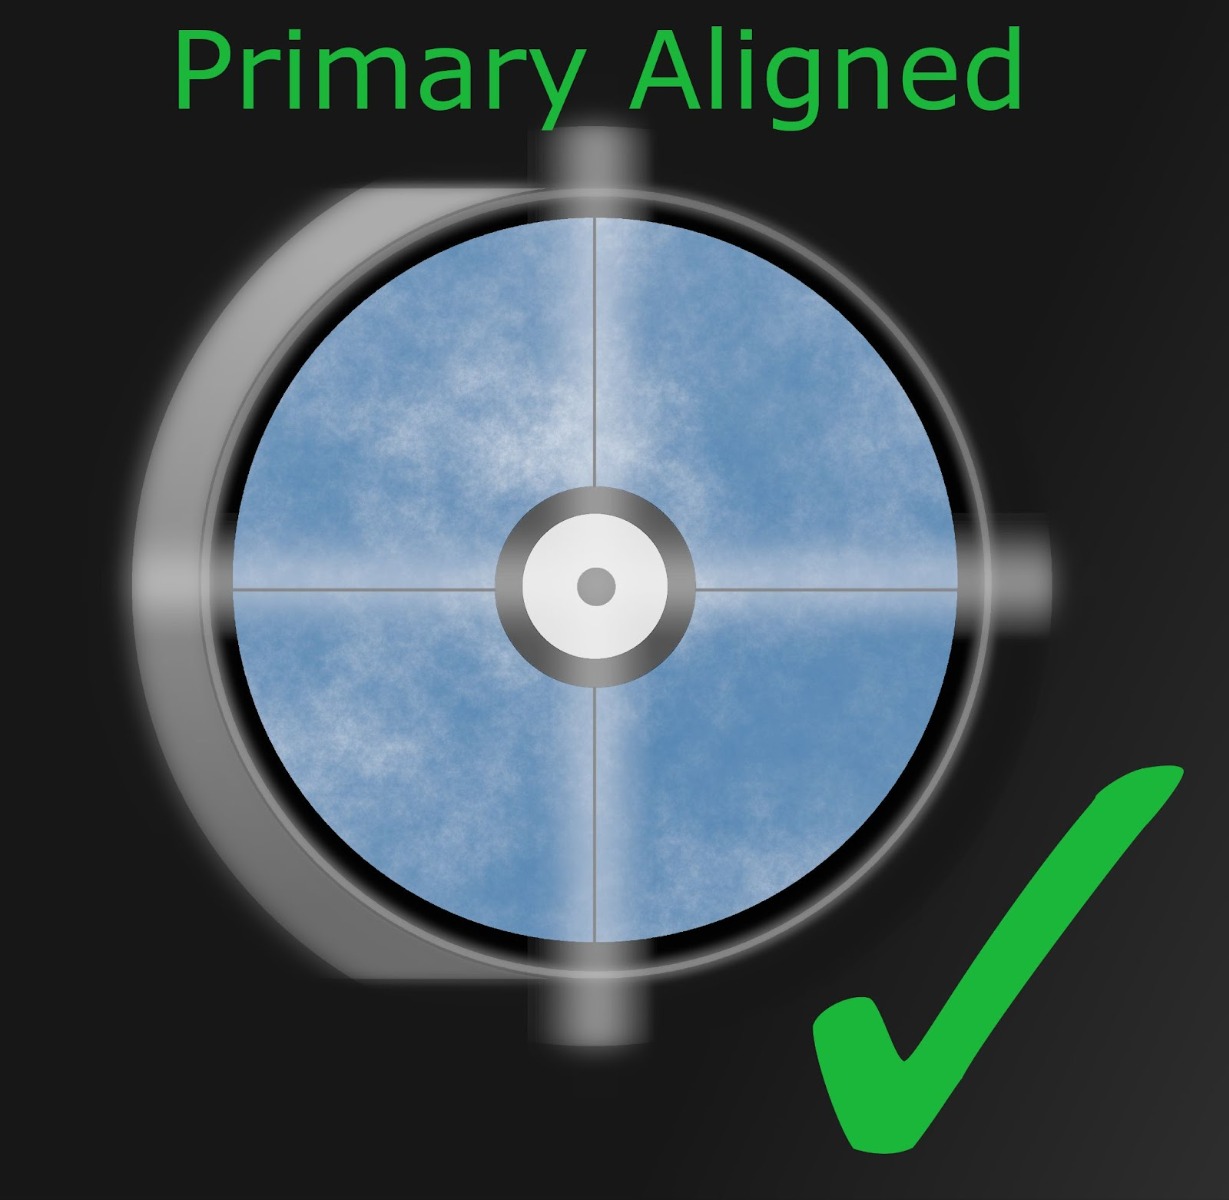
Now that you know which screws to adjust, look in the Apertura Cheshire Collimation Eyepiece and see if the primary mirror needs to be adjusted. The following two images will show a reflection of the secondary mirror and spider in the primary mirror. If the reflection is roughly centered, no major adjustments likely need to be made.
NOTE: Many telescopes use a design that has an offset secondary mirror. In these cases, even though the center spot on the primary mirror is aligned properly with the blurry collimation tool crosshairs, the reflection of the secondary mirror and spider vanes in the view might be offset some. Meaning, the blurry crosshairs of the collimation eyepiece might not perfectly align with the sharper crosshairs of the secondary mirror spider/support as seen in the reflections. The important part is that you can see all of the primary mirror, the center spot of the primary, and the reflection of the collimation EP line up with the crosshairs of the collimation eyepiece.
Before calling the final alignment as “Good”, it is best to look for the bright but smaller reflection of the collimating tool in the telescope’s mirrors. In the center of the bright circle will be a small dark dot. This is the hole that you look through on the tool. This spot should be centered on the primary mirror center spot, as well as the collimation eyepiece crosshairs for the greatest accuracy.
When aligning the primary mirror it can be difficult to know which screw to adjust. Partially placing your hand in front of the telescope while looking through the collimation eyepiece can give an idea as to which screw needs to be adjusted. While looking in the scope, move your hand around the front of the telescope until it is either opposite of or closest to the offset image of the primary mirror spot. There are three images below that show examples of this step. Once your hand is in a position that corresponds to the reflection’s offset, pull your head back from the collimation eyepiece, but keep your hand where you have it in front of the scope. Make a mental note of where your hand is on the telescope tube so that when we look at the back of the telescope we know which direction the mirror is offset in.
Example: Your hand is in line with the focuser at the front of the telescope. Look for an adjustment knob in line with the focuser at the back of the telescope. If one is not located at that position, look to see if there is an adjustment screw directly across the tube from this position. If not, find the closest adjustment screw to this imaginary line. This will be the screw that we want to adjust first.

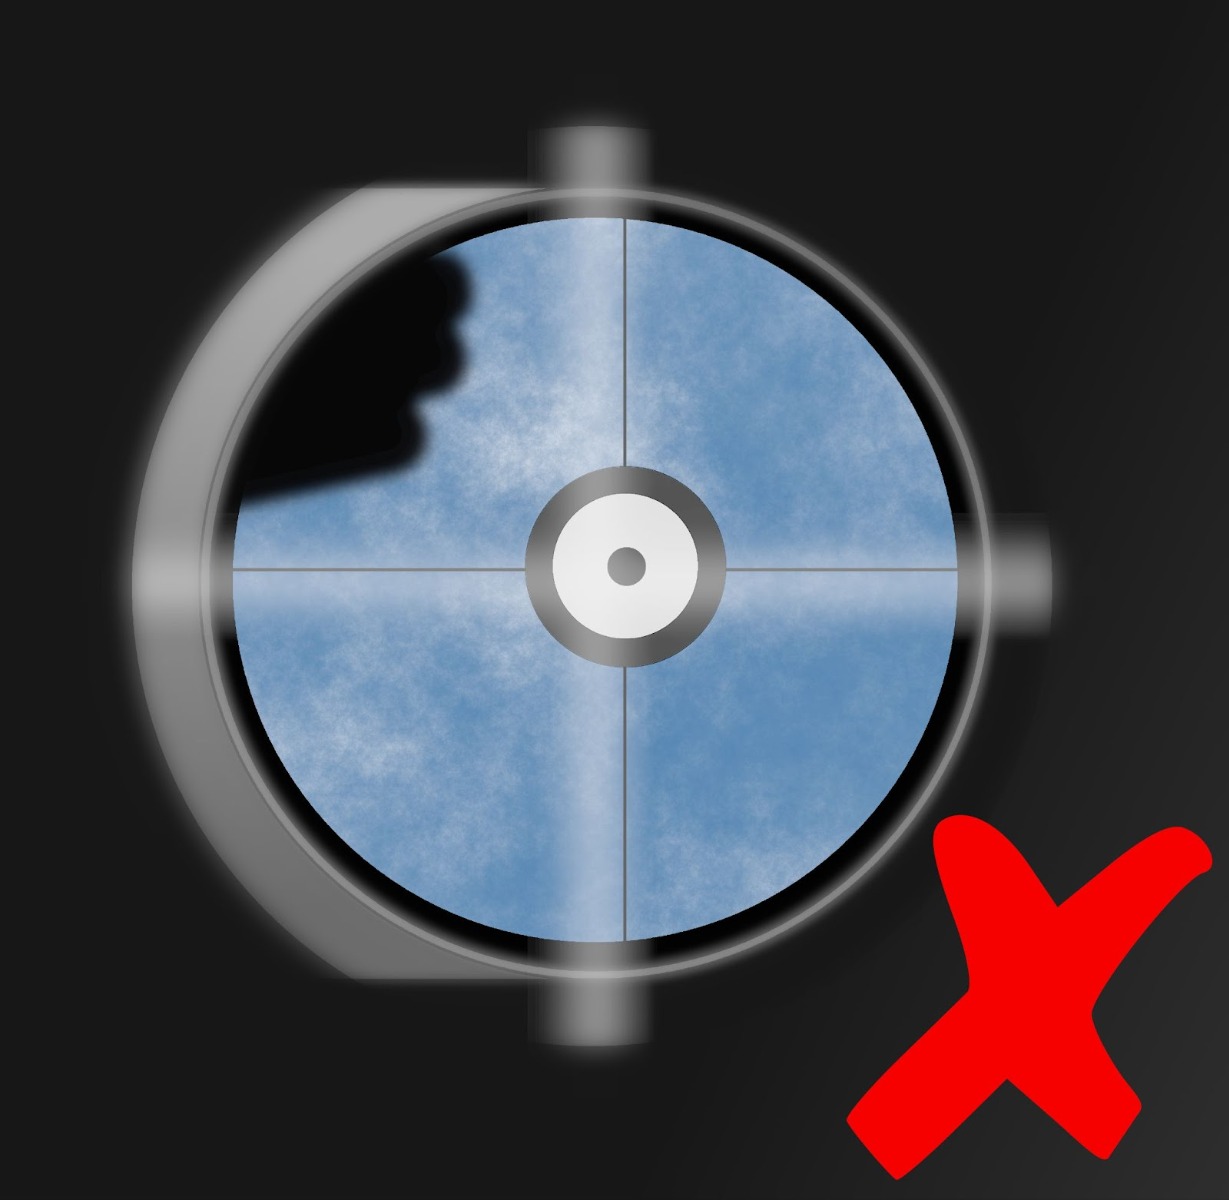
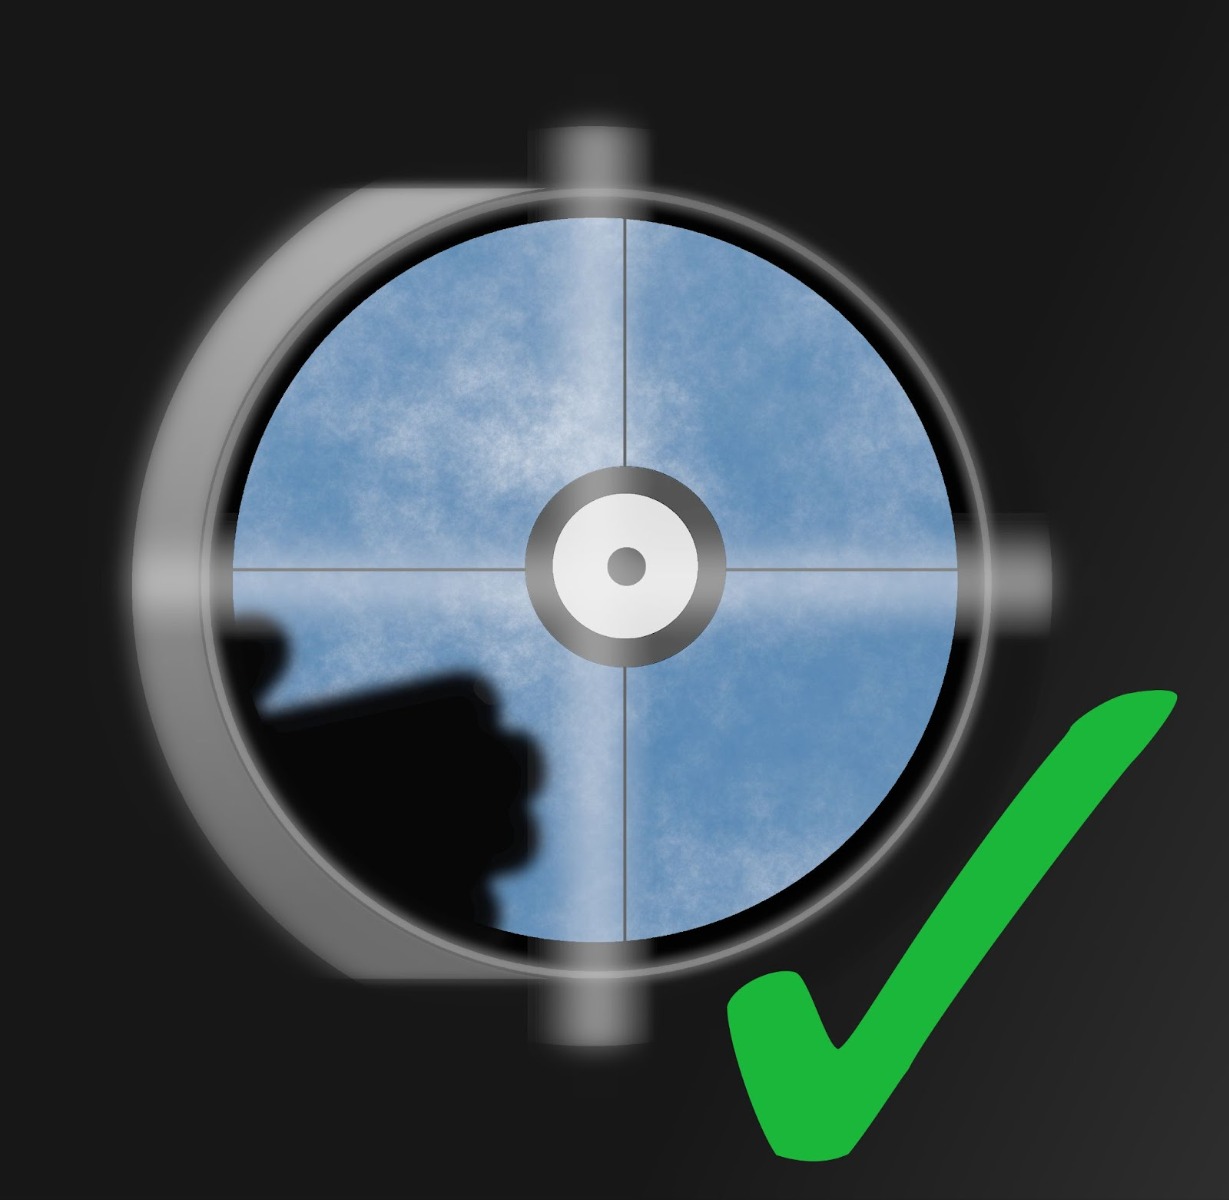
It will take some time and experience to gain a better understanding of how much to adjust each screw, and in what direction to turn it, but knowing which screw to adjust is a huge help. Start by turning this screw ¼ of a turn clockwise. Then, look back into the collimation eyepiece to see what the results of this adjustment were. If the center marking on the primary mirror moves in the direction that we want to move, continue to adjust this screw until the reflection is as centered as you can get it. Then perform this step again, placing your hand in front of the telescope observing the offset, finding the position of this offset, and locating which screw to adjust next.
Looking in the collimation eyepiece, all reflections should be centered within one another. If they are not, repeat this process from the start until you are satisfied with the results.
The important part is that you can see:
1. All of the primary mirror reflected in the secondary mirror.
2. The center spot of the primary lines up with the crosshairs of the collimation eyepiece.
3. The reflection of the eyepiece in the mirror lines up with the primary center spot and crosshairs.
Once all adjustments have been made, gently snug the locking screws on the back of your telescope so that the primary mirror keeps its alignment for the longest possible time. You might find that tightening the screws progressively, each a little at a time maintains the best alignment.
Remember that these mirrors do not need to be perfectly adjusted for casual low-power observing. For high magnification planetary viewing, observing double stars, or for the best possible performance; it is ideal to have them aligned the best that you can. Don't be discouraged if it takes some time to do, or even if you can not align them perfectly at first. It will become easier with time and experience.
Some users find that they check and adjust their collimation before every observing session, and this is good practice. Though other users only check from time to time. Either way you choose, the Apertura Cheshire Collimation Eyepiece will help to simplify the collimation process while offering the potential for more accurate results. Enjoy your freshly aligned Newtonian Telescope!

Contributing Writers
 Vincent
Giordano
This Article was Last Updated on 07/19/2023