Let me share a little-known secret with you….. deep sky imaging is easier than ever before and the necessary techniques that can yield excellent results can be mastered in a very short amount of time! In this astrophotography software tutorial, I will attempt to show you how you can take very inexpensive equipment and produce beautiful images of the night sky that can proudly be shared with your family and friends.
I have been a visual observer for decades, but about four years ago my curiosity got the best of me and I started to explore astrophotography with a small 6" reflector and a DSLR camera. I kept at it for about a year, but my results were not up to the quality that I had hoped for and the process was very tedious. Visual observing was slowly calling me back and I abandoned imaging altogether for quite some time.
In 2016 I started to see what backyard astronomers were doing with small, modified webcams known as CMOS cameras. I was excited to find out what could be accomplished with the short exposures that these very sensitive cameras generally worked best at. Compared to my old DSLR, where stacking many 2-5 minute exposures are the norm, these specialized CMOS cameras required only seconds. Here was a way to capture the beauty and splendor of many objects in the night sky without having to deal with the extreme tracking accuracy required for long exposures.
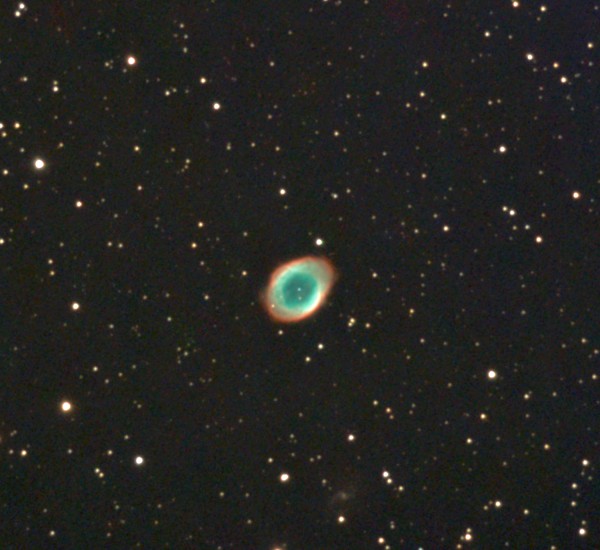
I took the plunge and purchased a ZWO 224MC color camera. Compared to a modern DSLR, this little red camera didn’t look much like a camera at all, but I soon discovered that looks can be deceiving! My first image of M57, the Ring Nebula, was far better than what I had ever accomplished before. Instead of a frustrating experience, capturing this image was so much easier and so much fun that I couldn’t wait for the next clear night! I thought to myself, now this is my kind of astrophotography, and I was instantly hooked!
This deep sky imaging tutorial was written to show you how easy it is to get great results with the smallest amount of expenditure and effort. No autoguider was used, and although I will admit to its usefulness in keeping the target centered for long periods of time when doing traditional astrophotography, one is not really necessary with this technique.
My imaging mount of choice has been the Celestron AVX. It’s highly accurate tracking and autoguiding capabilities make it downright easy to capture even the faintest of objects. However, for this tutorial, I have decided to use a much less sophisticated mount. I am doing this to prove a point; that extreme accuracy is not needed for the very short exposures that I will be demonstrating here. I have therefore chosen to use the simple yet solid Sky View Pro equatorial mount from Orion. Outfitted with the necessary right ascension drive and polar scope, it becomes a competent piece of gear for this kind of imaging. You can also use a tracking Alt-Az mount; however unless an equatorial wedge is added and the mount properly polar aligned, the inability for such a mount to track equatorially will limit your total exposure times somewhat and field rotation will be the inevitable result. With that said, I have seen beautiful images of very obscure objects shot with these types of mounts, using these techniques, so don’t let me deter you if you happen to own one and want to try your hand at deep sky imaging!
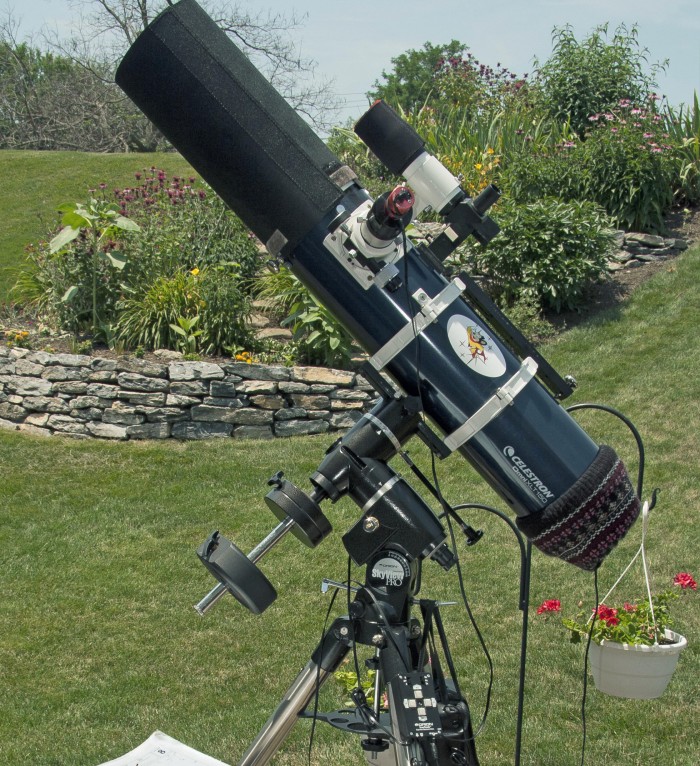
I have also chosen a Celestron Omni XLT 150…a 6" f5 Newtonian…for the optical tube assembly. This high quality, inexpensive and lightweight telescope has proven itself over and over again as a great choice for both visual observing as well as astrophotography. The 750mm focal length of the Omni XLT 150 works in conjunction with a small sensor CMOS camera to beautifully frame the targets that I most like to image, and its fast f/5 focal ratio helps keep the exposures short. Here is my setup:
Since I wanted to eventually explore tri-color imaging under my neighborhood’s light polluted skies, my camera of choice has now become the ZWO 290 Mini Mono USB 2 guide camera. This amazing piece of gear has blown my mind on many a night with its supremely sensitive sensor and high resolution. Why did I choose the Mini USB 2 290 in favor of ZWO’s standard USB 3 version of the same camera? Cost, of course! USB 3 cameras do have an advantage in planetary imaging due to their faster frame rates; however, this is of no benefit whatsoever for shooting deep sky objects. Also, the more streamlined 1.25” body makes it super easy to focus at the same point as any 1.25” eyepiece.
To make things as easy as possible I have chosen to keep the exposures down to a mere two seconds for this tutorial. As you can imagine, the advantages of such short exposures with respect to tracking accuracy are tremendous, especially when using an awesome program like Sharpcap Pro. Its "Live Stacking" feature has made this type of deep sky imaging not only extremely easy but very enjoyable as well. It has become the program of choice for many amateurs, regardless of whether they are doing EAA (Electronic Assisted Astronomy), where the normal total exposure time is generally kept under five minutes, or astrophotography, where exactly the same techniques are applied but the total exposure times are usually much longer.
My camera choice has other advantages besides the obvious cost savings that I already mentioned. Because the smaller sized sensor is largely in the sweet spot of my short focus Newtonian’s field of view, I do not use a coma corrector. This is another cost savings advantage. In my DSLR days, one of the most difficult aspects of the entire procedure for me was capturing what are called “Flat Frame” images. This is done to keep vignetting to a minimum and evenly illuminate the image. Since my sensor is very small compared to a DSLR or other large sensor camera, I can now completely ignore this step, which makes things easier and saves time. Another huge advantage is that you can acquire your necessary “Dark Frames” (explained fully below) in a matter of a few minutes or less. With my DSLR this procedure used to take me an hour or longer. Finally, the smaller sensors supplied with these lower cost cameras will magnify the image being captured to a larger degree versus a larger sensor due to its crop factor. This will tend to bring out finer details in the deep sky objects being imaged that may be harder to discern otherwise.
The downside, of course, is that a setup like mine will never cover large areas of sky in a single image. Therefore, shooting large objects like the Andromeda galaxy or the entire Pleiades star cluster is out of the question. I will tell you, however, that the vast majority of deep-sky objects are very small and, when that is the case, a small sensor camera combined with a medium focal length, fast focal ratio telescope is ideal.
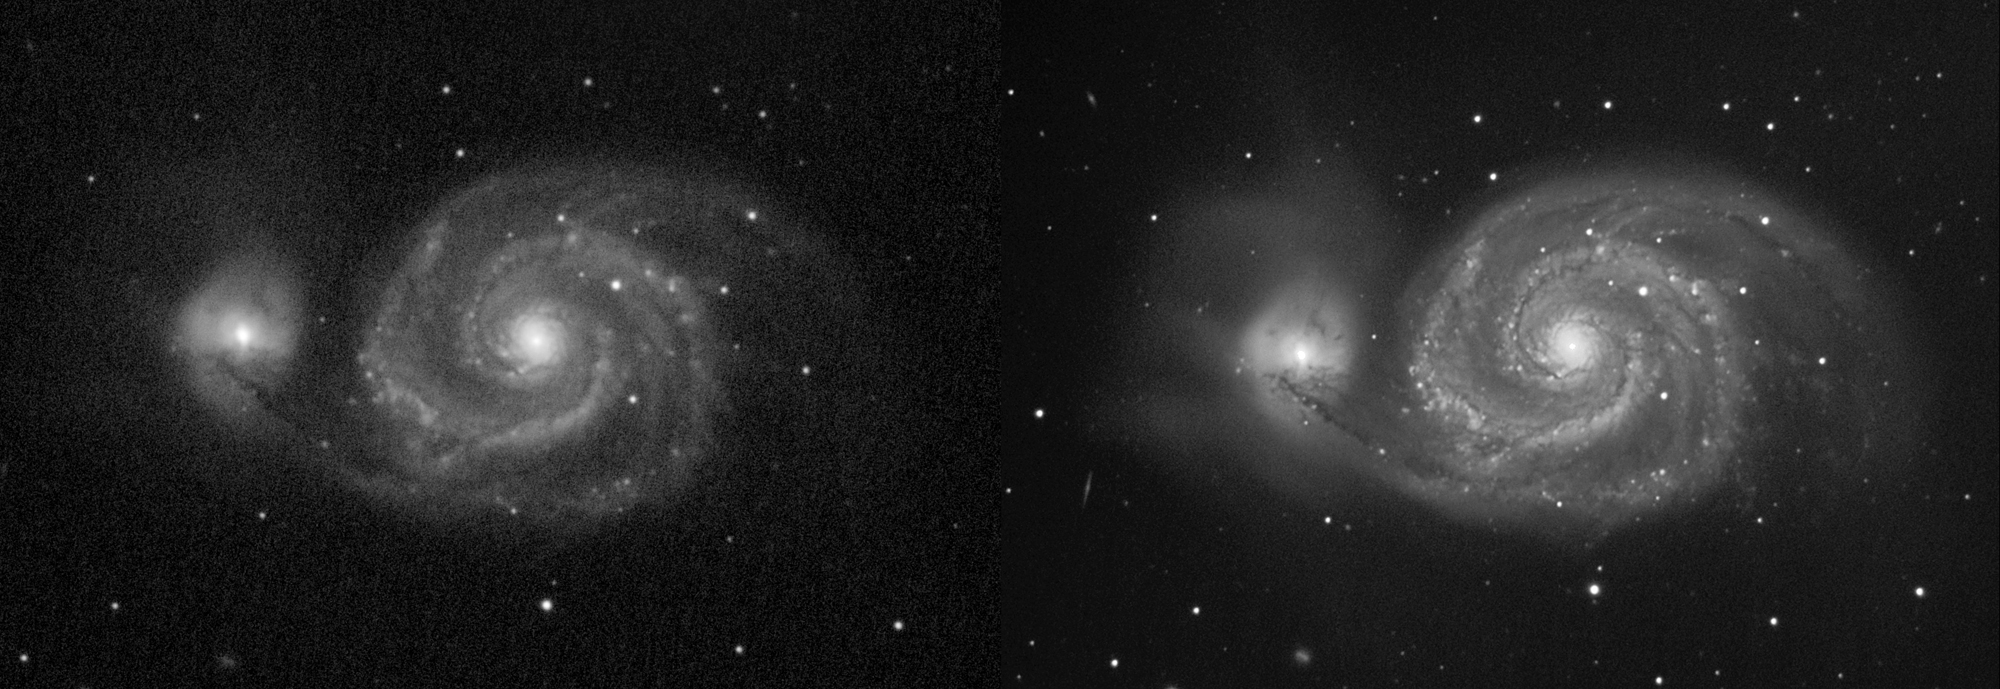
Before we start imaging, I want to dispel a well-known belief among beginners. Stacking many exposures does not make the image any brighter. It does, however, increase the signal-to-noise ratio by an incredible amount thereby making the image much smoother. This will allow you to greatly "stretch" or brighten the image during processing to bring out very faint details while keeping the background nice and dark. Take a look at the images below. They were both captured with the same camera and telescope that I mentioned earlier; however, the one on the left has a total exposure time of six minutes while the one on the right is nearly a five-hour exposure. Of course, both images are made up of many short sub-exposures, five seconds in this case. You can choose to take a particular image as far as you wish by either calling it done after twenty minutes of stacking or sticking with it for several hours.
Here is a great tip! You can combine stacked images taken over several nights to achieve details that would be impossible to obtain in one imaging session. You can save the data to your computer from each night's work and then combine the different stacked images from several nights using a free star stacking software program called Deep Sky Stacker (explained in greater detail below). This is how I captured the image of the Whirlpool galaxy on the right. Remember, while rotation will blur details if you don’t capture a planet within a few minutes, deep sky objects, with a few exceptions, do not change for centuries, at least not from our perspective, so their data can be combined for as long as you care to do so. Using this technique, a busy schedule or needing to get up early the next morning is no longer a deterrent for capturing very long exposures.
OK, let’s get started! The first thing to do is figure out what you want to image. I like to explore my star charts to find interesting targets that will be well-placed in the sky that evening. Once I have a handful of objects in mind, I go to astronomy.tools, my favorite field of view calculating website, to figure out exactly how my telescope and camera combination will frame each of those targets on my list. With that knowledge under my belt, I then choose a few of the best framed, most interesting objects, and off I go!
Next, I set up my mount and, as carefully as I can, polar align for the best tracking accuracy. Because I did not use an autoguider for the image in this tutorial (I wanted to try to mimic the gear that the average beginner might be using), I started to notice the mount drifting very slightly after several minutes of exposure time. This will happen unless you are extremely diligent (or lucky!) with regards to your polar alignment accuracy. If your mount drifts enough to affect your image, simply pause the stacking, re-center the target in the main portion of the program, and resume stacking. Doing this will allow you to stack for several hours. Obviously, initially spending a few extra minutes polar aligning your mount to a higher degree of accuracy is easier than having to continue to go back and re-center the target, but I mention this so you know that this is available if needed. Since I wanted to keep things as simple as possible for the image that I captured in this tutorial, I decided to crop the final image and not make these adjustments.
If you are imaging a target that is bright enough to be visible in an eyepiece, it may pay to first visually confirm that the object is indeed centered in the field of view before changing from eyepiece to camera. A trick that may save you some frustration is to figure out the focus point of your camera ahead of time compared to the focus point of, say, a medium power eyepiece. One of the benefits of the 290 Mini is that its body is, for the most part, a 1.25 barrel. If your telescope has a 1.25 focuser, I would recommend that you purchase a simple and inexpensive "1.25" Parfocal Ring" to help you accomplish this. If your telescope has a 2” focuser, you can simply purchase another 2" to 1.25" adapter and dedicate it to the camera. Then experiment on a bright star, moving the camera in and out of the adapter or parfocal ring, until the focus is identical to your eyepiece. This step will save you a ton of time since you can now go from eyepiece to camera knowing that the target will be squarely centered in your view and focused as well!
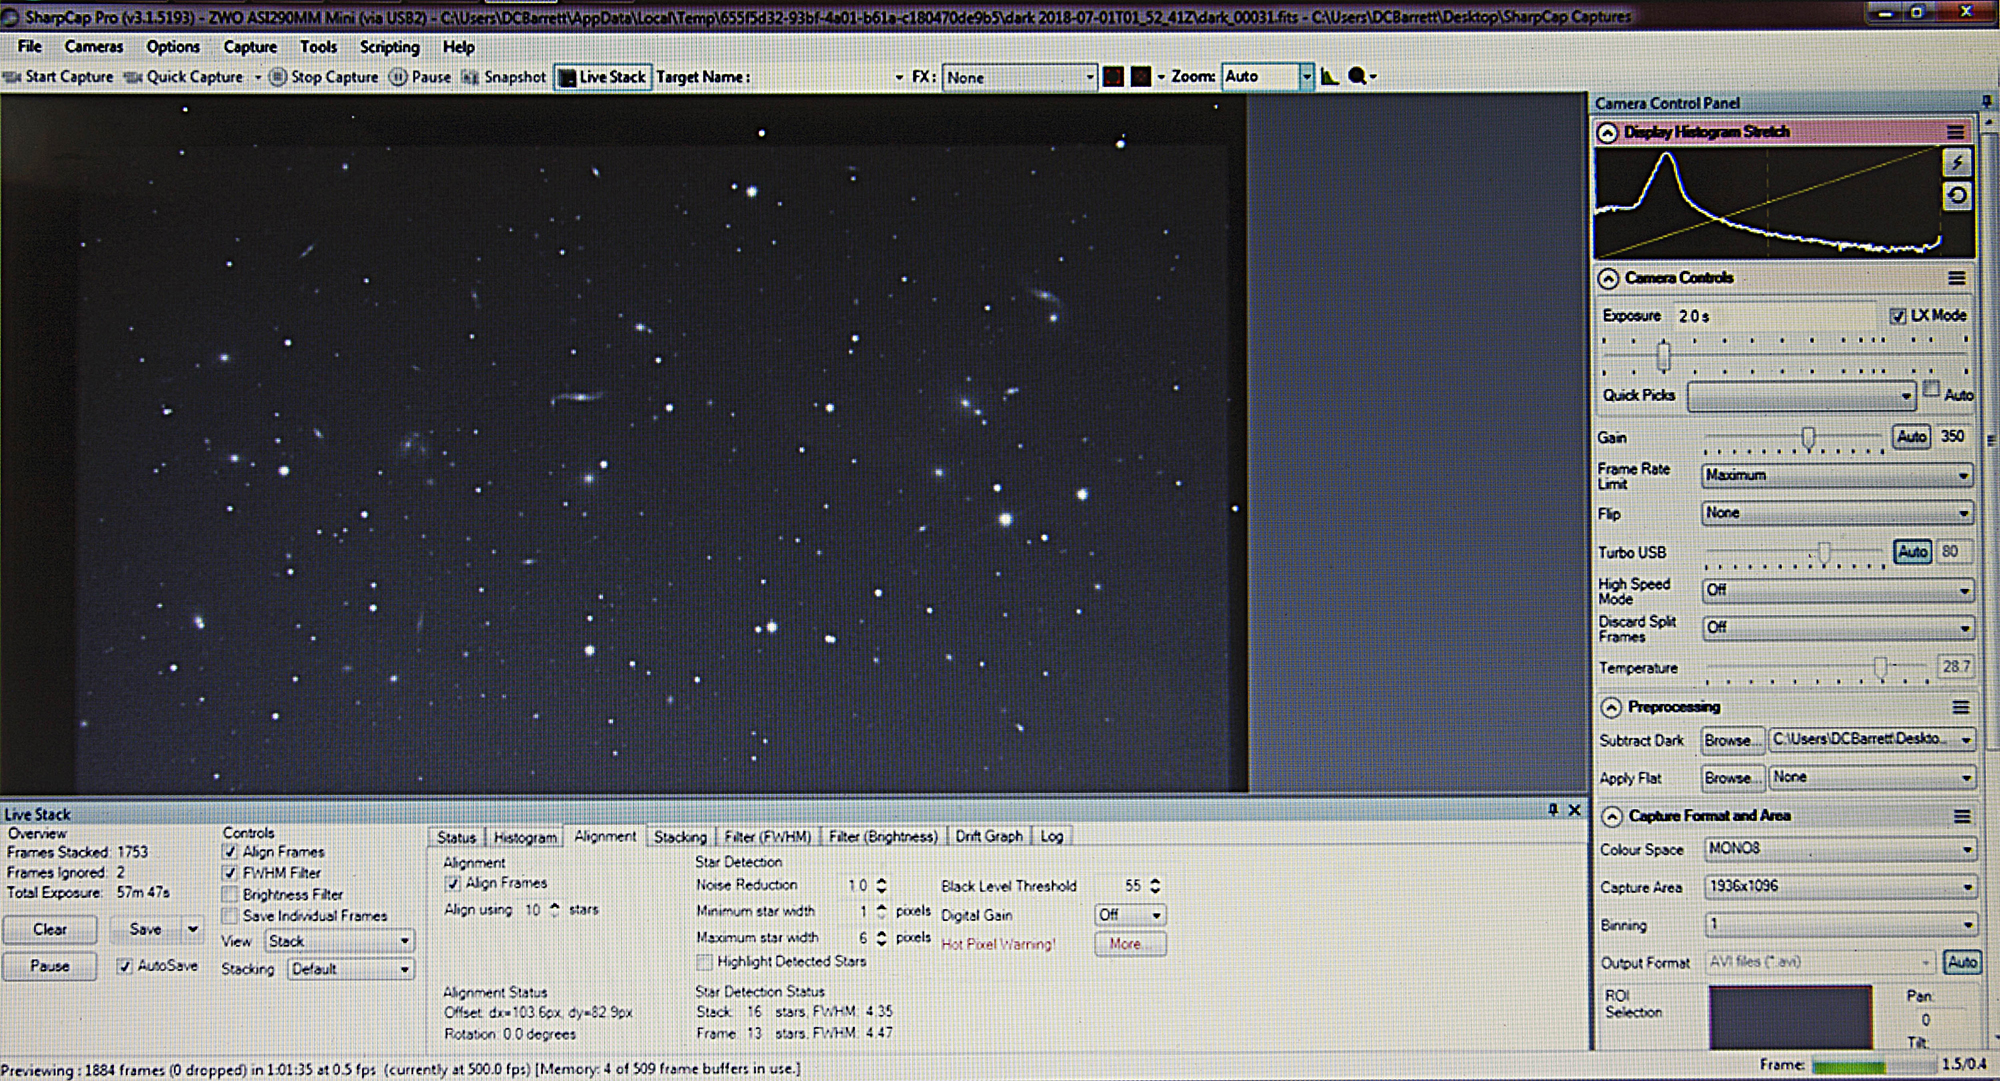
The following screenshot shows the deep sky object that I have chosen to capture centered in the frame using Sharpcap Pro’s live stacking program. I have not yet started stacking the image, however, so what you are seeing is a single two-second exposure. Notice the exposure and gain settings that I have decided to use. I have found that setting the gain at about 350 seems to be the sweet spot with very low noise cameras like the 224MC, 385MC, 290MC, and 290MM.
At the top right of the screen, you will also notice that I have clicked on the "Zoom" icon to reveal the different screen magnification percentages that are available. This is an important feature when trying to check focus or view interesting portions of the image once stacking is underway.

Please Note: If you are using a monochrome camera you can ignore the Bold Text and the next two screenshots as they apply only to users of color cameras.
If you are using a color camera (as opposed to a monochrome camera) to image the night sky, you will need to perform one additional step. This involves adjusting the white balance function to make sure that your colors are accurate. To do this you must first locate the Histogram icon at the top right-hand side of the screen to the immediate left of the magnifying glass. This icon looks like the letter L with a green mountain slope to its right. When this icon is clicked, you will see the enlarged view of the Histogram display, shown below; appear at the bottom of the screen. In this particular screenshot, you will notice that the Histogram display shows the blue and red colors to the left and right of the white and green colors which form the peak in the center.
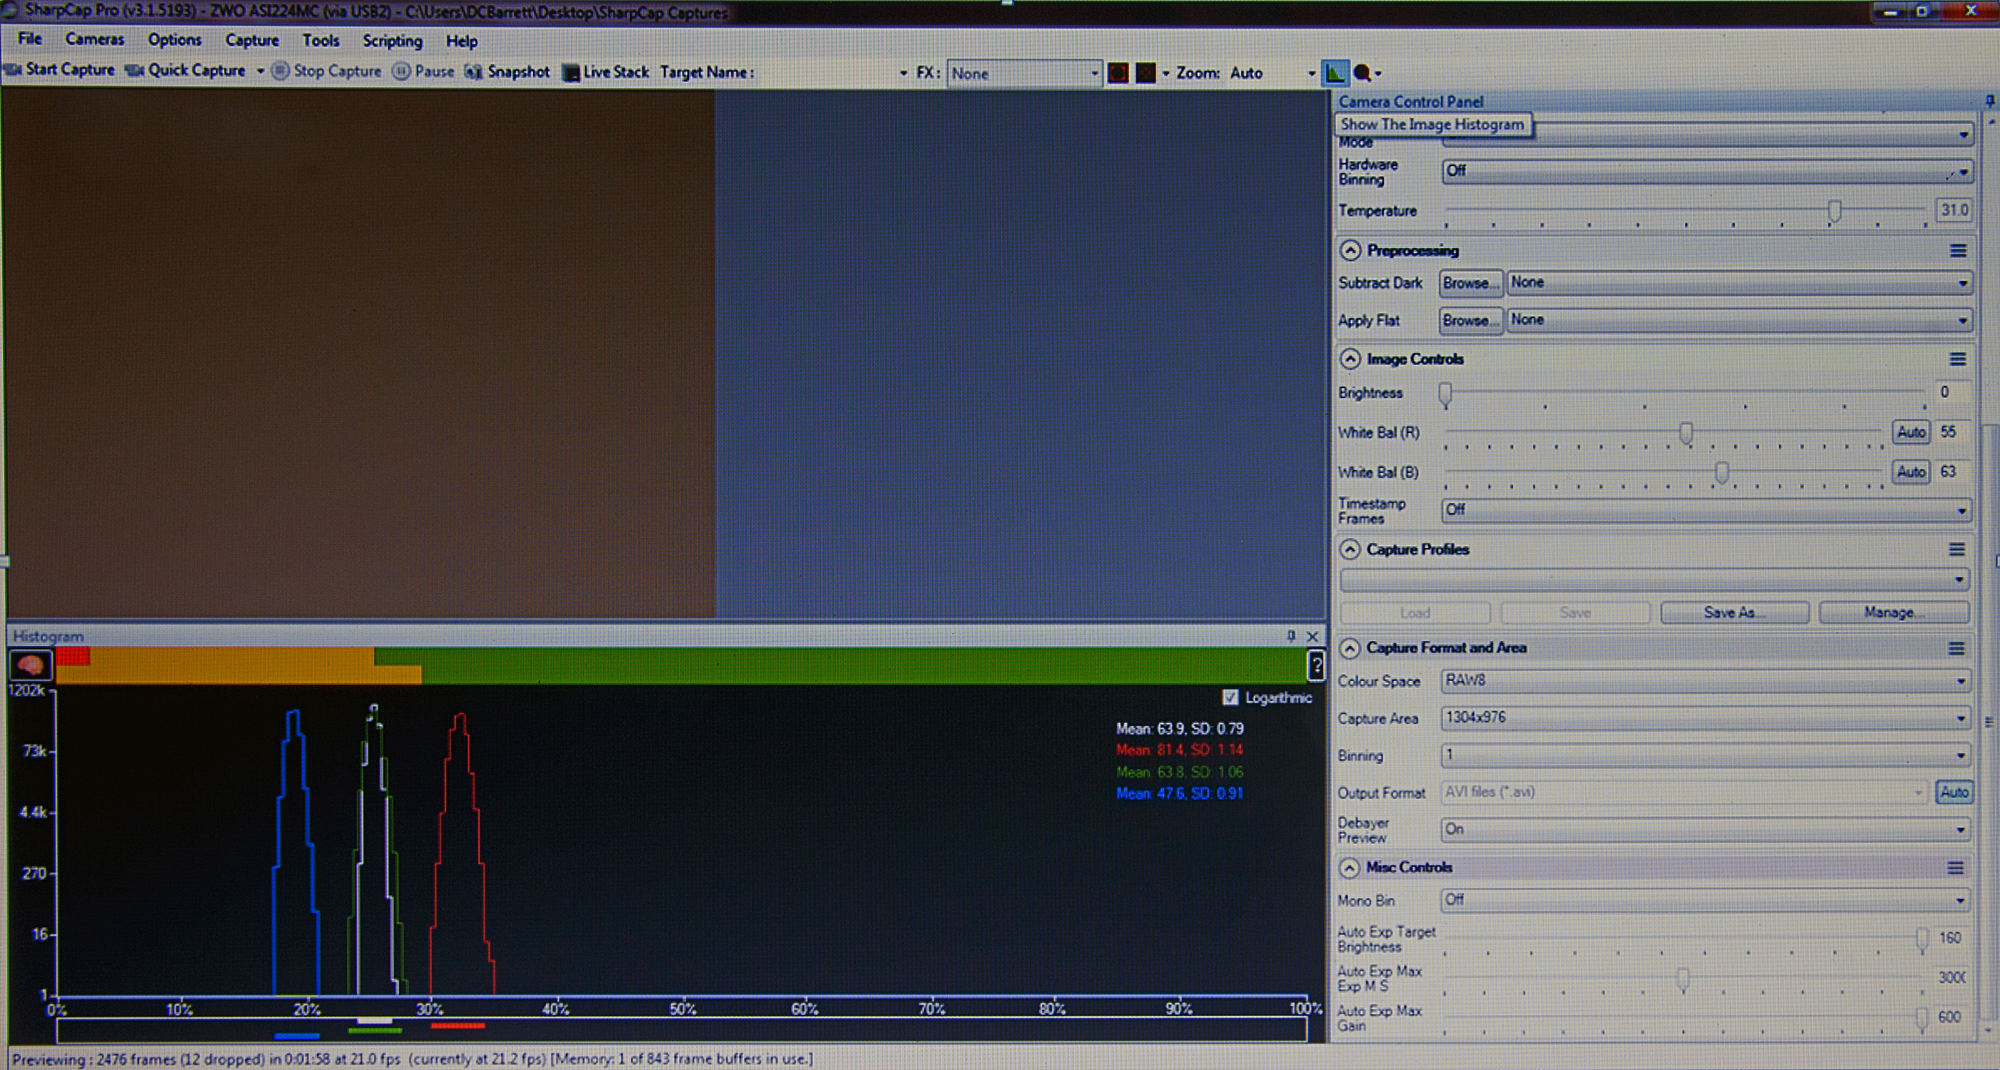
On the right of the screen under the “Image Controls” tab, you will see the “White Balance R” and “White Balance B” sliders (R for red and B for blue colors). To improve the color accuracy of the image you will need to carefully adjust these sliders either left or right to bring the blue and red portions of the Histogram in line with the green and white peaks in the center. Once done, you will see something like this (see below):
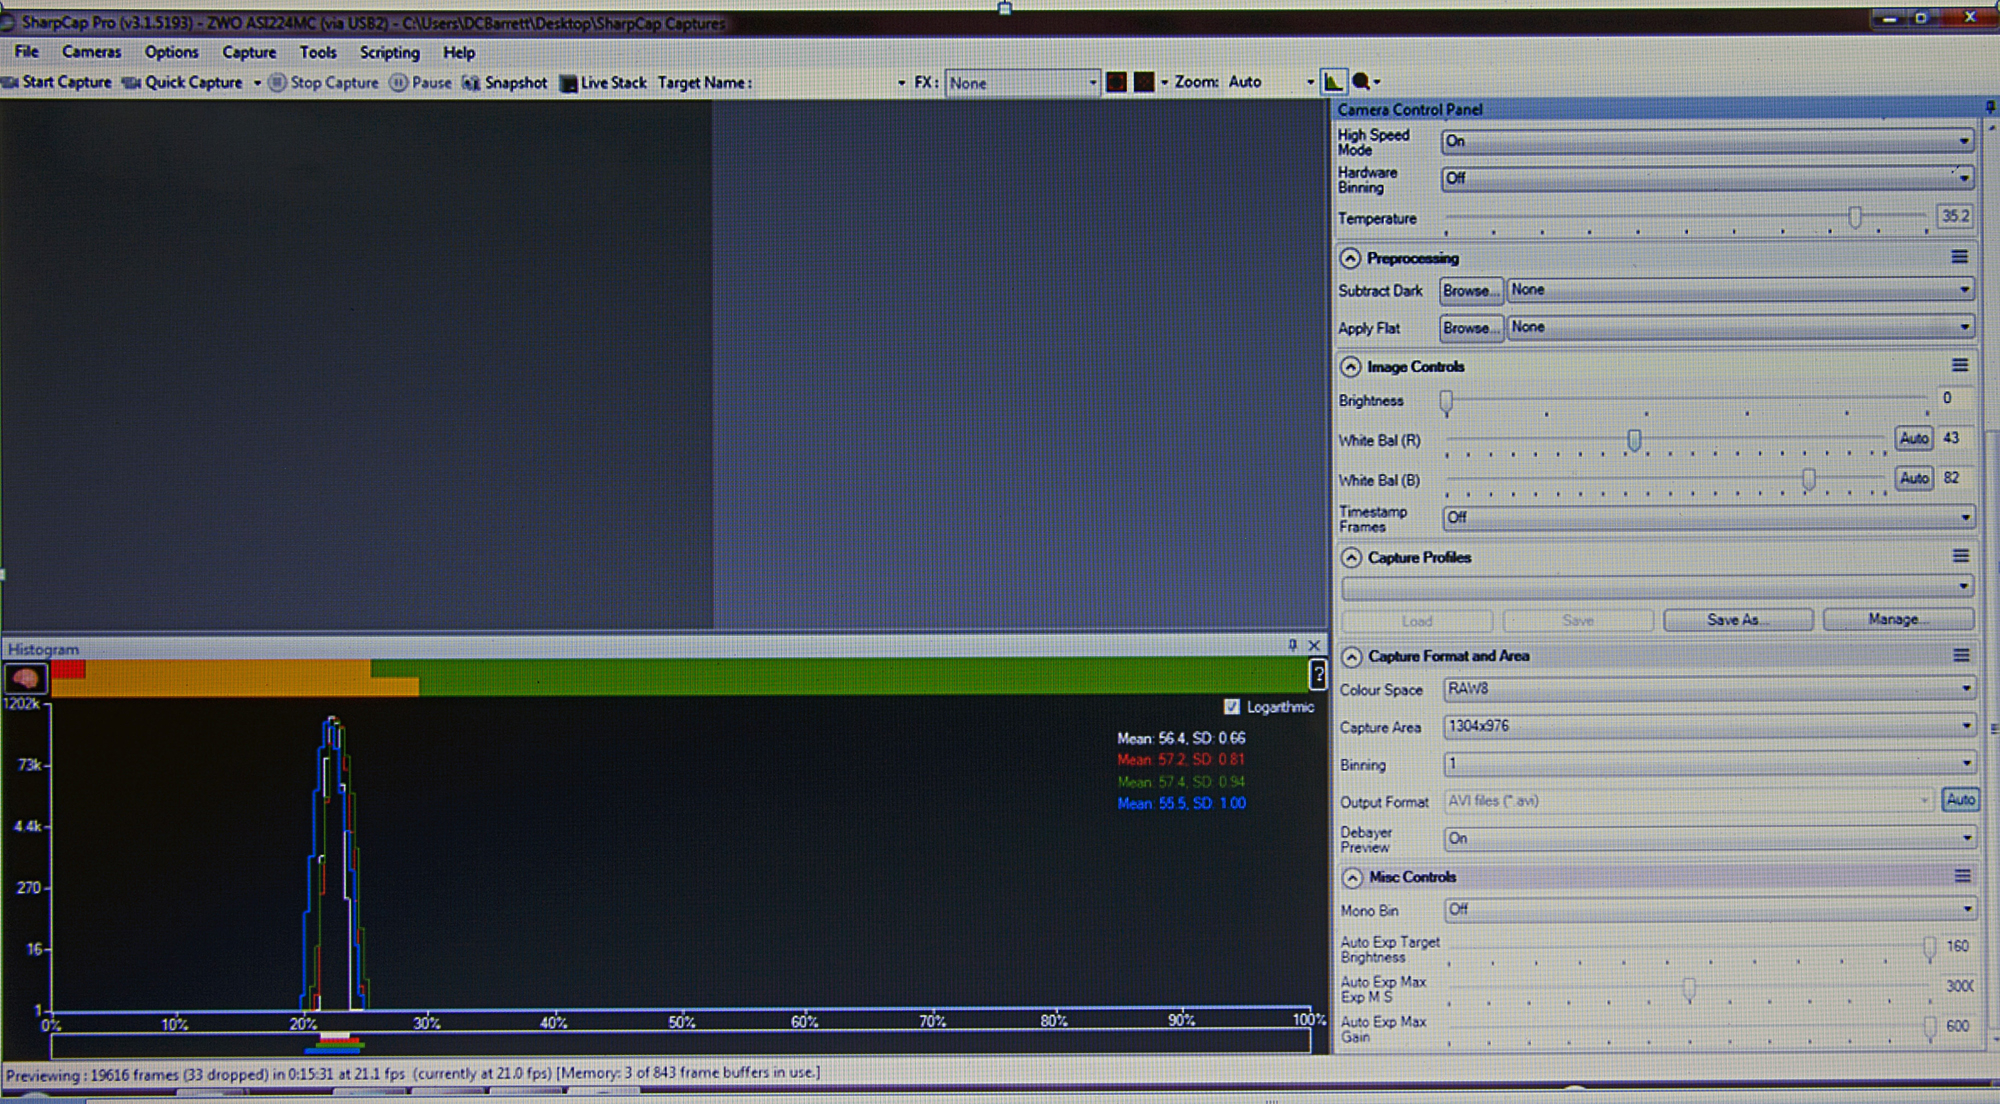
This action will need to be applied after the gain and exposure times are set. Once done you are ready to take your dark frame images mentioned below. Now back to the show!
I used star hopping techniques that I learned long ago to locate my target of choice, but there is no rule that says you cannot use a computerized mount if you desire. In some cases, including this one, you may need to rotate the camera in the focuser to best frame the subject. Don't overlook this important step. A well-framed galaxy, nebula, or star cluster will have more visual appeal and is worth the few extra seconds that this takes.
Once the target is acquired and properly composed, the focus is reasonably accurate (I will cover this step in much greater detail below), and the exposure and gain settings have been chosen, you will need to shoot and apply what is known as “dark frame images”. This mysterious sounding phrase is not really that mysterious as soon as you understand what it is meant to accomplish, and it is absolutely worth the effort to improve your images.
Get ready to do dark frames by first noting the camera's exact orientation before removing it from your focuser, otherwise, you may have to recompose the target all over again once the darks have been acquired. Cover the camera with a dark, opaque dust cap so as to block any light from reaching the sensor. In my early imaging days, I used to cap the entire telescope. What I noticed was that sometimes I would accidentally alter the aim of the telescope while attaching the cap, and then I would have to re-center the target. After this happened a few times, I realized it would work just as well to cap the camera instead!
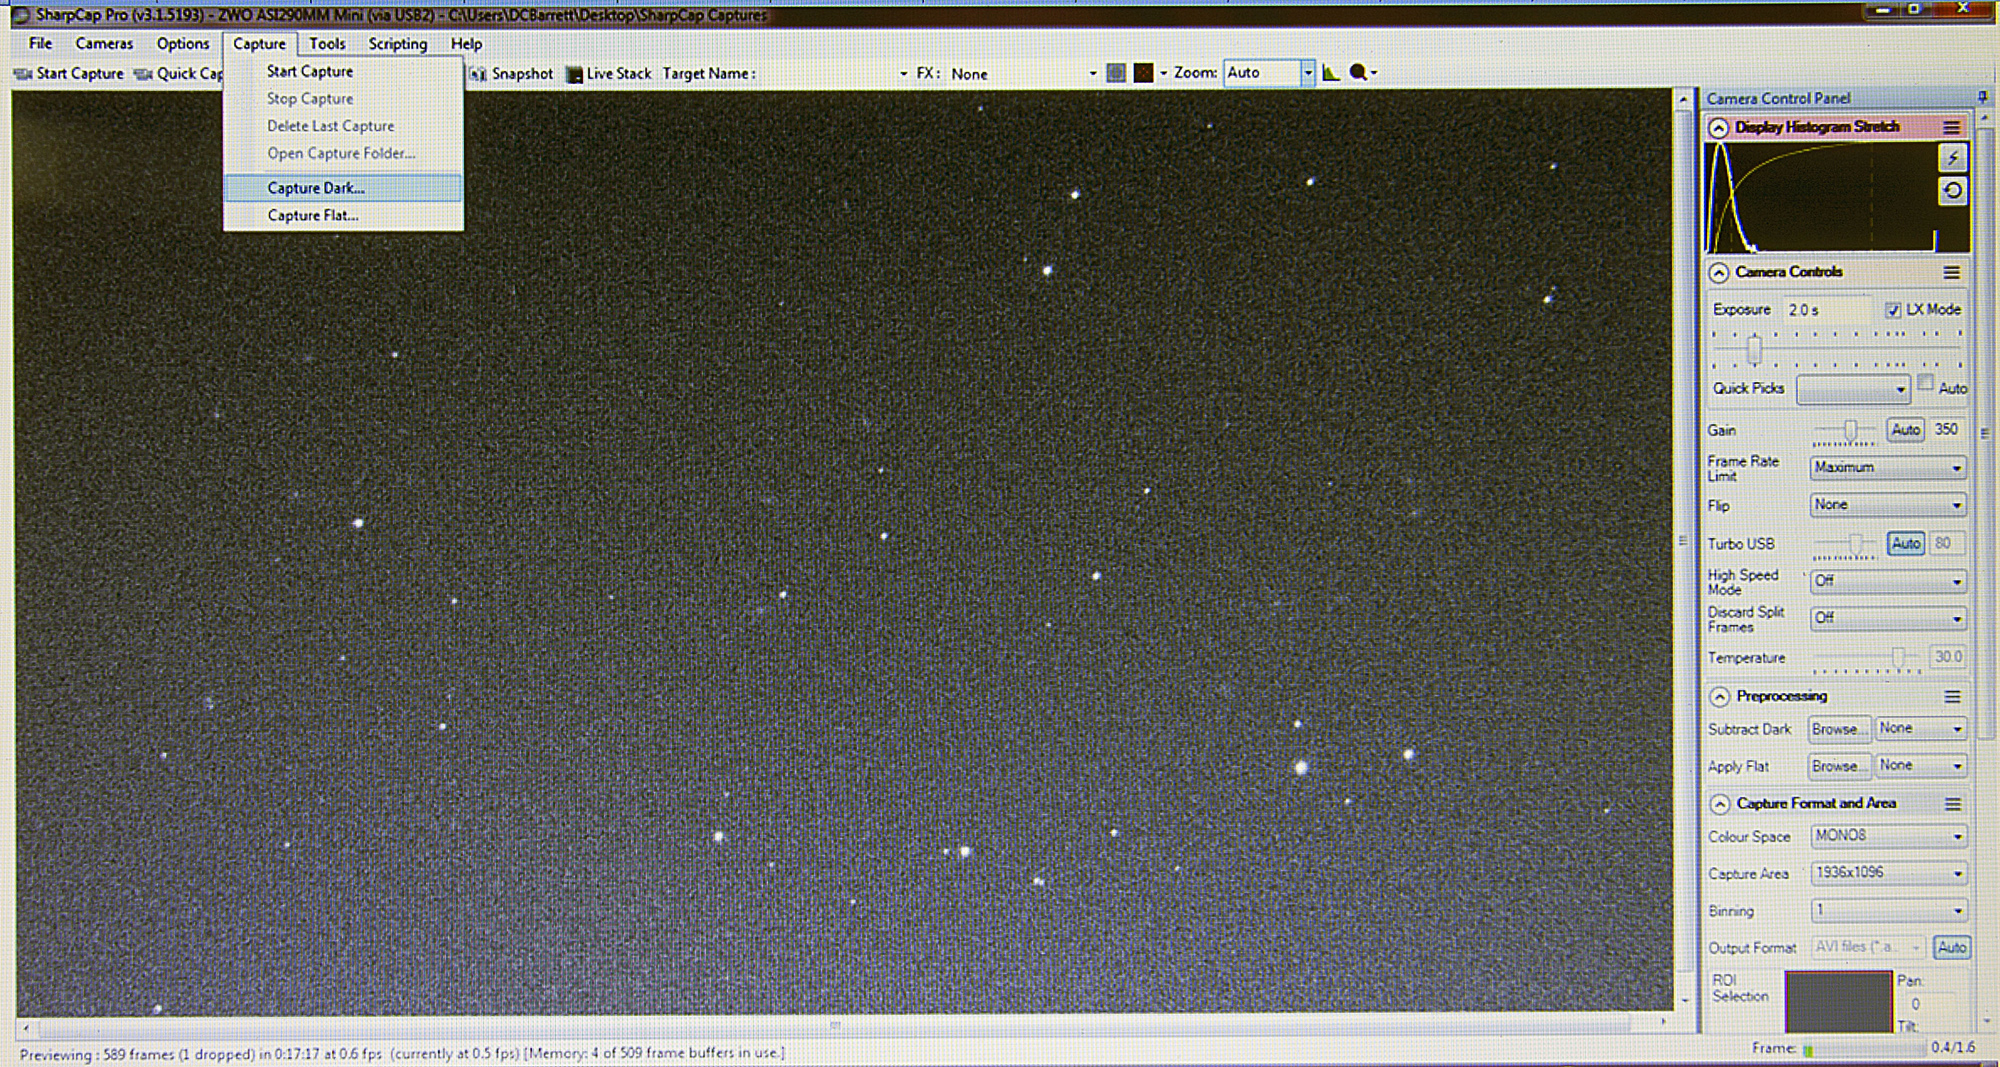
Once the sensor is covered, place the camera back into the focuser and take several (usually about 30) images at exactly the same exposure time and with the same gain settings that you will be using once you start stacking, preferably at very close to the same temperature that the main images will be shot. Since you will start imaging almost immediately after shooting darks, this is a given. With the camera sensor covered the only thing that is actually being captured is the internal “noise” of the camera. The capturing image stacking software can then remove this unwanted noise from subsequent images, making the final image less grainy than what would otherwise be possible. In the image below you will notice that I clicked on the "Capture" icon at the top left of the screen to reveal the "Capture Dark" icon. Please click on this icon as well to reveal the screen details below.
This screenshot (below) reveals the "Capture Dark Frame" tab. These instructions will need to be followed in order to capture the essential "Dark Frame" images. I generally save my darks in the "Dark Library" where they can be retrieved and applied to the soon-to-be-captured stacked exposures.
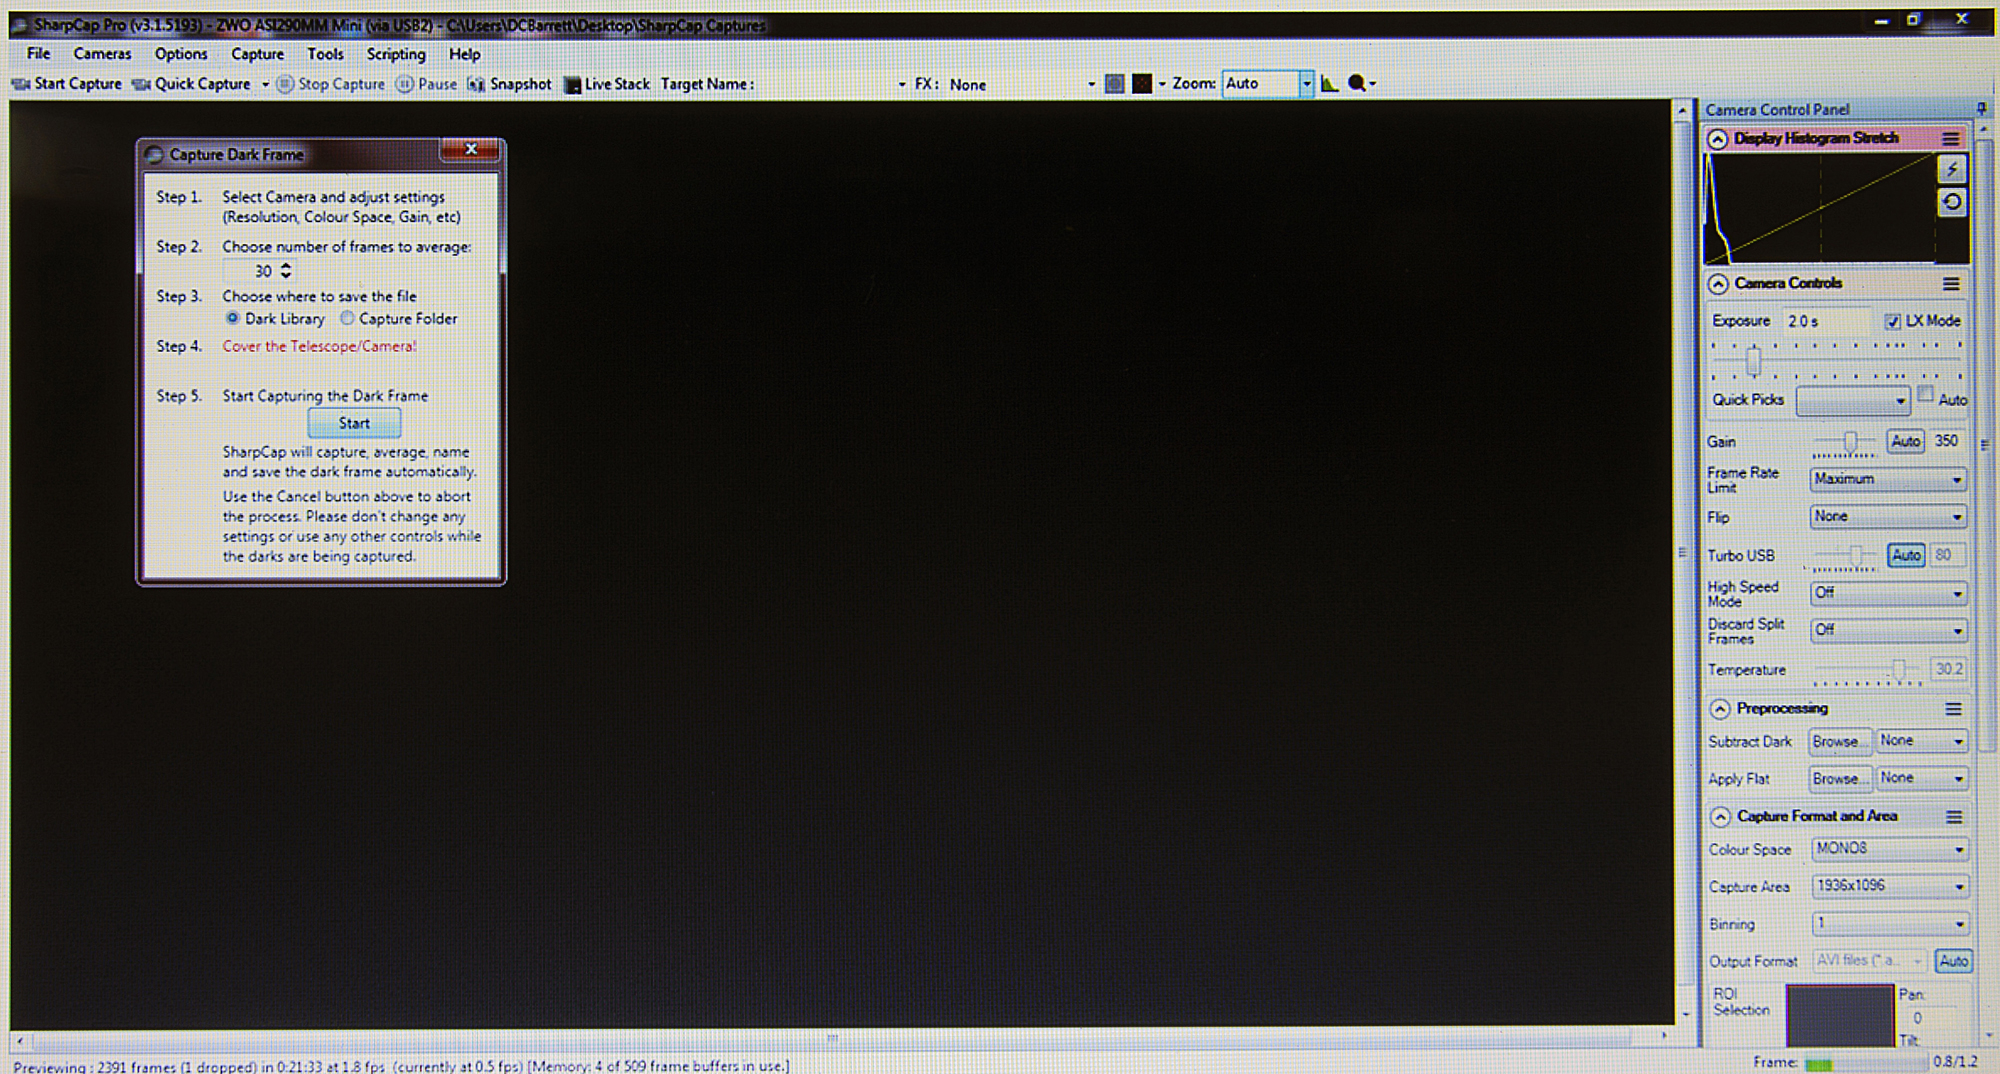
Choose the number of dark frames that you want to capture and then click the "Start" button. Once the darks are captured, take a look at the file details of that particular image so that you know which set of dark frames to add to your soon-to-be stacked images. Check out the green tab on the top of the image below to see these details.
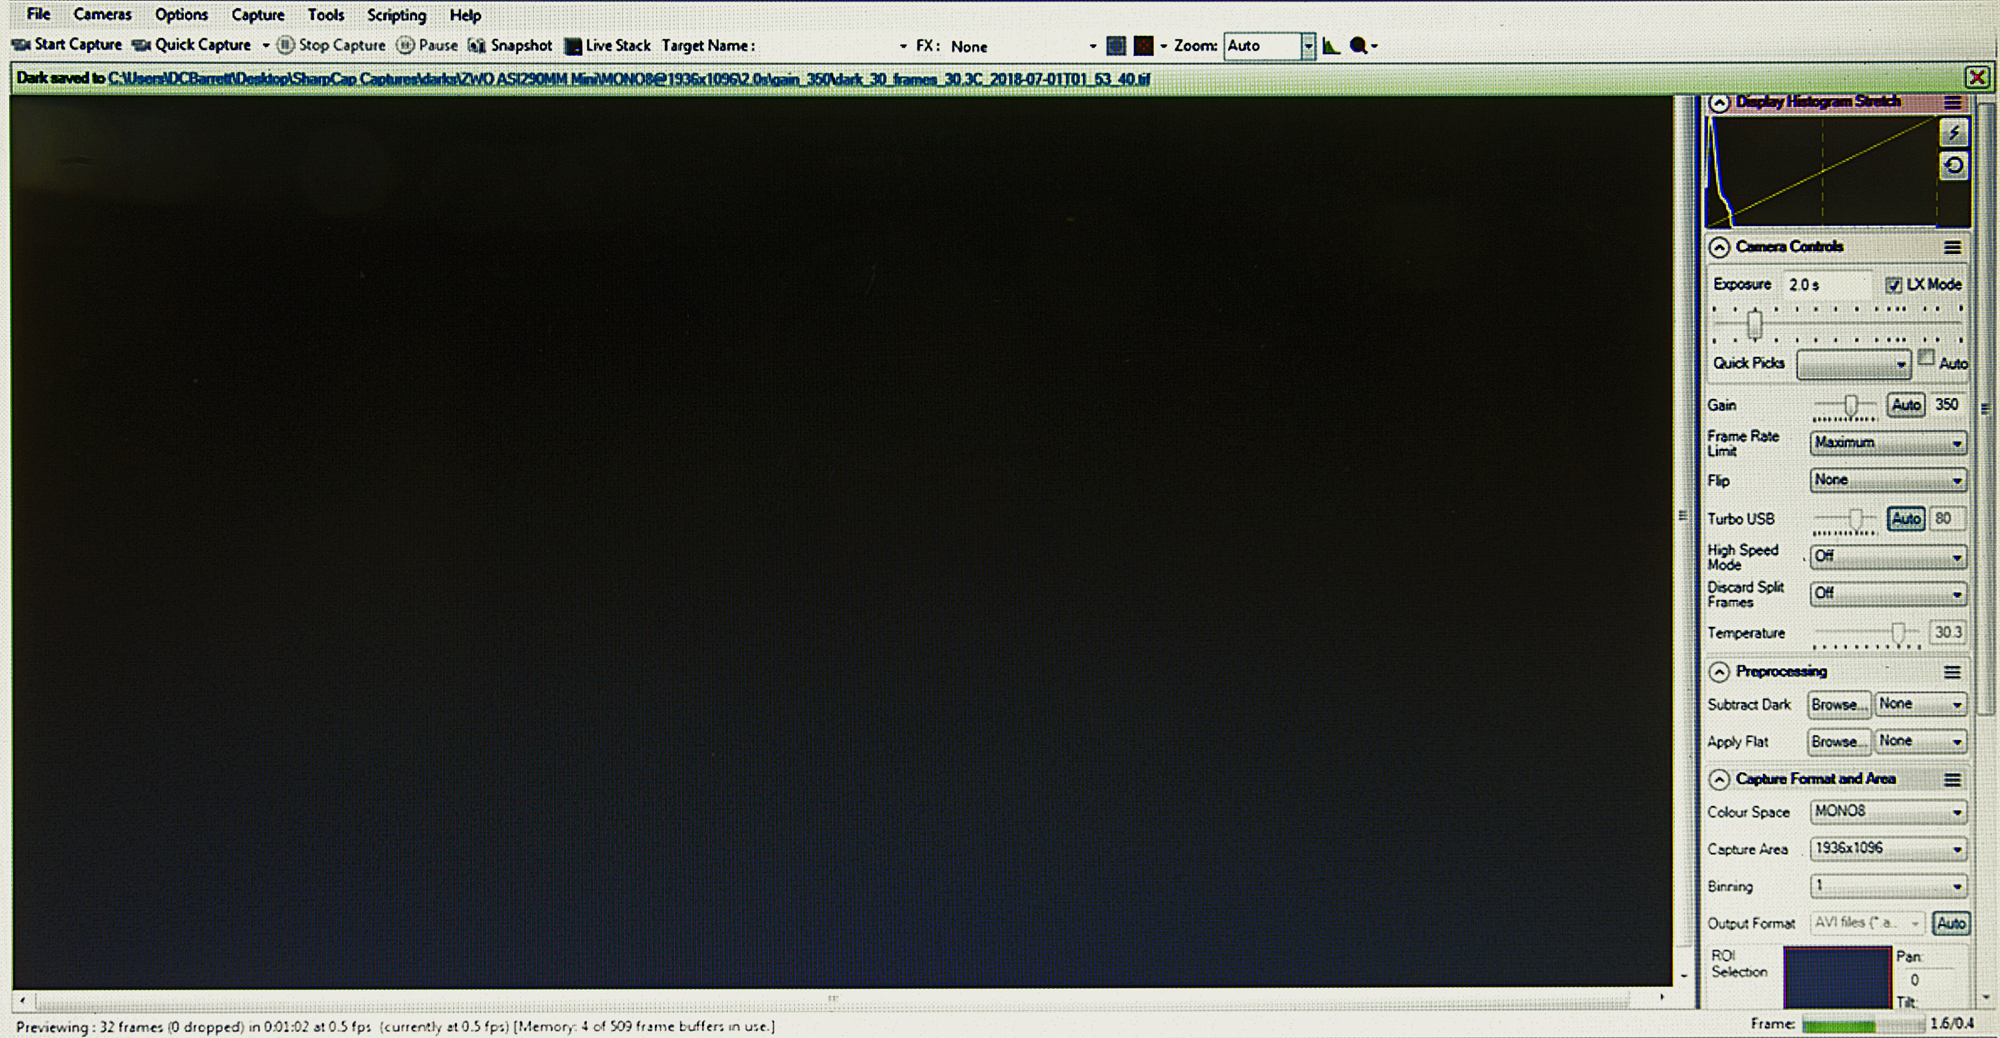
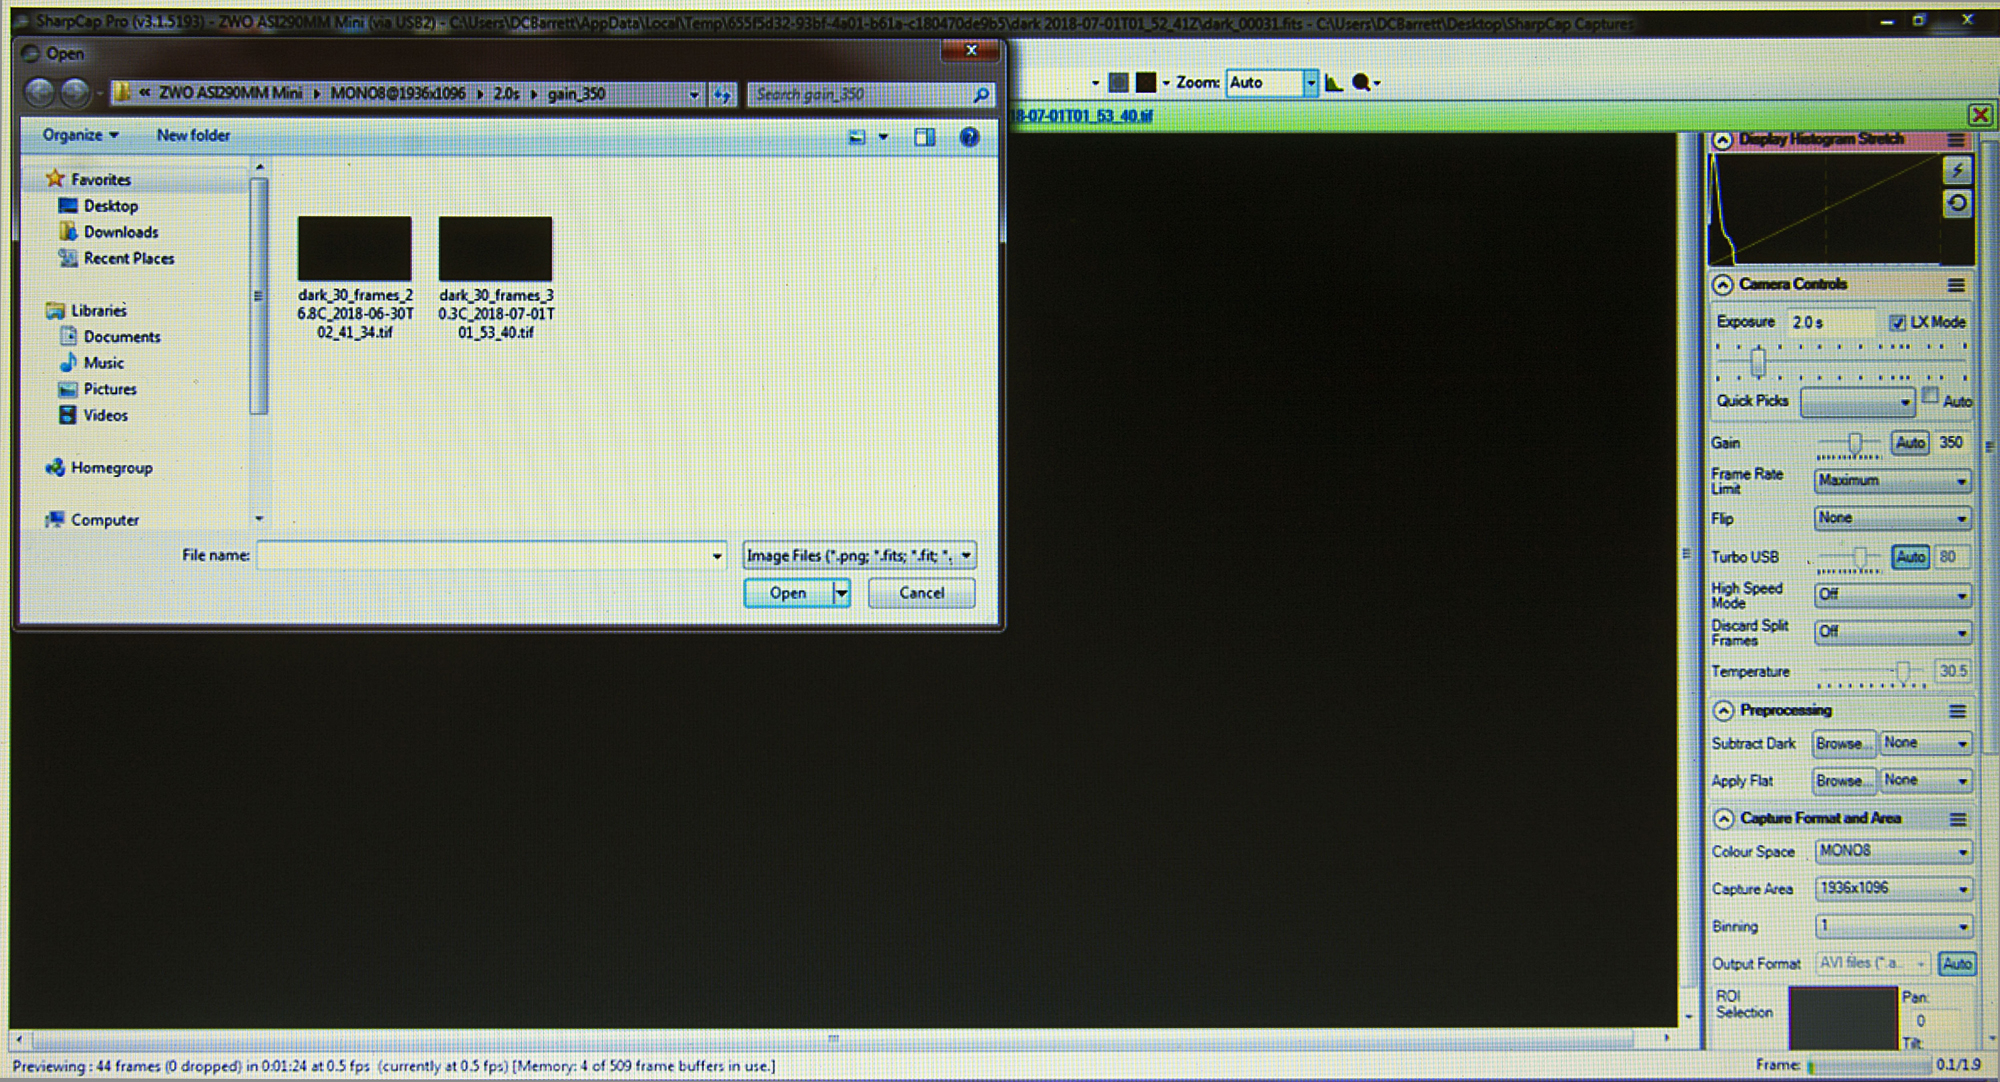
Once the darks have been captured, click on the “Browse” icon to the right of where it says “Subtract Dark” under the “Preprocessing” tab on the right of the screen. If you weren't paying attention to the file name for the particular darks that you captured when the green bar appeared on top of your screen (that detail only shows itself for a few seconds and then disappears), the easiest way to know which set of darks to add to your image is to check the one with the latest date, and then choose that one. Click on that image within the white open box to add your just captured dark frames and then click on the “Open” button to apply them to your soon-to-be captured images.
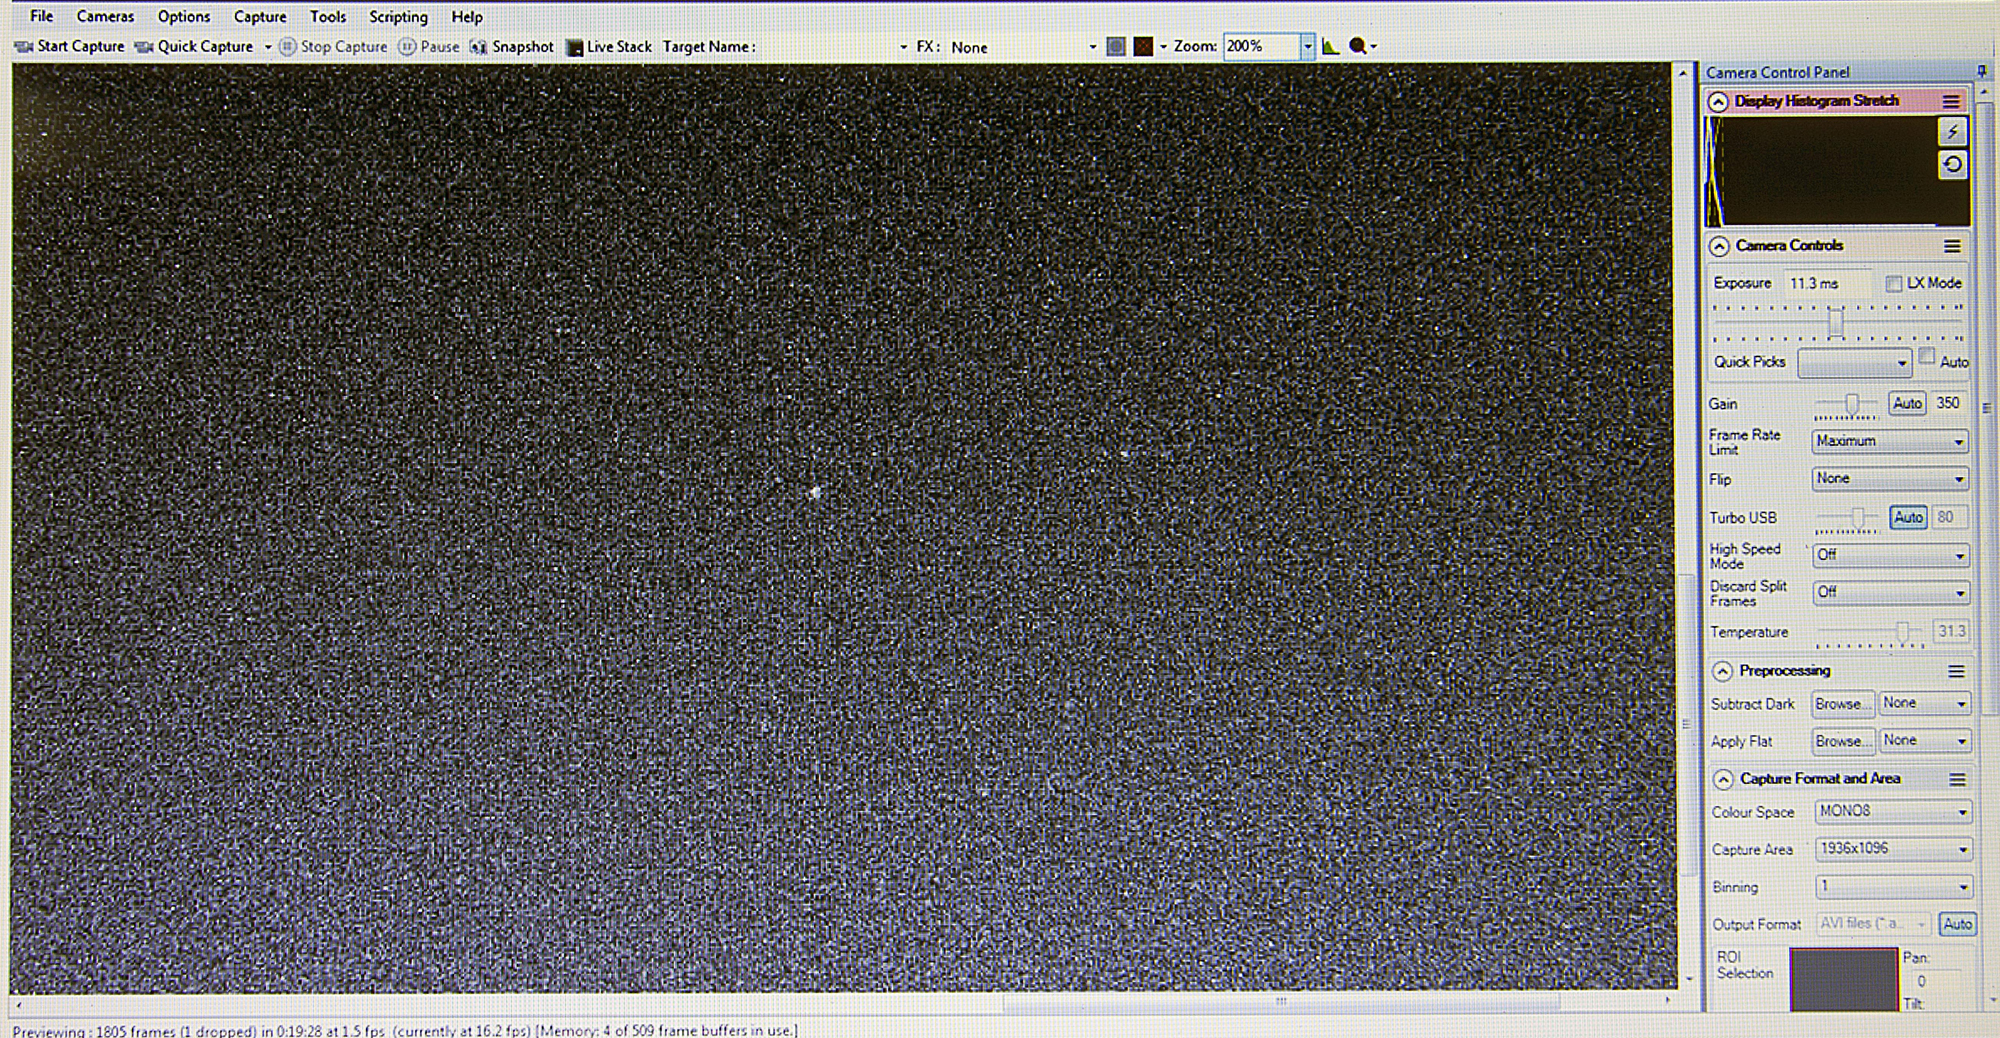
Now that the process of adding darks to your image is complete, you are almost ready to start stacking! Before you begin, take some time to tweak your focus. In the screenshot below, you’ll see the Zoom drop-down I mentioned earlier. This feature is important when trying to focus the image as accurately as possible. Magnifying the brightest star in the frame by a factor of between 200% and 400% will make it much easier to check the accuracy of your focus so that the sharpest image can be achieved.
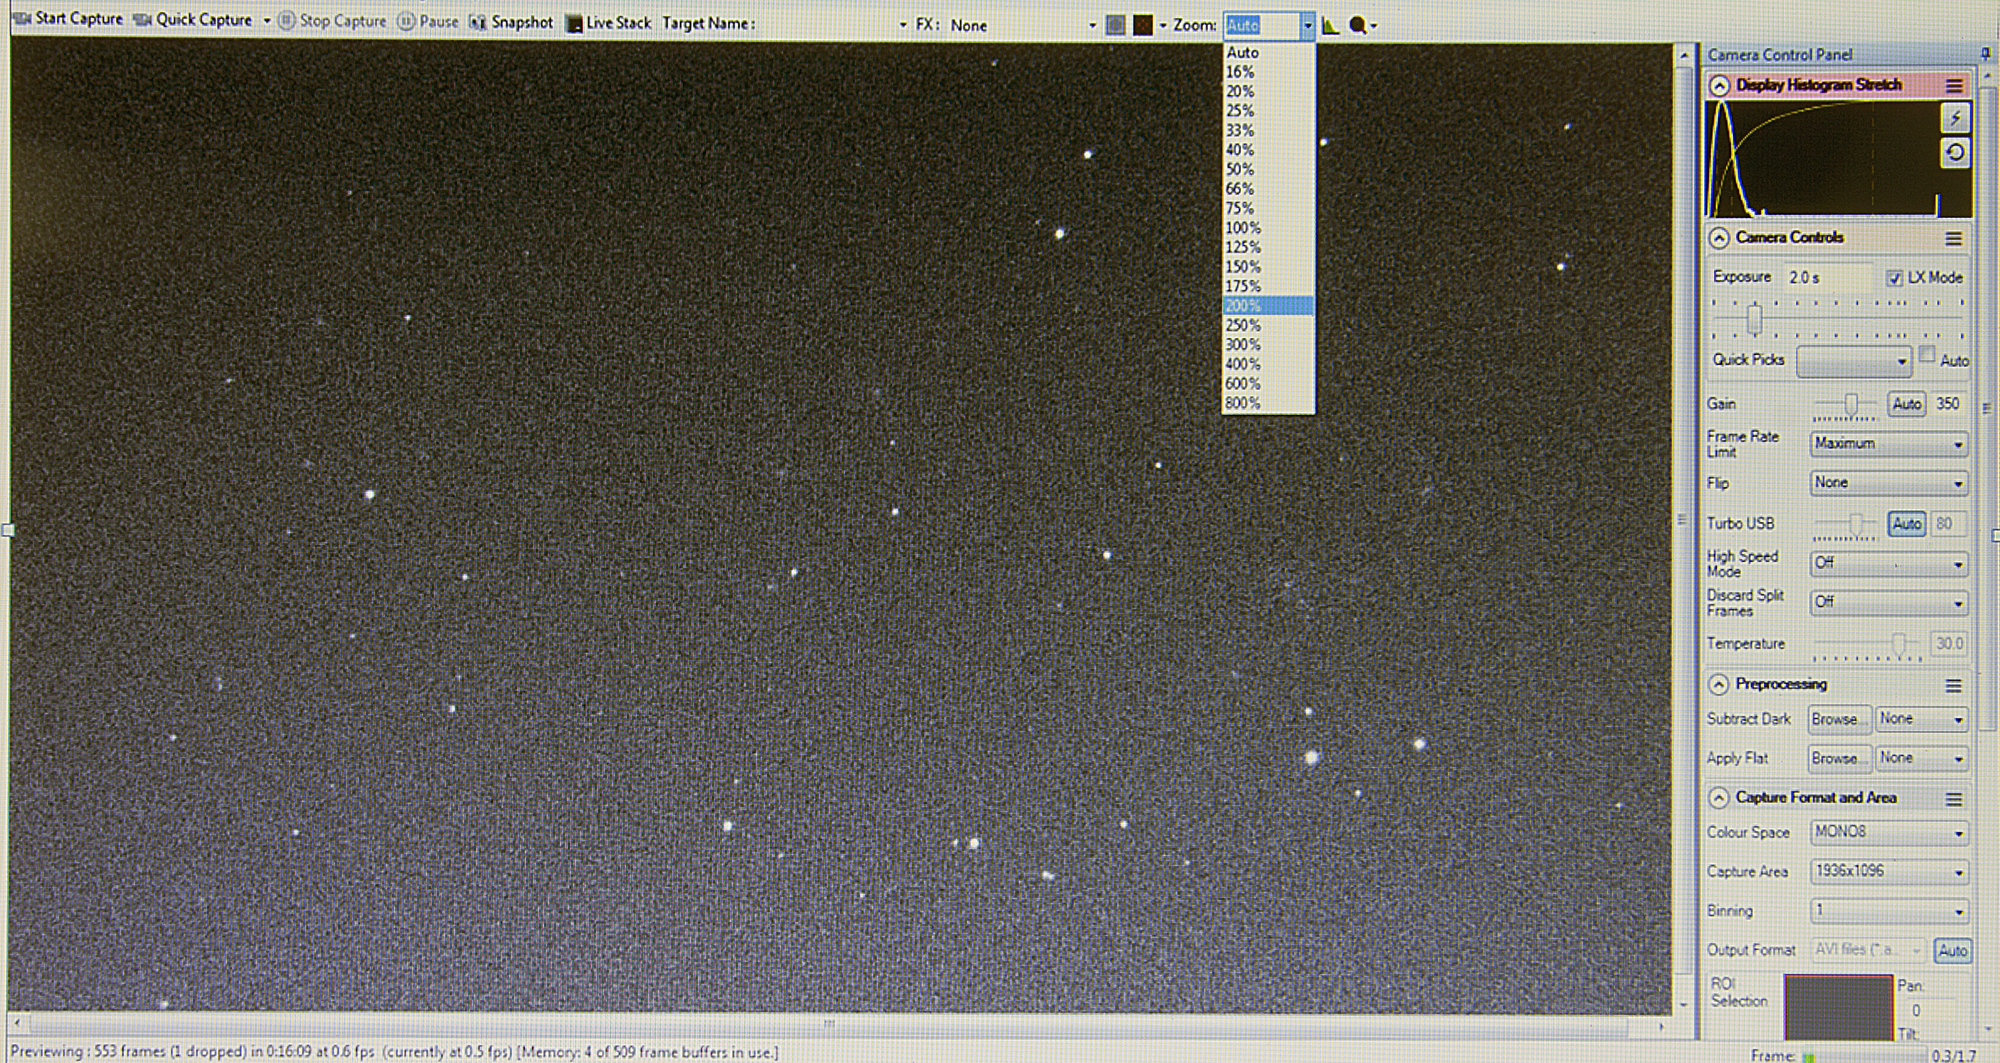
Once a magnification percentage is chosen and the brightest star is centered in the view, you will see something like this:
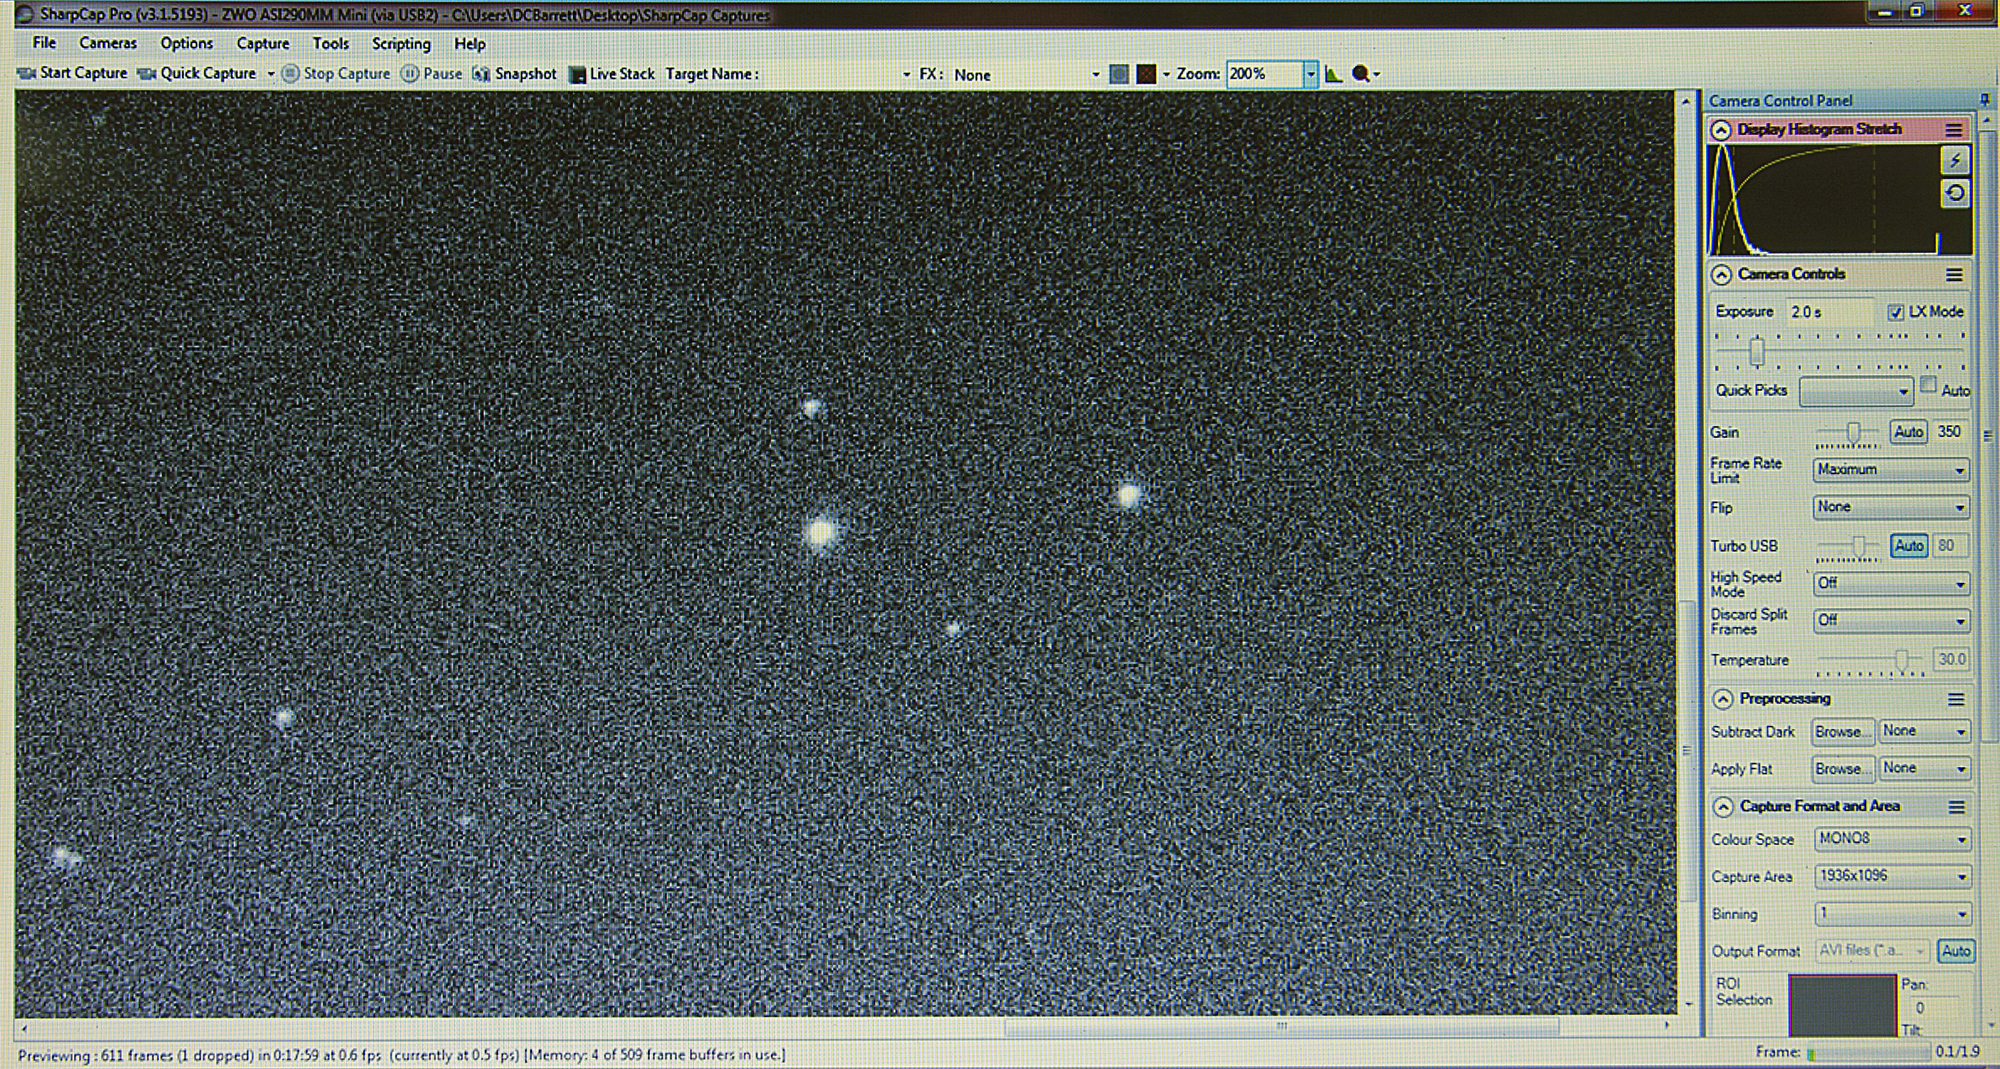
To more easily see the action of precisely focusing the image live, you will need to reduce the exposure slider to a point where you can now just barely see the star. Doing so will allow you to see the image respond immediately as you accurately focus your telescope. Now you won’t have to wait 2 seconds, before the next exposure occurs, to see if you made the image better or worse. I don’t use a Bahtinov mask when using my scope visually at high power and since this is precisely what we are doing here, I think that you too will find that this accessory is unnecessary for this method of imaging. When fine focusing on the lower exposure setting you will see something like this…
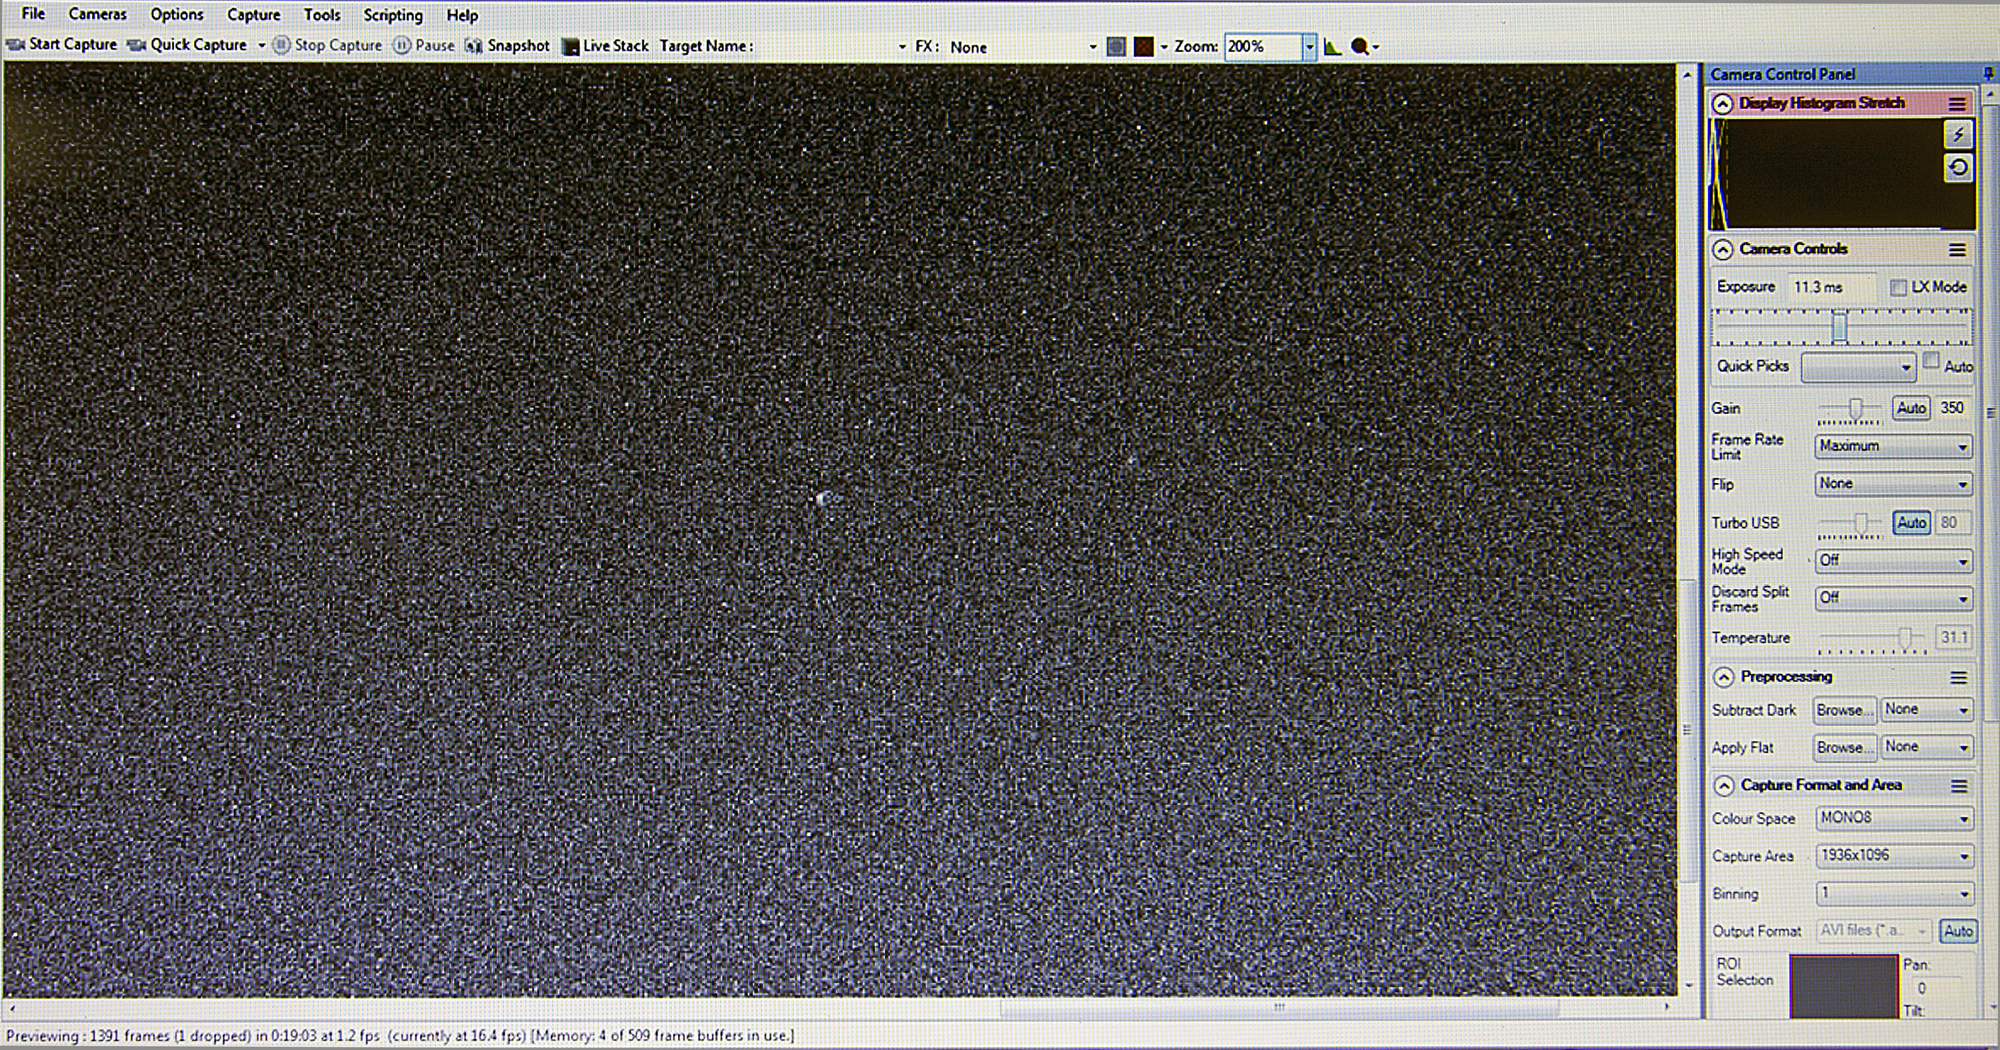
...become something like this:
Although this seems like only a slight improvement over the original image, I like to take every precaution possible to ensure the sharpest and most detailed final image. Just remember to reset the exposure time after you complete this step! One thing that you should know is that on nights when the temperatures are falling, you may notice that over time you will need to touch up the focus of your image. Later on in this tutorial, I will show you how you can discern when this is happening and take steps to correct it.
You are now finally ready to start stacking images! To do so, simply click on the “Live Stack” tab at the top center of your screen. Once this action is taken, you will see a screen like this.
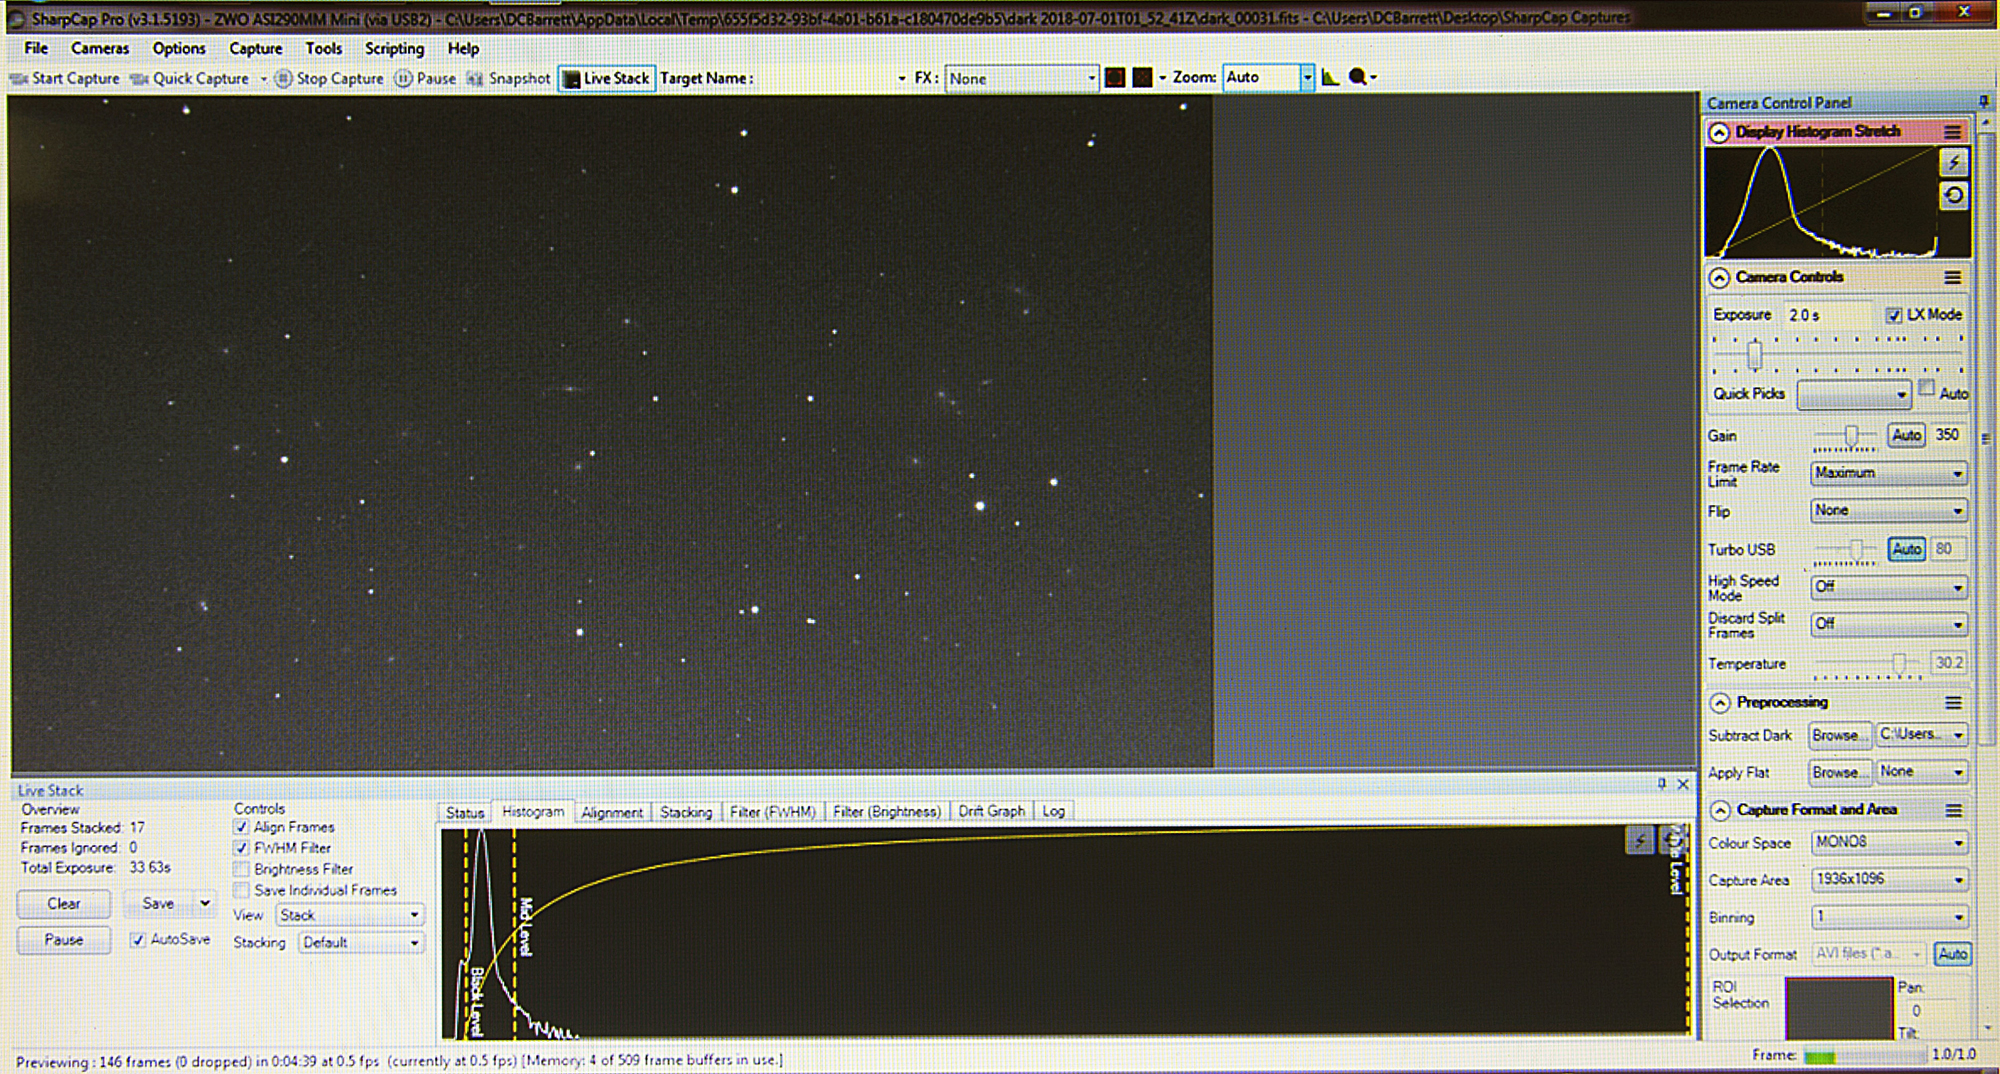
The screenshot above was captured about 30 seconds into the live stacking sequence and you can already see a much-improved image, with details that were not seen before now easily visible. Notice also, that I have clicked on the “Histogram” tab below the image to reveal the Black Level, Mid Level, and White Level sliders. This important tool is how you can alter the contrast and brightness levels of your image to bring out maximum details. You will also notice that between the Black Level and Mid Level sliders is the central portion of the Histogram, which looks like a steep mountain peak. By adjusting the Black Level Slider just to the left of that peak you can now darken the background sky to a nice level. The Mid Level and White Level Sliders are for adjusting the image brightness to bring out faint details not visible otherwise. These sliders will generally need to be adjusted throughout your imaging session so keep that in mind.
Just below the "Align Frames" checkbox under the "Controls" tab, you will notice that I have checked the "FWHM Filter" box. This funny sounding word is not actually a word at all and means "Full-Width Half Measure". It refers to the width of a star image at the halfway point of its peak. I won't go into the full definition of this in this tutorial except to say that you can use this feature to check the quality of each and every frame. Higher FWHM numbers generally indicate larger star images and poorer image quality. This is usually caused by rough seeing conditions (turbulence in the atmosphere), or inaccurate focus, possibly due to a change in focus as your telescope slowly acclimates to the falling temperatures throughout the night. This very important feature in Sharpcap can be used to monitor the image quality of each and every frame as the night progresses. It can also be used to weed out the bad frames and exclude them from your stack.
Take a look at the image below to see this feature in action.
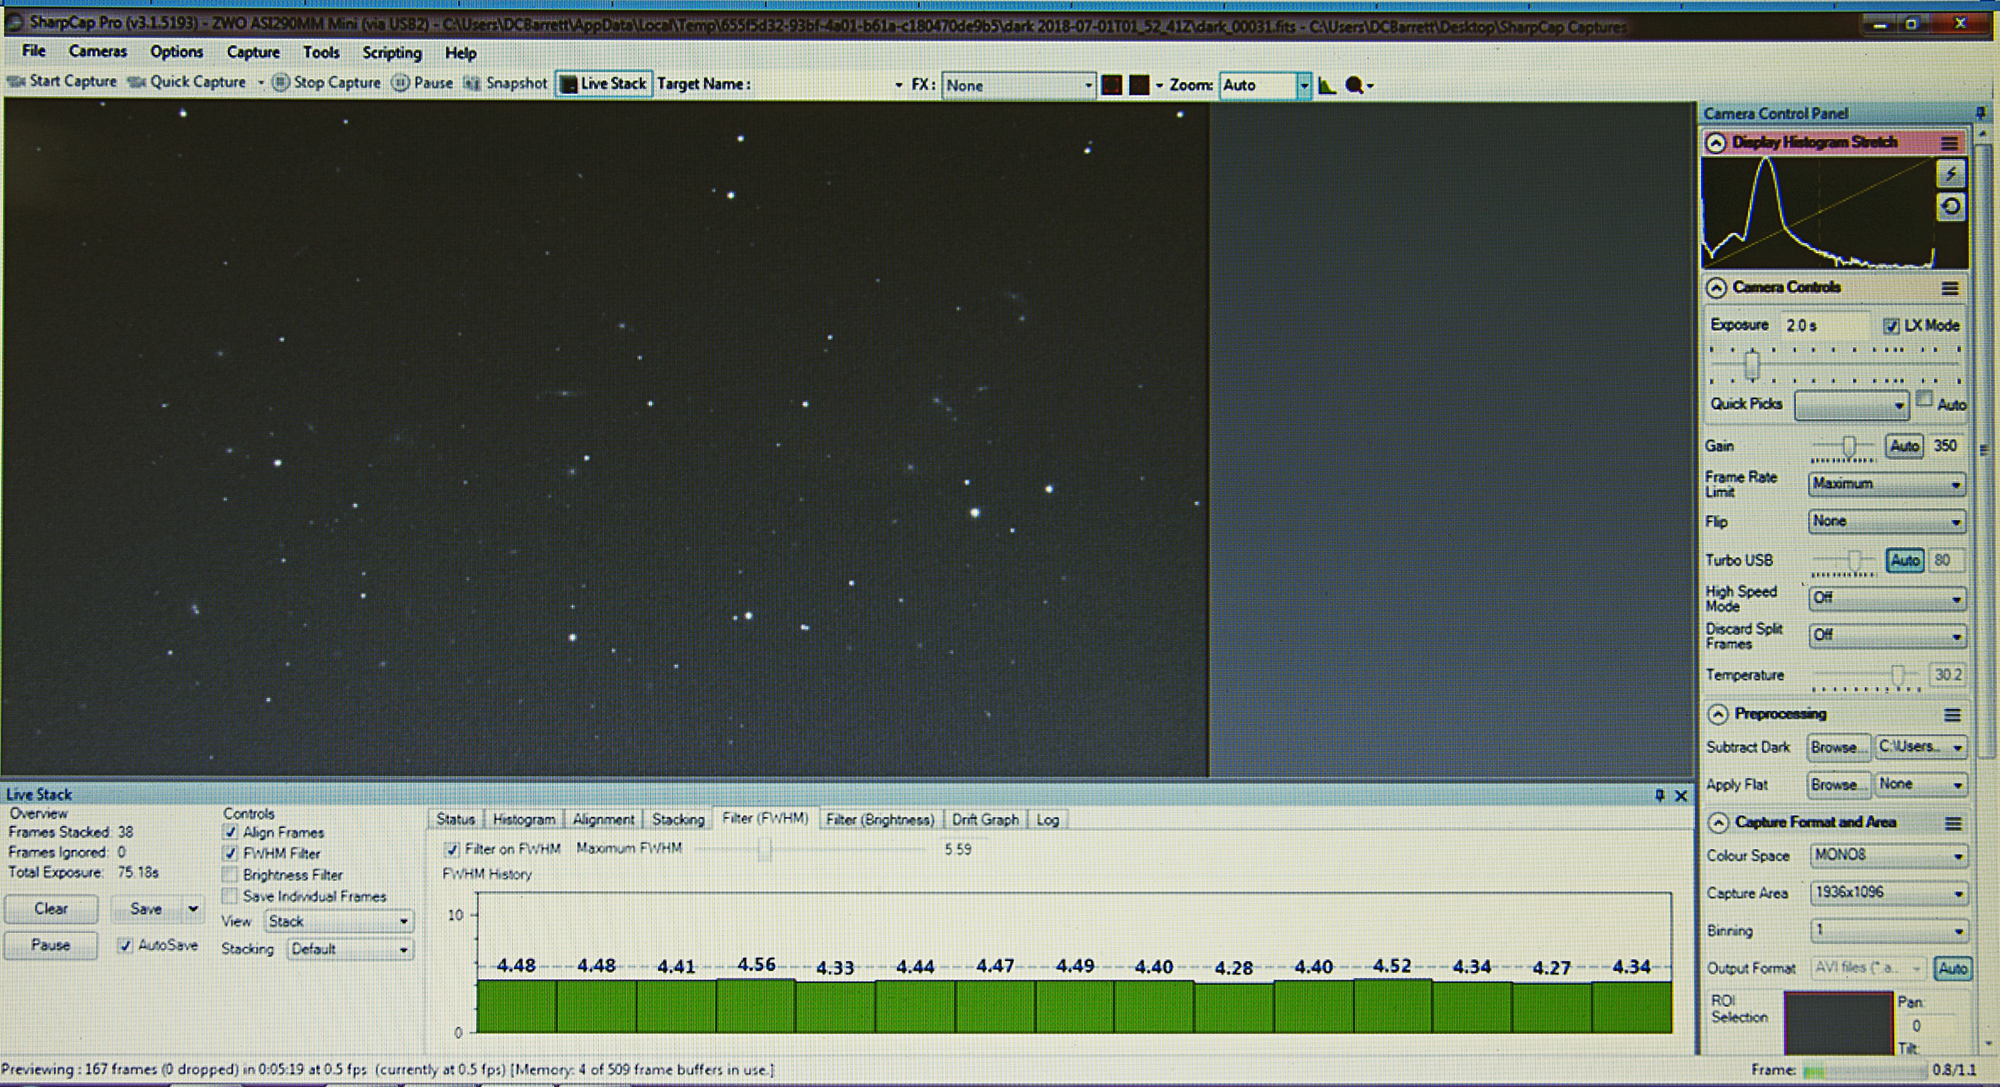
As you see, I have now clicked on the "Filter (FWHM)" tab to reveal the quality level of each frame captured. By adjusting the "Maximum FWHM" slider above the green bars, either to the left or to the right, I can control what gets added in the stack and what gets blocked. In this image, you will see that all the tabs are green which means that they lie within the quality parameters that I have set for the image. If, however, the level of quality happens to be lower than that parameter, the tab will show red instead of green, and that particular image will not be included into the stack. This fantastic feature allows you to control, to a large degree, the quality of your final image. I mentioned earlier that as your telescope acclimates to the falling nighttime temperatures that its focus will eventually change. By keeping this tab open and monitored you can check for that throughout the night. When you start to see that the quality of the individual frames are dropping so that many frames are now showing up red instead of green, my recommendation is that you pause the stacking program at that time, then click the “Live Stack” tab at the top of the page to bring you back to the portion of the program where you first started. Once there you can simply finely adjust the focus of your telescope once more using the procedure mentioned earlier and then start stacking again!
In the following screenshot, you will see what I have accomplished after nearly an hour of stacking.
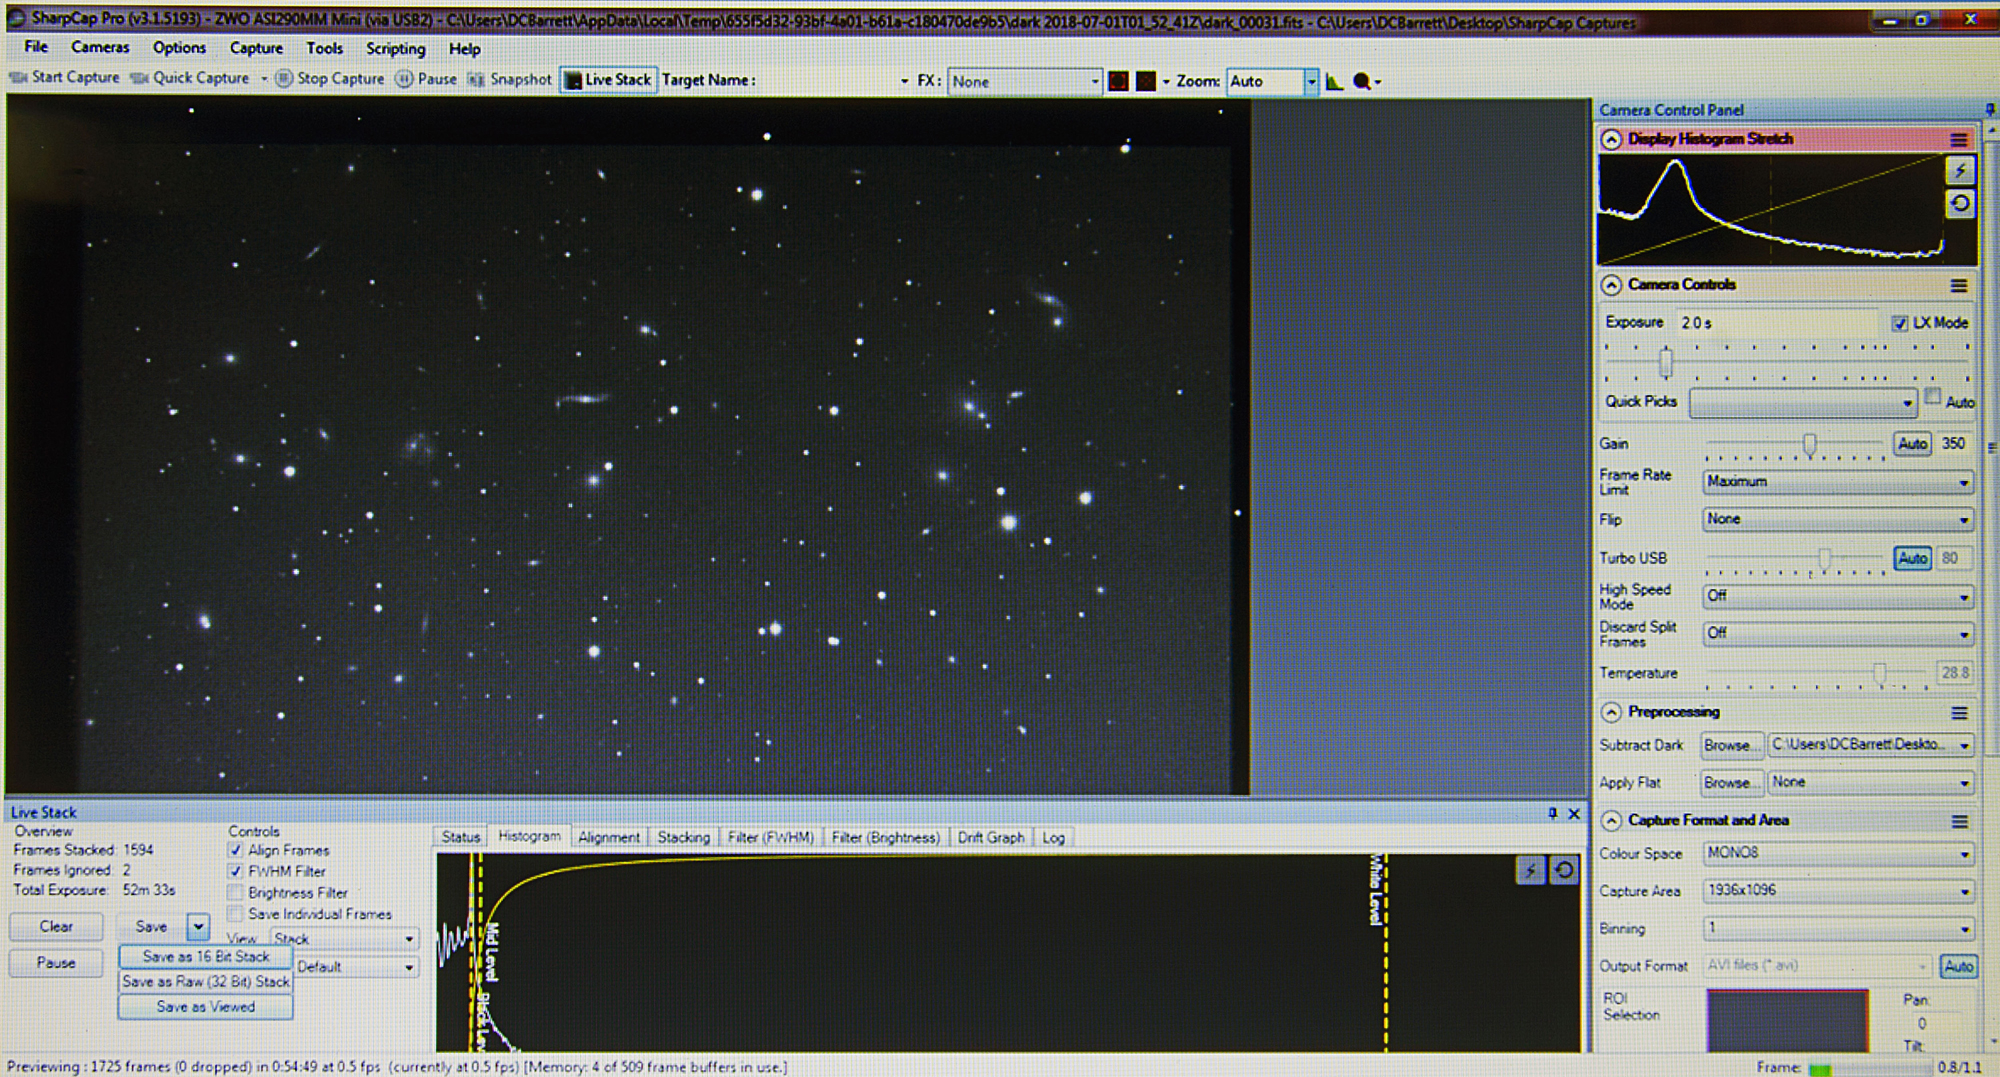
As you can see the image is far more detailed than before! You will also notice that the mount has slowly wandered away from its original position as evidenced by the black bars on the top and to the left of the image. You will also notice that I have clicked on the drop-down arrow next to the “Save” tab. This will reveal the “Save as Viewed” icon which you will need to click to save your results. Doing so will save the image as you see on the screen and, if desired, will allow you to further process the image using other specialized processing programs like Photoshop. Keep in mind that the slider bars in Sharpcap will, to a large degree, make most of these adjustments unnecessary, so don’t be too concerned if you have minimal skills in image processing at this time.
I do want to cover one more aspect of this program that I feel is important. Take a look at the screenshot below and you will notice that I have clicked on the “Alignment” tab under the image to reveal the “Minimum and Maximum star width icons. I have noticed that in most cases by adjusting these to show 1 for minimum and 6 for maximum, that the astrophotography stacking software usually does not have too many issues. Once in a while, however, you may need to adjust these parameters if you find that the program is for one reason or another not stacking as it should. I find this to be the case most often when I am imaging Globular Clusters. The vast amount of stars in these clusters may confuse the program and to counter that you may need to raise these levels to show something like 5 for minimum and 12 for maximum. Doing so, the program will largely ignore the many faint cluster stars and simply utilize the brighter stars around the cluster for its stacking parameters. Of course, your results may vary, so please use this information as a guide only.
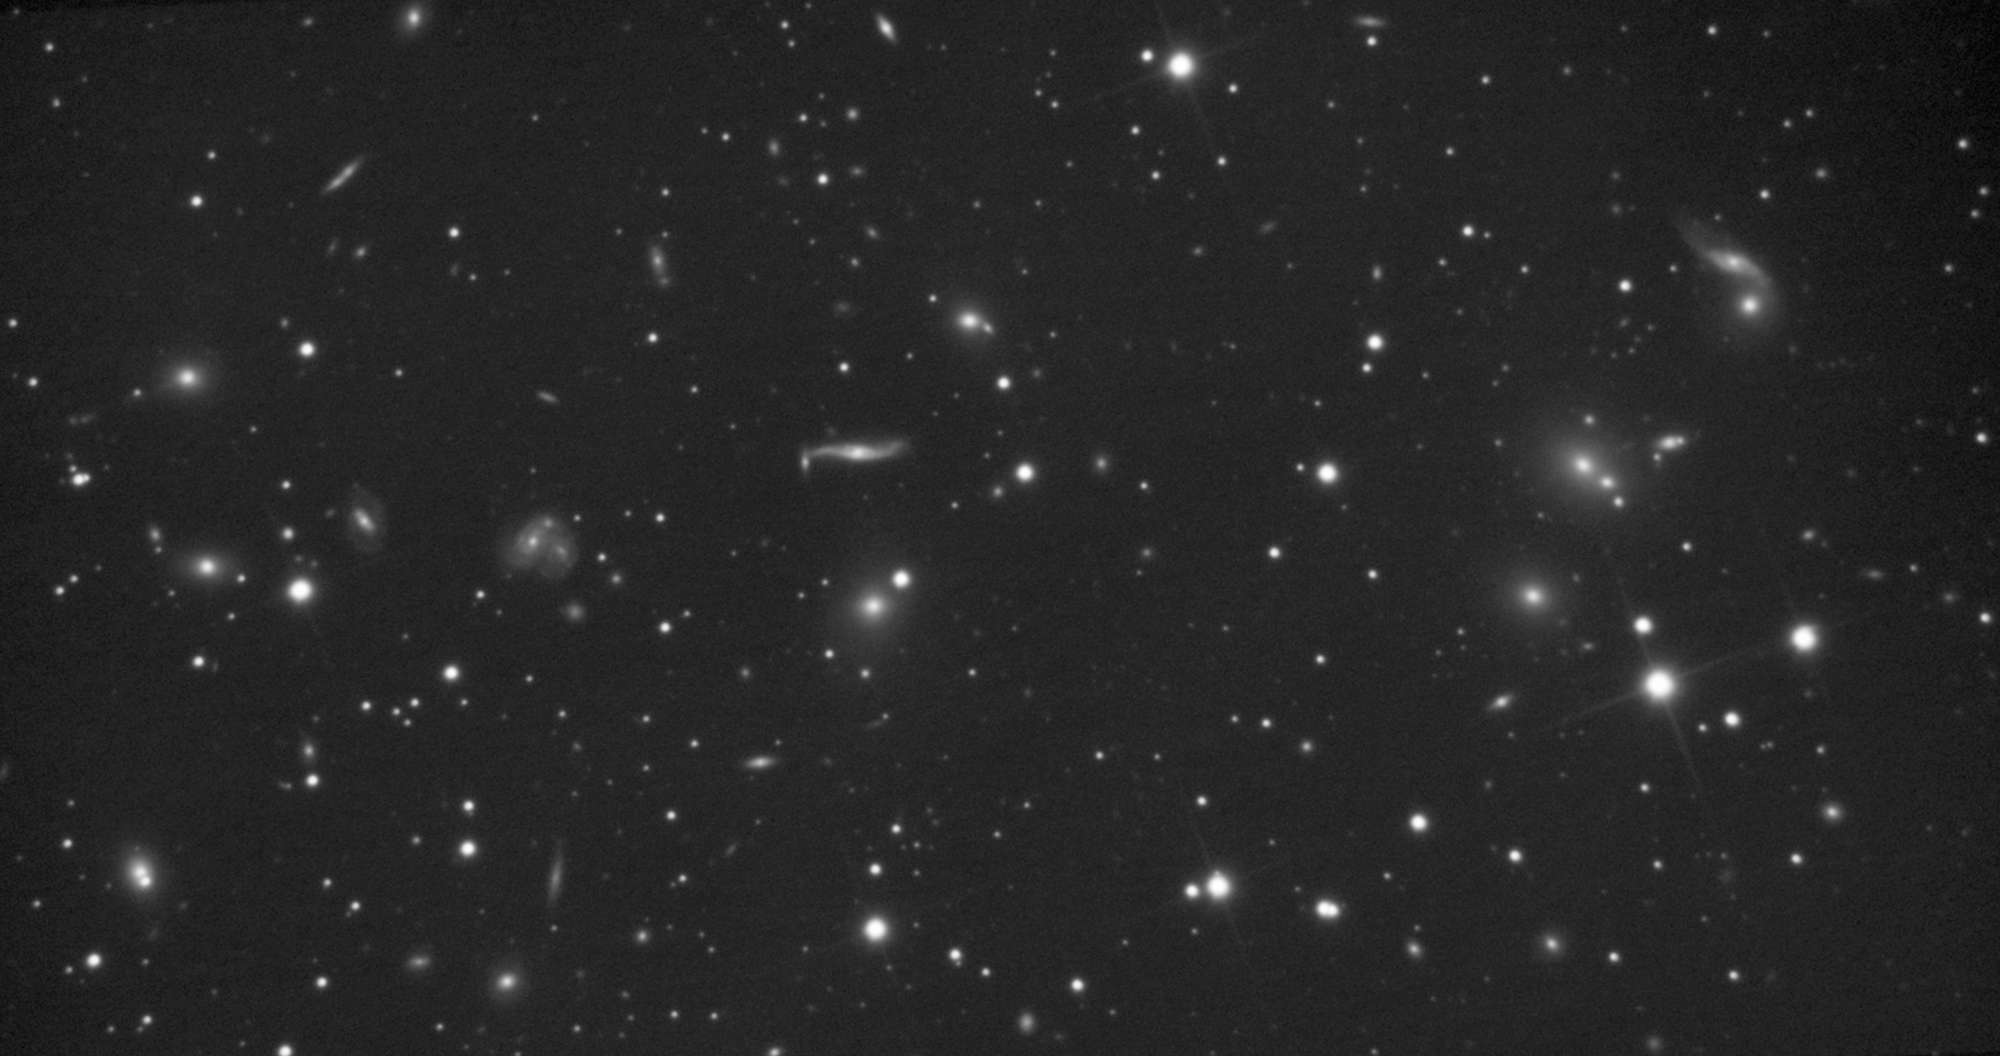
Now take a look at the result of all of this labor! Other than cropping and some very small adjustments to the background brightness, the final image has not been altered at all.
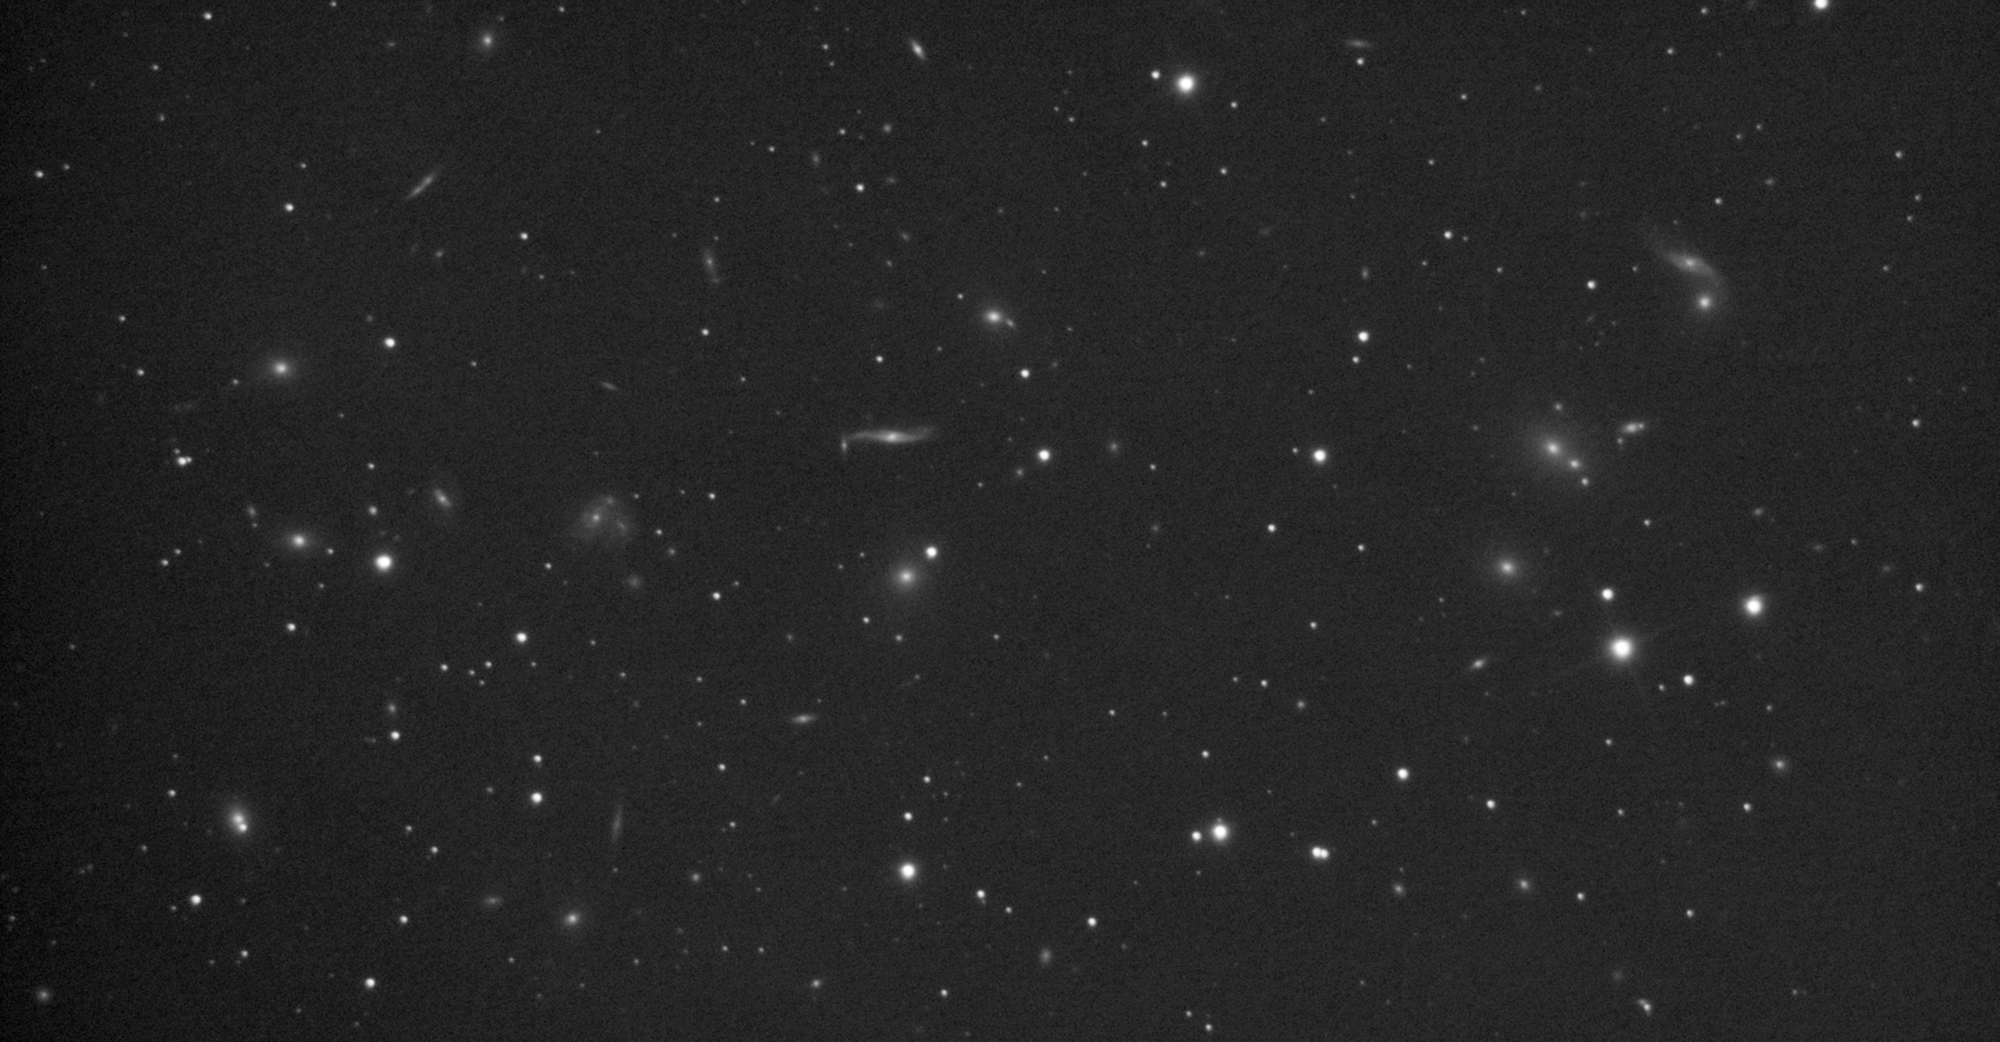
As you can see, I have chosen a very obscure object to image! This is the "Hercules Galaxy Cluster" and the faintest object seen within is easily dimmer than 19th magnitude! So much for the myth that says you have to take long sub-exposures to image very dim targets!
Throwing Everything into the Pot!
A few days after this imaging tutorial was originally written I started to think that you, the reader, might want to see the full potential of this imaging technique on such a faint and interesting target as the Hercules Galaxy Cluster. Therefore, I decided to add more data on subsequent nights using the exact same mount, telescope, and camera. I have already mentioned that this is done with Deep Sky Stacker, an excellent and completely free stacking program that makes this possible.
To do this you will need to save all of your stacked images to a specific folder. Open Deep Sky Stacker and click on the “Open picture files” tab at the top left of the page. Locate the folder where you have all of your images stored and choose them all.
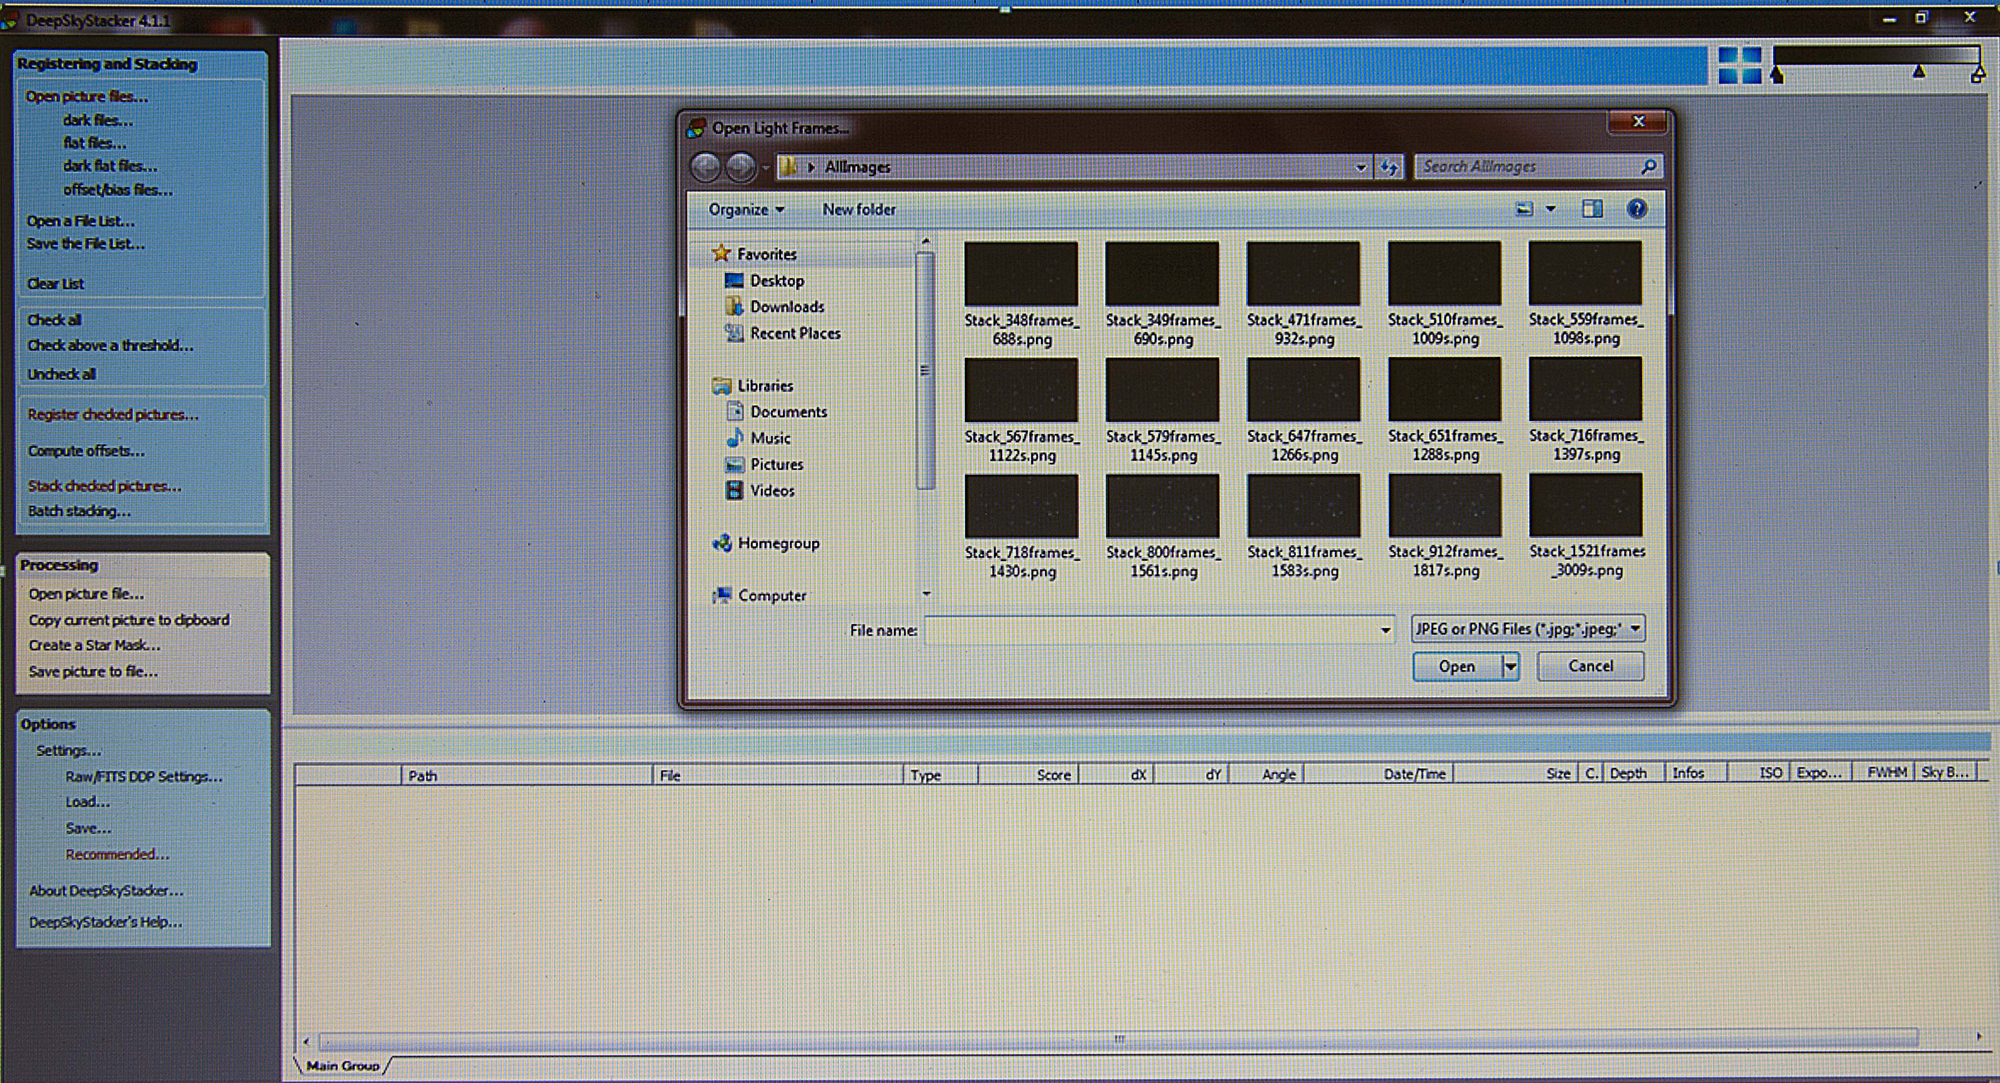
Click on the “Open” icon within the “Open Light Frames” box to apply them to the program. Once done you will see something like this…
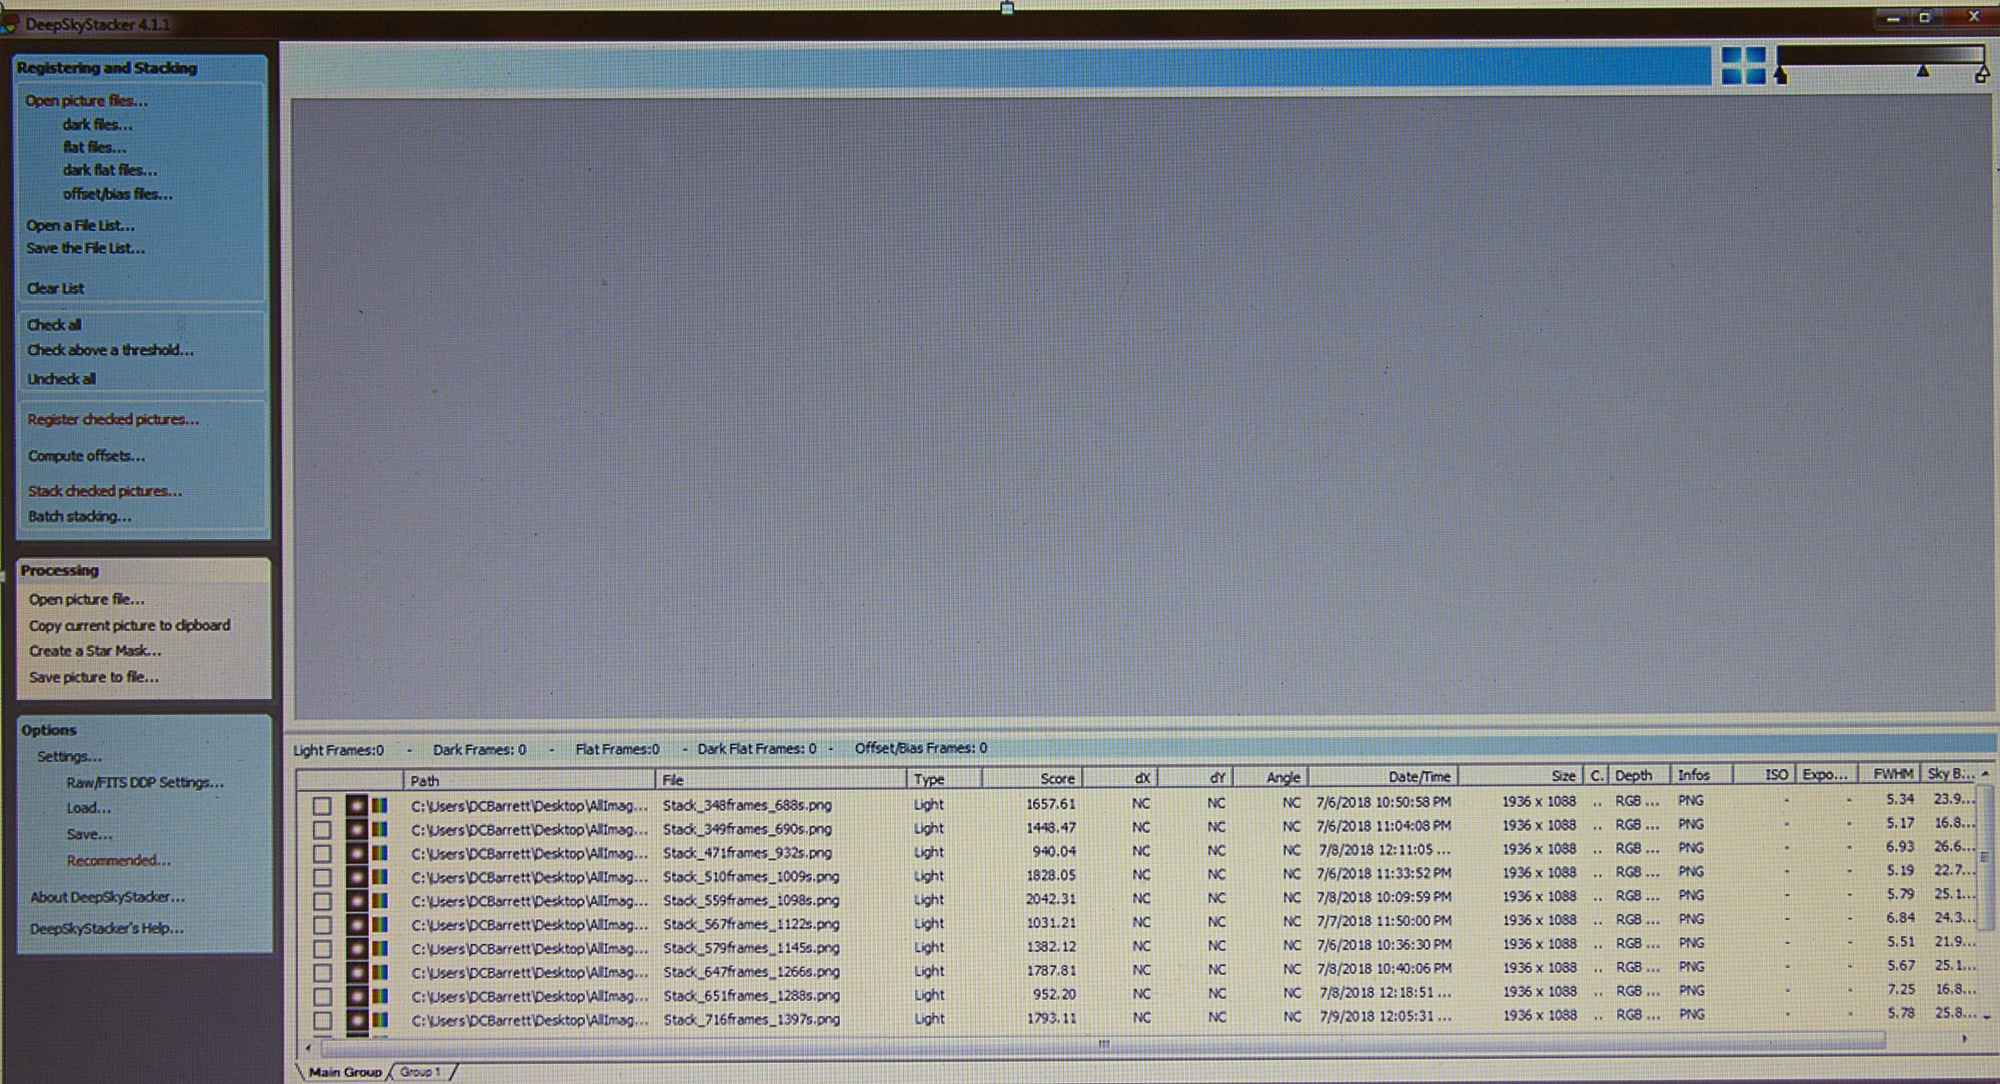
At this point, you will want to click on the “Check All” icon under the "Registering and Stacking" folder to the left of the page. Once done you will notice that all the empty checkboxes to the left of each individual file have now been checked. Then click on the "Register checked pictures…." icon and your screen will look similar to the one below.
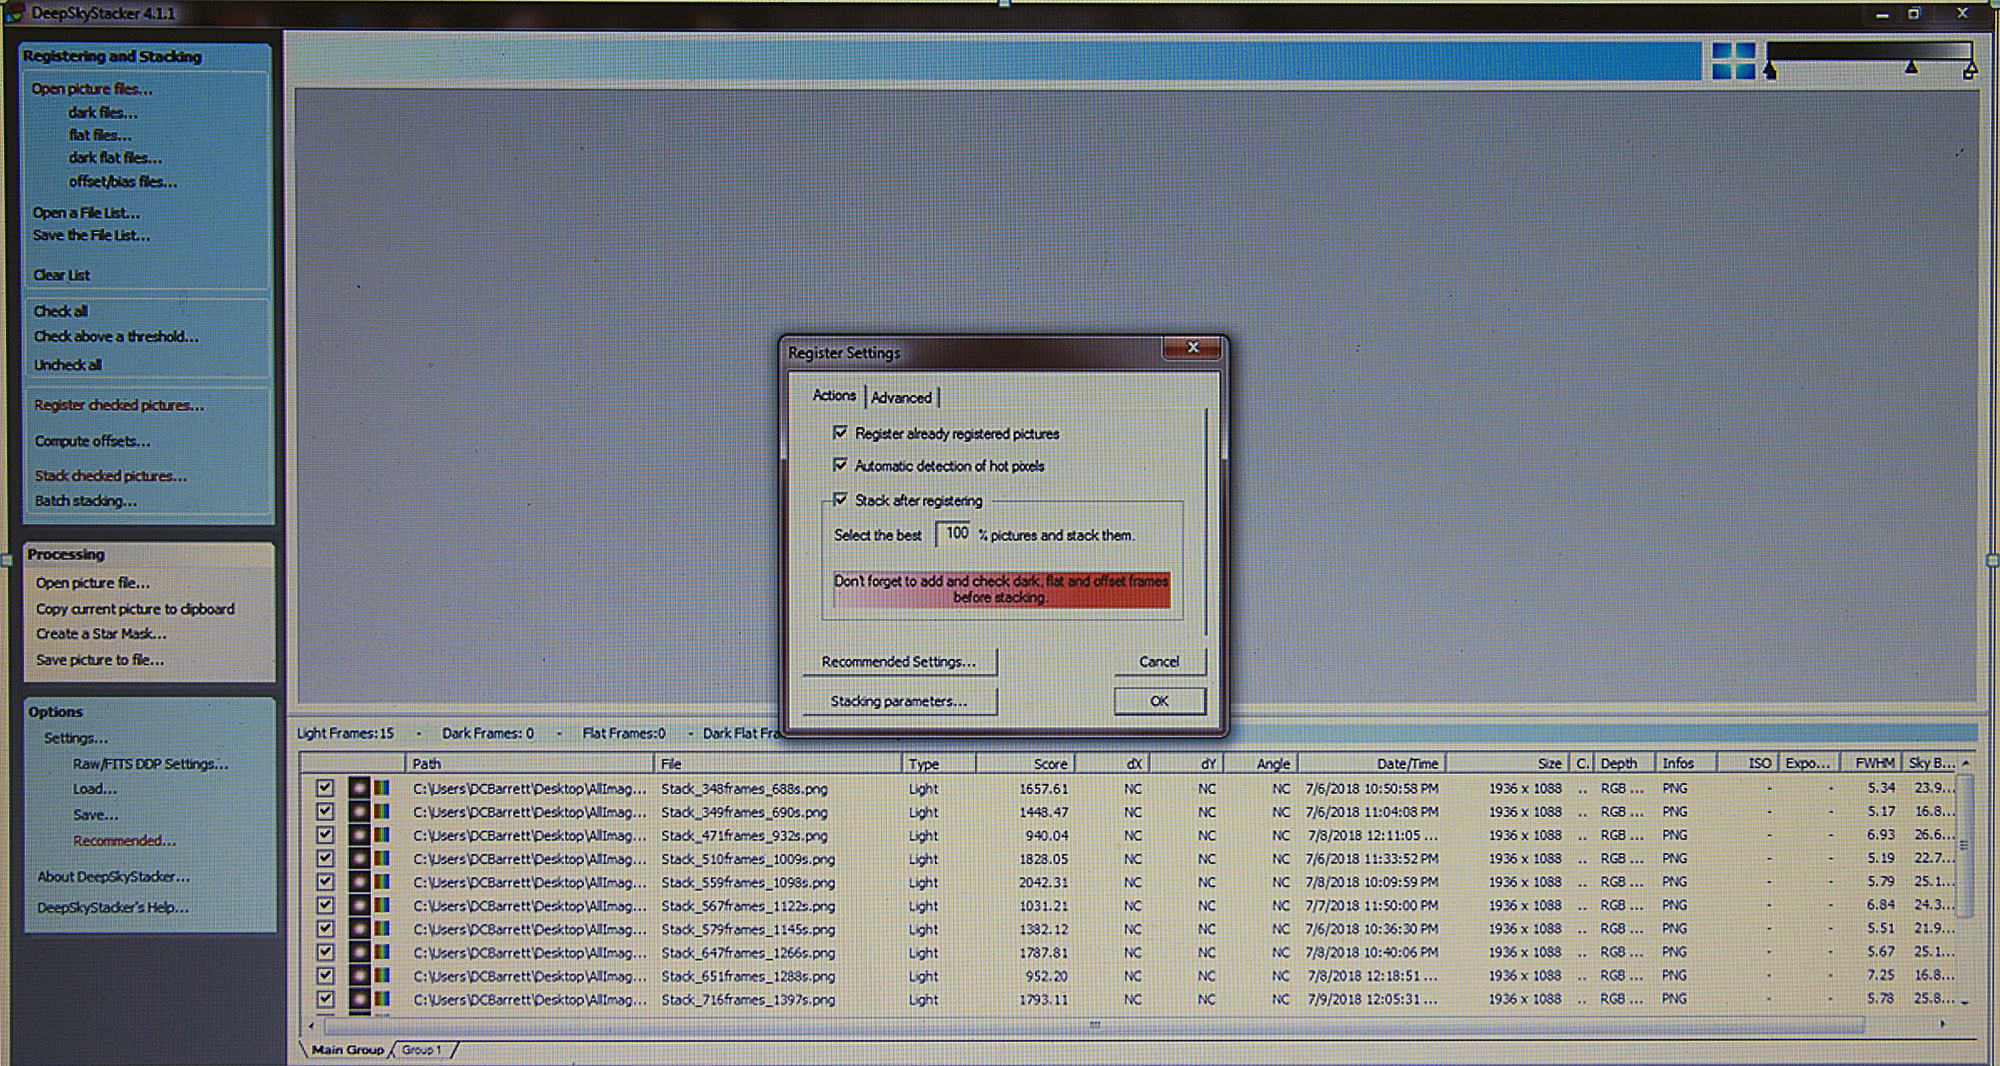
In the now open “Register Settings” box type 100 where it says "Select the best ___ % pictures and stack them". Click OK and then OK again in the now visible "Stacking Steps" box.
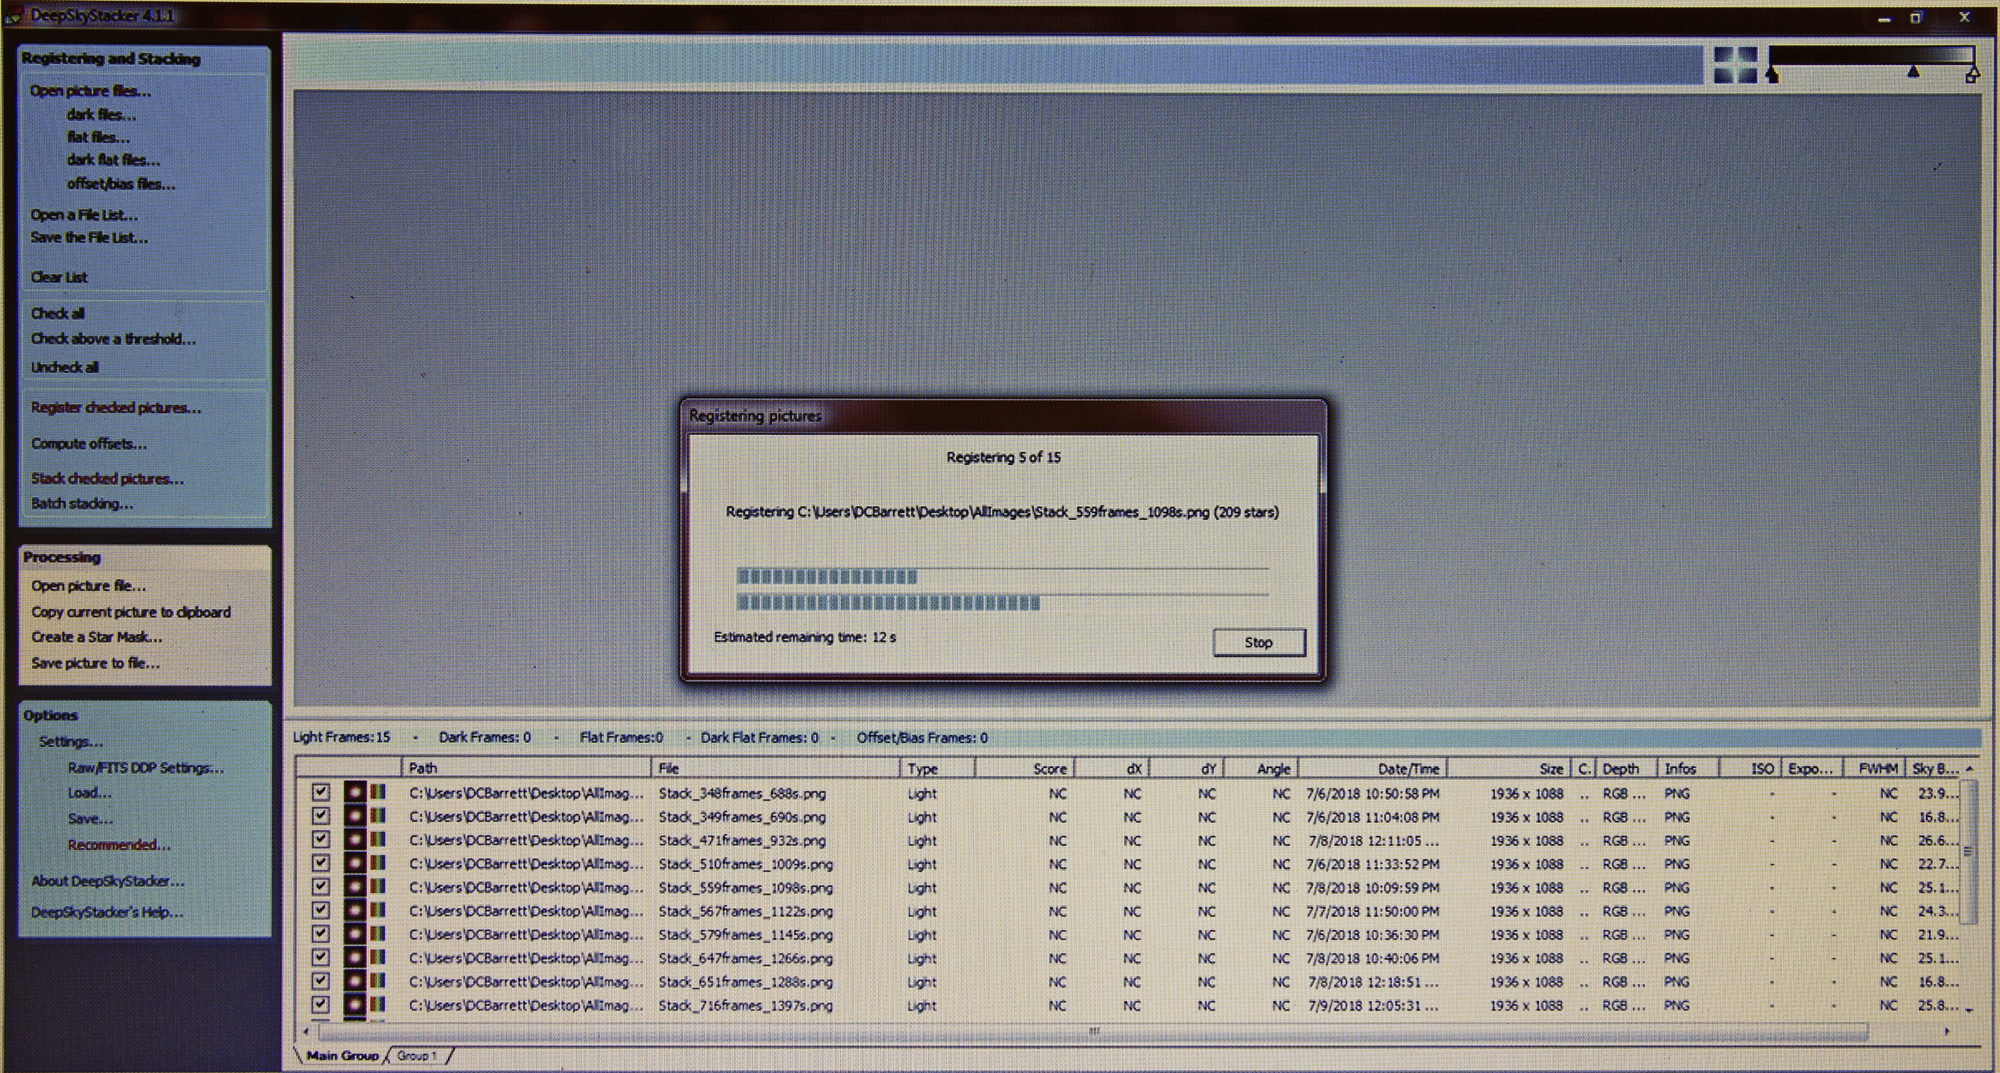
Let the program do its thing and it will eventually save all of your individual images into a combined TIFF file that can now be opened in your favorite processing program. This is my preference, but if you would like you can choose to process the images in “Deep Sky Stacker”. All that is left to do at this point is to crop your final image and enjoy the fruit of all your labor!
Getting back to my story…..
It was so windy the first clear night after coming to the decision to add more data that I had to set the FWHM in Sharpcap down as low as possible to get anything resembling a quality image. I did the best that I could under those conditions but I believe that the program rejected at least one-third of my images. The next night was very transparent; however, the seeing conditions (atmospheric steadiness) were horrible and the temperature dropped like a rock throughout the night, forcing me to refocus my scope at least three or four times. Still, I thought, "The average beginner would certainly image on a night like tonight and may be oblivious to the turbulence." I mention all of this to show you that although you may not have perfect conditions under which to image, very few of us do, that you can still achieve very nice results if you are patient and carefully follow the steps that I have outlined above. The final two nights of my experiment were both beautifully transparent and steady and yielded the best data of all.
All of these stacked exposures, totaling nearly eight hours, have been combined to create the image that you see below using the same gain setting and two-second sub-exposure times of the original image. I hope that you enjoy……..
 Click to Enlarge Image
If I can capture this much detail in such an obscure target using only two-second exposures, just imagine what you can do imaging your favorite showpiece objects!
Although I have certainly not covered every aspect of this wonderful program, I believe that you now should have enough knowledge to start capturing your own images in sharp high-resolution detail. Please note, however, that this short tutorial in no way replaces the necessity of reading and studying the official Sharpcap “Live Stacking” tutorial, which is far more in-depth.
As you learn more and more you will find that your level of quality continues to improve. If things don’t go exactly as you had planned (and when do they?) please don’t get too frustrated. Push through the learning curve and before too long you will be teaching others!
I hope that this tutorial has helped you to discover that you too can enjoy imaging our incredibly vast and beautiful night sky, and have plenty of fun while doing so!
Click the arrow above to see MLA, APA, and Chicago Manual of Style citations.
MLA:
Barrett, Dave. "Deep Sky Tracker & Sharpcap Astrophotography Software Tutorial," AstronomyHub, High Point Scientific, 19 Jan. 2021, https://www.highpointscientific.com/astronomy-hub/post/deep-sky-stacker-and-sharpcap-software.
APA:
Barrett, D. (2021, January 19). Deep sky tracker & sharpcap astrophotography software tutorial. High Point Scientific. https://www.highpointscientific.com/astronomy-hub/post/deep-sky-stacker-and-sharpcap-software
Chicago Manual of Style:
Bibliography:
Dave Barrett. "Deep Sky Tracker & Sharpcap Astrophotography Software Tutorial," AstronomyHub (blog), High Point Scientific, January 19, 2021. https://www.highpointscientific.com/astronomy-hub/post/deep-sky-stacker-and-sharpcap-software.
Footnote:
Dave Barrett, "Deep Sky Tracker & Sharpcap Astrophotography Software Tutorial," AstronomyHub, High Point Scientific, January 19, 2021, https://www.highpointscientific.com/astronomy-hub/post/deep-sky-stacker-and-sharpcap-software.