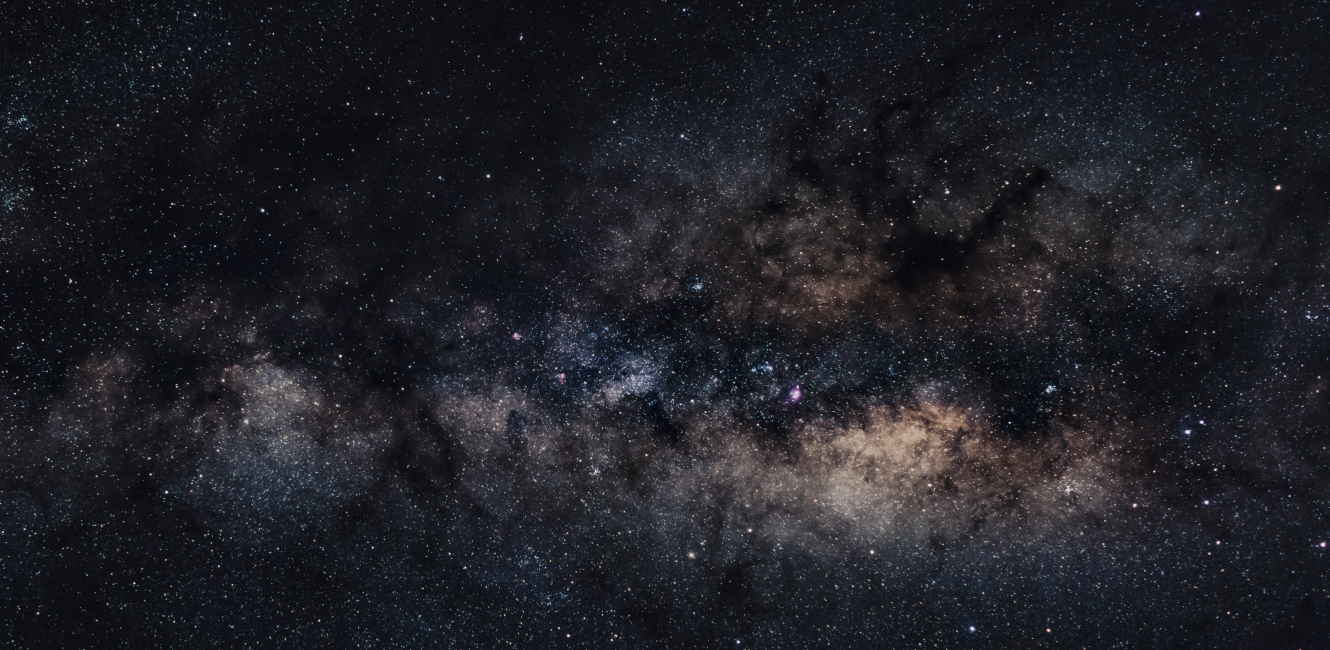
Have you gazed at the stars on a dark summer night and noticed the dusty clouds of the Milky Way stretched out across the night sky? Have you wondered how to capture the subtle glow of this galactic structure? Well, you might be surprised to learn that, with the right equipment and a bit of planning, anyone can capture an image of the Milky Way. If you want to explore the basics of Milky Way imaging, from planning to processing, this is the guide for you!
TL;DR: Learning how to image the Milky Way is a great way to begin your astrophotography journey. With the right equipment and a bit of patience, anyone can capture an image of our galactic core. Follow along to learn more about planning, capturing, and processing images of the Milky Way.
Planning Your Shot
Prerequisites
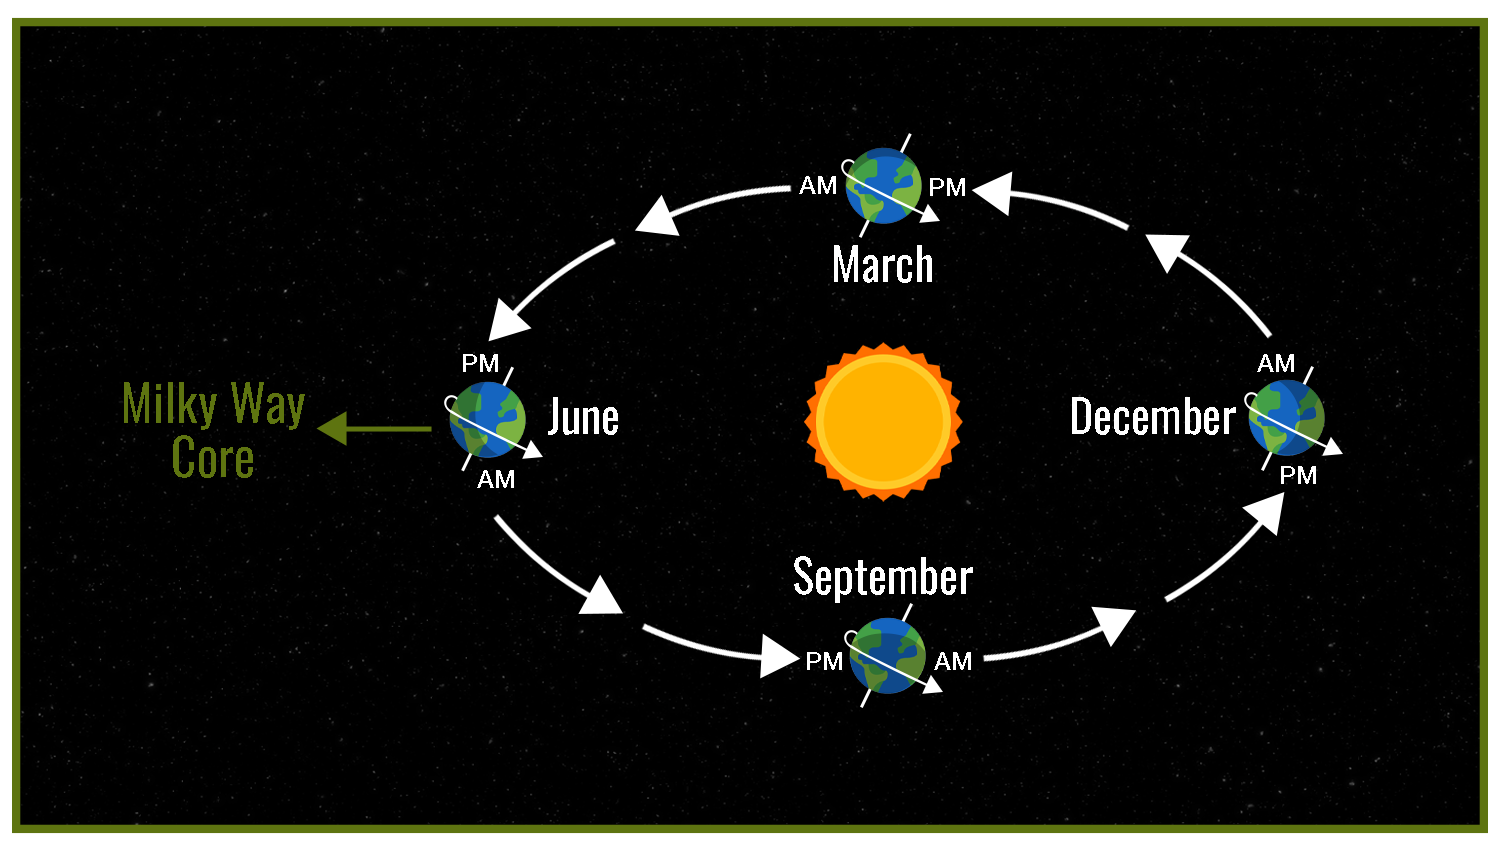
It may seem as if the Milky Way is ever present in our night sky, however, it’s only visible during a specific window of time. If this is a surprising revelation, or you simply want to explore the complexities of our galaxy, review our How to View the Milky Way article.
Familiarizing yourself with the Milky Way season is the first step to planning a successful imaging session, however, if you want to avoid an unplanned lunar imaging session, you should also spend some time learning about the Moon. Review our How to Predict the Phase of the Moon article to sync up with the lunar cycle!
Alternatively, you can download a celestial simulator, like Star Walk or Stellarium, to easily locate the perfect imaging window.
Types of Images
Once you’ve decided when you want to capture the Milky Way, the next step is choosing how you want to capture it. In essence, there are two main types of Milky Way images: With or without a foreground. Regardless of the type you choose, there is quite a lot of room for creativity. It's best to begin imaging the Milky Way without a foreground. Why is this? While you can begin with either option, imaging the Milky Way alone will help you develop a workflow that is also needed to capture an image with a foreground, as it requires building a composite of images in the post processing phase. Furthermore, foreground images can be time consuming at first, and you’ll likely have to experiment until you find the settings that work best for your imaging conditions.
In this guide, we will cover how to plan, capture and process Milky Way images with and without a foreground. Click the links below to jump directly to the processing tutorials!
Equipment
Imaging the Milky Way relatively simple. You only need a camera (a DSLR, mirrorless, or dedicated astrophotography camera), a wide angle lens, and a tripod. If you have an intervalometer or remote shutter release, this will make things much easier. While it isn't necessary, you can further support your imaging session dedicated star tracker.
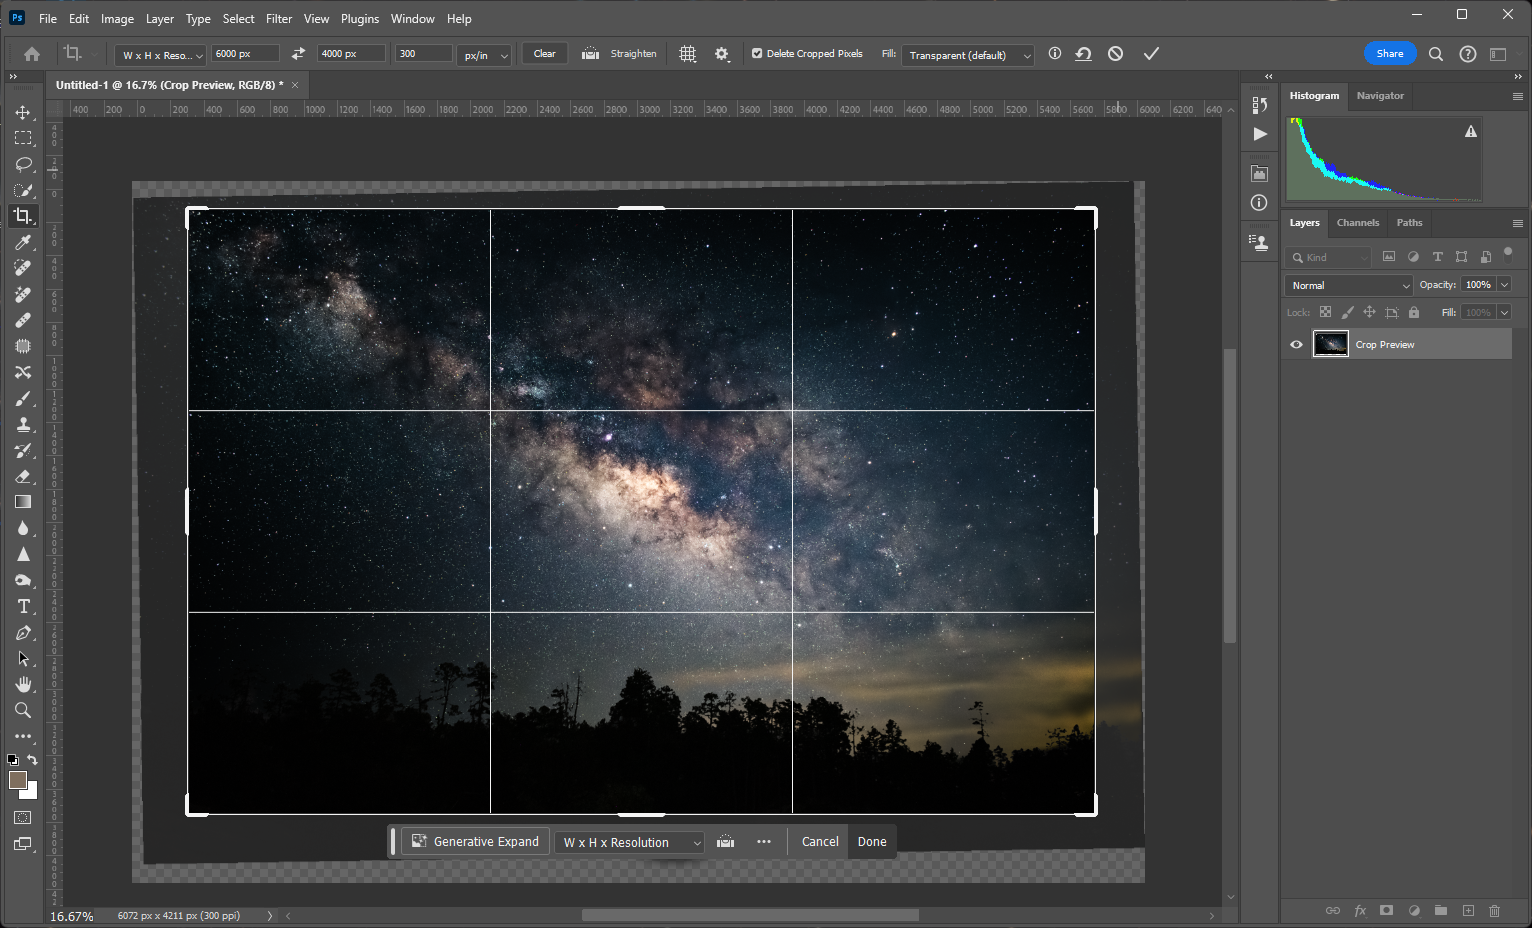
A star tracker is a motorized mount that allows your camera or telescope to rotate along with the sideral motion of the sky. This gives you the ability to take longer exposures without worrying about star trails and frees you up from constantly adjusting the position of your camera. If you are just starting out with astrophotography, or you simply want a light weight mount perfect for Milky Way imaging, our astrophotography gear experts recommend the Star Adventurer 2i, or the SkyGuider Pro. These mounts are equipped with all the feature you need to take your wide field astrophotography to the next level. Both models support up to 11 lbs. payload compacity, which is more than enough to support a DSLR or mirrorless camera with a variety of lens options, or a small refractor telescope. And these tracking mounts are almost as portable as the are affordable! The lightweight design doesn't come at the cost of functionality, making both the Sky Guider Pro and Star Adventurer 2i an easy choice for astrophotographers on the move! Take your rig even further by including the lightweight and sturdy Sky-Watcher Star Adventurer Tripod
For more information about the different tracking mounts to choose from, check out our Mount Buying Guide!
For more information about the different tracking mounts to choose from, check out our Mount Buying Guide!
Tips
- If you plan to use a tracking mount, make sure you consider the position of Polaris relative to your imaging location. Aligning without Polaris can be tricky, so it is best to pick a location with wide open visibility.
- While Polaris isn't hard to pick out in heavily light polluted areas, it can be difficult to distinguish from other stars in dark sky conditions. So, it's a good idea to pack a compass, especially if your imaging location lacks adequate cellular signal.
Overview of Settings
Once you are set up, you’ll need to first frame your shot. This requires adjusting the settings so that you can image the Milky Way quickly. Below you’ll find an overview of the settings you’ll need to understand. If you are already familiar with your camera's functions, move on to the next step.

ISO
The ISO setting controls the sensitivity of your camera sensor to incoming light. High values are more sensitive, creating bright images, and low values are less sensitive, creating darker images with less noise.

Shutter Speed
The shutter speed setting controls how fast the aperture closes when you take an image. Faster speeds let less light reach your sensor, which can help when imaging bright scenes or fast-moving objects.

Aperture
The aperture setting, which is often referred to as f-stop, controls the size of the lens aperture, which further controls the amount of light that reaches the sensor. Increasing or decreasing the aperture changes the depth of field. A wide aperture results in a narrow depth of field, making the foreground or background appear out of focus. A small aperture results in a wider depth of field, making more of the image appear in focus.

File Type
DSLR and mirrorless cameras allow a lot of control over the way your image is encoded on the memory card. Some file types (jpeg) compress the data received by the sensor, while others (RAW) preserve all the information. When imaging with the intention to edit the photos, you’ll want as much of that information as possible, so it’s generally best to set your camera's the file type to RAW.
Capturing the Milky Way
Once you’ve planned out your imaging session, you should be ready to get out there and start capturing some images. If you have the right gear, this step can often be relatively easy, so make sure you have fun with it.
If you are using a tracking mount, make sure you find a good location before polar aligning. You may prefer to locate the Milky way and frame your shot before aligning, as all the movement can throw off the accuracy of your alignment. If you don’t know how to align your mount with Polaris, review our article on Polar Alignment.
Framing the Shot
To quickly frame your image, increase the ISO to the maximum value. Then, set the shutter speed to 10-15 seconds and keep the aperture wide. If you have an intervalometer or remote shutter release, you should set the shutter speed to the "bulb" setting on your camera and find the matching setting on the remote, this will allow for more control over the length of exposure. Next, find a bright star and bring your camera to focus.
Finally, start snapping some images. With short 10-15 sec exposures, you should be able to locate the Milky Way without much trouble. It will appear bright and slightly cloudy. Once you’ve located the general direction, adjust the framing until the Milky Way takes up as much of the frame as possible. Alternatively, frame the brightest part of the Milky Way (the core) with a foreground; however, avoid bright objects or moving objects such as trees, as they will impact the editability of the image. Again, if you are using a tracking mount, make sure you've properly aligned your mount and set the tracking rate to sidereal. If you haven’t yet done this step, make note of the general location of the Milky Way, align your mount, and reframe your shot.
Capturing the Image
Once you finish setting up and framing, begin making adjustments to your camera's settings. Generally, you’ll want to capture long exposures with a modest ISO. Using a tracking mount will make this easy, as you gives you the ability to capture long 5-6 minute exposures while maintaining a low ISO (around 200-400). If you are imaging with a traditional tripod, you'll need to use the rule of 500 to figure out the ideal shutter speed for your camera and lens.

What is the rule of 500? The rule of 500 is a simple equation that will help you determine the maximum exposure time possible without causing star trails. It is relatively simple, if you are using a full frame camera, just take the focal length of your lens and divide it by 500. The result will be the maximum exposure time (in seconds) possible before you begin to notice star trails. If you are using a camera with an APS-C sensor, you will have to multiply the focal length of the lens by the sensor's crop factor before dividing (1.6 for Canon APS-C models, and 1.5 Nikon and Sony APS-C models). For example, I used a Nikon D3300 with an 18 mm DX lens to capture the images in this guide, by using the rule of 500, I determined that I could take 18.5 second exposures without noticing star trails (18 mm x 1.5 = 27 mm | 27/500 = 18.5 seconds).
Keep in mind that smaller sensors receive less overall light per pixel. So, if you are not using a tracking mount, you'll need to boost the ISO to compensate for the short exposure time. This will increase the overall noise of the image, however, you can balance the signal to noise ratio by stacking multiple frames together. If you are unhappy with the amount of noise in your images follow along with the stacking method below.
Tips
- Once you’ve found the correct settings and exposure time, try to capture at least 5-10 images or more if you plan to use a stacking method. You can always delete excess files if you don’t need them.
- Periodically check the focus by zooming in on a few stars. They should appear as pinholes of light. If they look bloated, try refocusing the lens.
- If you are using a traditional tripod you will need to readjust your camera between frames. This will allow you to maintain the same framing between the images, which is essential if you plan to stack images.
Processing the Data
After your imaging session is complete, the next step is editing the images. If you don’t already have a software that can handle RAW files, you’ll need to download one. There are a lot of software options on the market, and some of them are even free. Below you’ll find a list of the common free and paid software options:
Paid Software
Basic editing
For this editing tutorial, we will be using Lightroom Classic. This is a paid version of the software, however, be sure to check Adobe's website for updated offers, free trials, and more.
Step 1
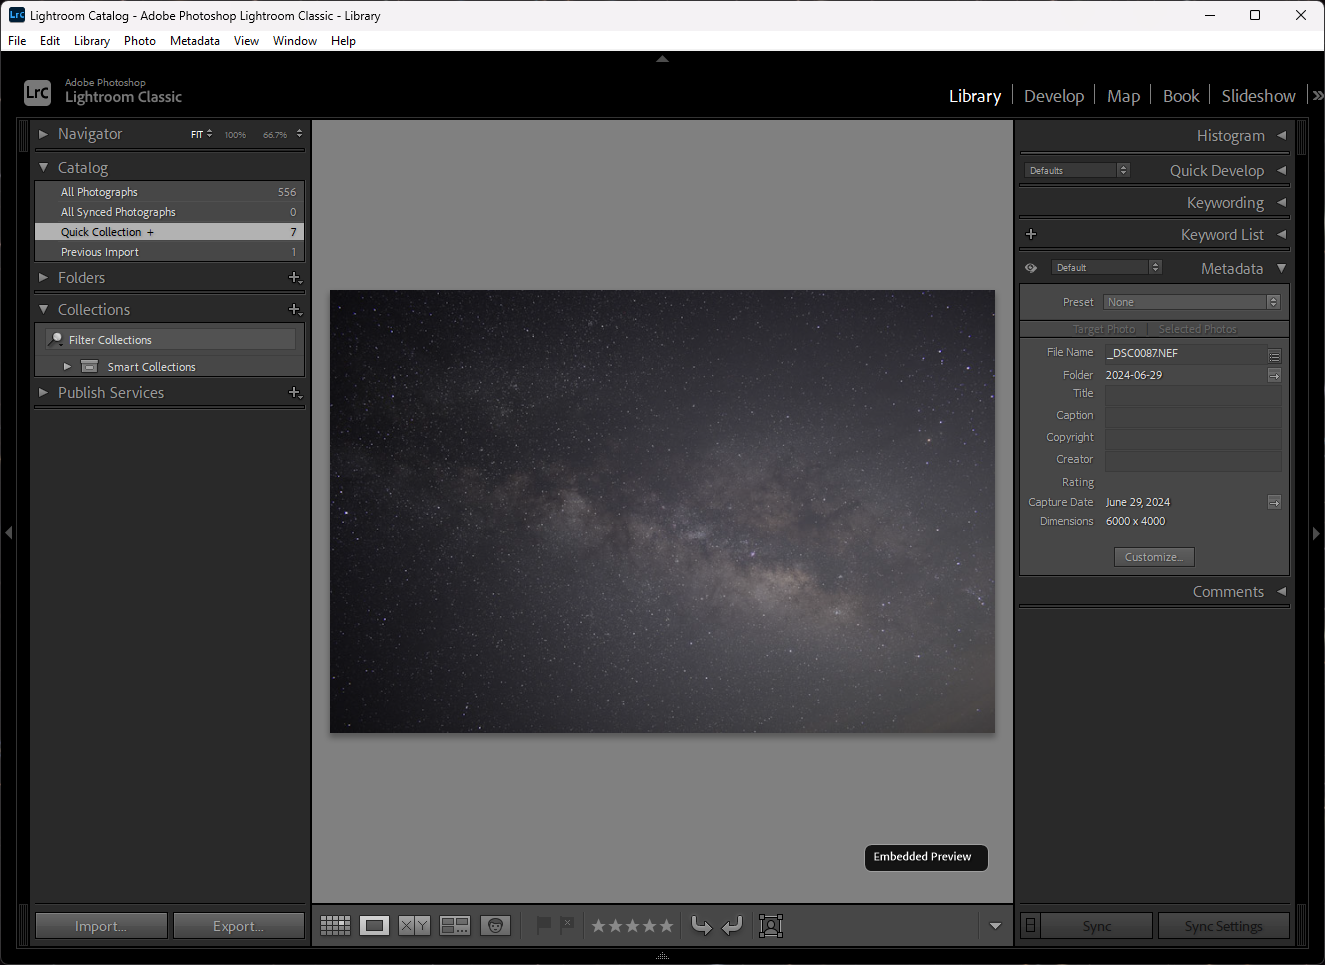
Import the image to your editing software.
Step 2
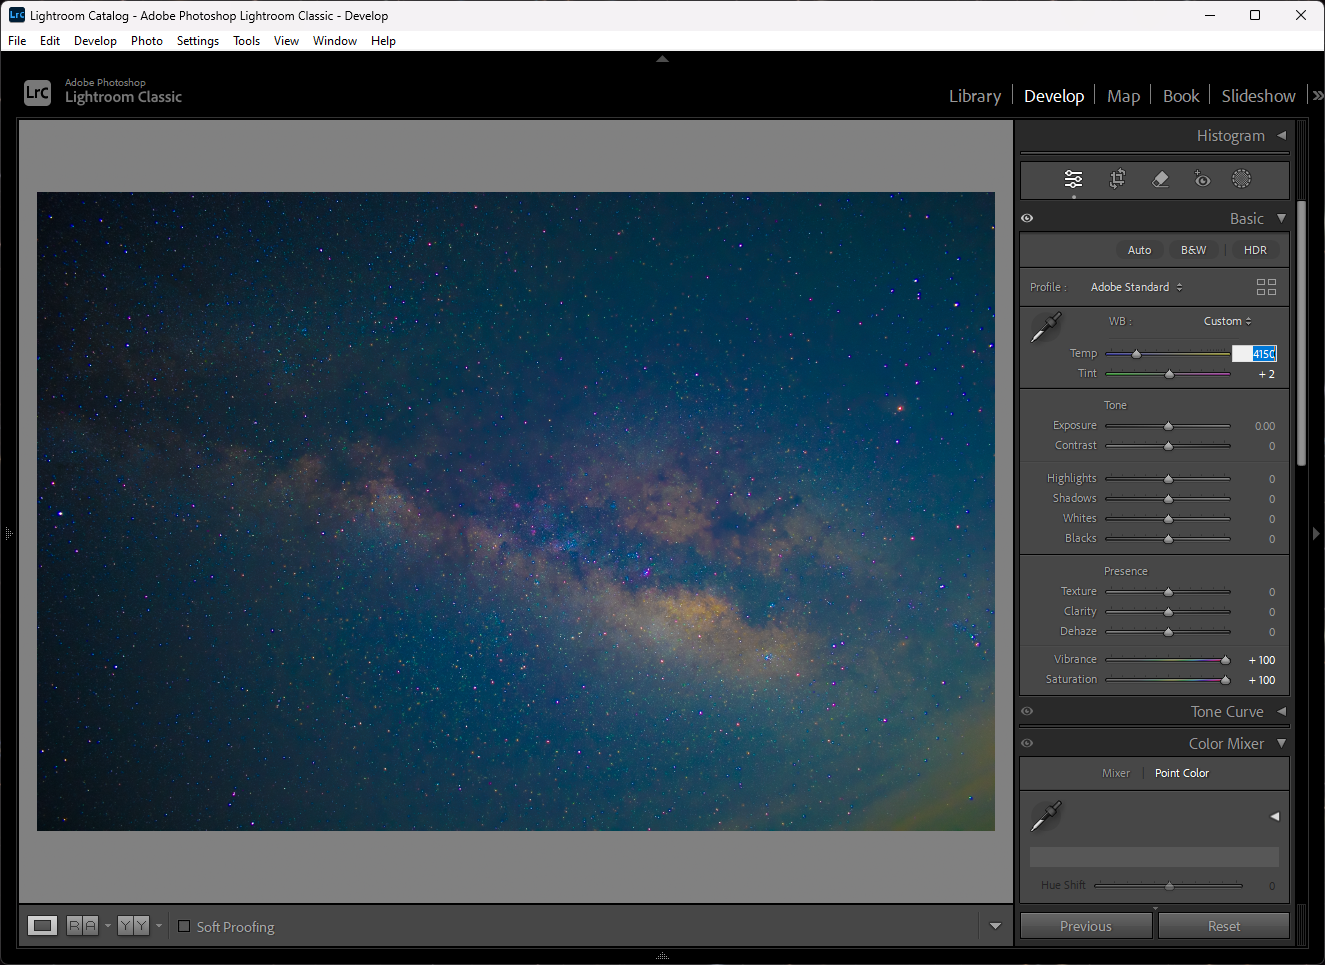
Increase the saturation and vibrance so you can clearly see the colors. Adjust the temperature and tint until there is a nice balance of colors.
Step 3
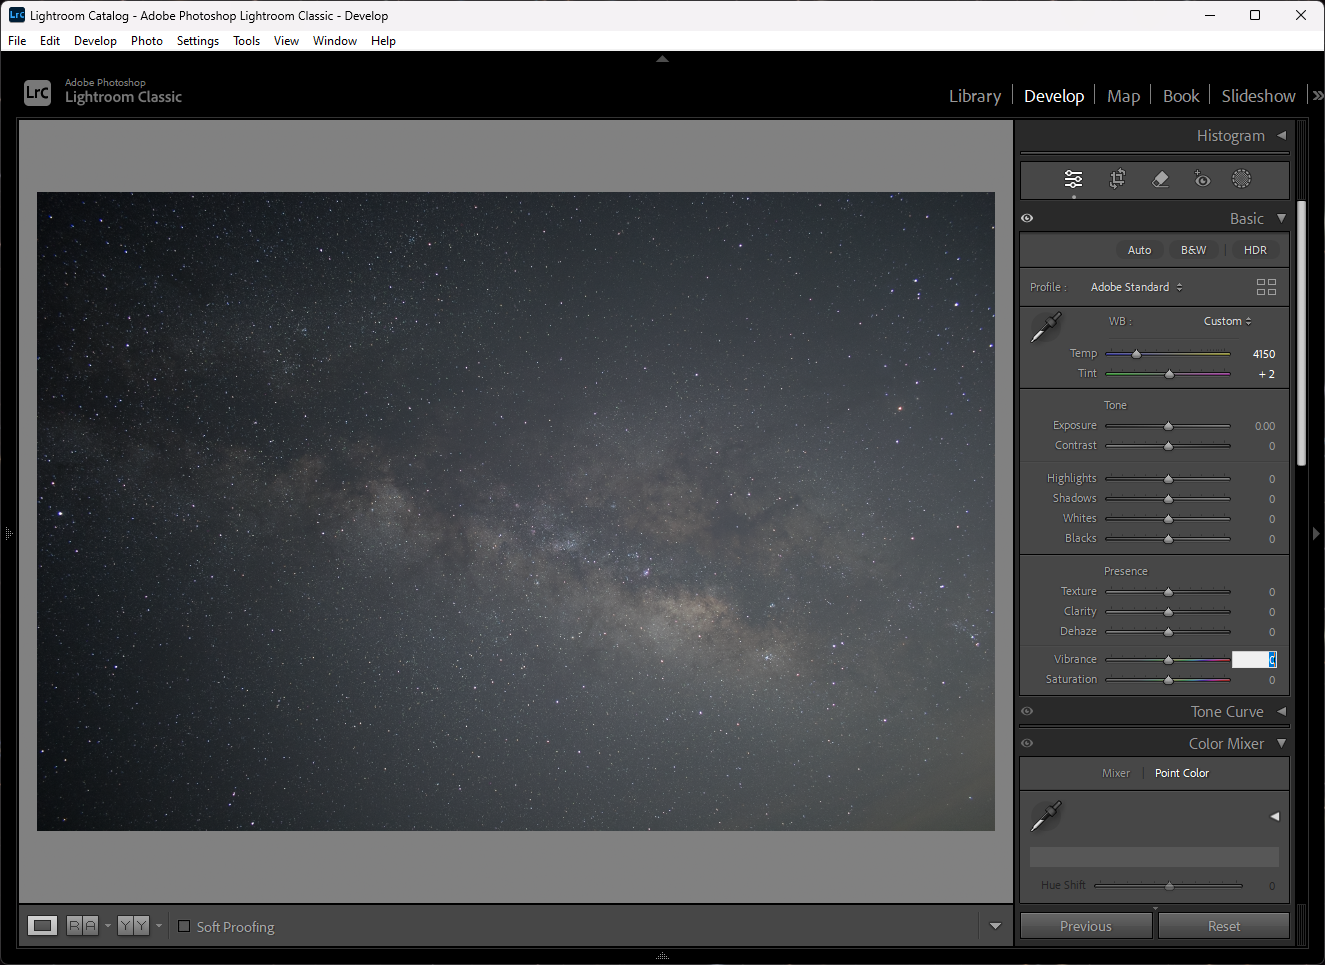
Bring the saturation and vibrance back to zero and move on to the lens correction tab.
Step 4
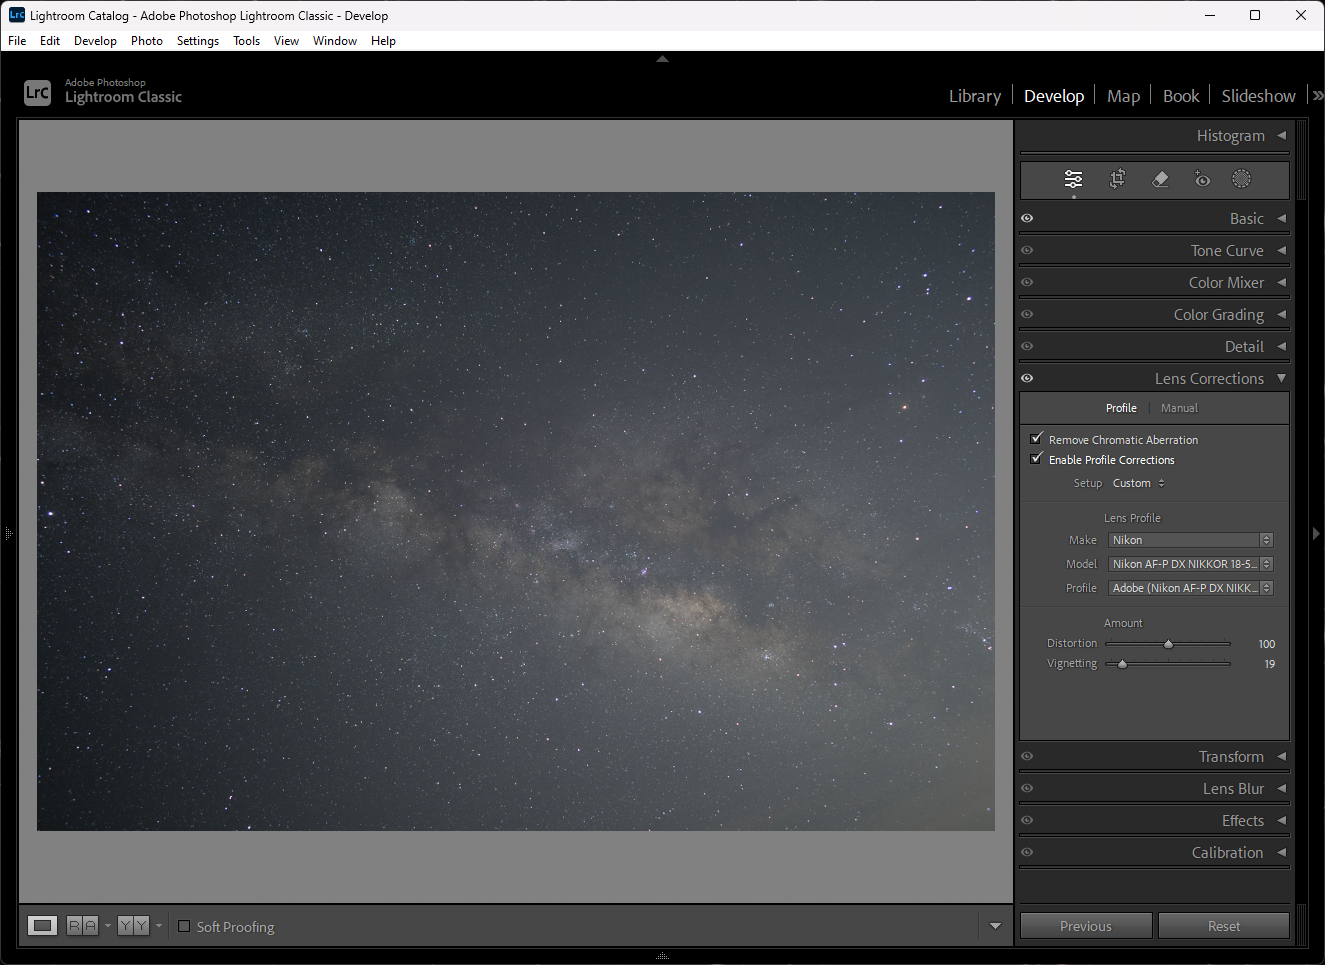
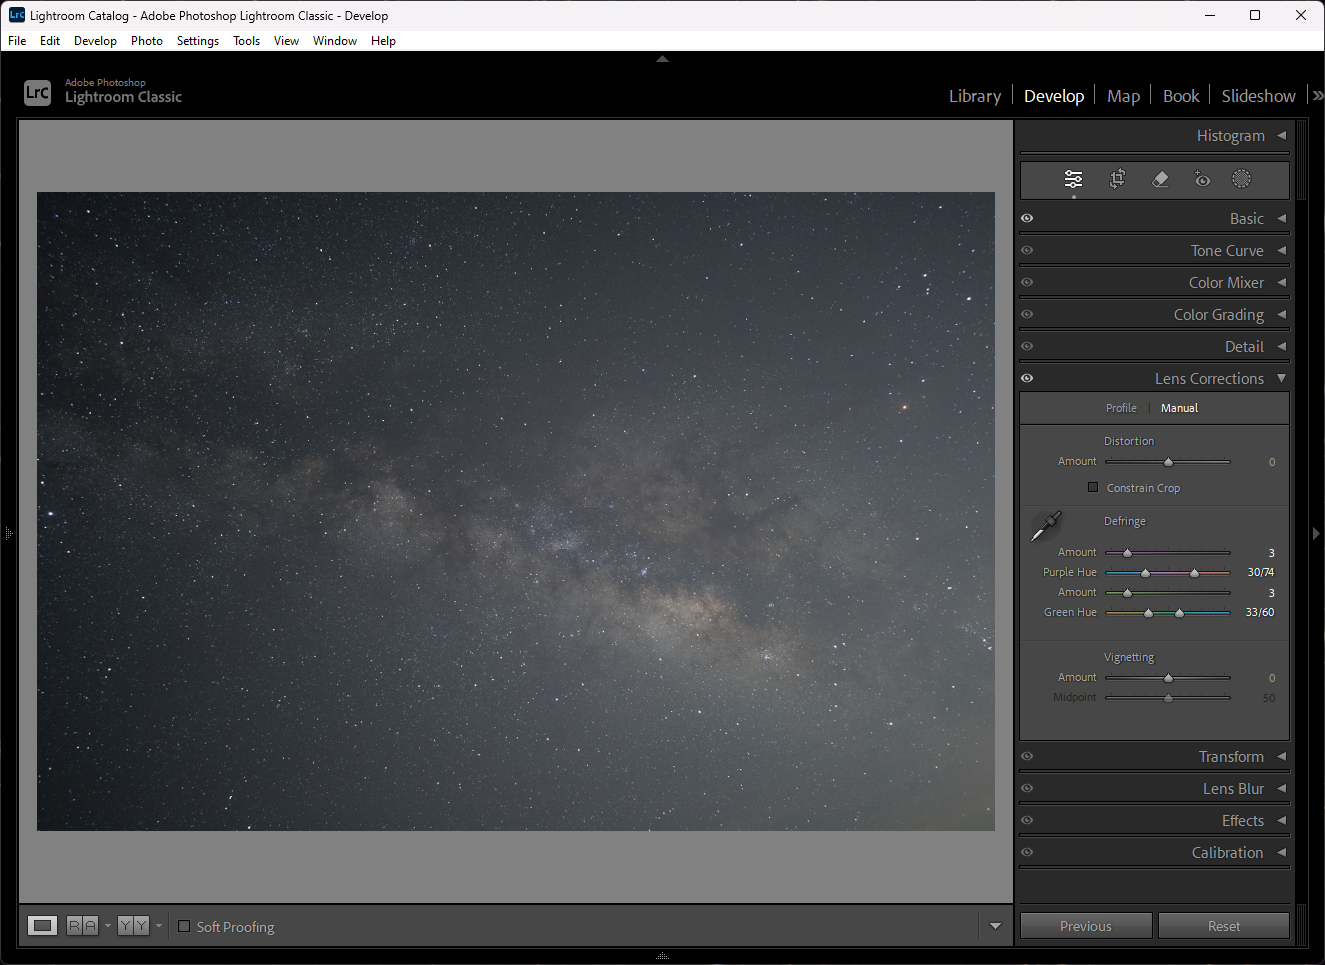
Zoom in on a bright star and check the remove chromatic aberration box.
Step 5
Next, manually reduce the color defringing until the color surrounding the star appears uniform with the star.
Step 6
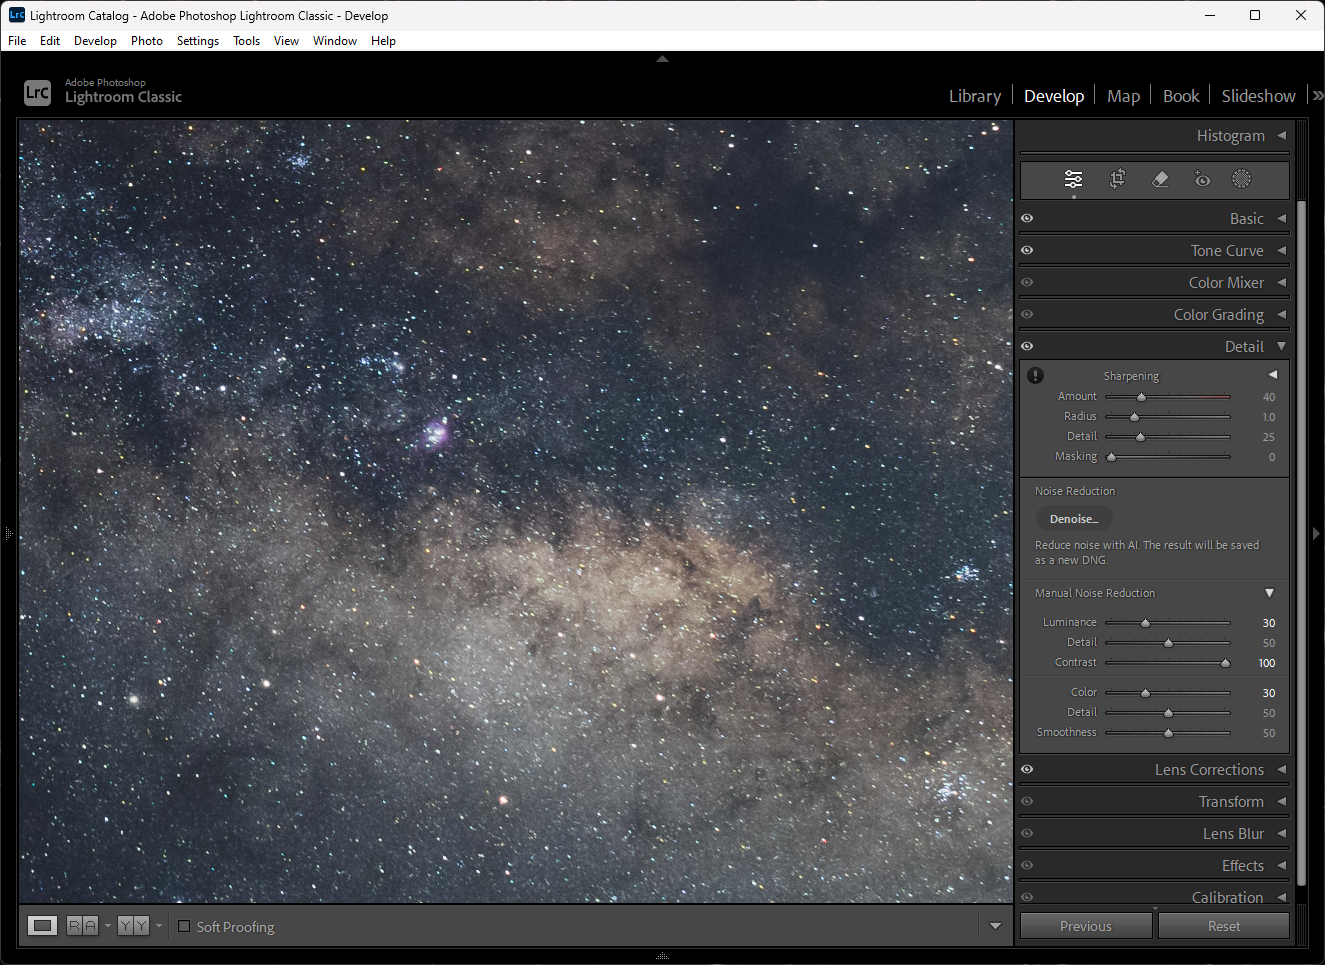
Next, denoise the image. Be modest with the noise reduction, as it reduces the overall detail of the gas clouds.
Step 7
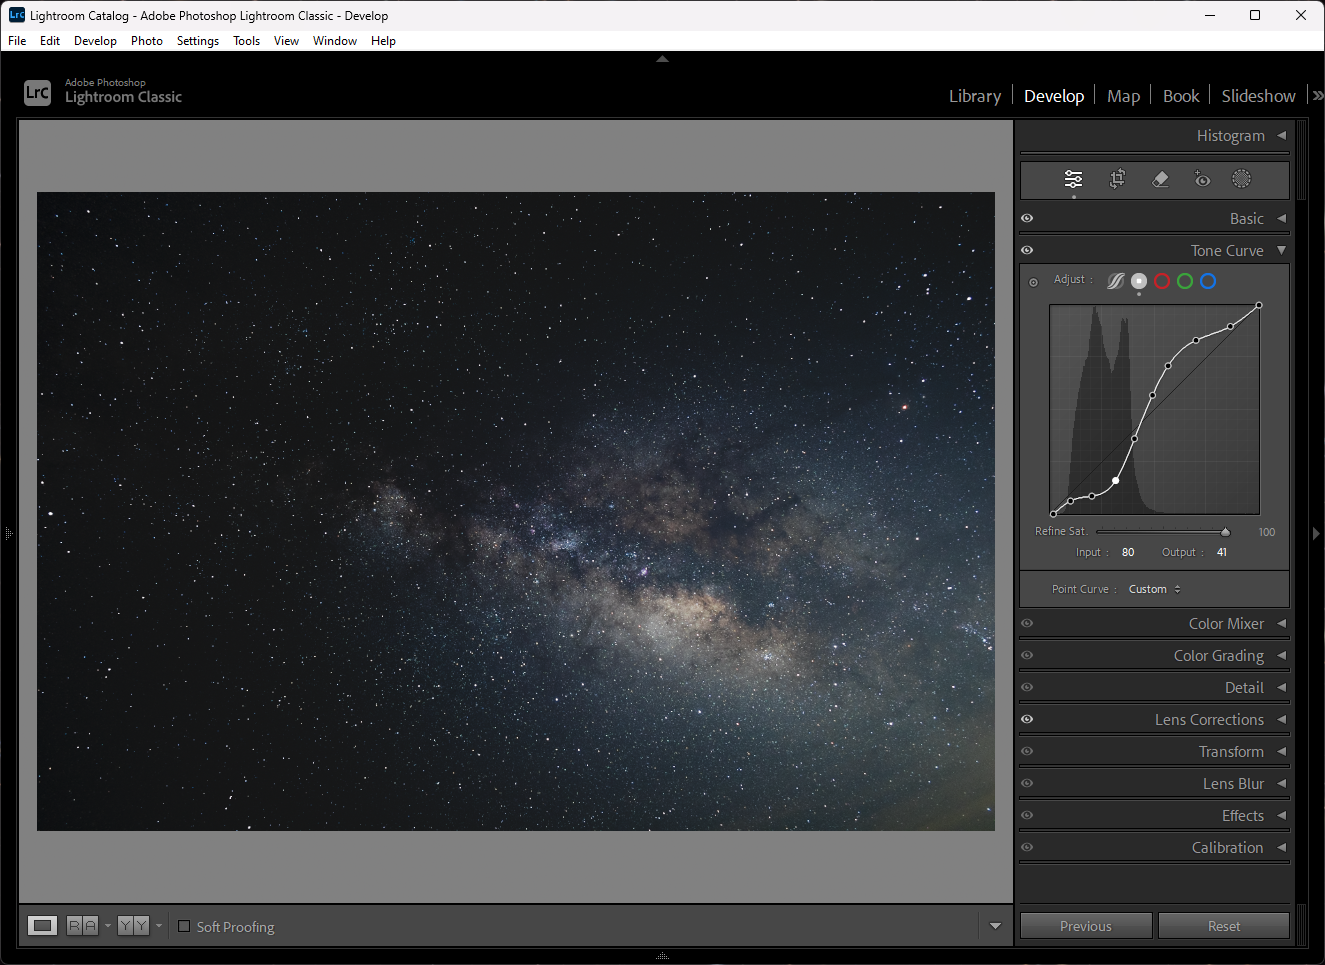
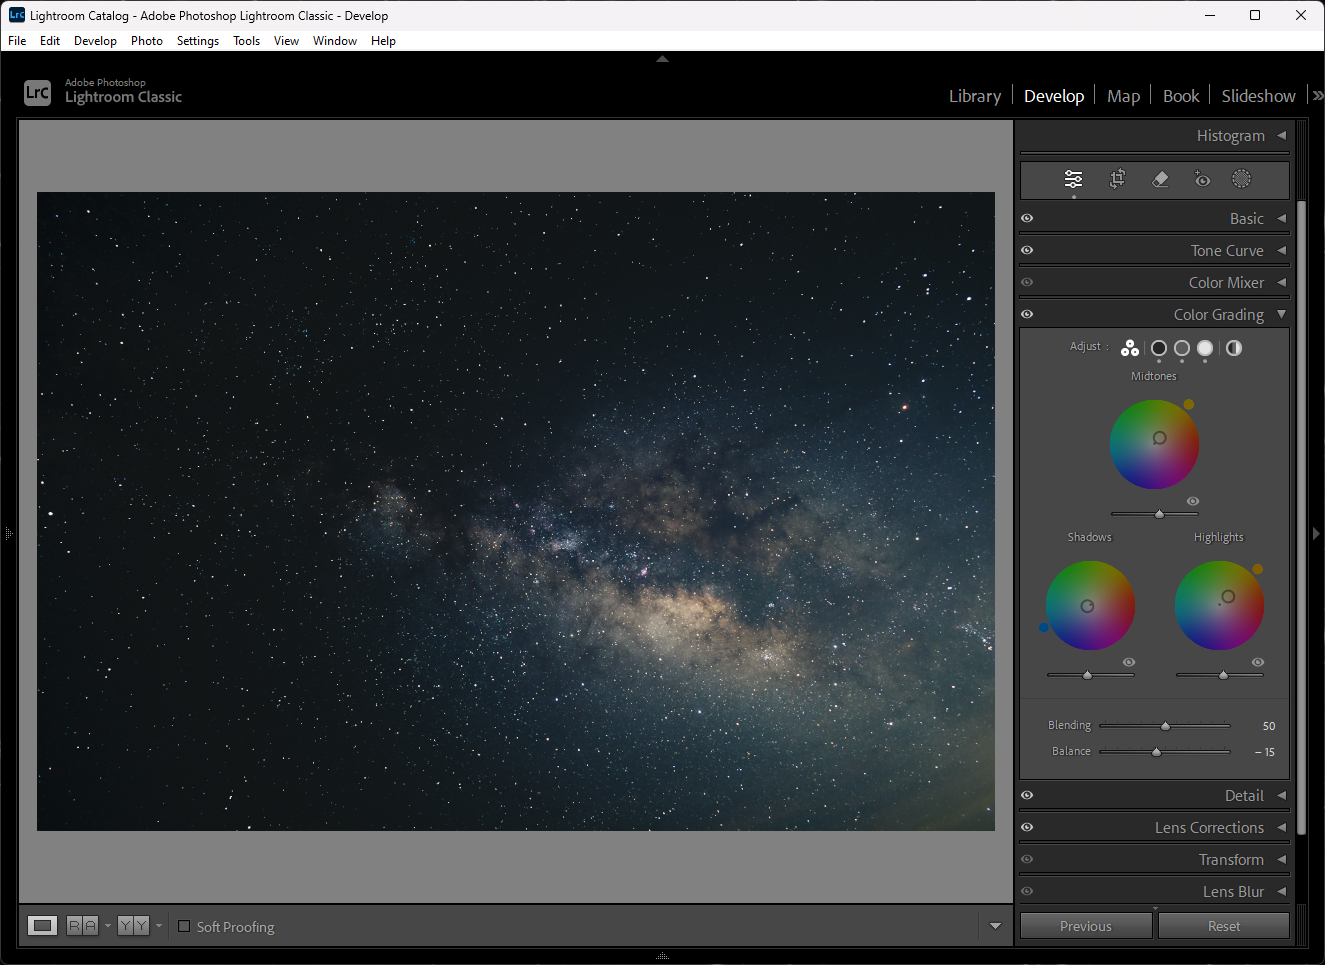
Once you’ve denoised the image, make adjustments to the tone curve to enhance the features of the Milky Way.
Step 8
Next, make adjustments to the color. With the color grading feature, you can easily make color adjustments to the dark, mid-tones, and highlights.
Step 9
At this point you can either make final edits to the basic panel and export the image (see step 12) or apply some layer masks to further enhance the image.
Step 10
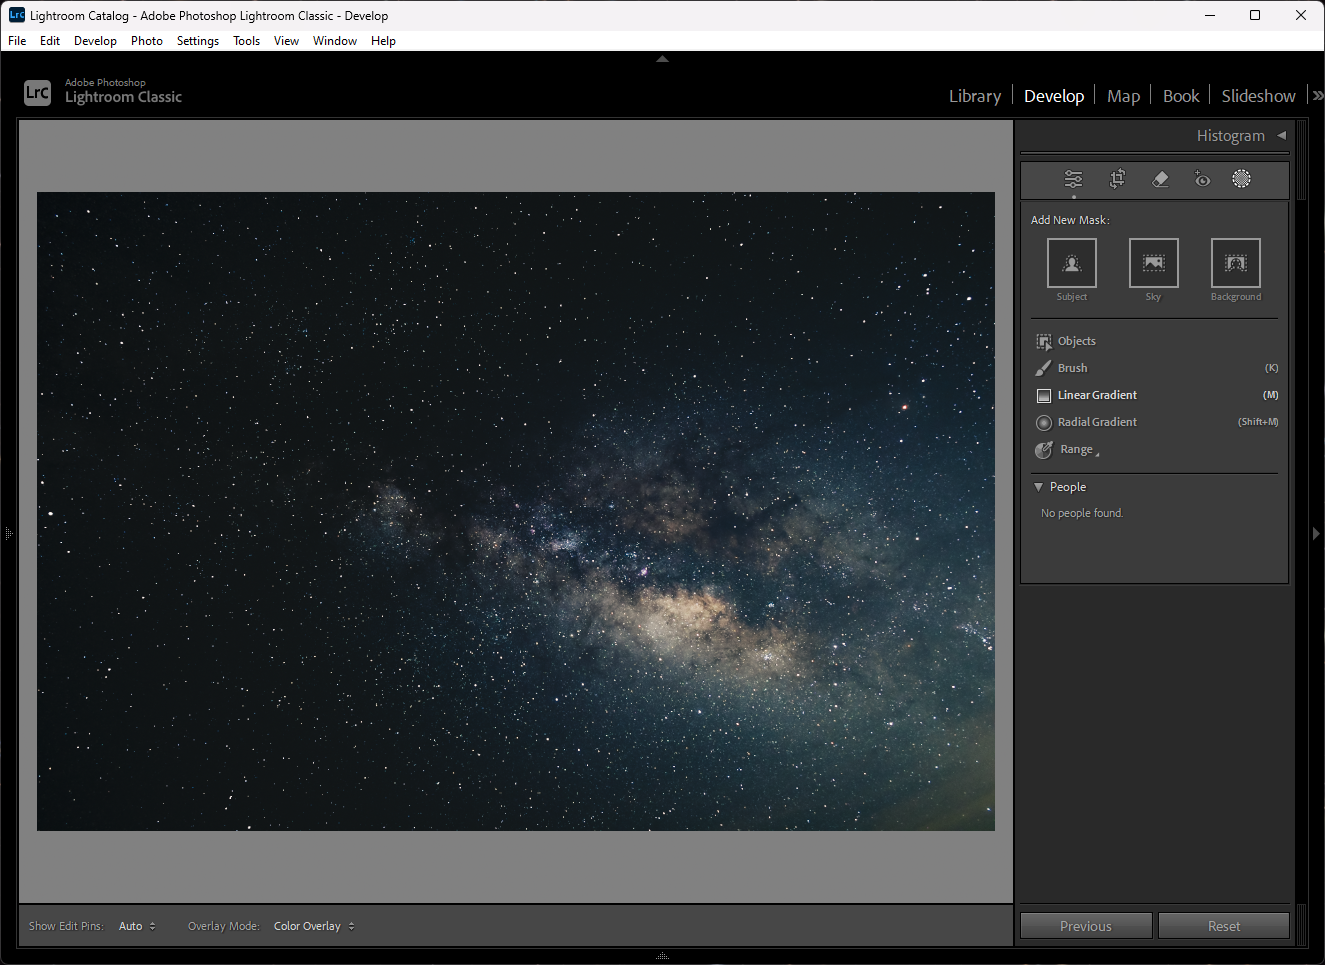
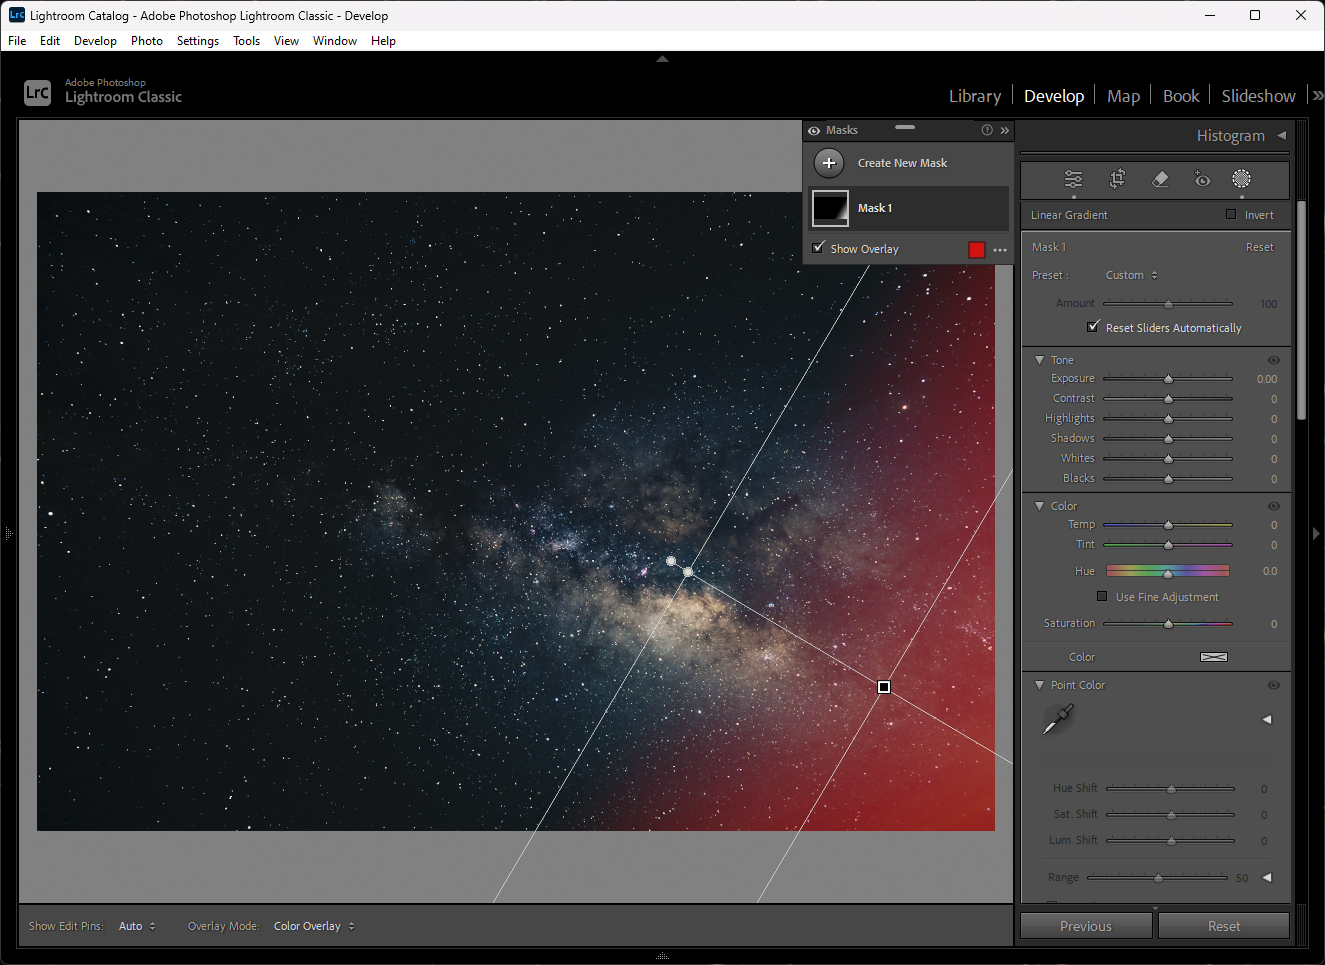
In the masking panel, select the linear gradient mask. Once aligned to your preference, make adjustments to the basic panel and reduce the exposure. This feature can be used to reduce light pollution and darken the area surrounding the Milky Way. You can apply additional masks to make adjustments to specific areas of the image.
Step 11
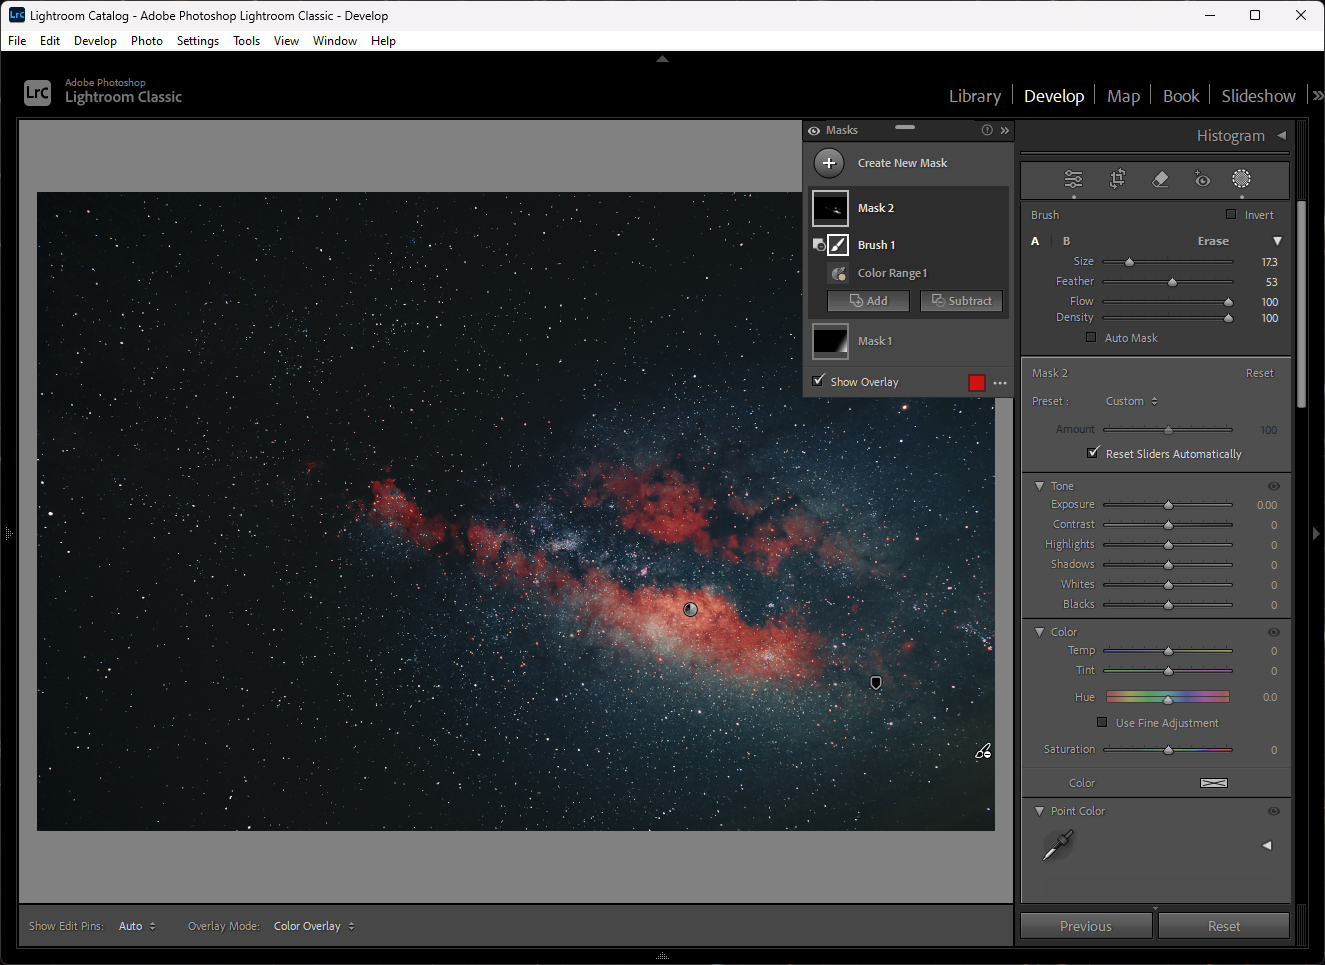
You can apply additional masks to make adjustments to specific areas of the image. Both luminance and color ranges functions work well to isolate areas of the Milky Way.
Step 12
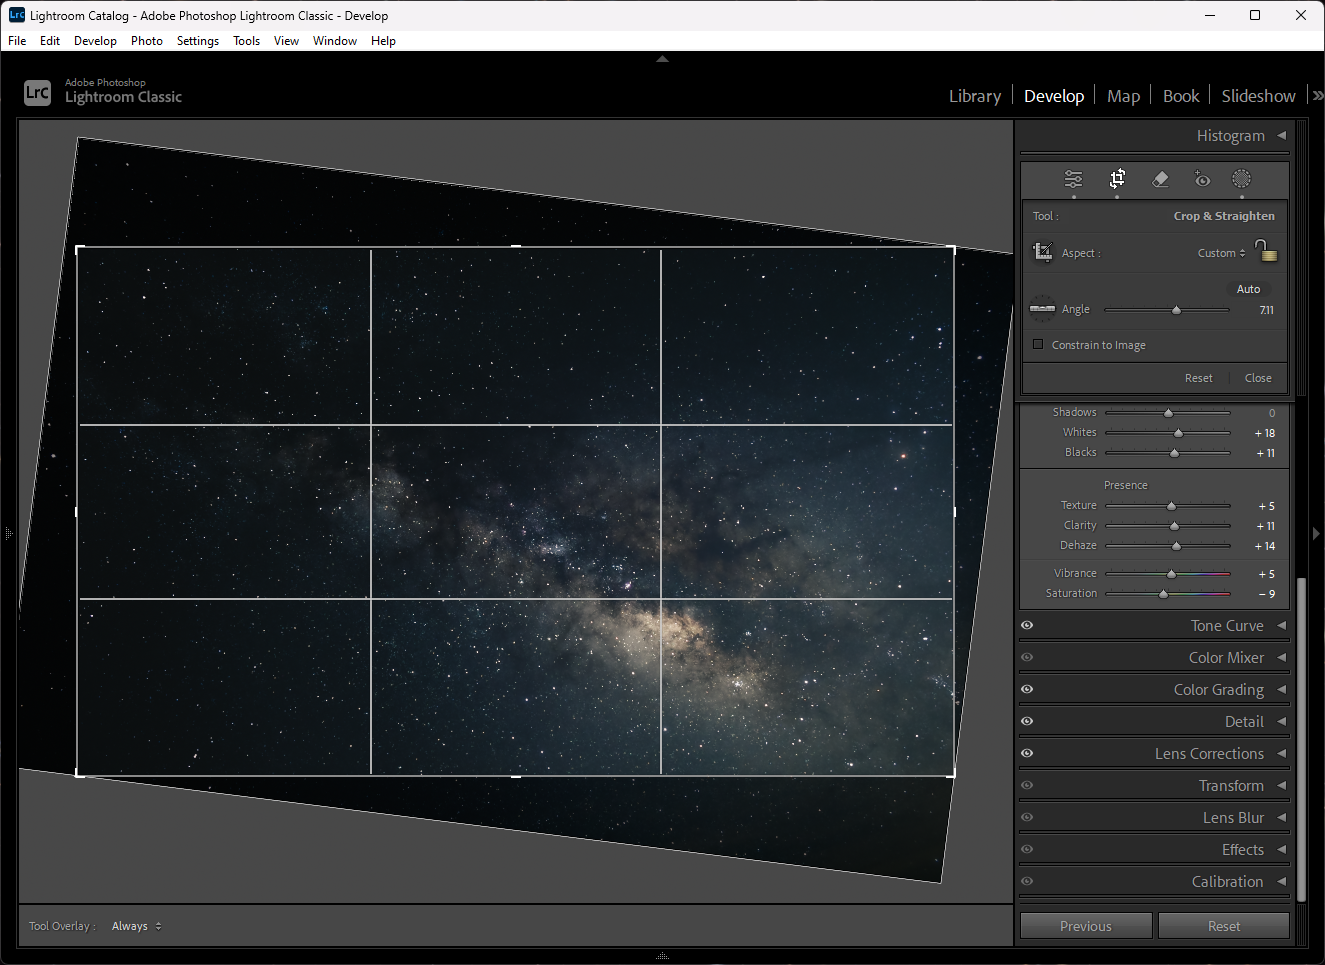
Once you are happy with the adjustments, you may want to change the framing by cropping the image.
Step 13
Now, make final adjustments to the basic panel and export the image.
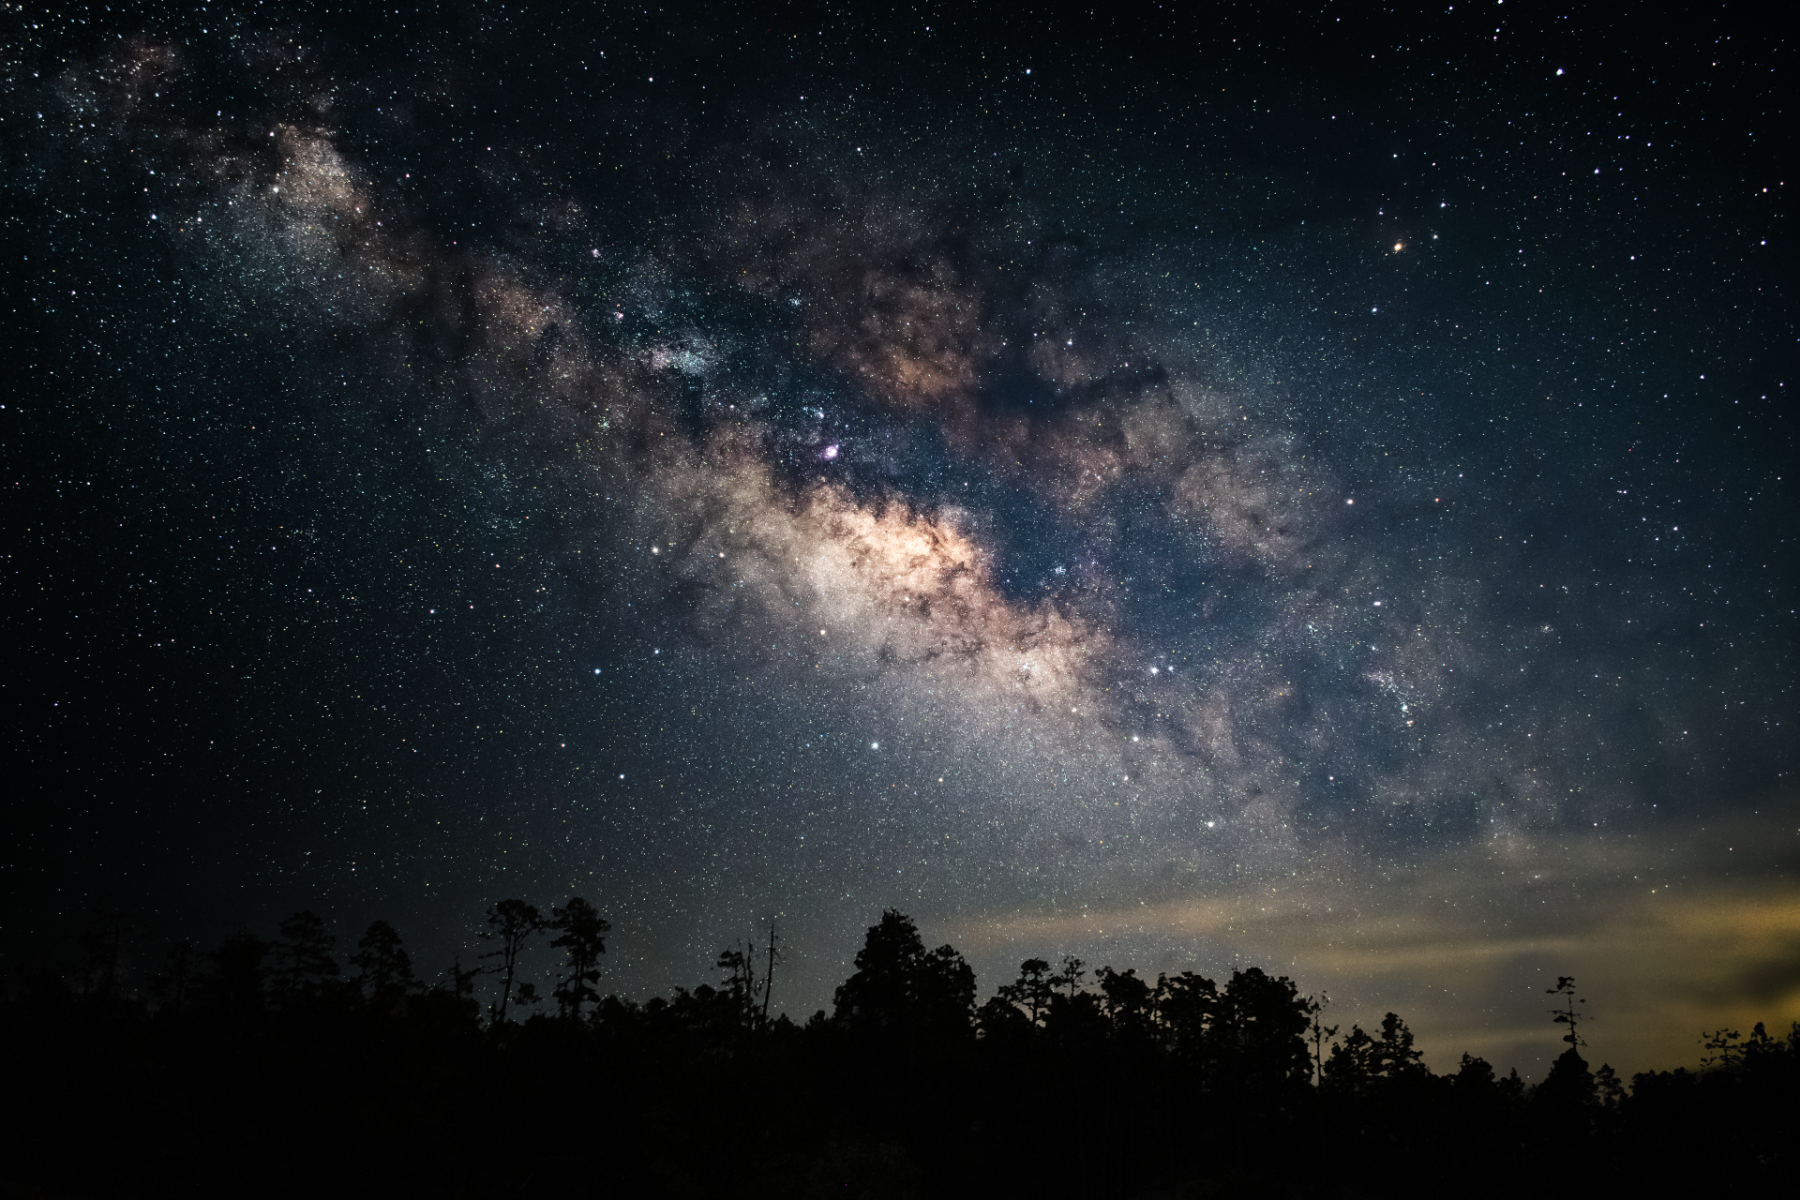
And here's the final product:
Stacking In Photoshop
Step 1
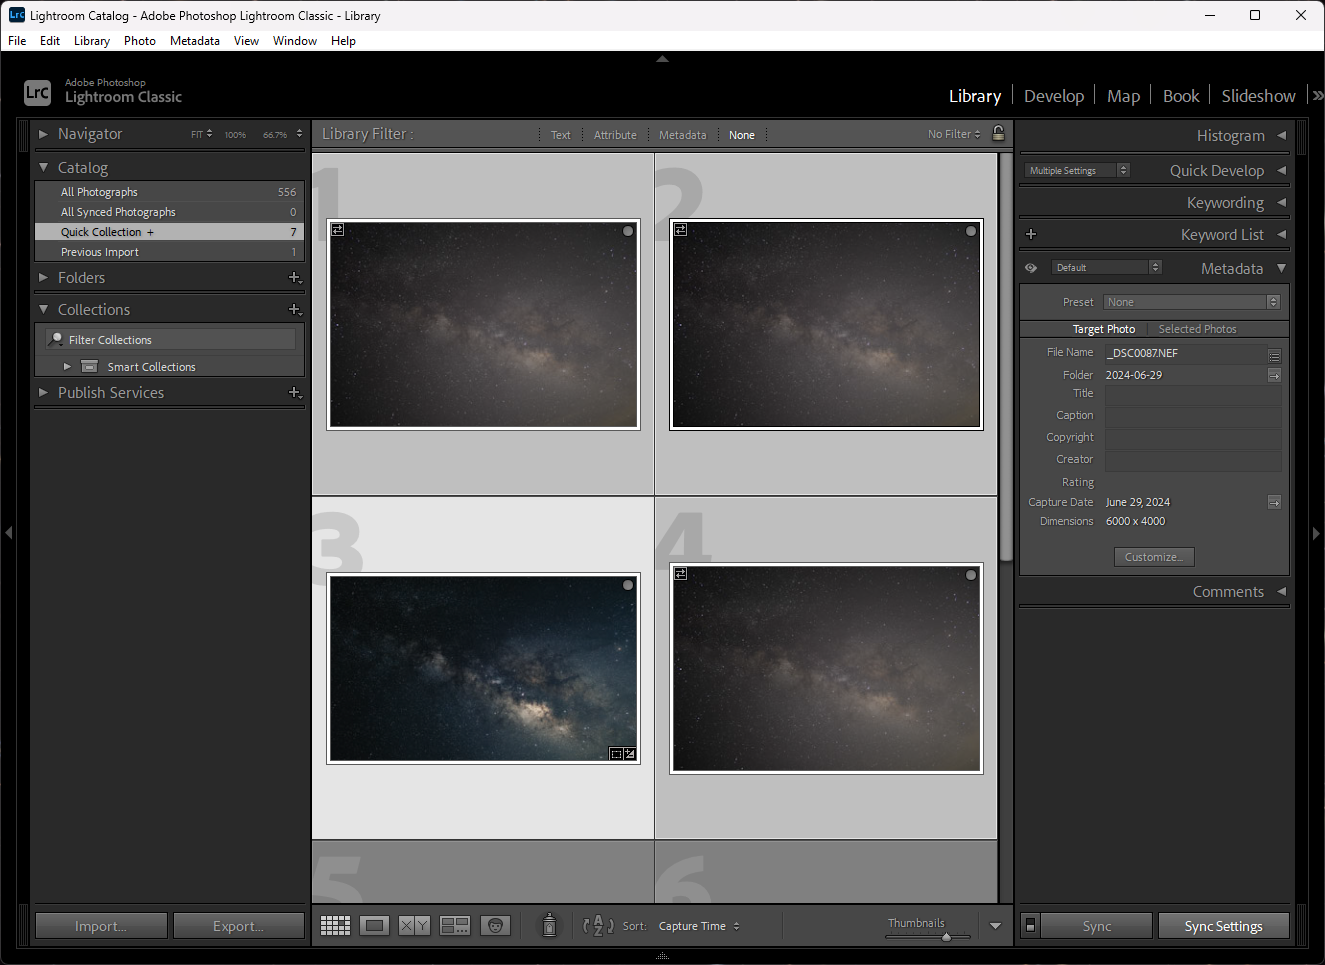
If you have additional frames to work with, you can bring those frames into photoshop to further enhance and denoise the images. Begin by navigating to the Lightroom image library and selecting the image of the Milky Way that you previously processed. Then, select the image(s) that you would like to stack. With the frames selected, use the sync settings function to paste the edits from the original image to the others. Make sure to sync the masks and lens corrections. Once the images are synced, open them as layers in photoshop (right click > edit in > open as layers in photoshop).
Step 2
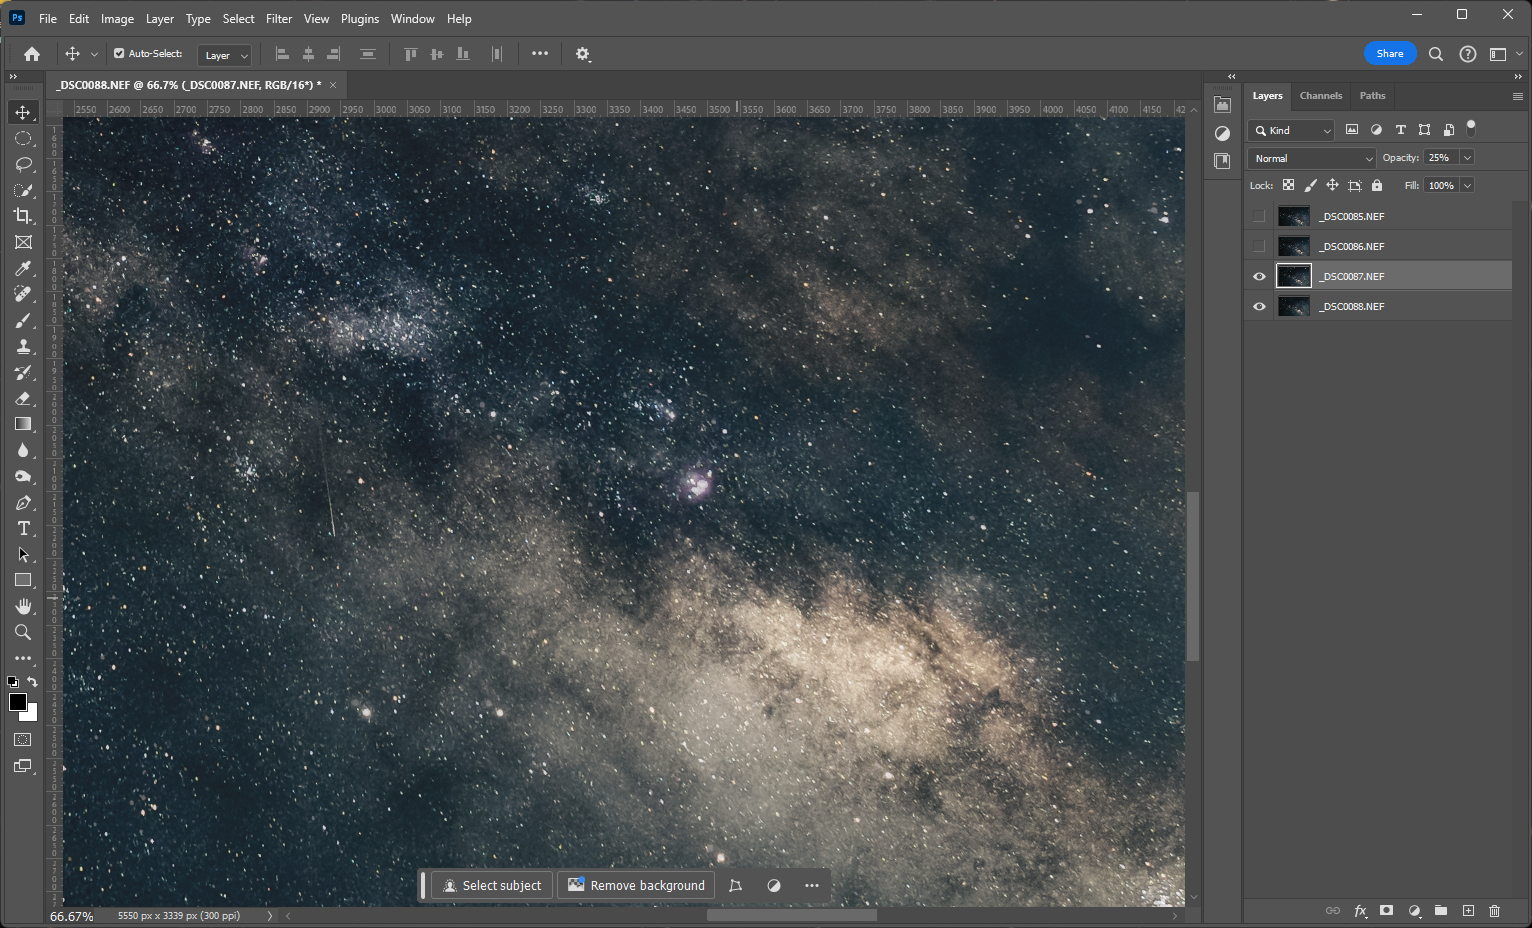
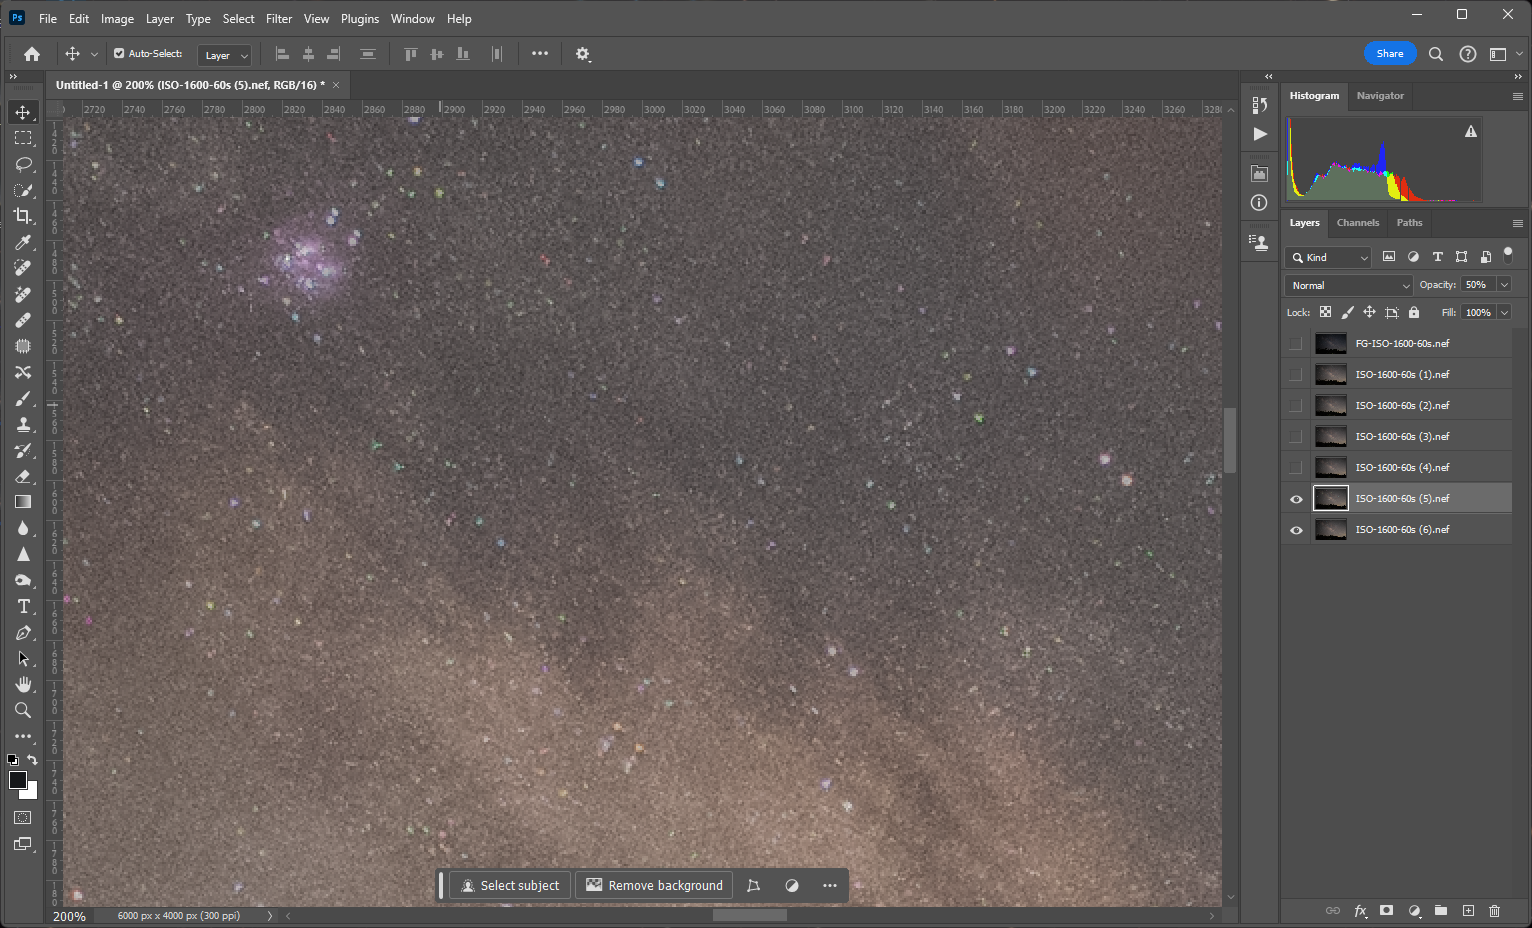
With the images open as layers, align them by reducing the opacity of the top layer and dragging it until the image appears in focus. Then reset the opacity and select both layers.
Step 3
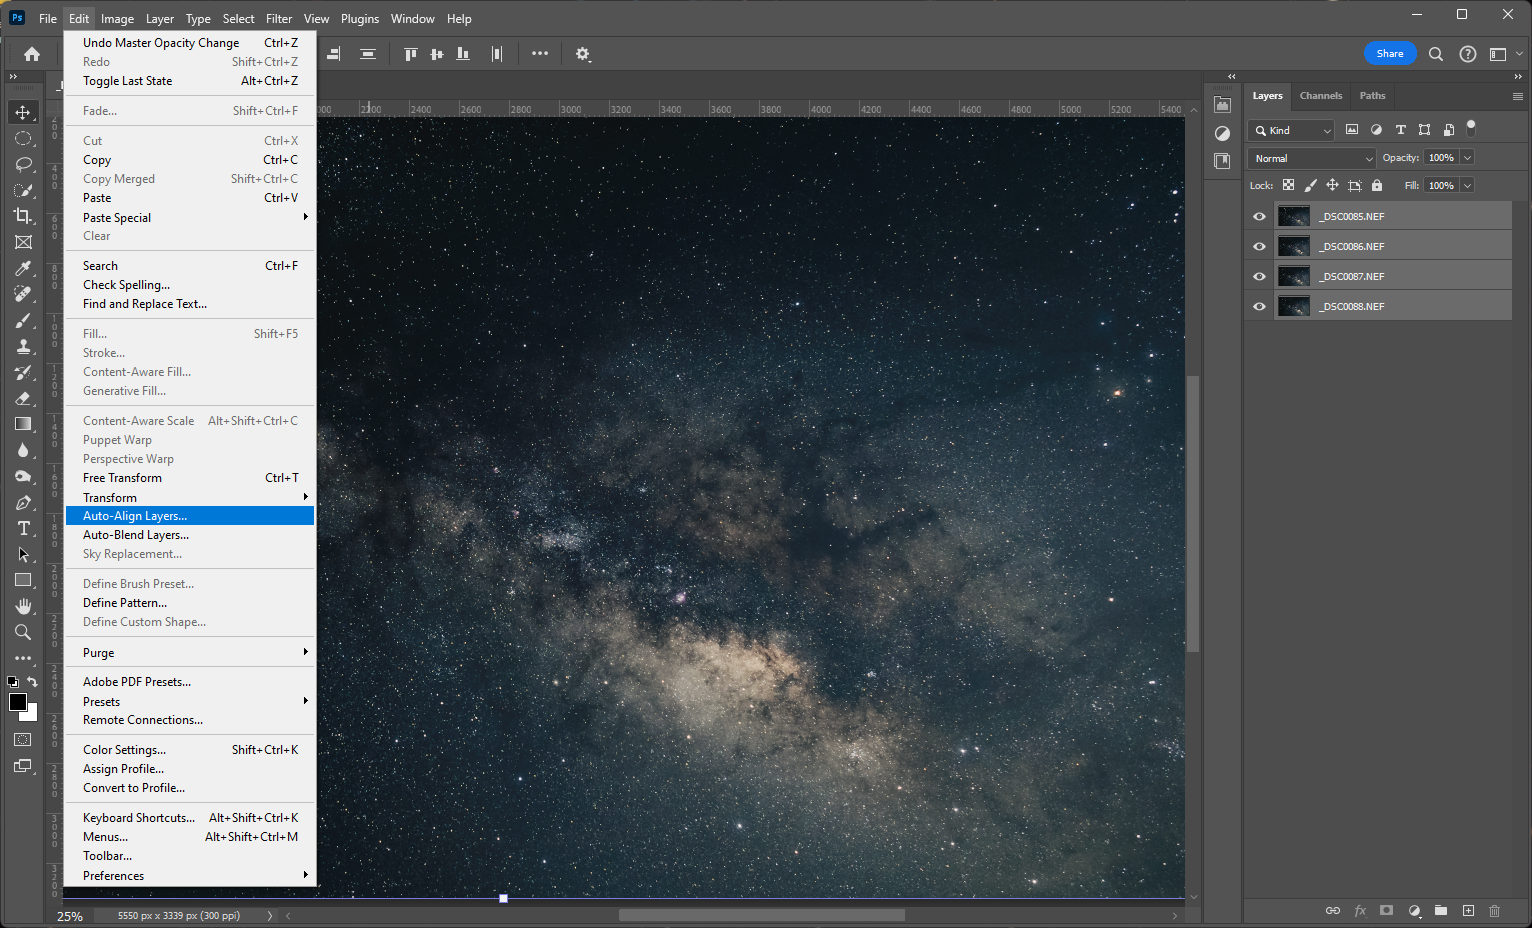
Once you've manually aligned the frames you can further align them with the auto-align function, however, sometimes this function will un-align a frame, so be sure to check each frame after the process completes to ensure proper alignment.
Step 4
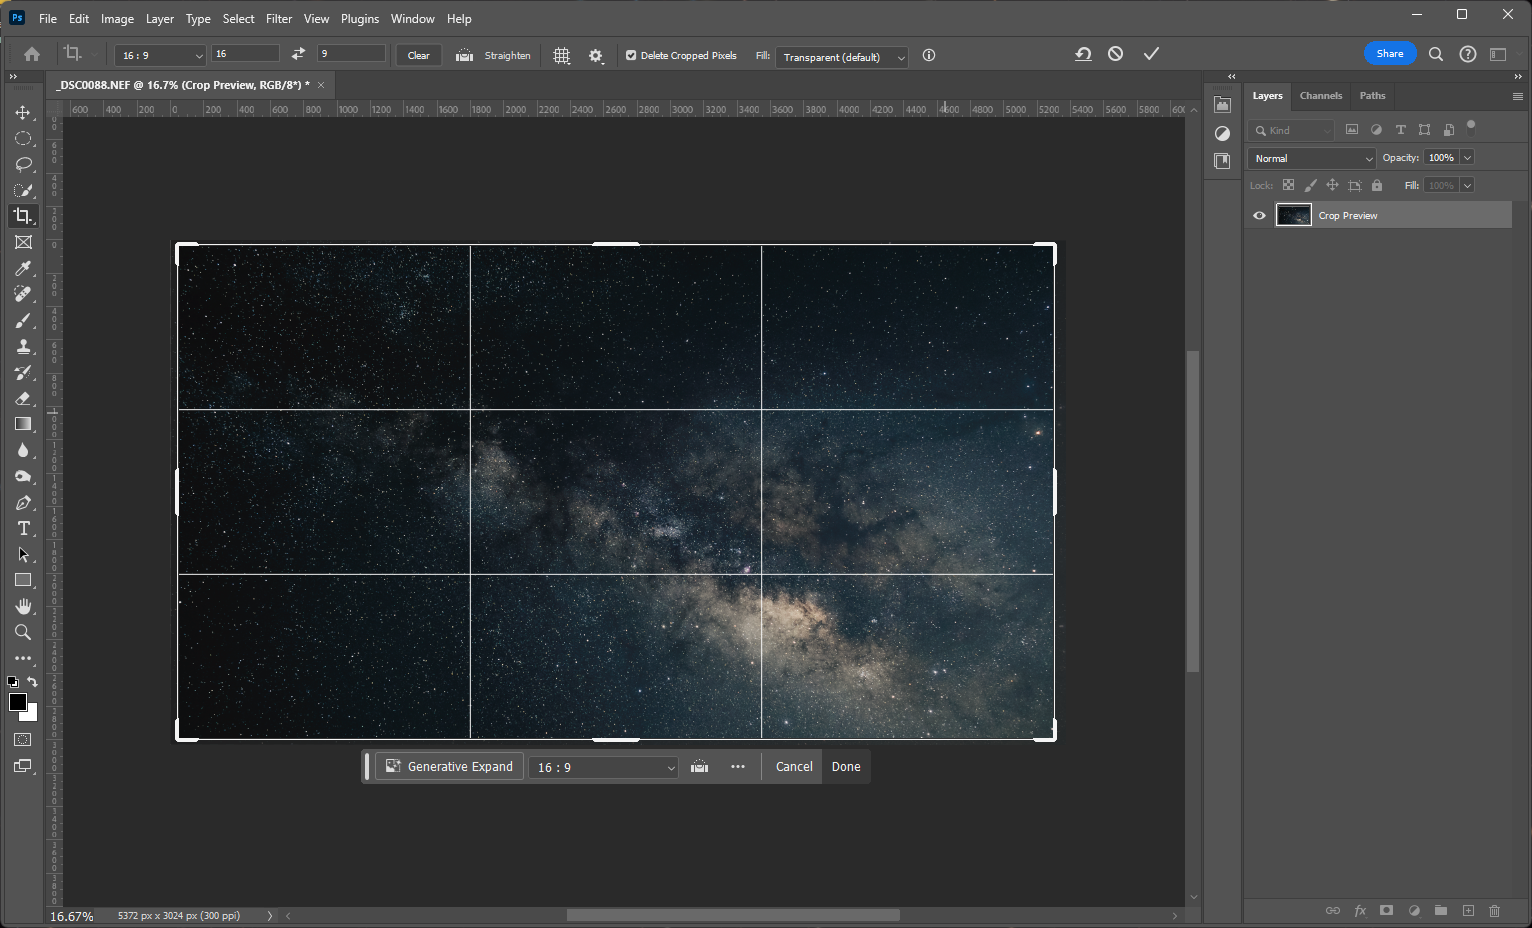
Next, crop the image to remove any left over white space from the alignment.
Step 5
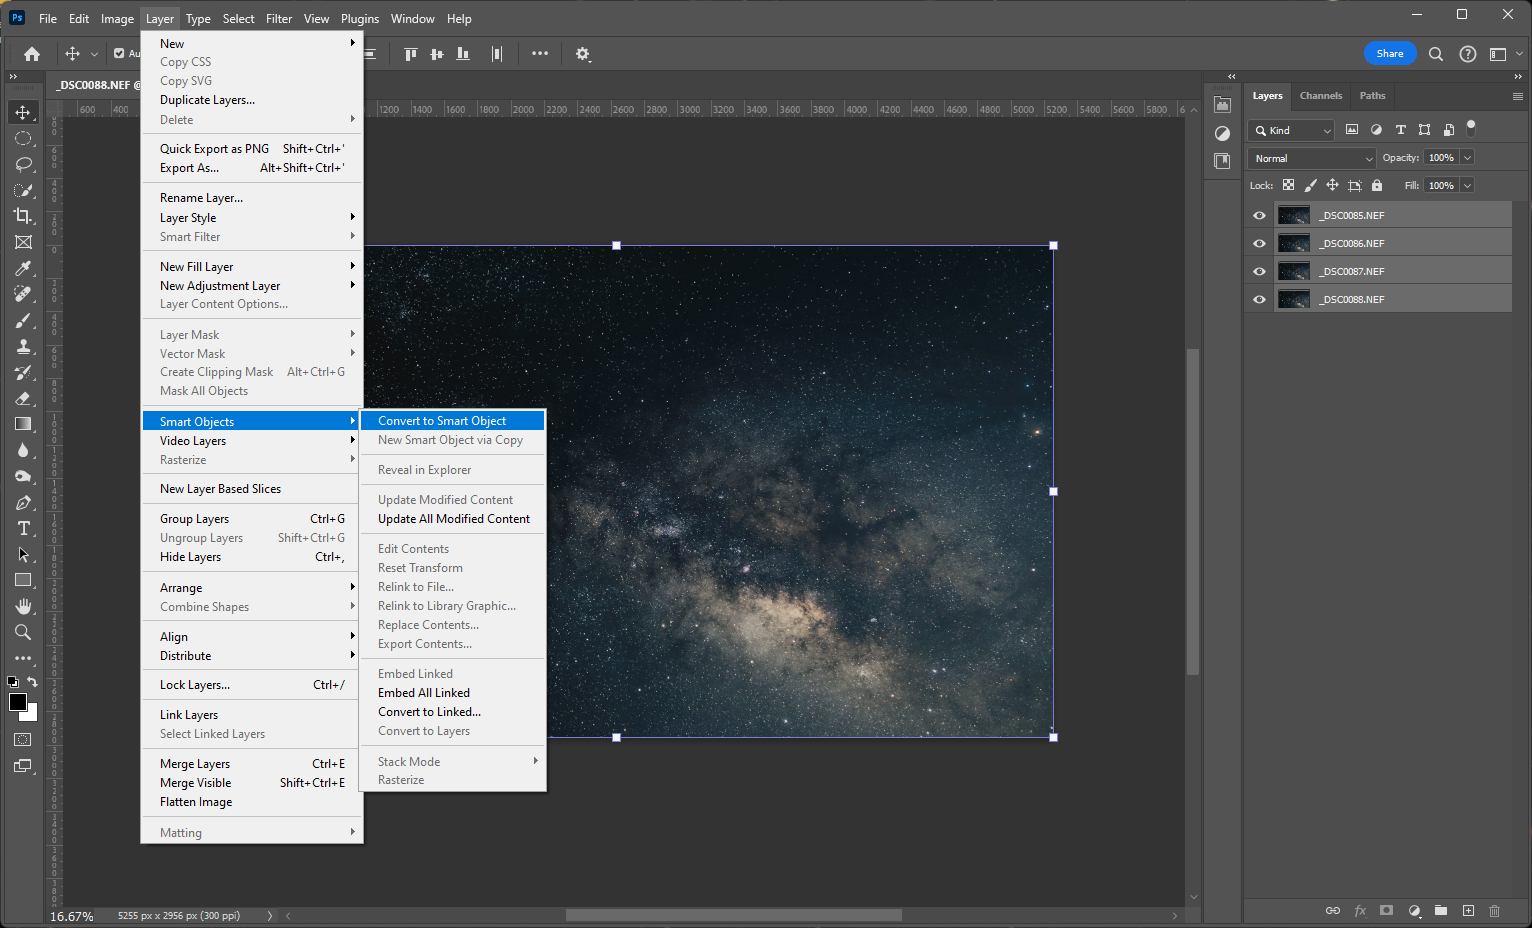
With the frames now aligned, select all of the layers and convert them to a smart object (Layers > Smart Object > Convert to Smart Object).
Step 6
After converting the layers to a smart object, you should be left with a single layer (aka the smart object). Select this layer and navigate back to the smart object drop down. From here, select the median stacking option (Layers > Smart Object > Stacking > Median).
Step 7
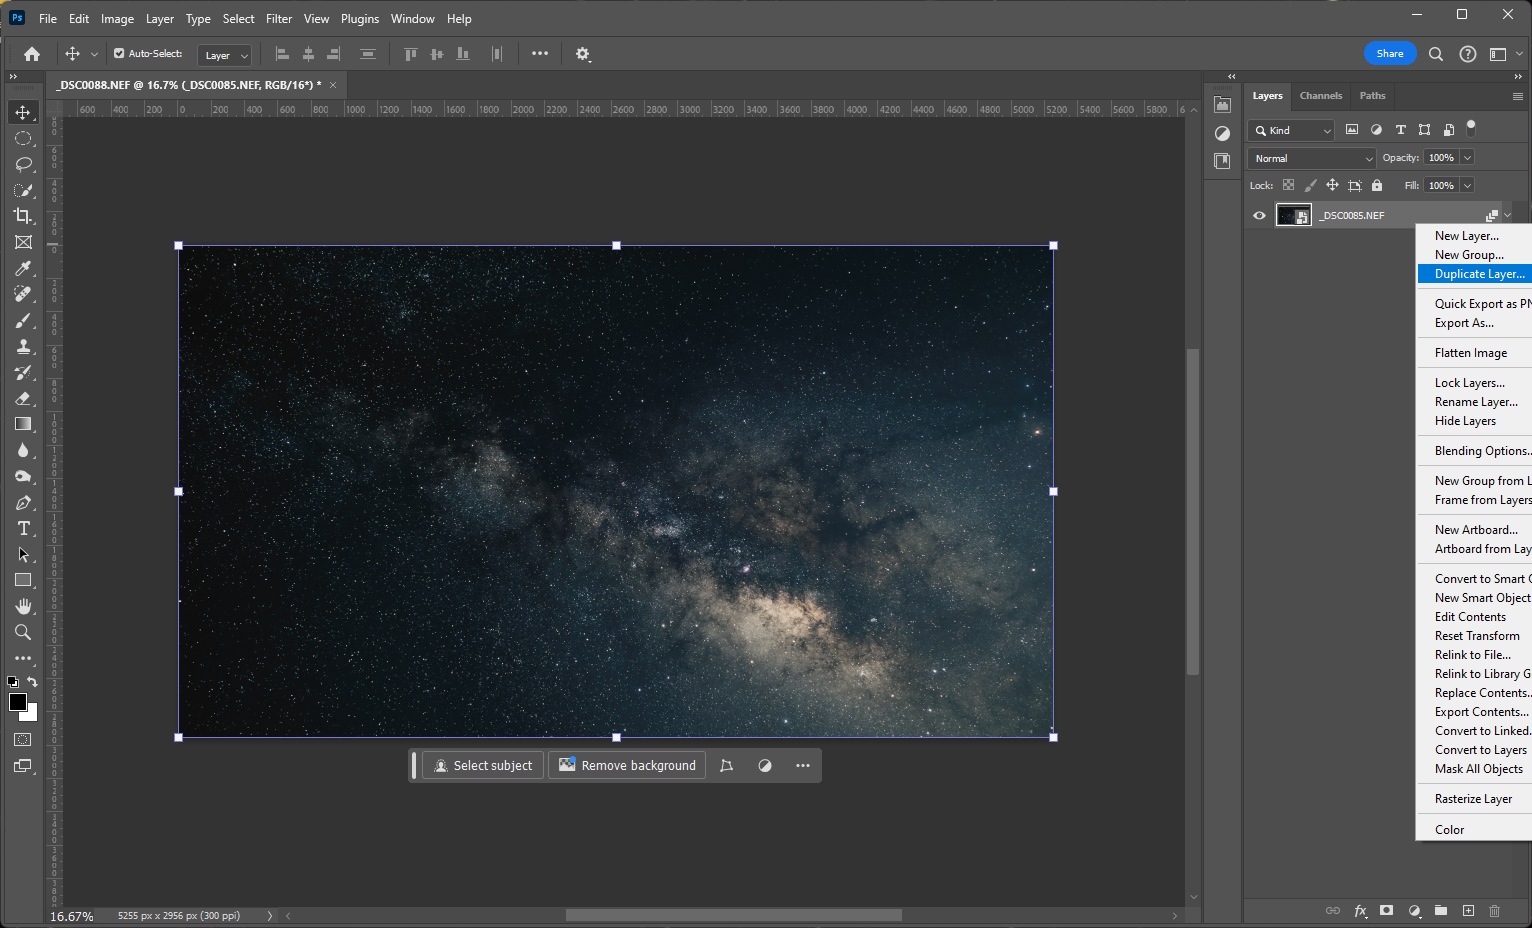
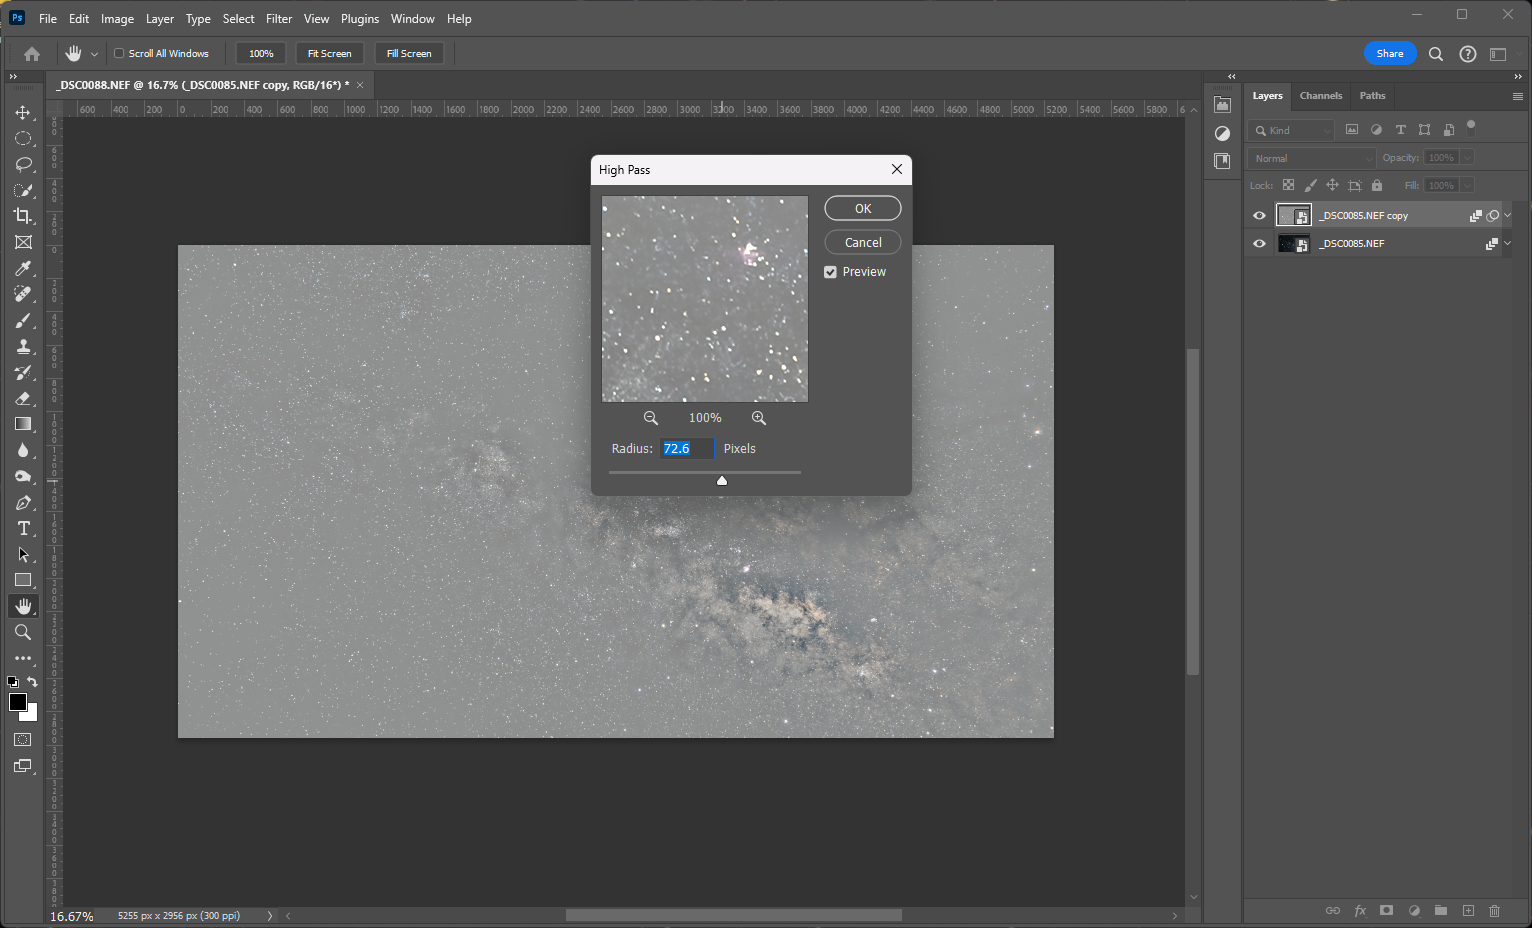
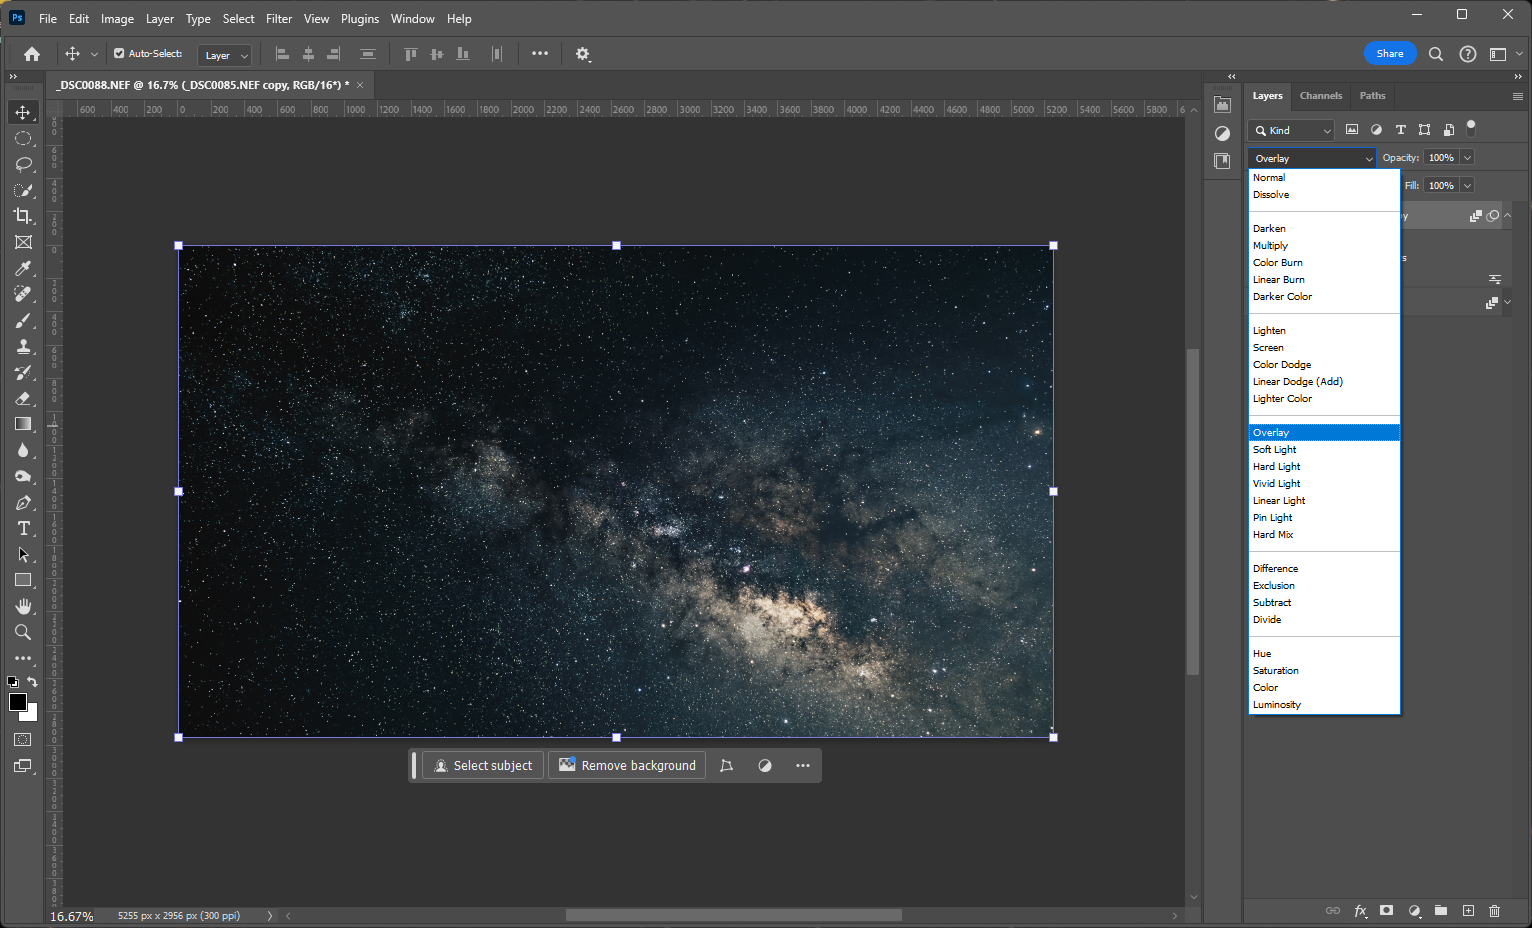
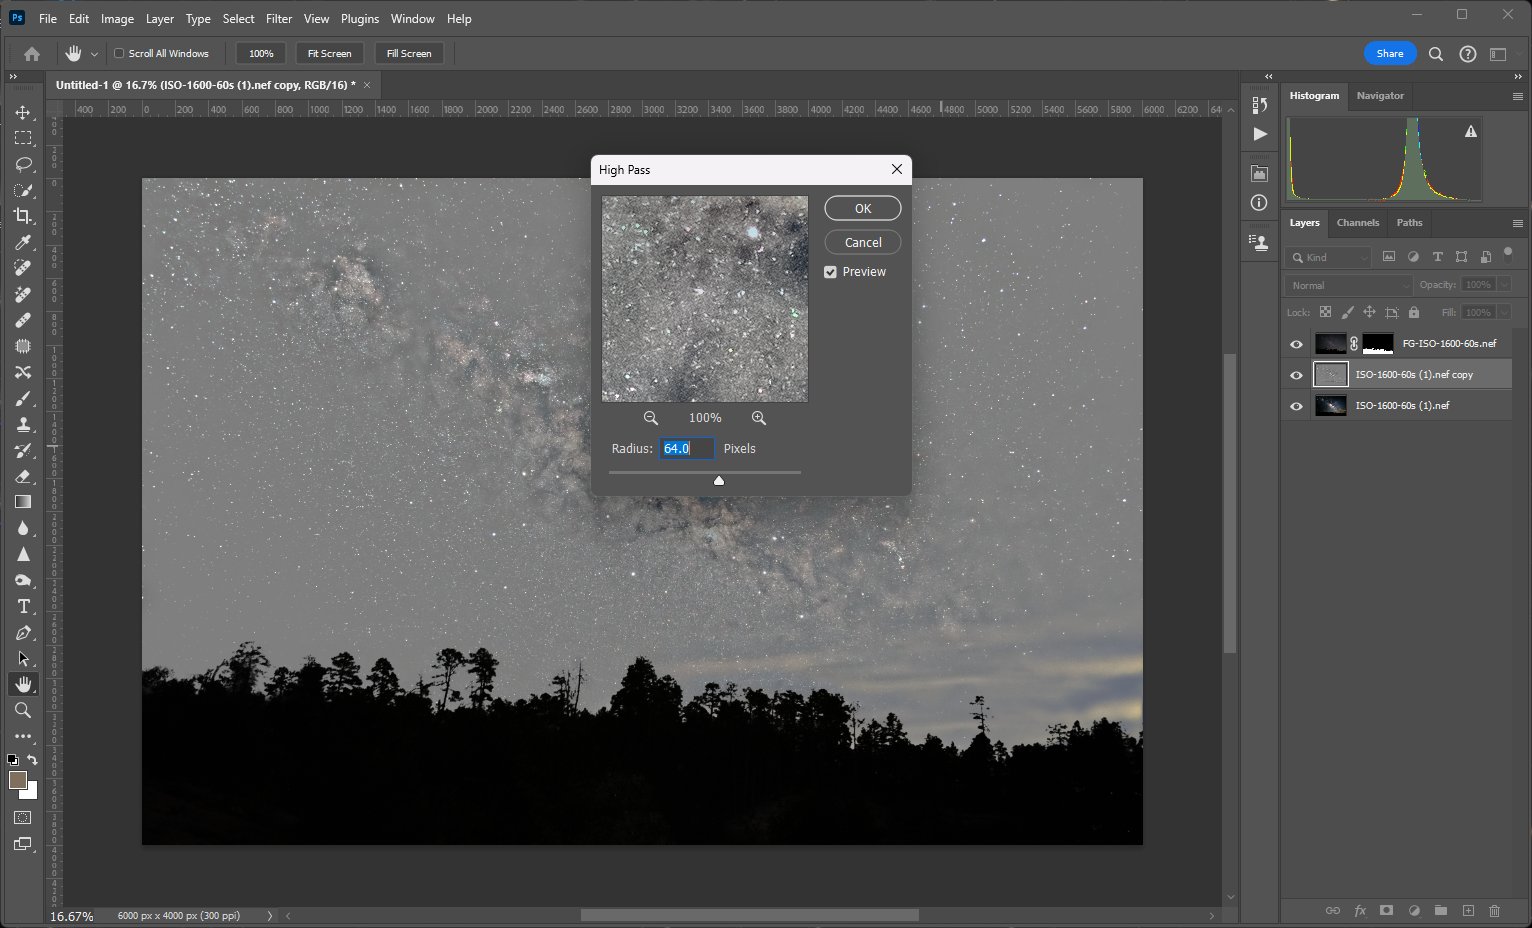
Once the stacking process is complete, you can either finalize the image and export (see step 10), or you can make further enhancements with filters. To add a high pass filter, duplicate the stacked layer and navigate to the filters tab at the top of the window. Under the filter drop down menu, find the "other" option and select high pass (Filters > Other > High Pass).
Step 8
Next, move the slider until the details of the dust lanes become clear.
Step 9
Next, set the blending to overlay and reduce the opacity until the image looks clear. Make sure the filtered layer is above the base layer. You can repeat this step with other filters to further adjust details of the image.
Step 10
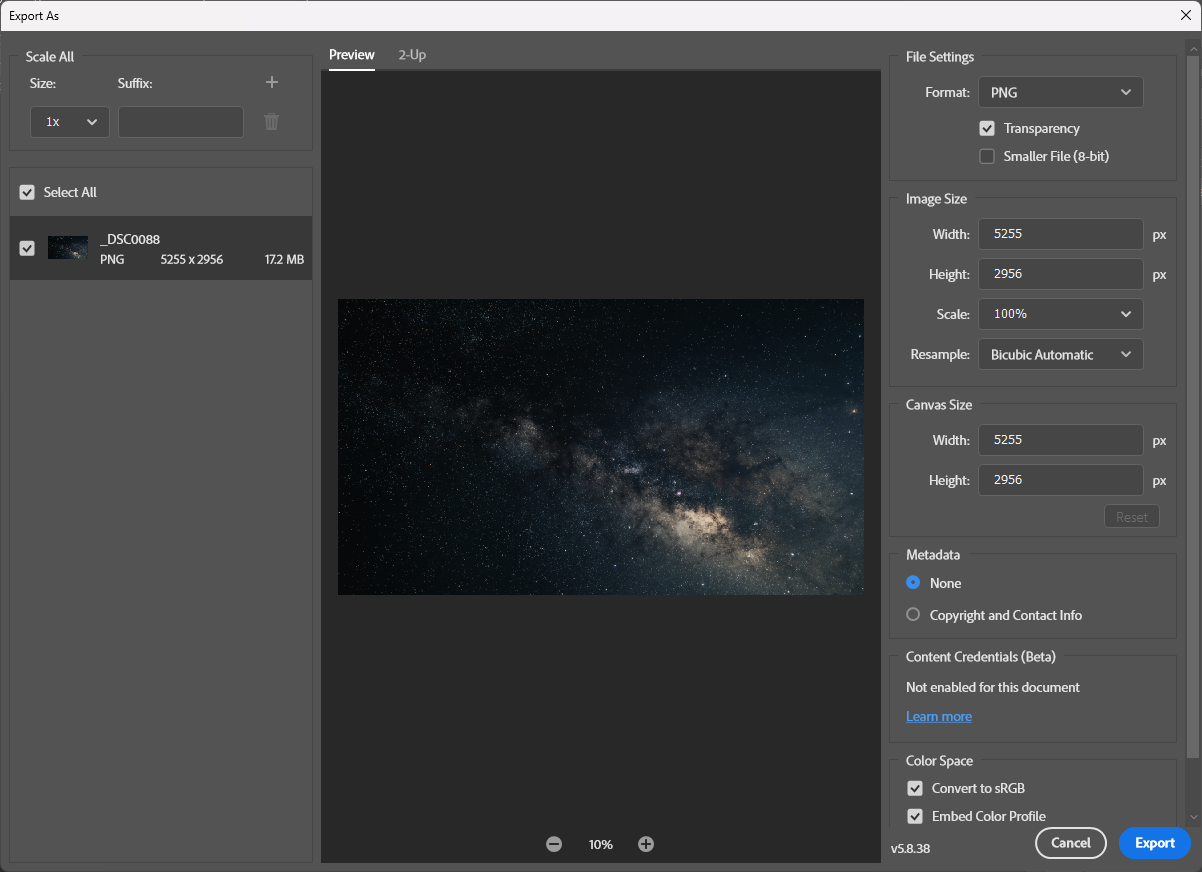
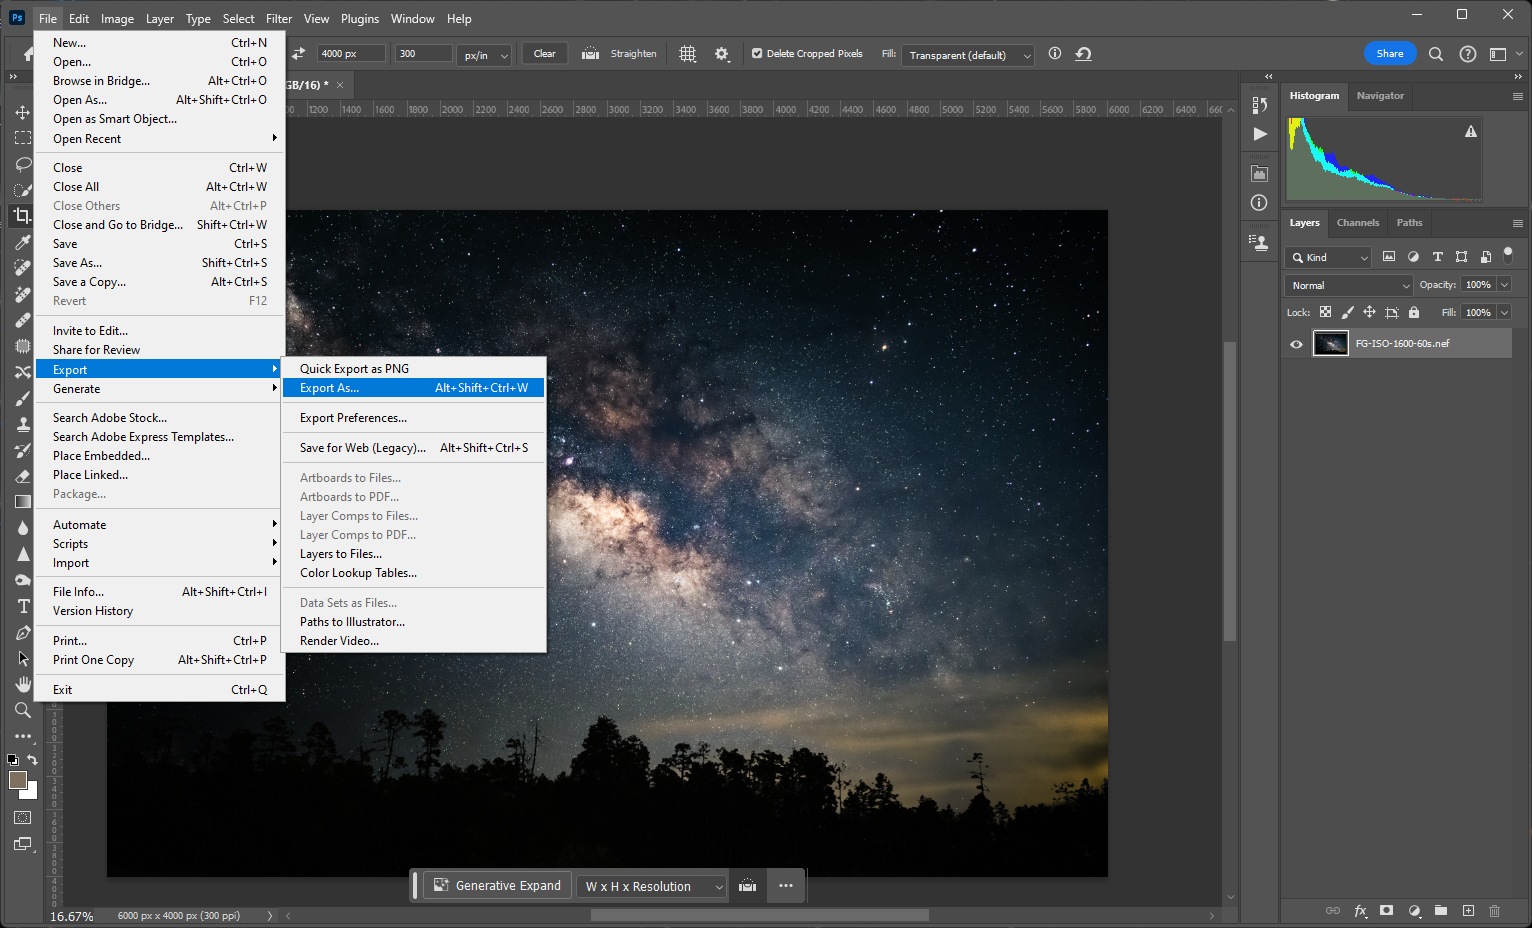
When you are done editing the image, navigate to the file tab at the top of the window and find the export option in the drop down menu. Export the image as a png to avoid unnecessary image compression.
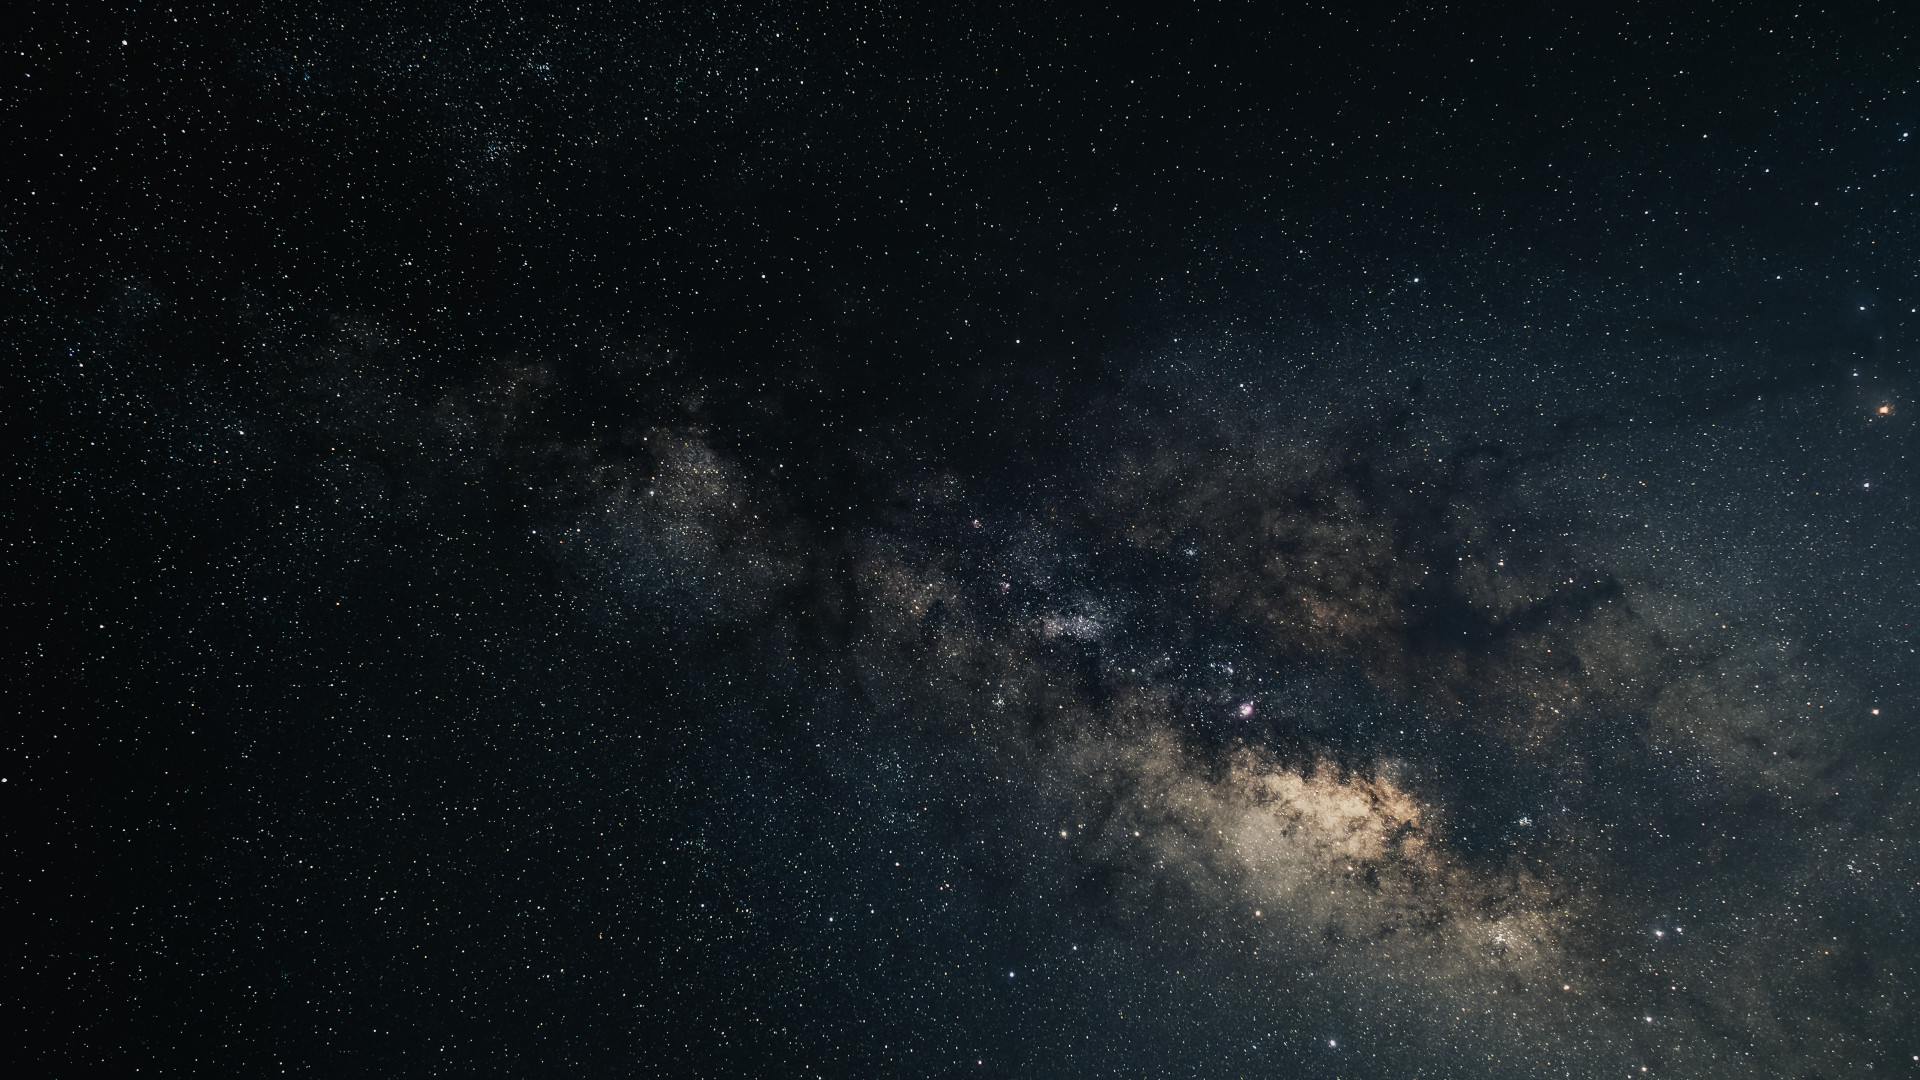
And that's it! If you followed the steps correctly, you should have an image that looks something like the one below.
Stacking In Sequator
Sequator is a free processing software that uses an automated algorithm to stack and enhance image files. It offers a wide range of processing tools while maintaining a simple and accessible interface. In this tutorial, we will use Sequator to stack a series of Milky Way images taken at a high ISO. This process will reduce noise and improve the overall detail of the Milky Way.
Step 1
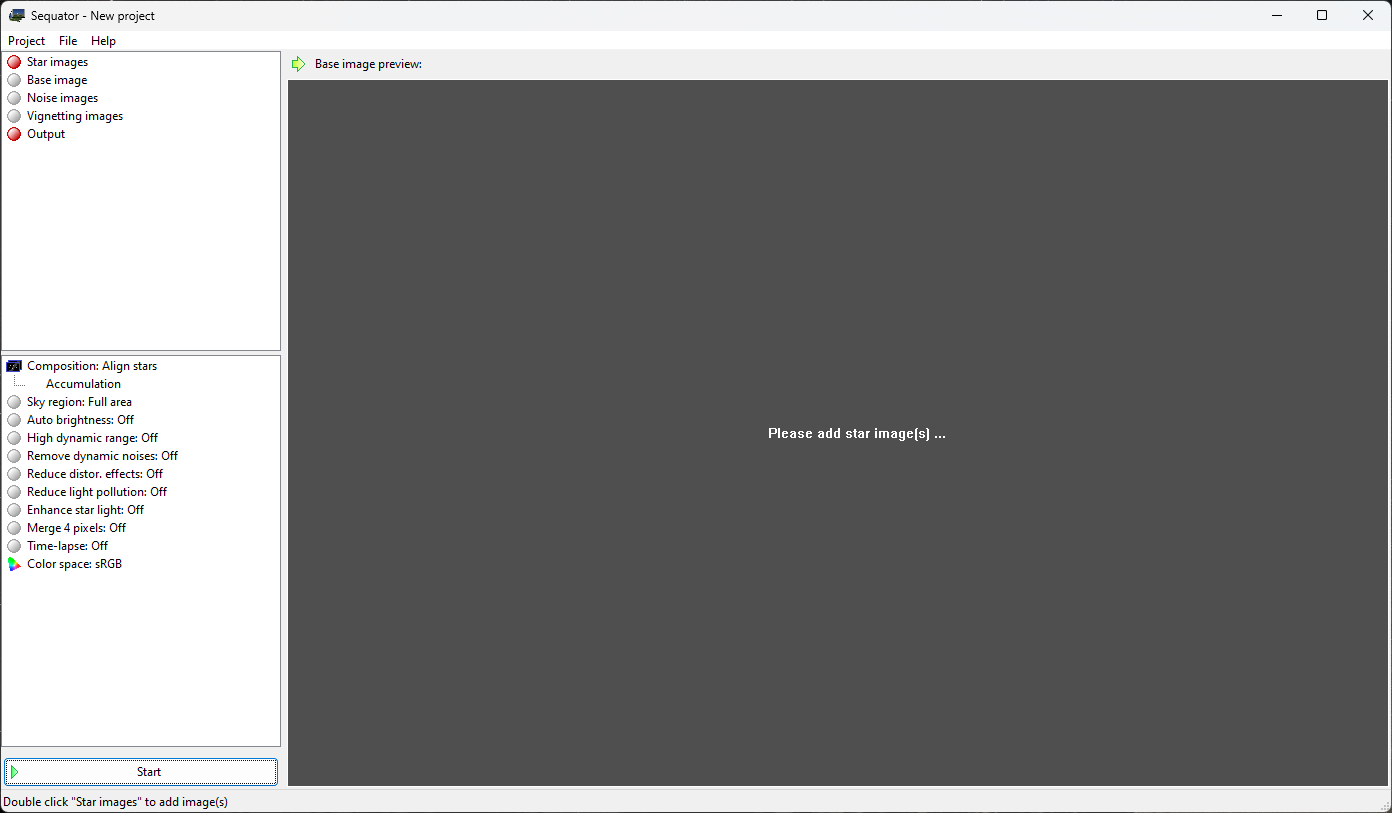
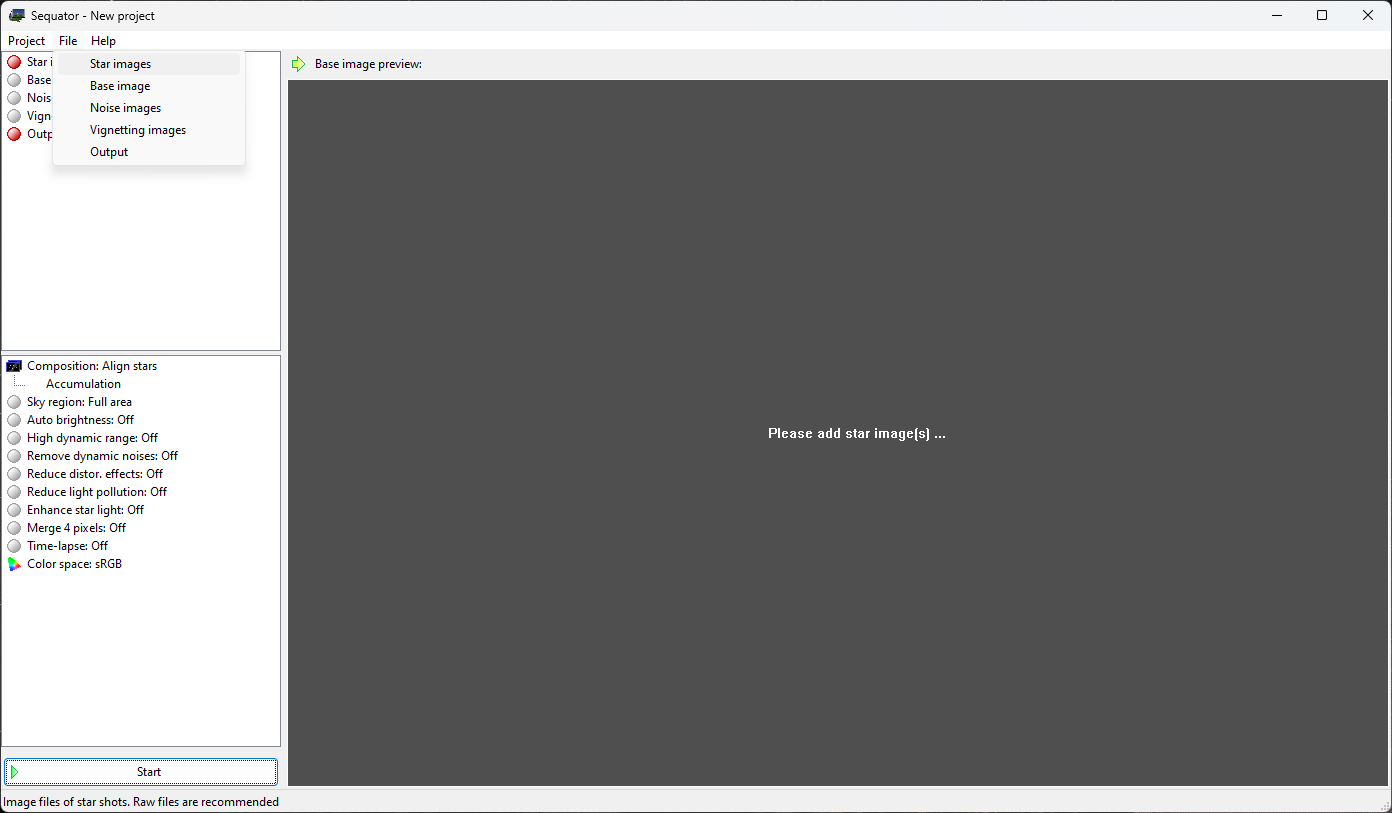
Once you’ve downloaded Sequator, extract the files and open the program. A window will open with two columns on the left-hand side. For now, focus on the top left-hand column.
Step 2
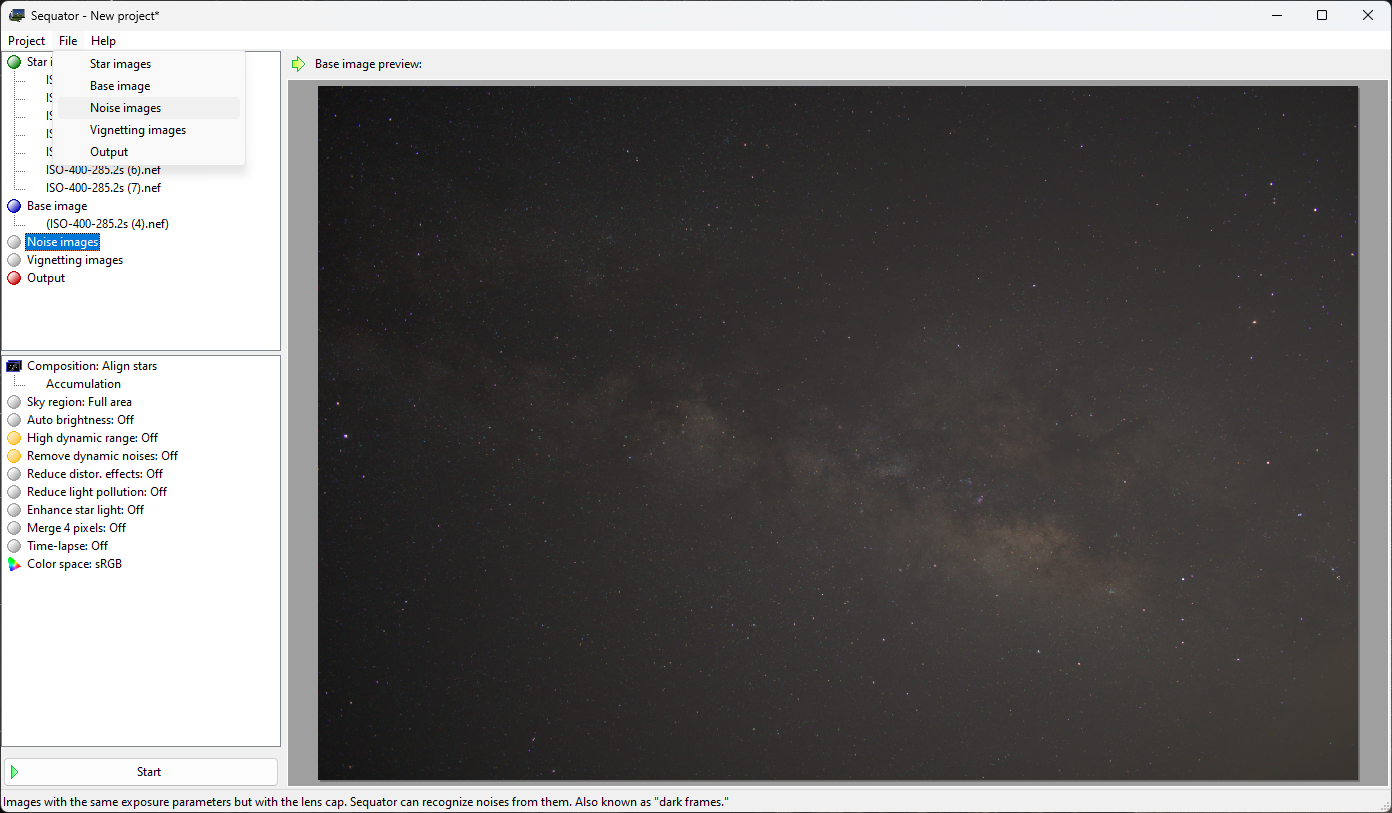
The first step is importing your images. Under the file menu dropdown, select “Star Images” and navigate to the file location on your computer. Once imported, you’ll notice that Sequator automatically selects a base image. This is fine, so long as all the images are taken at the same ISO and shutter speed. If you want, you can set the best image in the batch as the base image, but this isn't necessary.
Step 3
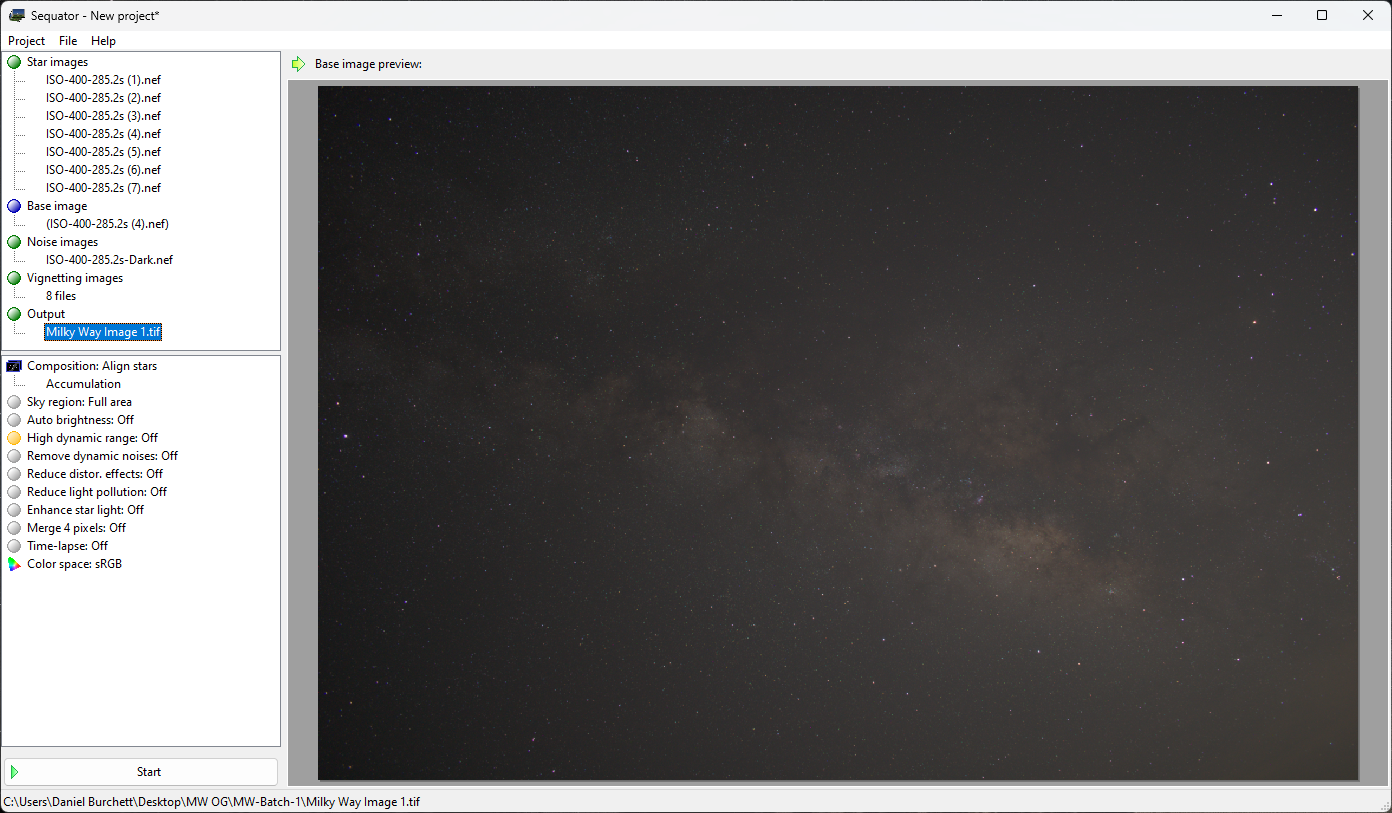
Next, import darks (noise images) and flats (vignetting images) if you have them (note, that you should have at least 5-10 darks, and 5-10 flats). If you don’t have these files, don’t worry, they are not necessary.
Step 4
Before moving on to the processing options, make sure to name your output file and select a storage location.
Step 5
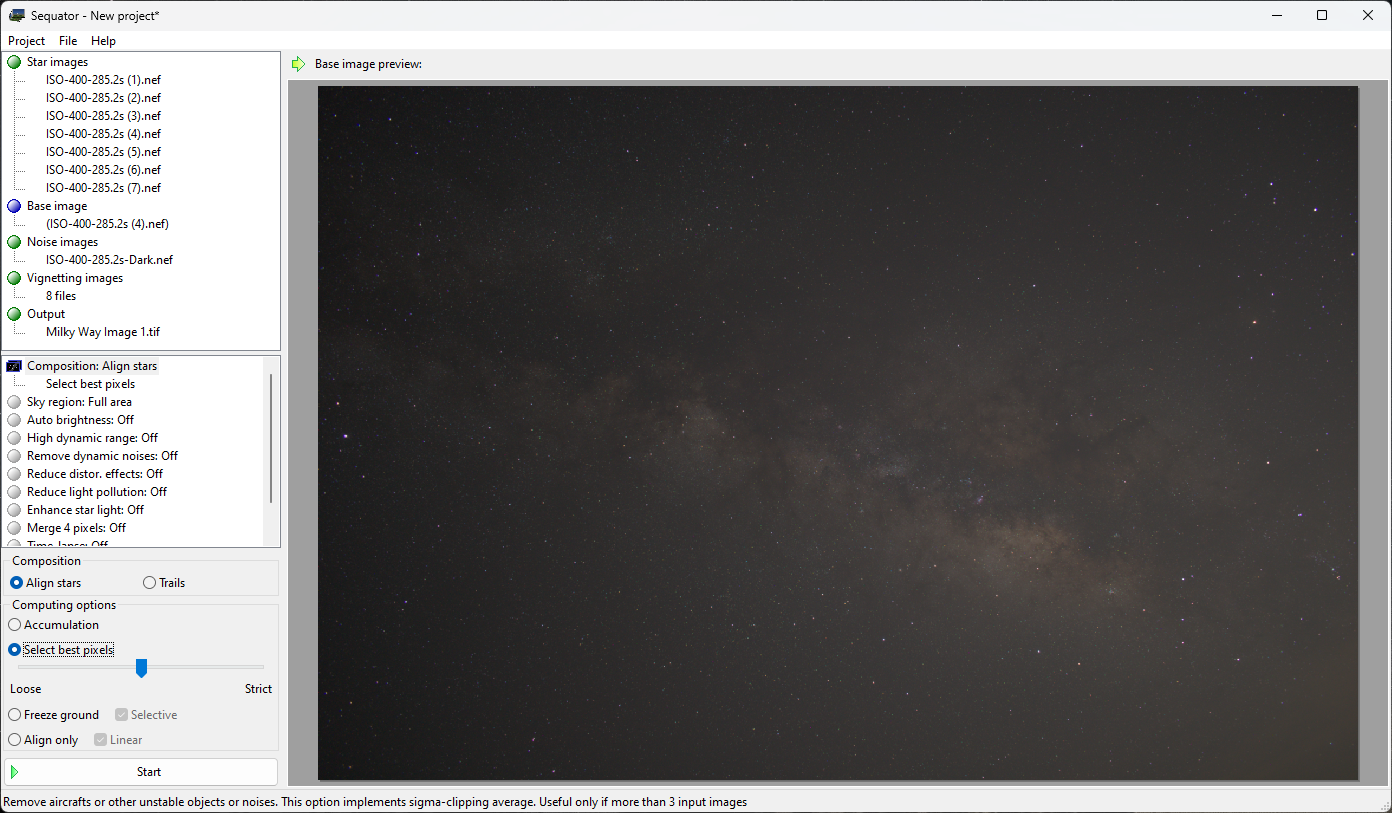
Now, shift focus to the bottom left-hand column. In this menu, you'll find a few options that control how the image files are stacked and processed. For this tutorial, you only need to adjust the composition. Select composition from menu and choose either “accumulation” or “select best pixel”. Both options will produce a stacked image, however, the “select best pixel” option uses a sigma clipping average to reduce noise or other unwanted artifacts. Only use this option if you are stacking more than three files.
Step 6
From here, you can either begin the stacking process, or explore some of the other options. If your image files have varying brightness, you can enable the equalize brightness so the resulting image isn't over exposed. You can also reduce light pollution, correct lens distortion, and remove dynamic noises (If you did not include flats or darks, make sure these options are off). If you did include darks and flats, I suggest experimenting with the settings to see which combination produces the best results.
Step 7
Once you've decided on the settings, locate the start button at the bottom of the window and press it. A new window will appear with a text dialogue outlining each step of Sequator stacking script. Once the image is finished processing, locate the output file and import it to an editing software such as Lightroom.
Step 8
Once you've open the file in an editing software, you may find that the image still needs to be processed. This is expected, simply follow the steps in the Basic Editing Tutorial above and you'll be able to enhance the image significantly. Note that if you included flats and darks you won’t need to enable lens corrections, and further denoising is optional.
And that’s it! Check out the image below! Remember, results will vary depending on how you process the image files and the conditions under which you imaged the Milky Way. You may need to go through the post-processing steps a few times before you get an image you’re happy with.
Basic Foreground Method
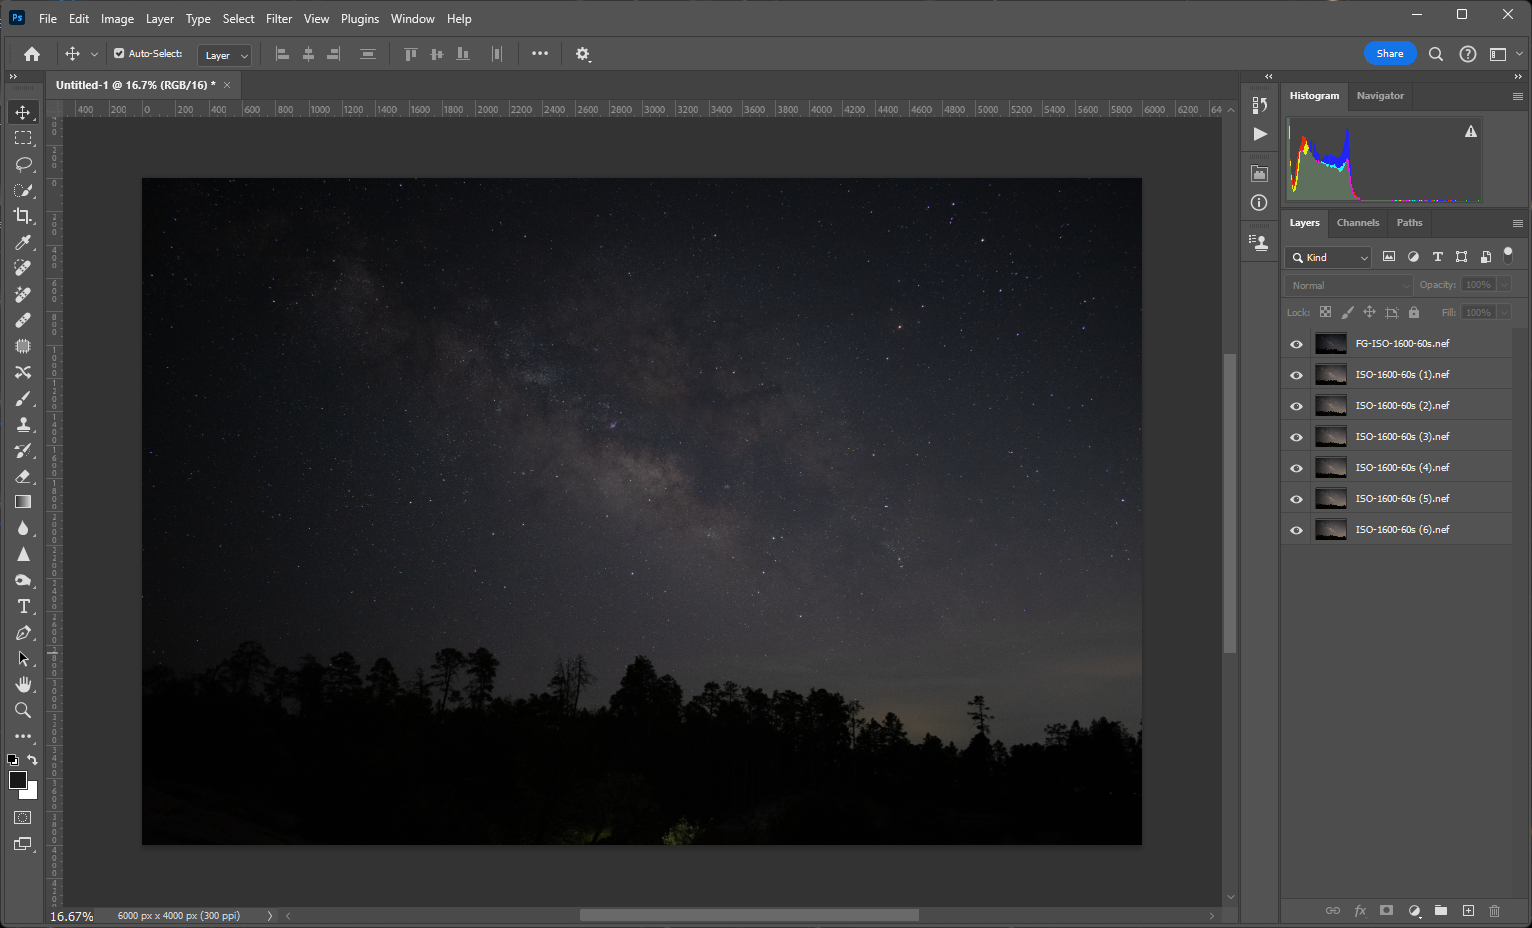
One way to make your Milky Way image stand out is by including a foreground. This adds depth and offers the viewer a sense of scale. There are many different methods for adding a foreground to your image. In this tutorial, we will cover how to add a foreground using a stacking and masking technique in Photoshop. To do this, you’ll need to capture two sets of images: one with a focus on the Milky Way, and another with a focus on the foreground. You will then stack the Milky Way images and, if you have more than one, stack the foreground images. Once stacked, you’ll remove the smeared foreground from the Milky Way image stack, mask out the sky from the foreground stack, and layer it over the Milky Way stack to create a single image with a stable foreground.
Step 1
First, open the image files in Photoshop. You can do this quickly by using "load files into stack" function from the file dropdown menu (File > Scripts > Load Files Into Stack).
Step 2
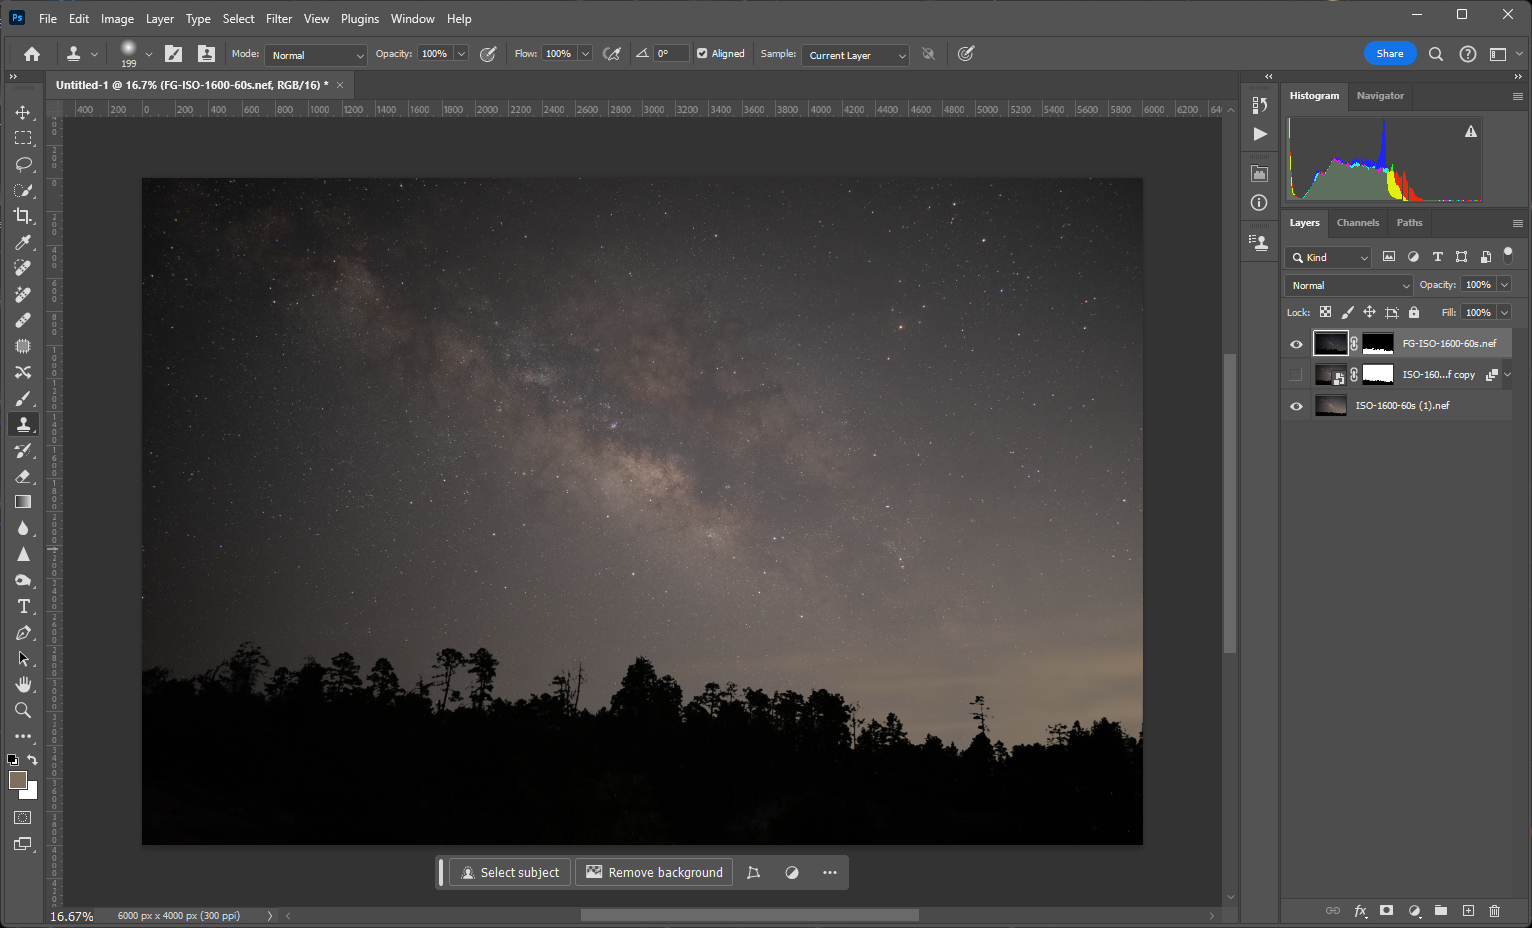
Once you've imported the image files, select the Milky Way images from the layers library. Align these images and stack them using the same steps in the Photoshop Stacking method.
Step 3
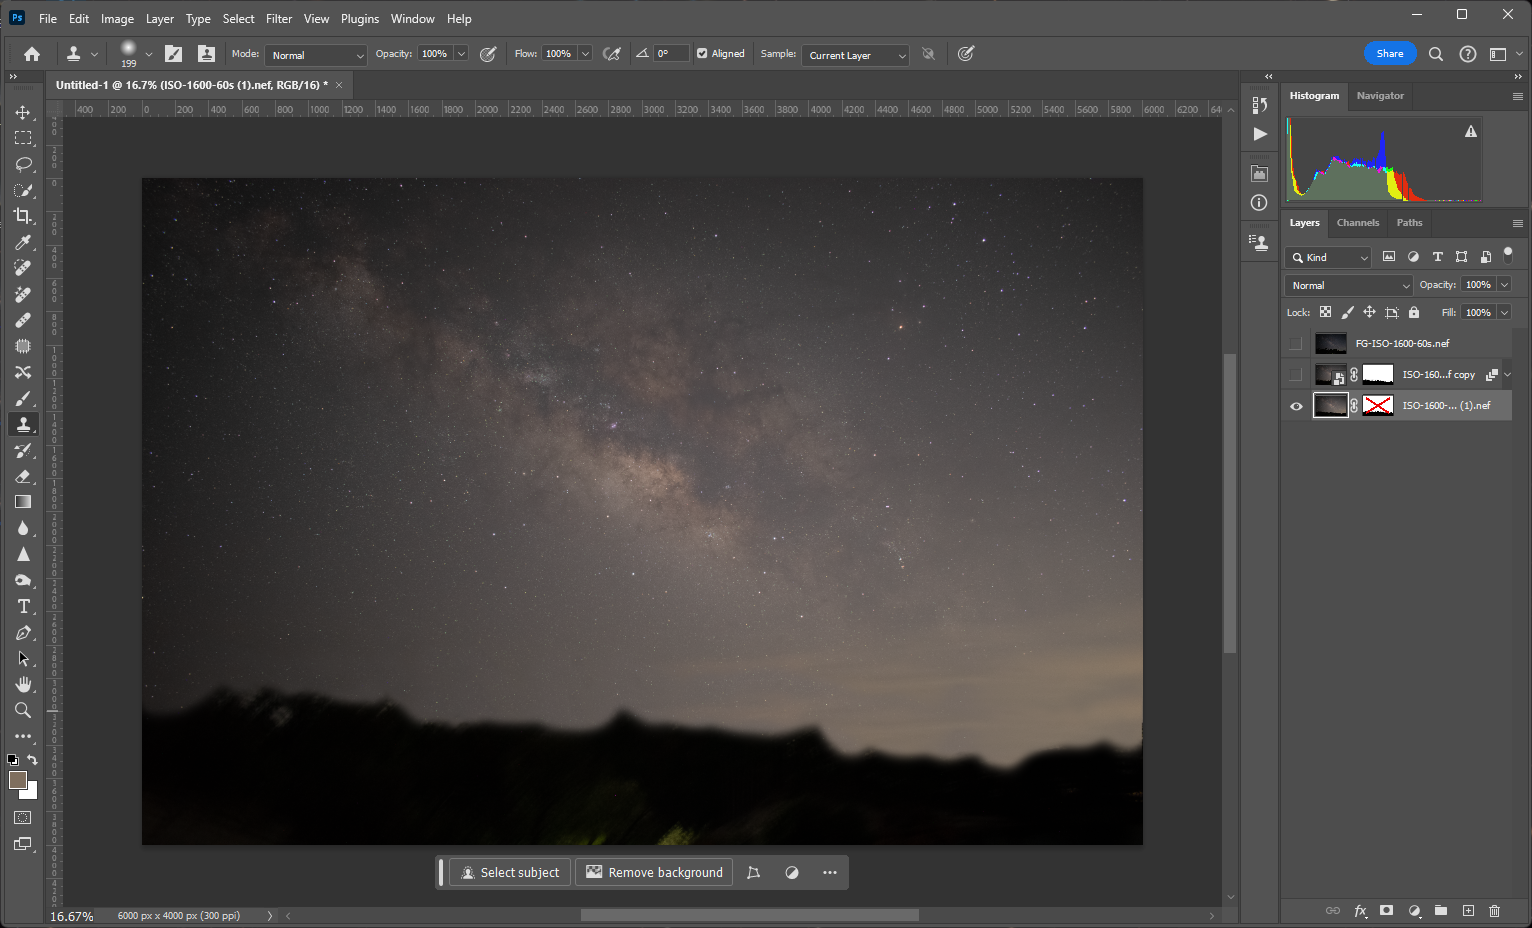
Once you've stacked the Milky Way images, the foreground will appear smeared. This is expected. To fix this, select the clone stamp tool from the left-hand column. While holding alt or command on your keyboard, select an area above the foreground and carefully brush out the foreground. The amount of cloning needed will depend on the foreground used. For tree lined foregrounds like the one in this tutorial, you'll only need to brush the foreground below the tree line.
Step 4
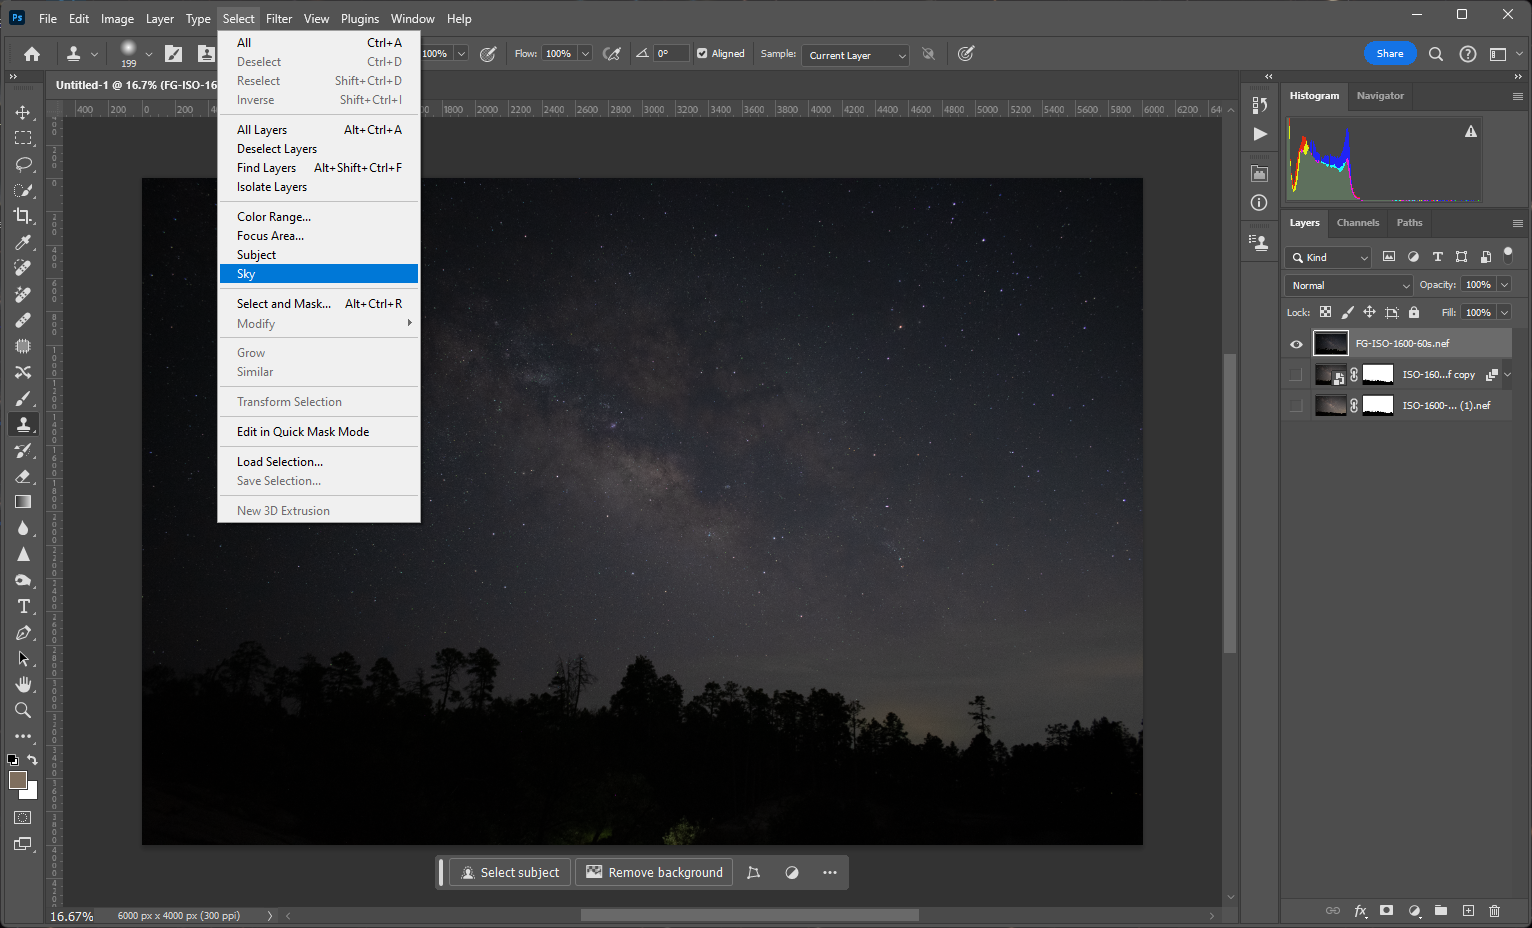
Next, hide the Milky Way image and select the foreground image. Navigate to the selection dropdown menu at the top of the window and use the sky selection function to isolate the foreground. This function will auto select the sky, but you want to select the foreground. To do this, use the reverse the option on the menu bar toward the bottom on the window.
Step 5
Once you've reversed the selection, navigate to the select and mask window and clean up the foreground. Once you're happy with the foreground, press okay. This will close the "select and mask" window and return you to the main editing window. You'll notice the foreground is still outlined by the selection tool. Navigate to the masking button (look for the square with a circle cutout) on the bottom menu and apply a layer mask. This should leave you leave you with a foreground layer, but if you aren't happy with the results, press CTRL+Z on your keyboard to undo the layer mask and return to the "select and mask" window to make further adjustments.
Step 6
Once the foreground is correctly masked, unhide the stacked Milky Way image. If done properly, the masked foreground layer should appear atop the Milky Way image (make sure the foreground is the top most layer in the layer library).
Step 7
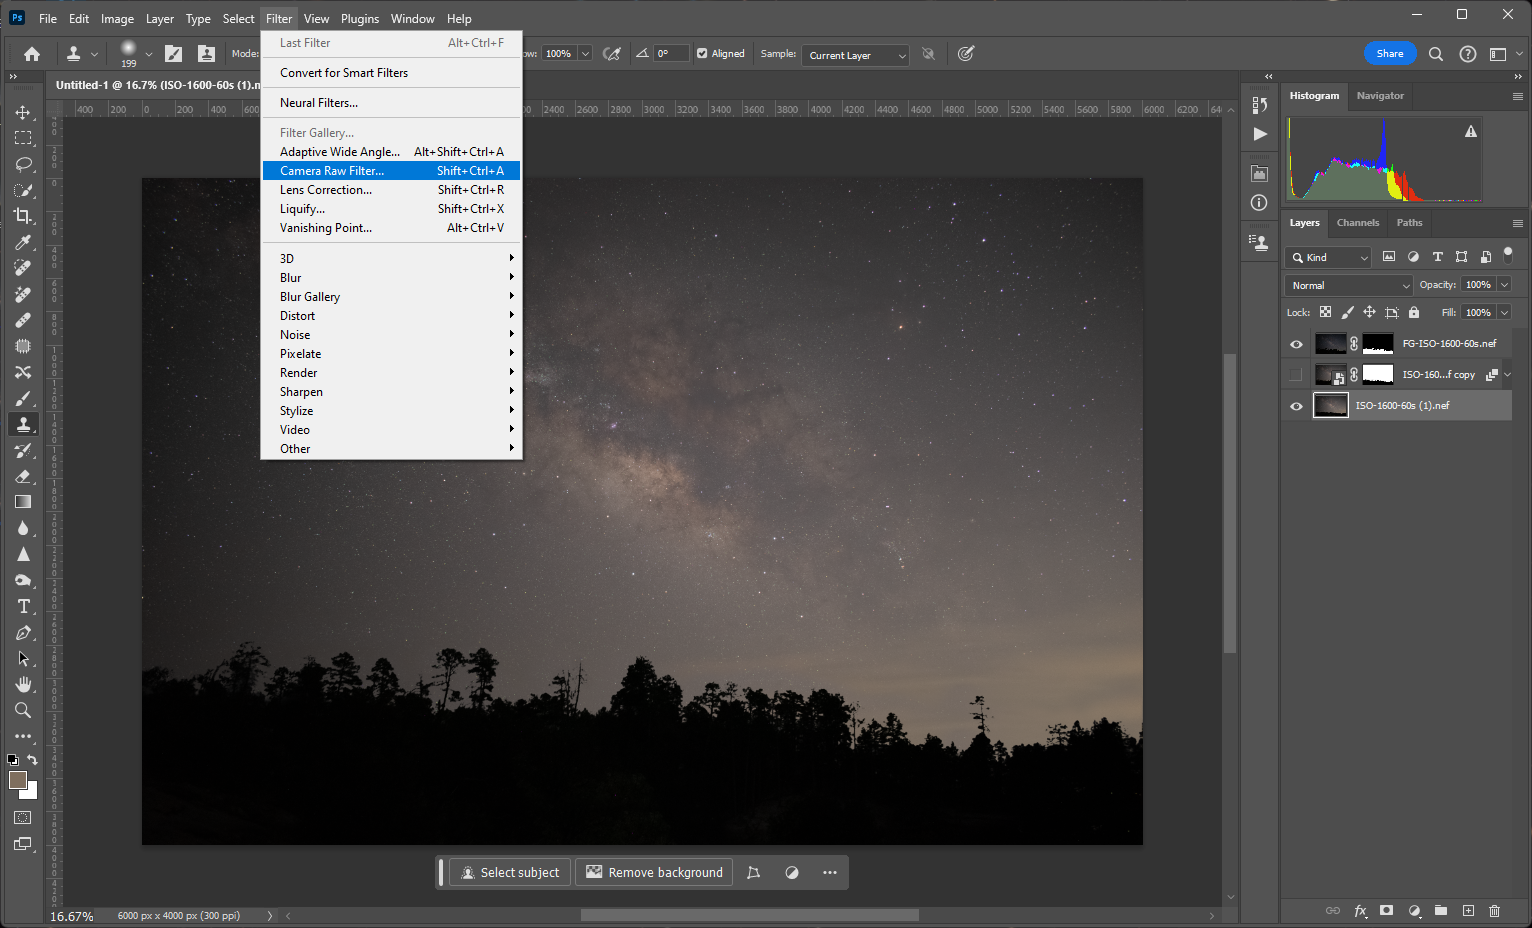
Next, select the Milky Way image and navigate to the filter dropdown menu. Locate the Camera Raw Filter and edit the Milky Way image. (If you need guidance on how to edit this image, check out the Basic Editing tutorial above)
Step 8
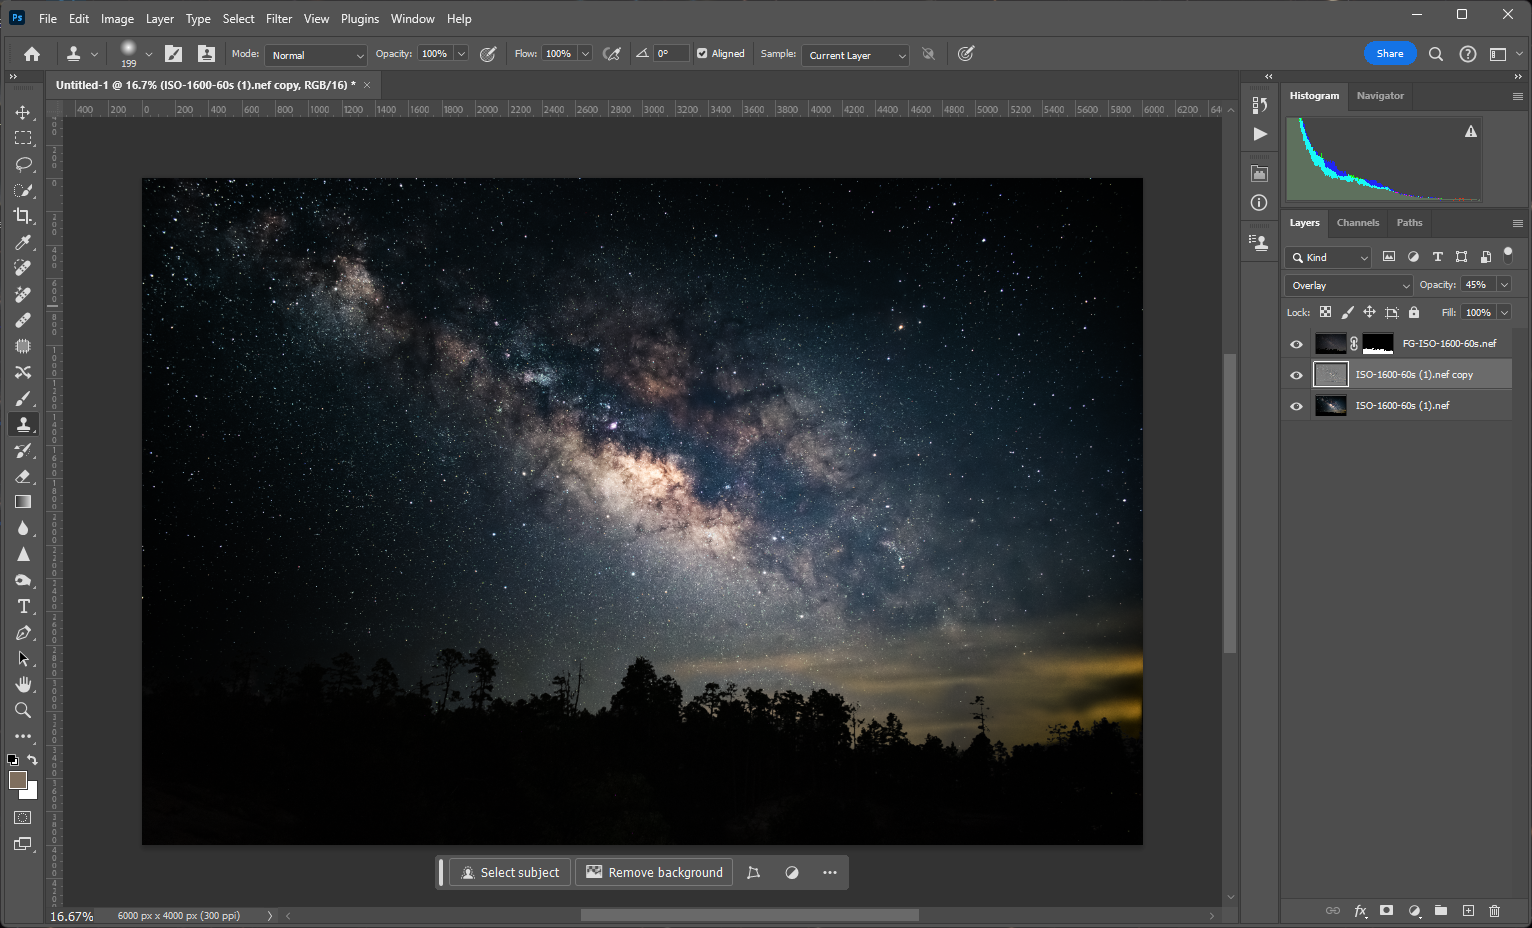
When you are happy with the edits, press okay and return to the main editing window. Then, navigate to the layer library and duplicate the edited Milky Way image. Select the layer copy and navigate to the filter dropdown menu and apply a high pass filter. Adjust the filter slider until it captures the details in the Milky Way, and press okay. Then, change the blending option to "overlayer" and reduce the opacity until the image looks detailed but not too sharp.
Step 9
Next, select and merge all of the layers into a single image.
Step 10
Then, crop the image to your liking.
Step 11
Finally, export the image as a png or jpeg.
And that’s it! Check out the final product! Remember, results may vary depending on the stacking method and the type foreground used.
Conclusion
Imaging the Milky Way can be a rewarding way to learn the basics of astrophotography, however, where you go on your astrophotography journey, and the way you process your imagery, is ultimately up to you. Remember, not every imaging session will be a success. So, make sure you are having fun! If imaging the Milky Way isn't everything you hoped it to be, that's okay! There are countless celestial objects that you learn to capture. Reach out to our astrophotography gear experts if you need help finding the right equipment for your needs!

Learn More
In this article, we covered two Milky Way imaging techniques from planning to processing. If you are interested in the other imaging techniques, or you want to learn more about our universe, check out our AstronomyHub!
Glossary
Aperture
The camera aperture is an adjustable opening within a camera lens that controls the amount and direction of light that reaches the imaging sensor or film. Wider apertures have a narrow depth of field, making the background or foreground appear blurry. Narrow apertures have a wider depth of field, bringing more of the image into focus.
Astrophotography
This refers to photography of astronomical bodies and phenomena. Astrophotography is not new, for example the popular T threading still used today harkens from Tamron’s T-mount developed for their 35 mm cameras - however it has seen a notable increase in popularity with improvements in cameras, mounts, filters, and software making astrophotography much more accessible. This is not limited to celestial bodies such as nebulae, planets, or galaxies either, as solar imaging is now more within the reach of the average consumer than ever before.
Background
A background is the part of a scene that falls behind the subject, and is furthest away from the observer.
DSLR
DSLR stands for digital single lens reflex and it is a type of digital camera designed to integrate the mechanics of analogue SLR cameras with a digital imaging sensor. These cameras feature interchangeable lenses, a reflex mirror that allows a user to see through the camera lens via the viewfinder, and a digital imaging sensor that converts light into a digital file that can be stored on a memory card.
Foreground
A foreground is the part of a scene that comes between the subject and the observer.
Galactic Core
The galactic core, also known as the galactic nucleus, is the luminous center point of a ecliptic and spiral galaxies. In our galaxy, the galactic core is home to a supermassive black hole know as Sagittarius A.
Image Masking
Image masking refers to a wide range of processing techniques used to isolate and alter specific areas of an image, and layer multiple images atop one another. It can be achieved digitally with processing programs such as photoshop, or it can be done altering physical images and film negatives.
Image Stacking
A method used to bring out what would otherwise be faint or invisible detail and contrast in an astrophotography image. When imaging a target, the longer an exposure is, generally the more faint detail will become visible. However as exposure time becomes longer several complications emerge - motion blur due to compounding small deviations or errors in tracking, increased sensor noise and glow, and overexposure of the bright areas of an image. Stacking mitigates these issues by combining a number of shorter exposure images, commonly called sub exposures, sub frames, or simply “subs”, into one image that effectively has a longer exposure time. The stacking process can further improve the resulting image with the use of calibration frames that help identify and compensate for visual artifacts introduced by the optics or sensor itself.
ISO
ISO is an acronym for the International Organization for Standardization. This organization works to create standards for various technologies, practices, and methodologies. In the case of imaging sensors, ISO is a numerical value assigned to the sensor's light gathering sensitivity. Higher ISO values collect more light and a faster speed, while lower ISO values collect less light and a slower speed.
JPEG
A JPEG image is a commonly used file type that is pre-processed and compressed. Due to the smaller file size, JPEGs can be efficiently stored and easily shared online. However, the compression significantly alters the image, limiting the range of processing options.
Lunar Cycle
A lunar cycle refers to the 29.5 day orbital period of the Moon around our planet, in which the Moon transitions through all 8 of its main phases.
Milky Way
The Milky Way is the name of the galaxy that hosts our solar system. Named for its bright milky appearance in the night sky, the Milky Way is home to countless stars, nebulae, and a even a few supermassive black holes. It estimated to be over 13 billion years old, and it would take over 100,000 light years to travel from one side to the other.
Mirrorless Camera
A mirrorless camera is a type of digital camera designed to maintain the functionality of DSLRs with less mechanical parts. Like DSLRs, they feature interchangeable lenses, however, they do not use an optical viewfinder or reflex mirror. The parsimonious design of mirrorless cameras makes them lighter, slimmer, and quieter than DSLRs and allow for more versatile imaging features.
PNG
A PNG image is a commonly used file format that achieves a reduction in file size without a loss in image quality. This file type is often used to share images that would otherwise be altered by the compression necessary for online usage.
Polar Alignment
Polar alignment is the process of aligning a telescope mount’s polar axis with the Earth’s axis of rotation. By having these two axes parallel to one another, precise counteraction of the Earth’s rotation can then be achieved. While a typical process of equatorial mounts that have three inherent axes of rotation, a similar effect can also be achieved by utilizing an equatorial wedge with two-axis alt-azimuth mounts.
RAW File
A RAW image file is an uncompressed copy of the information received by a digital imaging sensor. Often referred to as digital negatives, RAW files are minimally processed, allowing for a wider range of processing options.
Shutter Speed
Shutter speed refers to the speed it takes the mechanical or electrical shutter of a camera to open and close. By adjusting the shutter speed of a camera, a photographer can control the exposure of an image.
Tracking
As the Earth is continuously spinning and in motion, the location of a celestial object in the sky moves over the course of a night. This becomes apparent during observation as a target moves out of view, and particularly observable in images as stars and objects quickly become a blur as exposure time and focal length increases. To compensate for this, computerized mounts and smart telescopes employ tracking techniques to keep the target centered in the optics. Depending on the motion style of the mount, the resulting image can vary. Alt-Az motion, popular in smart telescopes, keeps the object centered but can not compensate for its “spin” without what is known as a wedge. Accordingly these images lose information on the edges of the frame as they rotate out of view, leading to ever smaller, circular, images as time spent imaging increases.


